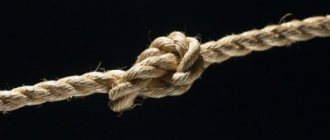
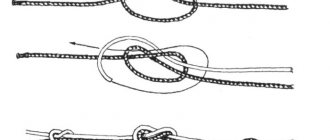
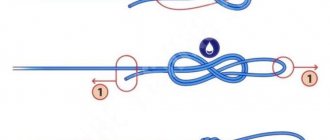
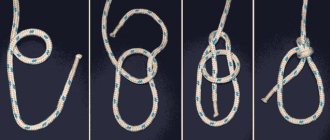
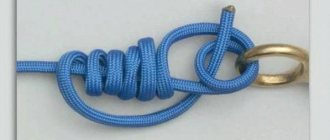
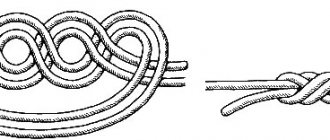
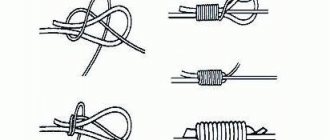
How to tie fishing knots
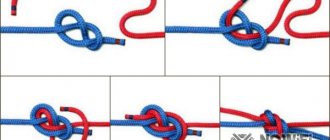
Some of you may have noticed that in the catalogs of various fishing companies and on the boxes of some products (hooks, cords or fishing lines) instructions on how to knit fishing knots are often indicated. These units are suitable for gear in the category or on the box of which this diagram is depicted. They are constantly updated and have a very large margin of safety.
Fishing Aliexpress fishing products at the lowest prices!
But no matter how strong the knot is, in any case it negatively affects the strength of the fishing line, some deteriorate it almost twice. And this, in the worst case, can lead to a breakage of the gear at the most crucial moment.
You can’t do without knots, because absolutely all gear must be connected to hooks, leashes or lures. Every beginner and experienced angler must know how to tie the right fishing knots; for this, several tricks are used that will help you quickly and without much difficulty tie a strong and reliable knot.
Recommendations from experienced anglers:
- Before tying a knot on a monofilament, experienced fishermen advise holding it in the sun so that the material becomes softer.
- If it is a braided cord, then it is recommended to moisten the structure with water before final tightening the knot. This will help reduce friction and increase the strength of the knot.
- To tie a hook, you should choose one of the simplest options. The simpler the knot, the less deformation the line undergoes. In this case, reliability directly depends on the number of kinks.
- Do not expose the fishing line to external fire under any circumstances. It is better to cut off the excess with scissors.
The knitting pattern for the ideal fishing knot has been found by fishermen for a very long time. This is facilitated by the considerable experience of our predecessors in combination with modern materials and technologies, which makes it possible to make very high-quality components. So, with the fact that the knot must be reliable and durable, we have figured out that another important requirement is simplicity. The knot should be very easy to tie.
You may be interested in reading about tying leashes, in this article we covered all the possibilities and types of knots for tying leashes, be sure to read: how to tie a leash to the main fishing line.
We recommend that especially lazy people watch a video that contains 5 simple fishing knots for all occasions. Well, for those who are interested in fishing knots for hooks, we recommend reading further and looking at the photos that show step-by-step diagrams of these knots.
Video: 5 fishing knots for all occasions
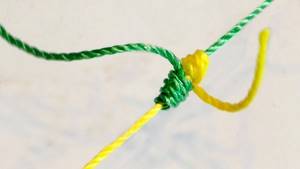
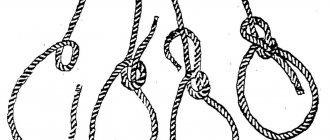
Basic sea knots: knitting patterns
1. Straight knot
Performance.
The ends of the connected cables are wrapped around one another, bent in opposite directions (Fig. 1, a) and tied as shown in Fig. 1, b.
The tightened knot is shown in Fig. 1, c.
Application.
A straight knot is used when tying cables of approximately the same thickness.
When there are large loads on the connected cables, as well as when the cables get wet, the straight knot is very tight. To prevent excessive tightening, a wooden insert is inserted into the loops of the knot.
Reef node
Performance.
A reef knot is tied in the same way as a straight one, but one of the running ends of the knot is inserted into the corresponding loop folded in half (Fig. 2, a, b). Thanks to this, the reef knot can be easily untied if necessary. A tightened reef knot is shown in Fig. 2, c.
Application.
A reef knot is used to tie the ends of reef lines when taking reefs on sails. This unit is used when securing the pins of covers of ship's boats, compasses, and deck mechanisms; and in other cases when a reliable but quickly untied knot is required.
Double straight knot
Performance.
The end of one of the connected cables is wrapped twice around the other, then the ends of the cables are bent towards each other (Fig. 3, a) and the initial operation is repeated (Fig. 3, 6). After this, the knot is tightened and the ends are secured with a shimushgar or a thin line (Fig. 3, c).
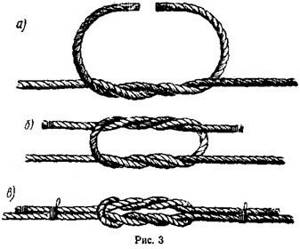
Application.
A double straight knot is recommended for tying cables under heavy load.
Flat knot
Performance.
It is convenient to tie a flat knot with the cables laid out on the deck. One of the connected cables (thicker) is laid in the form of a loop (Fig. 4, a). The end of the other cable is brought under the loop (Fig. 4, b) and sequentially passed above the main, but below the running end of the thick cable (Fig. 4, c). Then the thin cable is passed on top of the loop of the thick cable, but under its root part (Fig. 4, d). Thus, a thin cable forms the same loop as a larger diameter cable. The running ends of both cables are tied with half bayonets and secured with a thin line, skimushgar or heel. A tied flat knot is shown in Fig. 4, d.
Application.
A flat knot is used when tying cables of different diameters. It can also be used to tie together cables of uniform thickness, especially in cases where the cables are subject to heavy tension or wet conditions.
Simple bayonet
Performance.
The running end of the cable, wound by a pole, biteng or eye (Fig. 5, a), is enclosed around the root part of the cable and passed into the loop formed (Fig. 5, b). In this form, the knot is called a half-bayonet. Next, the running end is once again tied around the cable with a half-bayonet (Fig. 5, c) and firmly secured with a thin line or skimushgar. The tied knot is shown in Fig. 5, g. From the given figures it is clear that with a correctly tied knot, the close-to-close hoses of the half-bayonets form a bleached knot.
Application.
A simple bayonet is used for attaching mooring ropes to mooring devices, temporary guy lines to slings, as well as when attaching the guy ropes of cargo booms to the eyelets (butts).
Bayonet with hose
Performance.
The running end of the cable is wrapped twice around the mooring device (Fig. 6, a), after which it is tied to the root part of the cable with half-bayonets and secured with a thin line or skimushgar (Fig. 6, e).
As can be seen from the figures, a bayonet with a hose differs from a simple bayonet only in that it has an additional hose that covers the object.
Application.
A bayonet with a hose is used when fastening mooring ropes, guy ropes of cargo booms and in many other cases.
Bayonet with drift
Performance.
The end of the cable is passed from bottom to top through the eye (Fig. 7, a), passed under the cable and again threaded into the eye, but in the opposite direction (Fig. 7, b). Then the running end is tied to the root part of the cable with a half-bayonet and secured with a thin line or skimushgar. The completed node is shown in Fig. 7, c.
Application.
A bayonet with a skid is used when fastening mooring ends to eyelets or bits, fastening cables to the brackets of ropes and when applying safety nets to cargo hatches. Often used in practice.
Fisherman's bayonet
Performance.
The end of the cable is threaded twice into the eye (Fig. 8, a), then carried around the root part of the cable and passed into both loops formed, tightening them with a half-bayonet (Fig. 8, b). After the formation of the second half-bayonet (Fig. 8, c), the end is attached to the root part of the cable with a thin line or skimushgar (Fig. 8, d).
Application.
Using a fisherman's bayonet, the ropes are tied to the anchor brackets and the ends of the cable when placing safety nets on the cargo hatches. A fishing bayonet is used in all cases where it is necessary to secure the cable with a reliable and easily untieable knot.
Tying cables with bayonets
Performance.
Tying cables with bayonets can be done in two ways. The end of one of the cables is folded into a loop and secured to the root part with two or three half-pins; the end of the second cable is inserted into the loop, which is also tied at the root part with half bayonets; the ends of the cables are secured with a thin line or shimushgar. This method of tying cables is shown in Fig. 9, a, b, c.
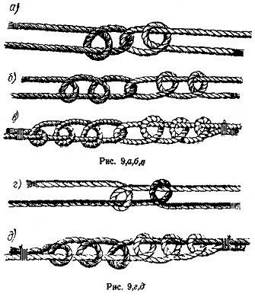
Alternatively, the end of one of the cables is attached with three half-pins to the second cable, and the end of the second cable covers the first cable with half-pins. This method of tying cables is shown in Fig. 9, g, d.
Clove hitch
Performance.
The running end of the cable is carried around the object, crossed over the applied hose (Fig. 10, a), again carried around the object in the original direction and brought under the crossing hose (Fig. 10, b). The tightened knot is shown in Fig. 10, c.
In some cases, a bleached knot is tied in a different way: holding the cable in your hands, make two pegs on it (Fig. 10, d, e), put them on the object (Fig. 10, f) and tighten the knot (Fig. 10, g) .
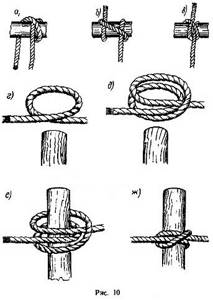
Application.
The tapping knot is one of the most reliable, highly tightened knots. It is used when tying ropes to shrouds, for attaching temporary guy lines to a sling when working with beams of cargo hatches, when lifting hoses for drying and in many other cases, especially when tying cables to objects that have a smooth and even surface (catching anchors, mop rods, etc.). In addition, the bleaching unit is used when attaching the throwing end to the mooring rope. In the latter case, the knot is supplemented with a loop.
Retractable bayonet
Performance.
A sliding bayonet, often called a tapping knot with a hose, is tied as follows: the running end of the cable is carried around the object twice, both hoses are crossed (Fig. 11, a), carried around the object one more time and passed under the crossing hose (Fig. 11, b ). The tightened knot is shown in Fig. 11, c. Thus, the sliding bayonet differs from the tapping unit only in that it has not two, but three hoses enclosing the object.
Application.
A sliding bayonet is used when lifting spar parts, logs, boards, etc.
Gazebo knot
Performance.
A small peg is made on the cable (Fig. 12, a). The end of the cable is passed into the peg (Fig. 12, b), carried around the root part of the cable and passed into the peg again, but in the opposite direction (Fig. 12, c). The tightened knot is shown in Fig. 12, g.
Application.
The gazebo knot is used when attaching a safety cable around a person’s belt when working on the mast and overboard; the knot is also used instead of a fire when attaching a cable to a hook, biting or bollard, since the loop of the arbor knot is not tightened regardless of the load on the cable. One of the most necessary nodes.
Double gazebo knot
Performance.
At some distance from the end of the double-folded cable, a double-hung peg is made (Fig. 13, a). The loop-shaped running end of the cable is inserted into it (Fig. 13, b), which is then expanded and carried around the unit. The knot is tightened so that its loops have different sizes.
A double gazebo knot can be tied in another way: a single gazebo knot is tied on the cable (see paragraph 12), after which the running end of the cable is drawn parallel to itself, forming a second loop and a second hose peg.
Application.
A double arbor knot is used instead of a arbor when working on masts and overboard, with the larger loop of the knot serving as a seat, and the smaller one covering the body under the arms.
Kalmyk knot
Performance.
The root part of the cable is carried around the running end (Fig. 14, a, b), after which the running end is folded in half and inserted into the resulting peg (Fig. 14, c, d). The tightened knot is shown in Fig. 14, d. To untie the knot, just pull the running end.
Application.
The Kalmyk knot is used when feeding various tools, buckets, brushes and other objects onto masts, pipes and overboard; the knot is also used when tying the throwing end to the mooring line.
Welding unit
Performance.
On the cable, in the place where the knot is supposed to be tied, a small peg is made (Fig. 15, a), into which a folded cable is inserted (Fig. 15, b). The tightened pile assembly is shown in Fig. 15, c.
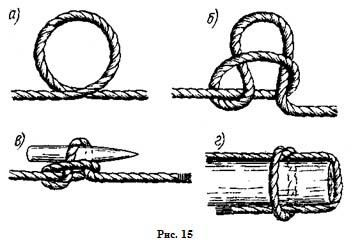
Application.
The welding unit is used when supplying various tools (piles, brushes, etc.) to those working on the mast or overboard and when tightening a line or skimushgar during the application of a cage, benzel, mark. In addition, the piling unit is used when securing cables to stops placed between the side and the berth while the vessel is moored. The last case of using a welding unit is illustrated in Fig. 15, g.
Clew knot
Performance.
The running end of the cable is passed from the bottom up into the thimble (fire, loop), carried around its neck clockwise (Fig. 16, a) and passed between the thimble and the root part of the cable (Fig. 16, b). The tightened knot is shown in Fig. 16, c.
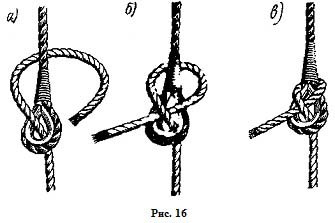
Application.
The clew knot is used when tying cables, one of which has a rope or thimble, and when tying various gear (for example, a sheet, a halyard) into a thimble or krengel. In addition, halyards are tied to signal and other flags using a clew knot. The clew knot tied into the thimble is reliable only when the cable is taut. It cannot be used if the cable is attached to a large thimble or to a hard fire.
Windlass knot
Performance.
The end of the cable is inserted into the thimble (Fig. 17, a) and carried twice around the neck of the thimble under the root part of the cable (Fig. 17, b, c). The tightened knot is shown in Fig. 17, g.
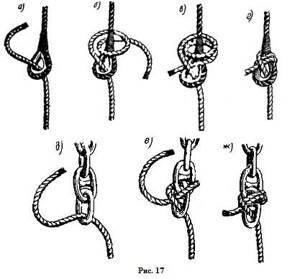
Application.
The clew knot is used in the same cases as the clew knot, but it is more reliable and is used when working with sails, rigging and anchor chains. The use of the node in the latter case is shown in Fig. 17, d, f, g.
18. Noose
Performance.
The running end is wrapped around an object (log, spar, etc.) and the root part of the cable, and then wrapped several times around the hose placed on the object (Fig. 21, a, b). The tightened knot is shown in Fig. 18, c. To increase the strength of the unit, it is supplemented with a separate hose (Fig. 18, d). In this case, the knot is called a noose with a hose.
Application. The noose is used when towing logs, lifting logs and other objects on board a ship, and when installing a spar.
Tightening noose
Performance.
The cable is laid in the form of two loops of the same size (Fig. 19, a). Both loops are wrapped four to five times with the running end of the cable (Fig. 19, b), after which the running end is passed into the loop facing the root part of the cable and clamped in it. The finished unit is shown in Fig. 19, f. The knot is easily untied if you pull the root part of the cable.
Application.
The “tightening noose” knot is used when temporarily securing a cable to floating objects (logs, boards, etc.) or when throwing a cable over the end of a spar.
20. Hook knot
Performance.
The end of the cable enclosed around the back of the hook (Fig. 20, a) is placed in the hook (Fig. 20.6) and covered on top with the root part of the cable (Fig. 20, e). The running end is secured with a thin line or shimushgar. The hook knot can be tied in any part of the cable.
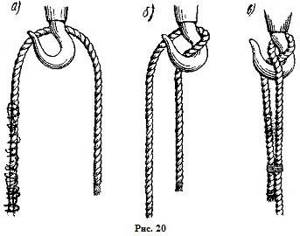
Application.
The hook knot is used when securing thick cables to the hook. The unit can withstand only relatively small loads on the cable.
Towing unit
Performance.
On the free part of the towing rope laid in the hook, a small loop is made (Fig. 21, a). It is carried out under the tow rope and put on the hook (Fig. 21, b). Next, the cable is looped onto the hook on the right side, then again on the left, etc. (Fig. 21, c, d). The running end of the cable (tug) is secured with a line or skimushgar (Fig. 21, e).
Application.
The towing unit is used when securing the towing rope to a hook or biting. It makes it possible to quickly release or pick up a tow rope. This unit is also used when securing mooring lines and other cables to the biting.
Cat's Paw Knot
Performance.
The end of the double-folded cable is pulled down so that two loops are formed (Fig. 22, a), which are then simultaneously twisted several times in opposite directions (Fig. 22, b) and put on the hook (Fig. 22, c).
Application.
The "cat's paw" knot is used to reduce the length of the sling (Fig. 22, d). It should be borne in mind that this knot allows you to reduce the length of the sling relatively slightly.
Knot for reducing cable length
Performance.
The shortened cable is folded in three, forming two loops (Fig. 23, a), after which each of the loops of the knot is pulled together with a half-bayonet and fastened to the cable with a line, skimushgar or heel (Fig. 23, b).
Figure Eight knot (first option)
Performance.
At the end of the cable, a small loop is made (Fig. 24, a), into which the running end enclosed around the cable is passed (Fig. 24, b). The tightened knot is shown in Fig. 24, c.
Application.
A figure eight is tied at the ends of tackles or laps so that they do not slip out of the blocks.
Figure Eight knot (second option)
Performance.
This knot differs from the previous one in that the end of the cable that is passed into the loop is first wrapped around the root part of the cable not once, but twice. The execution of the node is shown in Fig. 25, a, b, c.
Application.
See the use of the figure eight knot (first option).
Stopper knot
The stopper is placed on the cable with two hoses (Fig. 26, a, b), after which the running end of the stopper is wrapped two to four times around the cable in the direction of traction shown in the figures by the arrow, and secured to it with a line or skimushgar (Fig. 26, c ). The stopper can be placed on the cable not only against the descent of the cable, as shown in the previous figures, but also in the direction of descent (Fig. 26, d).
As a stopper for steel cables, a rigging rope is used, which is applied to the cable in the same way as a stopper made from a plant cable (Fig. 26, e). For chains, a special stopper is used, which consists of a short cable with a hook and a button at the ends. This stopper is attached to the chain using a line (Fig. 26, e).
Fastening the cable to the bollards
A mooring or towing cable attached to the bollards is passed between the bollard bollards and then alternately drawn around them in the form of a figure eight (Fig. 27, a, b, c). Practice shows that in order to securely fasten the cable, it is necessary to place three - five hoses - figure eights - on the bollards.
For the same purpose, the upper hoists of the cable placed on the bollards are fastened with a strong line or skimushgar, and the ends of the line (skimushgar) must be connected with a reef knot (Fig. 27, d, e). In Fig. 27, f, g, h, i, and also 27, j, show two ways of securing the cable on the so-called cross bollards.
Boat knot
Performance.
The running end of the cable is threaded into the bow eye of the boat (or attached to the eye with the help of a shimushgar) and passed under the first can. Then the running end is carried around the second can (Fig. 28, a), passed over the cable, crossing it, and again passed under the can. After this, the end of the cable is folded into a loop and placed under the hose surrounding the can (Fig. 28, b). A tied boat knot is shown in Fig. 28, v.
Application.
The boat knot is used to secure the cable when placing the boat on the backstrap or when towing it.
It is important for a real sailor to develop such good skills in tying sea knots that even with his eyes closed he can easily tie the knot required in a particular situation, and practice in this matter is one of the main conditions for successfully mastering this art.
Liked? Share with your friends!
The best fishing knots TOP 10
10 most necessary, basic fishing knots for feeder, carp fishing, float and spinning. The nodes from this list are popular and frequently used, the main nodes for mounting various fishing equipment. The diagrams show how to knit them correctly.
All of them have high strength and reliability. However, you need to understand that the strength and reliability of the knot depends not only on its own characteristics and properties of the fishing line, but also on how correctly it is connected. Most of the strength is lost when the line overheats when the knot is tightened. To avoid this, you need to wet the line before tightening the knot. Moisturizing the line reduces friction and improves its cooling when the unit heats up.
All the nodes below are very strong and easy to implement. Thanks to them, the equipment will be held securely and the trophy will not fall off the hook and will not spoil the equipment.
Palomar knot
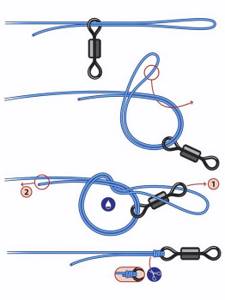
The Palomar knot is the most popular knot for fishing hooks that everyone knows. Most often it is used for tying the main fishing line with a swivel, but it also has no equal for tying a hook. Yes, it is also used to tie the weight-heads of silicone fish to a leash or fishing line. Suitable for any type of fishing line - monofilament and braided cord, nylon and fluorocarbon. But it has one drawback - when tying, you need to fold the line twice, which adds volume and shortens the length of the leash.
There are several varieties of the Palomar knot: single, double and triple. The latter is used for spinners and for baits with a large eye.
Grinner Knot
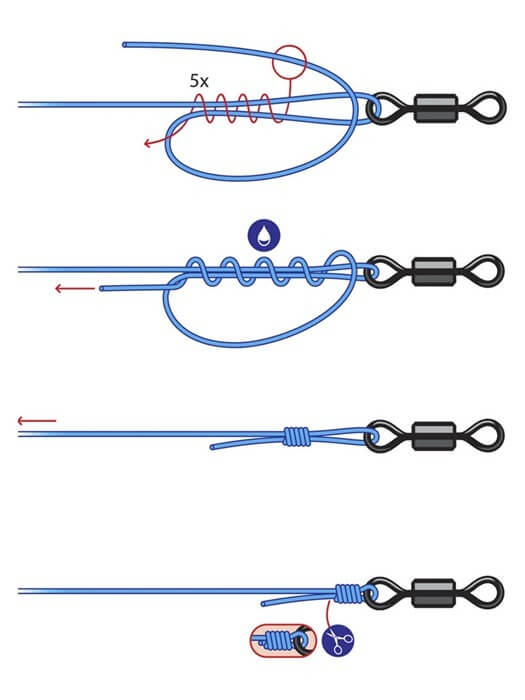
Durable and versatile knot. Suitable for attaching: hooks, swivels, 2 ends of fishing line and floating pop-up baits used in feeder fishing. It's not difficult to tie. The breaking load is 89%, but when connecting 2 lines with such a node, it is reduced to 75%.
Used for all types of fishing lines: monofilament, braided and fluorocarbon.
Stop Knot
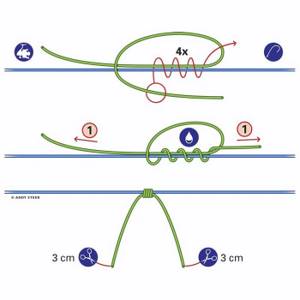
Used for feeder gear. Usually a special elastic material is used, which is attached to the main fishing line and serves to mark the measuring marks.
This is the strongest fishing knot and does not slip along the fishing line. If necessary, you can quickly remove it: pull the ends of the elastic thread and pull it out of the knot. After removal, a slight deformation will remain, but it will not have a negative impact on the performance of the fishing line.
Knotless knot
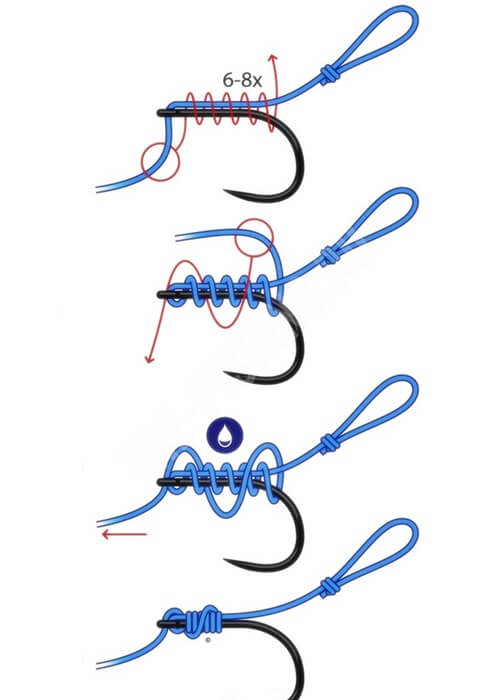
The knot is used to create a hair rig. It is mainly used for braids. Simple to make, but very strong and reliable fishing knot.
To make it even more reliable, it is recommended to lay the turns of the fishing line evenly, without fly fishing. You can additionally use glue.
Leader knot
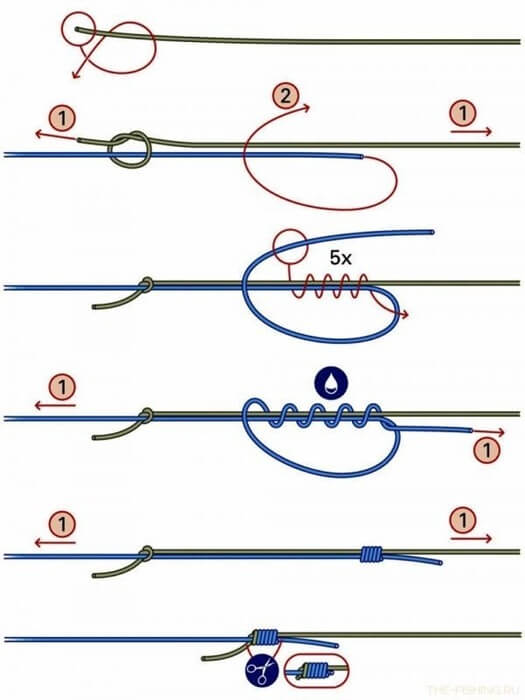
Used for feeder gear: tie a shock leader to the main line. Reliably fastens the 2 ends of the fishing line, even if they are of different diameters and types. At the junction, the knot is very neat, but the strength is 80%. It's not difficult to master.
Overhand loop knot
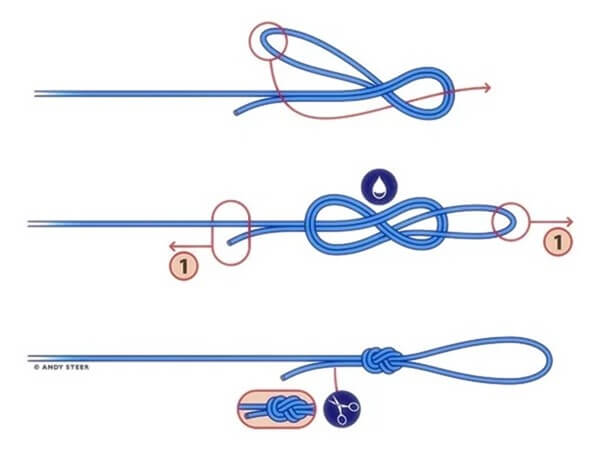
Universal node. Helps secure leashes and floats. It is invisible in water. Its strength is very high, but it is quite simple to perform. Suitable for monofilament and braid. This unit is used on an industrial scale. And there are all sorts of variations of it.
Carrot knot
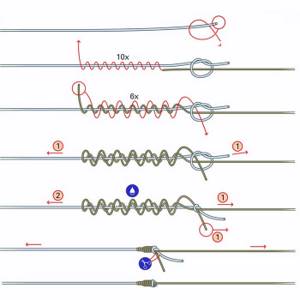
This is the strongest fishing knot. It is used when you need to fasten 2 ends of a fishing line of different diameters and types and to attach a shock leader to the main fishing line. Fluorocarbon and braid are often combined.
The pointed shape of the knot, for which it was called the Carrot, allows it to be used to connect the main fishing line with the shock leader. Suitable for tying any fishing lines in different combinations with each other.
The strength of the knot is up to 70% and does not depend on the properties of the lines used. It is very easy to tie. The knot is strong, but can loosen, then you can simply tighten it tighter.
Albright Knot
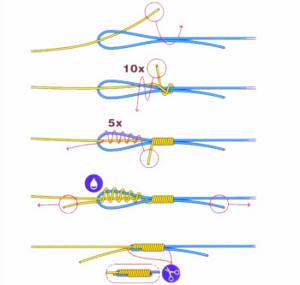
Has increased strength. Used for attaching a leash and shock leader to the base line and when fishing in difficult conditions, when there is a risk of breaking the equipment. Tightly ties 2 fishing lines together, even of different diameters and structures. It's not difficult to master.
Improved Clinch Knot
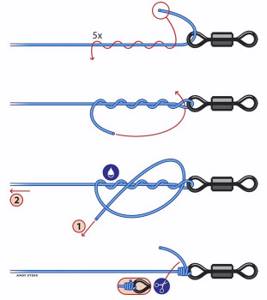
They are considered the best fishing knots for hooks, leashes, baits, carabiners and swivels. It has high strength, but only when using braids or monofilaments with a diameter of up to 0.4 mm. If you take more, the reliability of the node decreases. It is easy to tie as it does not have complex weaves. Suitable for different fishing lines and leader materials.
A simple “Clinch” differs little from an improved one; in it, at the last step, the tip of the fishing line is not drawn into a large loop.
Snell knot
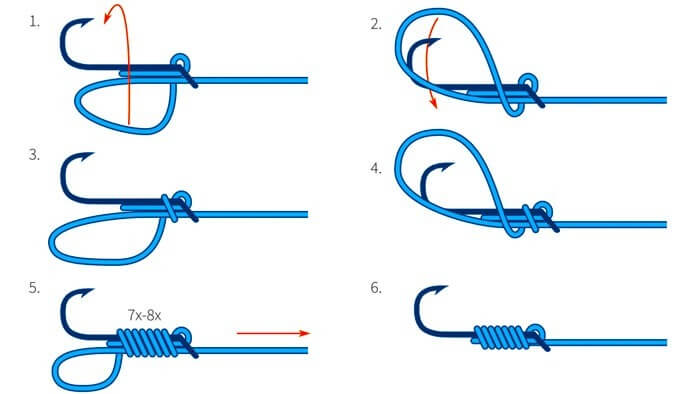
This is the simplest fishing knot on a hook, which is used for different fishing lines: monofilaments and braids of various diameters. It is attached to the forend and has excellent strength. When fishing, it distributes the load across the entire equipment. Therefore, aggressive jerks of the fish will not damage the fishing line.
These were just the basic fishing knots for fishing line hooks and leashes. There are a lot of them, and all of them are unlikely to fit into one article. We provided only the best of them, in the opinion of the editors. Choosing only what you have personally experienced in practice and your own experience.
Sea knots for beginners
Nautical knots are a real art that goes back to the origins of navigation and has not yet lost its relevance. Everyone who goes out on the water on a boat, yacht or boat should have the skills to master their correct knitting and appropriate use in specific cases.
Any sea knot must be tied tightly and reliably, because safety largely depends on this, and at the same time, so that at any time it can be easily untied if necessary.
Important! The main section of the rope is a section that is permanently fixed. The running end is the free edge, which is not attached to anything; the rope begins to be tied from it.
Video: 5 main sea knots
The first advice to future “sea wolves” is to study the terms. Without theory, you shouldn't start working on knots. Let's start with the correct names:
- “root ends” - the outermost section of a cable or rope, fixed motionless;
- “running ends” - the free end of a cable or rope. We start knitting any knot with it;
- “loops” – running or root ends folded in half;
- “pegs” - loops from the ends of the rope that cross each other;
- “half-knots” - overlapping ends of the same or different ropes;
- “Operations” - a section of rope or cable wrapped around an object or item. The ends do not cross;
- “Hose” - the rotation of a cable around an object or another cable. The ends go in opposite directions.
Now about other terms. It would be a good idea to get your bearings in the international (read English) notations and basic types that are used in practice:
- Intertwined or tied ends – KNOT
- Intertwined pair of running ends – BEND
- Attaching running ends to an object – HITCH
SEA TRADITIONS. The sailors of Northern Europe had a belief about three magical knots - if they were correctly tied on the ship's rigging, they protected them from wreck. There was even a ritual for untying, which was supposed to cause the wind.
We've sorted out the names. Next you need to master the basic patterns, so to speak, the principle of knitting. The remaining nodes will be easier. Initial knots include: bowline, figure eight, straight knots, simple half-bayonet and bayonet.
Strength of fishing knots
Among fishermen, knowledge of the percentage of knot strength is considered very important. How important is it? Let's figure it out...
Every angler strives to ensure that his tackle is as strong as possible, but at the same time builds it in such a way that in the event of a break, in a hook, or when a fish that is too large bites, the maximum amount of equipment is preserved. For this purpose, leashes are provided from fishing line or cord with smaller breaking data than the main vein (fishing line or cord). In the case of a spinning rod, extra meters of often very expensive cord are saved. At the same time, it is also impossible to save the expensive bait. In the case of a float tackle or any bottom tackle, the leash with a cheap hook comes off, but the float or feeder, which also costs much more than the hook, is retained.
All these are deliberate weakenings of the equipment. But it is known that knots are also elements that weaken the gear. In this case, the nodes have different percentages of strength. There are units that worsen the strength characteristics literally by half. This means that if you, having already provided for the necessary “protective” weakening of your gear, expect to pull out, relatively speaking, a kilogram of fish, then a fish worth half a kilo will easily tear your equipment at exactly such a “50 percent” knot and thereby bring you down discussion regarding the strength of the fishing line (cord). As a result, next time you will use a fishing line (cord) twice as thick as it would be worth, i.e. would significantly roughen the tackle. Do you need it?
And don’t forget that the number of the breaking characteristics of the fishing line and especially the cord, which is written on the box, must be divided by two. In all cases, be it expensive or cheap cords (fishing lines). The exception will probably be Chinese cords from AliExpress - you can’t trust them categorically! Moreover, cords from AliExpress are often more durable than what is sold in our stores. The secret is simple - “alish” cords are usually two times thicker than what is written on their boxes.
Nevertheless, any knot always deteriorates in strength. There are, of course, knots with almost 100% strength relative to the fishing line, but tying them is below average pleasure, especially if it is a cord and especially if it is the thinnest cord. On average, all known and popular knots have a strength of about 80% - this is normal! Those. When calculating the power of your gear, you need to divide the declared breaking load of the fishing line (cord) by two and take approximately 80% of the result - this will be the approximate critical weight for your equipment.
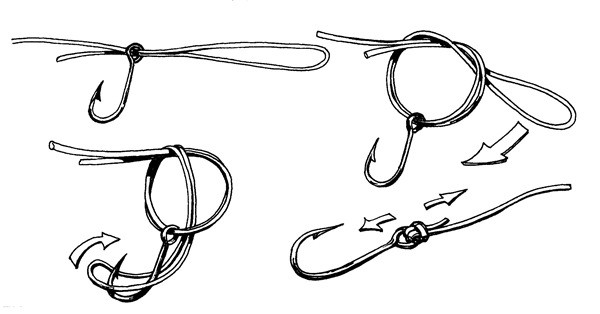
Figure: Palomar knot
What does it mean? This means that you should choose one single knot, the simplest and most convenient to knit. For example, the author of these lines always and everywhere (except for splicing fishing line and cord) uses one single knot called “Palomar” (knitting pattern in the figure above). It is very easy to tie, has a “standard” strength of about 80% and is convenient for tying hooks (snap hooks, snaps, just lures) not just at the end of the fishing line, but also hooks when forming a drop-shot rig, i.e. when it is required that the hook be positioned perpendicular to the fishing line. The only thing that is impossible is to tie jigs with Palomar. But that is another story…
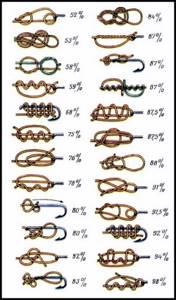
Figure: strength of fishing knots in percentage
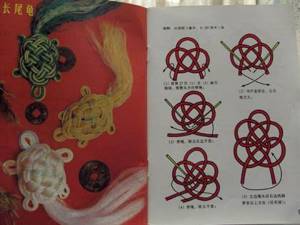
Variety of nodes
- "Button."
The weaving pattern of this knot is quite simple; it can be used in jewelry together with beads. When weaving it correctly, both loops should point in the same direction.
- Luck knot.
You've probably encountered such a knot more than once. The peculiarities of its weaving are that it is woven not with ends, but directly with loops.
- "Double Knot"
At first glance, such a knot seems quite simple, but the weaving pattern is very interesting. To weave it, threads of contrasting colors are usually used.
- "Snake Knot"
The snake knot got its name because of its resemblance to a snake. It is generally accepted that such a knot brings good luck to the owner and protects him from theft.
- Mystical knot.
Such a knot also brings good luck and symbolizes the secrets of the Universe. It is quite complicated in execution, but if you follow the scheme correctly, everything will definitely work out. Due to its volume and complexity of weaving, such a knot can be a wonderful gift or personal decoration for a mobile phone or keys.
- Lotus knot.
Read this: How to weave an owl from rubber bands using the example of a keychain or three-dimensional figurine
This knot is woven using a special pillow and a needle. Also, to use it, you should take two threads with a length of at least 50 cm.
Please note that two variants of this knot are indicated, it all depends on the direction of the thread during weaving, for example, if you weave in one direction, you will get a “round” cord, and if you change the direction after each knot, then you will end up with get tetrahedral.
There are still quite a large number of different nodes, some have been preserved since ancient times, and some have already changed over time. All of them are amazing and unique in their own way, and if you become seriously interested in this art, you can make amazing things that can become not just a talisman, but also an exquisite decoration, both for clothing and for your interior.
Crocheting equipment
For greater convenience when tying hooks and tying any other knots, there are special devices and tools that greatly facilitate and speed up the process. Special hooks for tightening, hook ties, and scissors ensure high quality, strength and reliability of the knots.
Knot tightener
Carp Zoom Knot Hook Tester
Knot tightener is a very useful and indispensable accessory in the assortment of any angler. It is a hook made of stainless steel, with which you can easily and quickly tighten all the necessary knots. The handle of the tool has a bright color, making it easy to spot.
A knot tightener will help you quickly, and most importantly, tie knots efficiently and reliably, or tie a leash or hook. In addition, the simplicity of this device is so obvious that it does not require any comments or explanations. We only note that the tool is of high quality and durability.
Accessory for making leashes
Accessory for making leashes Carp Zoom Hair Rigga
A simple and easy-to-use tool for creating leashes. Its presence in the fishing arsenal will allow you to make a leash of the required length in a minimum of time. At the same time, the created leash will be neat and will fully correspond to the required length. Manufacturing material – stainless steel.
Leashes, like hooks, are essentially consumables, so you need to prepare a sufficient amount of them before fishing. To be able to place a leash of the required length, diameter, etc. at the right time. In carp fishing, the so-called hair rig is very often used, which requires the ability to knit a special knot. This device allows you to tie it up quickly and without hassle.
