Content
- What is needed to make a box
- Making a box frame
- Making the “shell” of the box
- Attach the shoulder strap
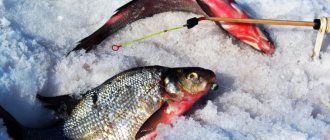
At one time, I got tired of carrying weights on my shoulder on the way to the hole, and even more so back, and the idea of a lighter design matured. The material is polystyrene foam - it couldn’t be easier, and at the same time it solves the problem of storing food in the summer heat at work and in nature. As they say, two in one bottle. On occasion, my wife at work collected scraps of sandwich panels of the required size, thickness 25-30 mm - laminated polystyrene of sufficient density. But you can use any dense foam. And then both the dimensions and the assembly diagram have already matured in my head. The process has begun. I will briefly describe how I made these boxes.
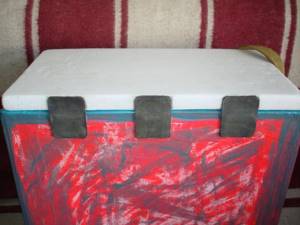
Gluing the sides of a box for ice fishing
Let's start assembling the box of a homemade box for winter fishing with our own hands by gluing the side walls to each other. For what:
Coat the side end of the widest blank of the winter foam box with polyurethane glue, join it to the edge of the narrow side wall and tighten it together in the center with a pair of countersunk screws 20mm long.
You can join the wide front or back wall and the narrow sides of a homemade ice fishing box only on sides that have the same height (280 mm). When gluing, both foam blanks must be vertical. There should be no gap between the bottom ribs of the foam sheets and the table surface.
In order to prevent the glued surfaces from moving away when screwing in the screws, you can first grab (pierce) the narrow side in the corners, that is, where the remaining screws will also be screwed in, with two thin nails. It would be better if the heads of the nails protrude a centimeter.
Having pulled the two sides of the box for ice fishing in the center, we remove the nails and also screw the screws in their place.
We perform exactly the same operations with the same side and the second wide side. To do this, we coat the opposite ends of both wide side sheets of foam with glue and glue the remaining narrow side of the homemade fishing box to them in the same manner.
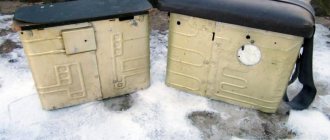
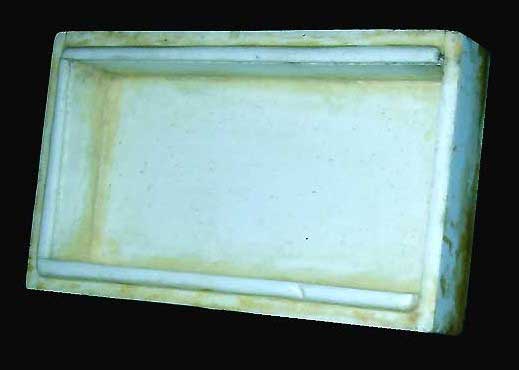
As a result: we will make our own frame for an ice fishing box, consisting of four sides - two narrow and two wide sides, having a rectangular through cavity. Before the glue sets, glue the bottom to all four side walls of the box.
Making a box frame
We make a drawing of the required size of the box and cut out the blanks strictly according to the square. Next, we apply silicone to the ends and assemble the structure. While the silicone has not hardened, it is possible to make adjustments. Afterwards, leave for a day for the silicone to completely set. Next, we cut out the outer skin from thin polystyrene foam and glue the overlapping seams on the sides with liquid acrylic nails.
Then we cut out the reinforcement for the bottom of the box from low-modulus carbon fiber and glue it to silicone.
We cut out the lid according to the external size. On the inside there is a lid seal. We glue the seal onto silicone.
We process the box with sandpaper and prime it with PVA.
Gluing the bottom of a winter fishing box
To glue the bottom of the box to the frame of a winter fishing box, turn the box 180 degrees vertically, coat the upper ends of all sides with PU glue, apply the bottom of the fishing box, and glue it using the already known technology.
(When making a box for ice fishing with your own hands, the through cavity must be turned over, since when gluing all the side foam sides, their bottom stood on a flat plane, but the upper edges in height may not have coincided slightly)
Before gluing the bottom to the box of the fishing box, two side foam plastic planes (wide and narrow) should be aligned along the two side edges of the bottom blank.
A right angle must be maintained between the side planes, otherwise, in the end, our home-made winter fishing box may take the shape of a parallelepiped.
Considering that the foam bottom and top of the pencil case were cut off with a margin, both in length and width, this will not be difficult to do. On the two remaining sides, the sheet of foam plastic bottom, due to the provided margin, can protrude several millimeters above the planes of the sides of the ice fishing box box.
Next, we tighten the glued bottom along the perimeter of the box with screws, and screw the rest of the fasteners into the foam sides of the frame. In this case, you should check the right angles between the planes of the sides of the box. Otherwise, the tackle box glued together onto the box may lie crooked.
After gluing the bottom, we coat all the internal corners in the box container with glue, after which it becomes waterproof.
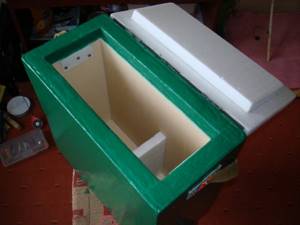
As a result of the not very difficult work done, we will have a box-base for an ice fishing box made (glued) with our own hands, but for now without internal partitions.
Making the “shell” of the box
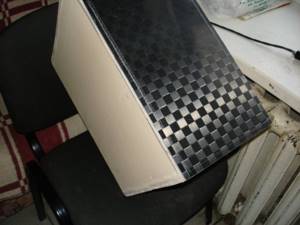
Next, we make the shell - to strengthen the structure, we cover it with thin fabric (I used old sheets) and cover the fabric with several layers of PVA.
After gluing, we paint the box with any paint, except acrylic and nitro.
Adhesive pencil box for ice fishing
Next, we’ll start gluing the pencil case to the ice fishing box. On my box, the walls of the tackle box are only held together by one screw from each edge. The manufacturing technology for making a pencil case with your own hands is the same as discussed above.
After the glue has dried, we cut off and adjust the foam pads to the dimensions of the internal cavity of the pencil case, which serve as guides for the movement of the pencil case cover, cut from three-layer plywood. In addition, when the lid of the winter fishing box is lowered, they additionally block the access of cold air to the fish, thermos and food.
In my self-made fishing winter box, the height of the guides is 10 millimeters greater than the height of the sides of the tackle box, that is, the width of the foam strips glued into the box is 60 mm.
Before gluing into the pencil case, rectangular grooves should be cut in the linings. For our winter fishing boxes, we cut grooves with our own hands with a special homemade cutter, which allows us to make a rectangular cut in the foam material.
If you follow the link at the bottom of the page to my YouTube channel, you will see the foam fishing box “live” in the video frames.
You can, at a distance of 10 mm from the edge, use a knife to cut two parallel slits in all foam pads for the pencil case to a depth of 4-5 mm. The distance between the slots should correspond to the thickness of the plywood from which the lid of your winter fishing box is made.
The foam can be removed between the slots with a slightly curved, narrow screwdriver sharpened for a chisel. This hand-made cutter may come in handy more than once in the future.
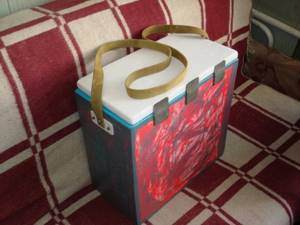
Attach the shoulder strap
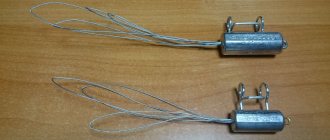
We cut out the belt mounts from plastic and glue them to the side walls on both sides - drill a hole in the center. And also, instead of hinges, I used rubber ones for the lid - they are glued with cosmofen.
Next, we decorate the box - we adjust the belt, cover the inside with thin polystyrene foam, and put a sheet of thin polystyrene on the top of the lid. The box is almost ready.
And then the process of painting in several layers - I used green lining.
In addition to this first drawer, I made a couple more, but without removing the laminate, which increased the weight a little. Then he began modernization - he made shoulder pads for the belts from a leather belt.
And in conclusion, I will say: there is nothing difficult to make - everything is from scrap materials. The boxes were tested both in the heat in summer and on ice in winter. It has become much easier to carry such a box, and it is comfortable to sit on the ice. The only negative is that the bottom slides. Over time, I will glue a thin sheet of rubber to the bottom - this will solve the problem. Snow and ice do not freeze on this box like they do on a metal box. In summer, food remains cool all day long, as if it were straight out of a refrigerator.
I’m also thinking about creating a strap for the box, like a backpack – two-shoulder. It would be much more convenient to go fishing with a box on your back - you only have a drill in your hands. You need to think about this - a replaceable belt is a great convenience for moving over a distance. Someone will say, there are sleigh drags. But try to struggle with them while climbing a five-story building-high staircase. The idea for companies is to make a quick-release cover for the box with straps, like a backpack - you come to the place, remove the cover and sit on the box. The case is made of durable material, even a tarpaulin will do. Or a universal strap system for all types of drawers.
Gluing the fishing box box
A self-made foam box for winter fishing after gluing all the components of the box is shown in the photo.
The boxes and cases of my winter fishing boxes (foam and plywood) are glued together with PU glue (white).
Polyurethane glue takes a relatively long time to set, but in terms of strength, thermal insulation and water resistance it is hardly inferior to any other adhesives.
If you decide to make your own box for winter fishing from foam plastic according to the dimensions, technology and drawings suggested on the website, then keep in mind: the glue remaining on your hands and clothes after assembling and gluing the fishing box is not washed off with solvents.
Therefore, be careful when gluing the foam blanks of the box and the pencil case of the ice fishing box.
I propose to start gluing a homemade winter fishing box only after all the foam components of the box have been adjusted to size.
Then, in one go, start gluing the bottom, pencil case and side walls of fish tanks, fishing rods and tackle with your own hands, ruining only one pair of thin rubber gloves.
Operations for assembling the components of a foam box for an ice fishing box with your own hands are carried out on a flat table surface with a film or newspaper laid on the tabletop.
Considering the properties of polyurethane glue, you can immediately expect that after gluing the blanks you will receive a closed foam box that meets the difficult conditions of winter fishing, with strong seams, but with dirty surfaces on the sides.
Gluing partitions into a fishing box
To finish making your own winter fishing box, glue a foam partition with two rectangular sections in the corners into the compartment of the box. The distance between the outer side of the fishing box and the dividing wall should match the diameter of your thermos.
During the manufacturing process, you can move this compartment to the left side of the winter foam fishing box. You can also make your own tackle box differently.
If someone needs it, then you can separate the corner for the walking fishing rod. Then the side ribs of the foam partition for the fishing rod should be ground off at an angle of 45 degrees. See photo.
The belt without a buckle adjusting the length is glued and screwed through aluminum plates to the side walls of the fishing box.
By the way, using the technology of gluing a fishing box with your own hands, you can make a foam plastic canna box for live bait, in which the water will not freeze so quickly in winter; you will also need it in summer.
CONTINUATION OF THE TOPIC:
Homemade fishing box made of plywood
***