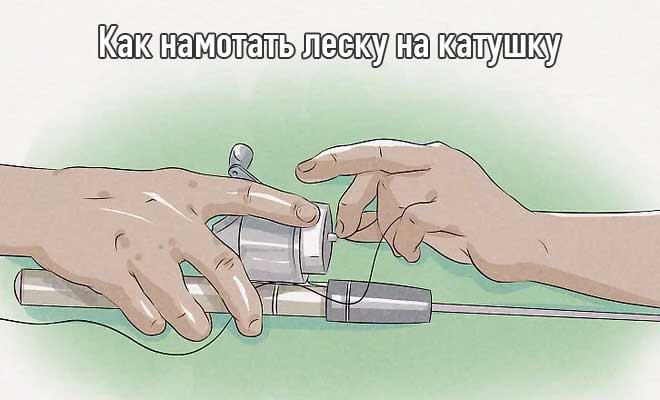
Fishing and accuracy are practically synonymous words. If an angler is careless in relation to gear, rigging and planning of fishing strategy, then he will clearly not be distinguished by his catch. This conclusion directly relates to the equipment of the spinning rod and, in particular, the winding of fishing line on the spinning reel.
Initially, it seems that there is nothing special about this operation. You select a cord in the form of a fishing line or braid, attach the fishing line to the spool and wind it until there is enough space on the spool, because the supply is clearly not a hindrance. But in fact, the fishing practice of a spinning rod shows how important winding the line is for comfortable fishing, the casting distance of the bait and the ability to carry out high-quality and effective retrieves.
Why is correct winding important?
Tying a fishing line to a reel will not work anyhow; here you need knowledge of the features of winding and their methods, depending on the type of reel and the material being wound. Mistakes when carrying out this manipulation already in fishing conditions, and experienced fishermen realize how valuable every minute of hesitation becomes when a predator is actively biting, is fraught with the shedding of rings and the creation of confusion or, in simple terms, a beard. Unwinding the beard can subsequently take up a significant portion of the potential fishing time and bring all fishing to naught.
But the tangle of tangled cord is only one component of the problematic issue. This is followed by defects in the cord from kinks after the formation of knots, loss in casting range, bends in the tip of the rod and shooting of expensive baits, which always negatively affects the initial positive attitude before fishing. Winding a fishing line onto a reel, as can be seen from the above, is a significant factor and there is reason to consider carrying out this operation more thoroughly, so that already on the reservoir the fisherman can avoid serious troubles. How to wind the cord onto a reel and how to properly tie the fishing line to the reel will become the main questions in further consideration of the material.
How to wind fishing line or cord on a reel: practical tips for beginners
Just now, while fishing, an interesting incident arose: I was catching a predator with a spinning rod on the river. There are bites on almost every cast, and perch and pike perch delight with their activity. However, the neighboring fisherman is completely calm. I decided to take a closer look and understand why this situation is happening. At first I thought it was a matter of bait or a bad presentation. In reality, it turned out that everything is much simpler...
No matter how hard the neighbor tried to reach the fish, he couldn’t. Although, the weights used were approximately the same, and there were no obvious errors in the technique itself. So the reason is obvious - the braided cord is wound incorrectly. In general, I started a conversation with him, looked at the reel and was convinced that my theory was correct: the distance between the whip and the upper edge of the spool is gigantic. In addition, everything was full of bumps and hollows. It was then that I had this idea, to collect material and write a short article on this topic, addressed to beginners. I myself am, in fact, a novice fisherman, but curious!
How to tie fishing line to the spool of a reel
At this point it is worth dwelling in more detail. Incorrect methods of attaching fishing line or braid subsequently violate the entire principle of laying the cord and its rational distribution on the base of the spool. Depending on the design features of the reel and its type, the methods by which you should tie the fishing line to the spool also differ.
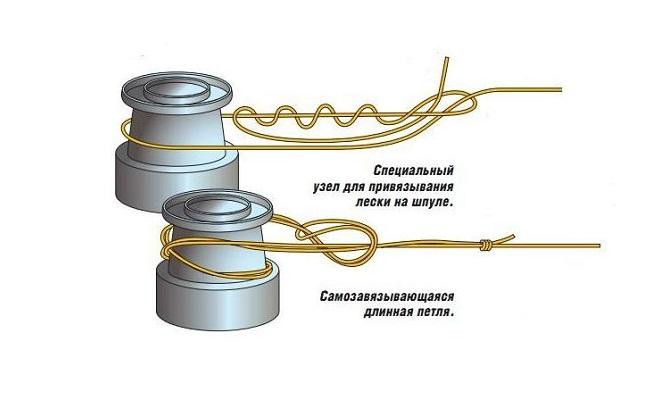
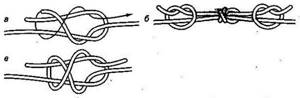
There are two methods for tying fishing line to the spool of a reel in its inertia-free design. One of them is the method of knitting using a special knot, like a clinch. Such a knot has advantages in its ability to resist stretching. The second method of effectively performing the operation is to use a self-tightening knot. This knot stretches a little, but during the operation of the reel, the tension of the cord prevents this shortcoming from fully manifesting itself.
Let's look at how to tie a fishing line to an inertial reel. In this case, the location of the winding changes. If in the inertia-free version the cord winds along the spool across its axis, then in the inertia version - along. It is more effective to secure the fishing line on the reel with this winding method if you tie a knot with a double loop or a regular figure eight.
You need to secure the fishing line to the spool of the multiplier reel by tying its beginning to one of the holes structurally made on its base. Here the angler has the right to use any reliable type of knot that prevents its relaxation and subsequent loss of fastening ability. The principle of cord slipping does not apply to the multiplier reel, since it is attached to a blind one. In inertial and non-inertial versions of the mechanism, slipping of the cord along the spool should be prevented by the optimal tightening force of the knot.
Backing on a spinning reel
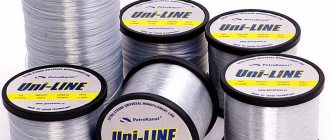
For backing you need a fishing line with a diameter of up to 0.3 mm. Winding thicker backing line may cause uneven winding of the main line. Nylon thread is also not the best option for backing, since if it gets wet it will take quite a long time to dry.
The volume of the backing line is calculated during a peculiar procedure using an additional spool. The process itself is not at all complicated: first we wind the main line onto the second spool, and then the backing, leaving 1-2 mm of distance to the sides.
Then the main spool is installed on the reel and the reverse process of winding from the additional spool is carried out. Naturally, the backing will be wound first, followed by the main part of the fishing line. If there is no additional spool, you will need to wind the entire line twice on another reel or bobbin, which is less convenient.
How much fishing line to wind on a spinning reel
The principle of calculating the capacity of the main cord is similar in the multiplier and inertial versions. The cord is wound onto the multiplier reel without preliminary calculations or other auxiliary operations. The amount of material to be wound is determined visually; until the free volume of the spool is completely filled, about two millimeters of the useful volume are not wound.
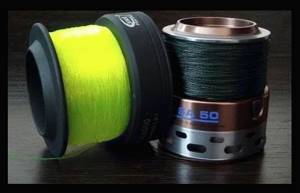
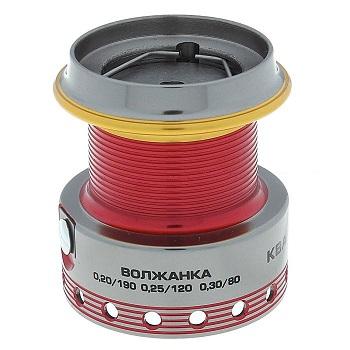
Important! How many meters of fishing line and what diameter will go into the volume of a multiplier reel can be found out from the product labeling. Typically, this information is printed directly on the mechanism body or is given in its operating instructions. Inertia-free and inertial types of modern models are marked according to the same principle.
When purchasing fishing line or braided cord for subsequent winding on a spinning reel, the angler must take into account these data on the volume of the spool, comparing the diameter of the cord and its quantity on the purchased reel. As a rule, the amount of cord with a purchased reel should not be much higher than the amount in theoretical calculations.
Important! It is impossible to correct the lack of winding to the required volume without a knot, but the extra meters can always be trimmed. A knot in the main cord is strictly unacceptable.
The work of cutting the cord on an inertial reel consists of winding a volume of three quarters of its height. It is this kind of filling that is convenient to work with both when casting and when retrieving, without fear of unauthorized tangles of the cord over the upper edges of the spool. Difficulties in determining the size of the cord for a spinning reel are solved with the help of a spare spool and backing. We will talk about these features in more detail in the next section of the article. The volume of the spool is wound based on the principle of underwinding to its upper edges of about three millimeters.
This feature prevents the rings of the main thread from coming off without permission. This size must be maintained. After all, when casting, the line comes off the spool automatically due to the force of the flying bait, and in this case the angler will definitely not be able to prevent the extra rings from self-resetting, which will lead to a guaranteed beard. Here I would like to draw attention to the cross problem of winding with clipping of the cord when casting.
Important! When the threads are clipped, the winding level may rise, and when cutting with large diameters, you need to pay attention to this factor, increasing the unwinding distance.
Braided reel: how to choose and use correctly
Here's a typical story. Provincial fisherman Vasily Pupkin lived a quiet life, fishing for his pleasure with a Crocodile brand spinning rod with a Sun-Vyn brand reel and Chinese monofilament wound on it. But from some point on, he began to develop complexes. “All normal spinners fish with a thread. I, like the last sucker, have a “vein”. It's time to stop this business." Well, Vasily buys a “wicker”. And not just any kind, but “anti-budget”. For we have always been taught that the more expensive a product is, the better it is. And the fact that the price of the cord is even higher than that of the reel does not alarm our fisherman... It all ends in tears. The first fishing trip becomes the last for a brand new line. "Beard" flies after "beard". And a couple of times the cord just breaks somewhere in the middle. Tragedy…
The definition of “consumable” in relation to cords evokes ambivalent feelings. On the one hand, this is not a rod or reel that is bought “for centuries”; the cord is subject to relatively rapid wear. On the other hand, it does not cost junk money, and therefore each of us wants this inevitable wear and tear to go more slowly and, most importantly, there are no unexpected incidents due to which the life of the cord can be reduced significantly. Most of these incidents can be calculated ahead of time. And, accordingly, try to prevent and avoid them. Today we will talk about how to do this.
Principle of price matching
The example we started with is right on this topic. For example, you have a cheap reel, costing about one and a half thousand. So, the “braid” that you intend to wind on it should not cost the same (not to mention even more) money. You should be satisfied with the one that in an average unwinding (this is 135 -150 m) will cost, say, 600 rubles.
Why is that? There are several reasons. First of all, you can expect all sorts of not-so-pleasant surprises from a budget reel, of which, in this context, the most critical is the low quality of cord laying. Which, as you should understand, has every chance of turning into regular shedding of “beards.” To carefully and methodically untangle them half a dozen times during a fishing trip, you need to have the super-poise of a Buddhist monk. What I mean is that in reality the “beards” will have to be trimmed. Agree, it’s better when it comes to a cheap cord rather than an expensive one. It also matters that most inexpensive cords, basic ones within their brand, are medium-hard and can withstand knots and ties relatively painlessly, after untying which they do not lose strength.
The principle of price matching in the more expensive segment is also relevant, although to a lesser extent. Even if we keep in mind reels with a price tag of about 2.5 thousand rubles, then we should pay tribute to the progress of Chinese manufacturers - at this level you can already find many models with very decent performance characteristics. For example, Select or Stinger. But still try to avoid a combination where the “thread” costs the same as the spool.
The principle of correspondence of power
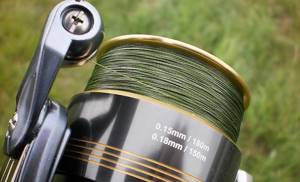
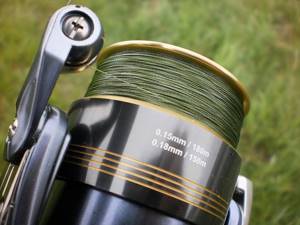
You've probably noticed that reel spools indicate their line capacity. Previously it was basically like this: 0.3/140 (say, mm/M), now you can often see something slightly different: 1.5/200(#/m). In the first case, a monofilament line is meant, in the second - a braided line, which is marked in Japanese “gou units”. But in the context of today’s conversation, we are not interested in the capacity of the spool, but in the power characteristics of the reel indirectly contained in these numbers.
Typically, line capacity is given for three different diameters of monofilament line, and the largest of them is exactly the maximum that the manufacturer recommends for a given reel. If you exceed it, then there is no guarantee that the coil will not soon die from excessive loads. Here you may ask a logical question: much more often the capacity is indicated for “monofilament”, but we fish with “braid”. What should I do? The considerations are as follows. Let the maximum diameter be specified as 0.3 mm. An average monofilament line of this thickness has a breaking strength of approximately 12-14 lb*. If we mean a cord of such a real test, then this is approximately the one that formally passes as “18-20 lb” - here, you know, these are the “rules of the game” in the braided fishing line market. Therefore, we can more or less calmly wind “braid” on our reels with a designated test of 20 lb.
Question: what will happen if we significantly exceed this figure? I’ll tell you frankly, based on my many years of experience, that, most likely, nothing. More precisely, this: if something happened to my reels due to the blatant exceeding of the reasonable strength limit of the “thread,” then this concerned budget models, for which, even if all limits were observed, the lifespan was predicted to be short. It all started with backlashes, which gradually progressed, then the move became heavier. Well, at some point it became impossible to fish with a reel. I can imagine that if I had used less durable cords, these reels would have lasted longer, but not by much.
Read: Repair and maintenance of fishing reels
I will still give one piece of advice: try to reduce the load on the reel in case of serious hooks. Tearing a thick cord directly means risking “breaking the head” of the coil. Often in such a situation it is recommended to wind the cord around some handy branch - and use it to pull until the bait breaks or is released. But I do it simpler. If the bait is thoroughly stuck and you can’t pull it off (for example, using the “bow method”), you have to “start tearing through.” Here, slowly pulling the cord, you should slightly support the knot with the roller with your index finger - approximately as can be seen in the photo given in the text.
The other extreme is when a thin cord is wound around a powerful power reel. They do this sometimes simply out of ignorance, and when they do it consciously - well, to throw it away. Perhaps nothing bad will happen. But it should be remembered that most powerful reels are designed so that their friction brake does not allow for fine adjustment in the area of light loads. And sometimes in this very area the clutch does not work smoothly, but rather in jerks, which, as you understand, is unlikely to lead to anything good if you use extremely thin cords.
However, there is one useful exception here. If a relatively large and powerful reel is equipped with a match spool, then it is automatically assumed that a thin cord will be wound on it, therefore the friction brake is designed for smooth operation at low loads.
Surprises of different diameters
Let's say you have a reel with a spare spool. On the main one, you wind the cord of the most relevant test for you. If the initial winding is not satisfactory, then adjust it with washers. I won’t describe how this is done once again, because everything can be easily found through any search engine on the Internet. After adjustment, the coil will only make you happy in operation - no problems with loops.
And then you decide to use the reserve spool. Of course, you wind a cord of another dough around it, which differs by two or even three gradations. And on your first fishing trip with this second spool you get several “beards”...
How is this possible? That's how. If we were fishing with a monofilament line, then, having wound, for example, 0.3 mm on one spool, and 0.2 mm on the second, we would fish calmly, alternating them, nothing terrible would happen. Simply because monofilament, thanks to its physical and mechanical properties, when winding, seems to slightly “spread” along the spool, filling its space more evenly than if there were “braid” in its place.
But “braid” of significantly different diameters fits differently on one spool. And in our example, if, for example, a #1.5 cord is wound on the main spool, then the #0.8 cord on the second (exactly the same!) spool will fit differently. This will be noticeable even to the naked eye. For example, on spool 2 there will be a dip in the front, which is not present on spool 1. And, as a result, with spool 2 the reel “loops”. What to do? There are three options to solve the problem.
The first one is the most banal. The principle of “one reel - one spool”. It’s normal when it comes to fishing with lines of significantly different thicknesses, and reels of different classes are required - in size, “power”, etc. Another thing is that such a solution runs into the desire of many of us to have “two in one”, i.e. e. just save...
The second way is a compromise. We “spread” the cords on two spools: smaller – for thickness, larger – for some other properties. Let's say, on the first spool we wind 4-core #1.5 - for fishing among grass or snags, and on the second - 8-core #1.2 - for long-distance casting in open places.
Option three is a little more complicated and, I would say, trickier. We leave one of the bobbins as is, and to the second we glue from below the washer that we removed when adjusting the winding of the first bobbin. We get two spools with different adjustments. I could describe everything in more detail, but I think you will figure out what and how if the question raised is relevant to you.
About the benefits of small spools
Our idea of the ideal reel has changed over time. About 15 years ago, many people (including myself) believed that if the spool included 300 yards (this is one of the American unwinding standards) of running test cord, then it was a very correct reel. The reasoning was quite convincing: one skein of 300 yards lasts, as the cord wears out and is used up, noticeably longer than two skeins of 150 yards. Well, simply because a shorter cord reaches the stage of “no longer enough to cast” much faster.
Read: Spinning reel. How to choose?
However, later it gradually became clear that a small spool has its own benefits. Not only have we begun to treat “wicker” less reverently than before, having accepted the inevitability of its consumption. It also turned out something less obvious: a small spool gives a more even winding. Which manifests itself in two ways.
Firstly, what happens to the cord wound on a deep spool on serious hooks? Even if initially the quality of installation did not raise any questions, then when the cord tension is close to the limit, it cuts into the lower layers. Or maybe not even cutting in, but pressing in - this word more accurately conveys the essence of what we are talking about now. As a result, an uneven “base” is formed under the working section of the cord - and, as a result, this working section itself lies less smoothly than it did at the beginning. In theory, after each such episode, you should unwind the cord to its entire length, at which the indentation is noticeable, and wind it back, passing it through your fingers. But who will do this?! After all, we can talk about rewinding two hundred meters of cord back and forth each time. Therefore, you have to put up with the fact that the winding that was ideal at the beginning of fishing becomes imperfect during its course. But this, as you might guess, entails a greater risk of shedding the “beard” and, accordingly, losing part of the cord. Savings due to greater unwinding come at a cost...
Secondly, on a shallow spool the cord generally lies more evenly - you may have noticed this yourself. If you haven’t noticed, then conduct a simple experiment. Take a reel with a deep spool that has problems with winding quality. And start filling the spool from scratch, paying attention to the moment at which these very “problems” become visually noticeable. For most of these reels, this happens after the spool is 40-50% full. That is, there would be no question of problematic installation if the spool were low-capacity.
In this regard, I remember one of my reels from 10-12 years ago. It was a very budget product, marketed under the Tom Lakefield brand. What was remarkable about the reel was that it was equipped with as many as three spools, including a small one. It was with this spool that I fished with the reel for a season and a half. I caught it for my own pleasure. But the two deep ones were not useful. They "bearded in black." Apparently, they were intended for monofilament fishing line, and I did not have sufficient grounds to make any claims.
This insidious “chord twist”
I'll start with a specific example. About five years ago, on one of the forums, there was a discussion about such a not particularly important, at first glance, issue as getting the cord on the front part of the spool when starting to wind. Even then I noticed that I had a Daiwa Steez reel, and with it something like this had never happened before in a hundred fishing trips. He said it and “jinxed it”: a day later Steez laid his first “chord turn”...
This question itself may seem to some not worth a damn. If you think so, then you are just lucky. In fact, the problem is serious, threatening trouble. Therefore, let's look at it in detail.
How does this happen? You are casting. You start rewinding as usual, without looking at the reel, but due to some slack in the cord and, possibly, the rear initial position of the spool, the cord on the first turn does not lie where it should have gone, but somehow along a chord across the side...
Everything would be fine, but this is what happens next. Firstly, during subsequent casts, the line running off the reel strongly rubs itself at the two points where the chordal turn intersects the edge of the spool. Secondly, if on one of the subsequent longer casts the chord turn simply leaves the reel “in order” along with all the line involved in the cast, this is luck. Worse is the scenario in which the cord running from the spool pulls the chord turn earlier than it should. I will not describe in detail the options for what could happen. Let me just say that there may be two worst ones. This is either a “beard” (note, fifty meters from the end of the cord!), or even a break in the “braid” in this place. Both of these, one might say, are a death sentence for the cord, and often an expensive one. Well, because anti-budget 8-cores are more prone to getting tangled and torn in such a situation. N And this is just a “harmless” chordal turn.
Now in more detail - why this happens and how to deal with it. First, let's note that the problem is more typical for inexpensive reels. The top ones have something built into their design that makes the chord turn the exception rather than the rule. But most of us fish with budget reels, so we have to take it into account. It is important that even among cheap reels there is a “stratification” on this issue. For some, the chordal turn happens rarely, for others it happens often, up to a dozen times per fishing trip. If you notice such a bad habit on your reel, then, even if it sounds trivial, make it a rule after each cast to check how the first turn is laid - and if anything, simply correct it with your finger. It may seem tedious and dreary, but I’ll tell you for myself, you get used to it. I had such coils.
Read: How to dye fishing line yourself using natural dyes
Often a chordal turn is caused by a technical error in casting - when we send the bait along an unreasonably high trajectory. This is even more fraught when casting against the wind. Then a large slack is formed, and in the first few turns the cord lies on the spool anyhow, including across the side. Therefore, try to throw more flatly. Especially with a headwind or headwind.
Another factor that provokes a chord turn is an excessively pronounced reverse cone of the cord laying profile on the spool. We usually get it by adjusting the winding in order to prevent the loops from being thrown off when fishing with the jerk method. But here you can overdo it - the cord will strongly “prop up” the edge of the spool, and sometimes even “step over” it, which can lead to a chordal turn. If so, then you should place a thin washer under the spool. The reverse taper will remain, but will be less sharp.
"Architectural excesses"
There are a couple of elements on spinning reels that seem to provide useful functionality, but sometimes create problems.
The first of these is the friction brake adjuster, i.e. a nut with a grip. This very grip is sometimes designed purely geometrically in such a way that the cord tends to wrap around it with several turns. What happens next, if it does happen, usually causes a stream of swear words from the angler: the same troubles as with a chord turn, only in even more radical terms.
The second trouble associated with the clutch regulator is the cord getting under it. You just suddenly feel that “something has gone wrong”, look at the reel and see that the “braid” has somehow gotten under the nut - and has already managed to wrap itself around the axle with a dozen turns. This may not be as critical as winding it around the regulator itself - well, already because it is not fraught with the formation of a “beard”, but still not very pleasant.
What to do? More than once I had the desire to take a file and smooth out the sharp corners of the trapezoidal clutch grip, characteristic, for example, of Shimano reels of previous generations. But, of course, this path should hardly be approved. The better option is to select a regulator from an old reel that is suitable for threads and other mechanics. I have about a dozen of these “meat grinders” that I use as spare parts donors. For example, what you see in the photo is a Cormoran brand reel, which in its original form did not have a string, and even got under the nut. I found a replacement, everything returned to normal.
Finally, another “sometimes extra” part of the reel is the clip, the line clamp. It may contain two “surprises”. The first is to damage the cord with sharp metal edges hidden under the plastic cover. It is useful to look at this place on the cord - are there any torn fibers visible on it? If you notice, just stop using the clip. Not a big loss. About four of these coils passed through my hands.
The second problem also does not appear often, but is fraught with the shooting of the bait. It’s just that on the next cast your jig or favorite wobbler treacherously flies away into nowhere. And all because the cord on the previous cast somehow managed to get under the clip, which then caused an abrupt stop and breakage.
How does this happen? Due to the same thing that, as we noted above, causes a chordal turn - due to the beginning of winding with slack. Only in this case does the cord get in front of the spool, and in this case – on its “skirt”, where it “finds” the clip.
But here's the moment. This (the cord getting caught in the “skirt”) happens with different reels, but getting caught under the clip happens only with some of them. It's difficult to cure. Therefore, if suddenly you are unlucky with a reel and you come across exactly the same one, then the surest thing is to simply remove the clip. Again, no big loss. And you will get rid of unnecessary headaches.
Subscribe to
our channel in Yandex Zen
What is backing
Using a base or backing allows you to wind fishing line onto an inertia-free reel without flaws and waste of expensive cords. Often the volume of the spool is much more capacious than the diameter of the cord required for fishing conditions can fill. As a rule, the working dimensions of the thread do not exceed one hundred meters, and manufacturers strive to produce for sale precisely these volumes of bobbins.
In addition, braided cords of small diameters and fishing lines specialized for spinning equipment are expensive enough to fill the free volume without any practical use. In these cases, the excess spool height is filled with another, cheaper material. In various sources devoted to this problem, anglers are recommended to use electrical tape as backing, considering it a quick and effective way, but based on practice, I will say that this solution can subsequently cause a number of problems and lead to difficulties in using the reel.
The insulating tape is exposed to water, and water constantly gets onto the base of the spool from the winding cord, either getting wet or completely drying out. As a result, the electrical tape loses its elastic properties, begins to warp and break the winding pattern of the rings. As a result, the rings overlap each other, which ultimately leads to a loss of range of the tackle and increased wear of the cord, especially braided ones.
The most correct solution is to use monofilament fishing lines as backing with a slightly larger diameter than the main thread and, of course, with lower requirements for its quality. When winding fishing line onto a reel, you simply need to tie the fishing line together with a regular knot and cut the ends of the connection as short as possible, soaking the knot with glue to prevent it from untying. A knot hidden in the depths of the coiling will not interfere with the convergence of the rings when casting.
How to properly wind braided fishing line onto a spinning reel.
It would seem that there is nothing complicated here: attach the reel to the butt of the spinning rod or feeder, tie the braid to the spool with a “noose” knot, throw the reel into a bucket of water and reel in, but that’s not the case.
Let's start with the fact that braided fishing line is not “monofilament” and there is no need to throw it into a bucket of water when winding it, because the thread tends to absorb moisture. And if you also wind the cord, relying only on the resistance of the water, then at the very first cast the loop may be reset, which is not always possible to untangle. Impregnated brand cords are less likely to get wet, but it's still better to have someone hold the spool on a pencil than to use a bucket of water.
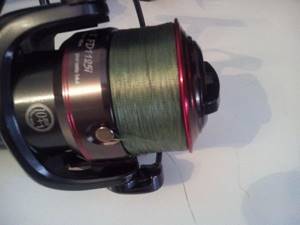
It is very important that the winding density is good. A wet cord, at least slightly, still expands, and when it dries on the spool, the winding density decreases, so even if you had to resort to water during winding, you must wind the braid with force, which is achieved by pressing the cord against the blank. The index finger of the hand that holds the blank is wrapped with electrical tape and when winding occurs, this finger slightly presses the braided line against the blank, while the whole hand holds the butt about thirty centimeters from the reel. The pressure of the fence is adjusted so that the reel handle rotates evenly, but with some effort.
In addition, this device, which is sold in fishing stores, can help you wind the cord tightly around the reel spool.
It may look different, although the essence is the same: the reel with the cord is attached to the shaft and is slightly pressed with clamps to create a force with which the cord will be wound as expected, without any slack, evenly, turn to turn.
By and large, this entire structure can easily be replaced by an assistant wearing gloves and a pencil, who can hold the reel on the pencil, slowing it down a little when winding it with the phalanges of his thumbs. So, let everyone decide for themselves whether it is advisable to buy a special design, and we will return to other important points.
Backing (Backing, backing)
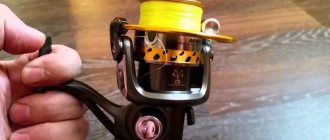
The correctness of winding the cord, and indeed the monofilament line, does not end only with the density of its placement on the spool. Another important detail is the winding height. This parameter very seriously affects the casting distance of baits, so you should not neglect it. The fishing line (cord) should be wound in such a way that there is only a couple of millimeters left to the top edge of the spool
and it is not always possible to achieve this without backing.
What is backing?
This is the name given to the backing for the braided cord, which fills the volume between the spool and the cord so that the winding ends at the height the spinner needs from the edge of the side.
The easiest way to “raise” the cord is to wind electrical tape onto the spool, but this method has significant disadvantages:
1. How to calculate the amount of backing so that there are two millimeters left to the side?
2. Some argue that in hot weather the adhesive of the electrical tape flows and damages the lower turns of the cord.
It’s hard to say how real the problems with glue are, but I don’t want to experiment, especially since the first drawback is enough to give up this method. Although there are stubborn fishermen who are not too lazy to rewind the line from spool to spool several times (and in the absence of a second spool, back to the reel) in order to achieve the desired winding height. That is: the spinning player wound up the electrical tape, then wound the cord, looked... - “more is needed”! I rolled up the fence, wound up the electrical tape again, etc.
The process is labor-intensive, but it can be done; the only thing that can be advised to tireless enthusiasts is to use good FUM tape instead of electrical tape.
A simpler, faster and better way to achieve the desired winding height is to use regular monofilament fishing line. If the reel has an additional spool, everything is done this way:
-the tip of the cord is inserted under the clip, and the braid is completely wound onto the spool. With effort, as stated above. Next, take a fishing line and tie it to the end of the fence with an academic knot,
then winding continues until the fishing line has filled the required volume to the edge of the spool side.
It turned out that the fishing line is on top, the fence is on the bottom. Now the spool is removed from the reel, an empty one is placed on which one of these loops
the fishing line is tied, and everything along with the cord is rewound. Here we must remember that ideally, the backing line should be no thicker than the section of the braid, then together they will “lie” evenly on the spool, and the knot with which the cord was connected to the fishing line will fit well and will be invisible.
If you don’t have the required amount of thin fishing line on hand (sometimes you need 100 meters of “monofilament” with a cross-section of 0.15 mm), then you can use monofilament up to 0.25 mm in diameter. True, there is a nuance to this. There is no need to tie the fishing line with a braided cord, because the knot turns out to be bulky, which will interfere with the flow of the latter and, during a long cast, will lead to the loop being dropped.
The “braid” is simply wound onto the spool, then the tip of the fishing line is wound into the clip in the same way and the fishing line is wound. Then the fishing line is wound onto the new spool. A couple of turns of the same FUM tape, which you just need to hold the tip of the fishing line, will help you get by without a large knot with a thick monofilament
after which, a cord is tied over the backing and wound onto a working spool.
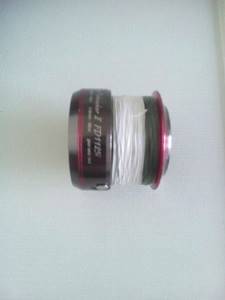
This is how the braid with a cross section of 0.10 mm lay down. (in our opinion) on the above shown backing-

The situation with winding backing becomes more complicated when the spinning reel does not come with an additional spool or has two spools of different depths. In this case, you will have to use the help of another reel, the volume of the spool of which should be the same as the volume of the working one, and wind it in this order: first, a braided cord is wound onto the spool of the assistant reel, then the required amount of backing is wound. Next, take a working reel with an empty working spool and rewind everything onto it.
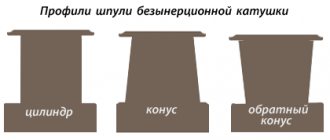
And the last thing that may also be useful to someone. During winding, the line or braid can lie on the spool in the form of a proportional “cylinder”, “straight cone” or “reverse cone”.
It is believed that winding with a “straight cone” contributes to better line flow. To achieve the desired winding, it is enough to “play” with the adjusting washers, which for reels with a front clutch are located on the main reel rod.
For example, if the cord is laid in a straight cone, and the spinning player prefers an even laying in the form of a barrel, then one should remove one adjusting washer and repeat the winding, etc., by analogy with the example.
On most rear-drive reels, the shims are located in the spool itself. To get to them you need to unscrew a special nut that is located on the top of the spool
But the adjustment is exactly the opposite: you need a barrel made of a straight cone - you need to add a washer.
Winding Features
Just as fishing methods differ depending on the type of reel, so the method of winding can vary depending on conventional or inertial gear.
So, it should be noted that:
- Spinning reels do not have a spool, so insert the line onto the rim itself and simply secure it with a regular sea knot.
- Putting a fishing line on a fishing rod with an inertial reel is quite simple and there are no nuances here, because this type of gear is considered the most common.
- With multiplier reels, everything is even better, because you just need to tie one knot, and the laying will go like clockwork. The line is passed through such a rod quite simply, and there are no large gaps left.
We suggest you read: How to tie several leashes to the main fishing line
Experiment and find the most convenient combinations specifically for your needs.
Why is proper winding necessary?
- First of all, the quality of winding greatly influences the casting distance: the ideal winding would be one that provides close to the maximum distance corresponding to the technical characteristics of the reel.
- Winding also has a great influence on the service life of the fishing line. For example, if the level of the top layer exceeds 3 mm from the side of the spool, then the fishing line, due to physical friction, will have greater mechanical wear. If this level coincides with the side, uncontrolled discharges will occur, which will lead to the appearance of a “beard” and the need to cut the line.
The first step in equipping a reel with fishing line is securing the line to the spool. Many anglers do not secure the line, hoping that the lower layers will not be used, but this is not entirely the right approach. Over time, the top working layer will wear out and gradually shorten. There are many methods of tying, but the most common are a specially designed knot and a self-tightening loop:
- The special knot is very reminiscent of a clinch. Its advantage is that it practically does not stretch and holds perfectly.
- The self-tightening knot has a slight stretch, but under the influence of the tension of the fishing line it will continue to be tightened until it stops.
Backing (rewinding)
Thanks to the development of technology, modern fishing lines are produced increasingly thinner in diameter without loss of strength, so very often the length of the wound line is significantly less than the capacity of the spool. In this case, there is a need to fill the free space with something. Some anglers fill it with insulating tape or nylon thread.
These methods are not very good, since over time the tape peels off the glue that holds the lower layers of the fishing line together, and nylon thread takes a very long time to dry if it gets wet while fishing. American fishermen came up with the best option: reel in a cheaper line into the lower layer, and then tie the main one of better quality to it. The bottom layer is called backing, in our country it is better known as winding.
The backing is an inexpensive fishing line with a diameter of up to 0.3 mm.
It is not recommended to use thicker fishing line, as it will deform the main layer. The winding length can only be determined experimentally. This will require an additional spool. First, the available amount of main line is wound onto it, then the backing. After which the winding is shortened to the required size after filling the spool. Winding onto the main reel occurs in the reverse order: first the backing section is wound, then the main component.
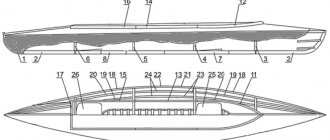
Taper profile
The first two types correspond to expensive well-known manufacturers. The coils lie smoothly and in a row. The latter is typical for cheap Chinese counterfeits. Technical shortcomings of such reels can ruin fishing, and it is better to abandon them.
It is impossible to wildly combat the negative effects of winding, since the spool stroke is structurally provided for by each manufacturer. But it is quite possible to improve winding to some extent. For this, the mirror method is used. That is, in those places where the coil leaves depressions, hills are created, and vice versa.
In turn, trapezoidal winding has two types of taper: direct and reverse.
A straight cone is formed if the technical feature of the reel provides for laying the turns with a decreasing pitch towards the spool wall. This cone ensures minimal friction of the turns during release. With a reverse taper, the pitch gradually decreases towards the spool flange. The friction of the turns with such a cone is greater, but the likelihood of spontaneous dropping of the line is reduced.
In how to correctly wind the fishing line with a straight or reverse cone, spacer washers will help us; complete with some inertia-free spinning washers, their number reaches four. Such washers are placed on the spool axis. By increasing the spool fit by adding spacers, you will lay the cord in a straight cone, while decreasing it in a reverse cone. This is true for devices with a top clutch.
When using shim washers for a rear-friction reel, you need to remove the spool and place washers on the axle inside the reel. Only, unlike front-friction models, a higher fit will give a reverse cone, and a low cylindrical fit.
- Tie the vein with any knot, for example with the same “clinch”.
- Install the “meat grinder” on the spinning rod and pass the braided line through the right ring.
- Tighten the friction and axial brakes.
- Control the tension of the vein by passing it between your fingers.
With this installation method, accidental braking of the coil will be eliminated.