Canoe drawings
Canoe drawings for self-building.
The term "canoe" is often applied to the dugout and especially the frame boats of the North American Indians. These boats were used for trade, hunting and fishing, war and simply for moving along rivers, lakes and even seas. Basically, the design of boats of different nations is similar - it is a durable frame covered with a shell of bark or leather. The exception is Indian pies, made from solid wood by chiseling with sharp stones and burning with fire.
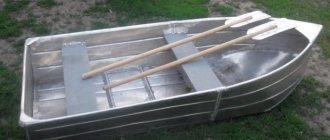
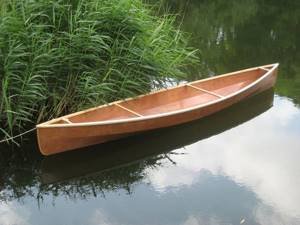
Lightweight and durable canoe.
The materials for making canoes for the American Indians were branches and bark of trees (mainly cedars, spruces and birches) and resin, a layer of which covered the entire shell. Thus, the lightest and strongest canoes were made from birch bark. Such a boat could be carried on the shoulders of one person.
The size of the canoe varied depending on its purpose, for example, a hunting canoe was about 2 meters in length and could accommodate 2 people. In addition, this boat was light, compared to pirogues, and had a high carrying capacity. Canoes played an important role in the fishing of local residents, as well as in communication between settlements.
First information about canoes.
It is believed that Europe owes the first information about American canoes to the French traveler Jacques Cartier, who saw these boats during an expedition. According to his description, these boats were about 7 meters in length and could carry up to 500 kg of cargo or up to 10 people.
Methods of canoeing.
A characteristic feature is the method of rowing - it is carried out with a spade-shaped single-blade oar, which also performs taxiing by turning the oar in the water and changing its trajectory at the end of the stroke. It should be noted that canoe rowers sit at the bottom of the boat or on bench seats.
Currently, these boats are popular all over the world.
The simplicity of the design of such a boat allows it to be built in a small shipyard or simply in a garage. Therefore, using our drawing as a basis, you can replicate an ancient Indian canoe and go on it to conquer uncharted spaces that cannot be reached by any other means of transport.
Canoeing is about harmony with nature.
The Indians have always lived in special unity with nature, according to its laws. The canoe, the traditional watercraft of the ancient Indians, did not interfere with the harmony of man and nature, but complemented it. Traveling by canoe, you will not disturb the silence of the forest with the noise of a modern engine, however, you will be able to enjoy the splashing of water, the singing of birds... You will have the opportunity to observe various animals and birds in their natural habitat.
This is an almost impossible dream, as well as an unaffordable luxury in our frantic pace of life. The Indians lived in harmony with nature, believed in Spirits, and knew how to build beautiful canoes. Having adopted our drawings, it is possible for us to follow their example.
Making a canoe
Note. The word "canoe" is borrowed from the Spanish language from canoa, which was spoken by Indians in the Caribbean. This is a small rowing boat without rowlocks, and it is rowed by at least two people with oars with one blade, which also serve as a steering wheel.
What materials are needed
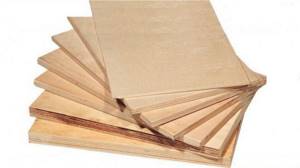
Birch veneer plywood
Selection of lumber:
- Of course, for such a design we will need plywood at least 5 mm thick directly for the body and about 15 mm for the frames;
- The safety of operating the boat will depend on its quality, therefore, it is best for you to choose the highest (elite) E or first grade. Although the price of the material, of course, will be slightly higher;
- in addition, it is important to take into account the strength and moisture resistance of plywood, which depends on the impregnation, and here you can choose the FSF or FSF-TV brands (flammable), FB and BS (aviation grade - also used in shipbuilding);
- for the arrangement of lintels, spacers and edging of the sides you will need solid wood. For this, a pine wooden board without knots and a 10x5 mm block are best suited, but they must be well treated with antiseptic impregnations.
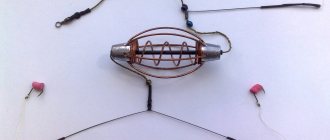
Suture material and sealants:
- you will also need a thick fishing line for tightening parts, that is, for lining seams;
- To ensure tightness, all joints are sealed with fiberglass and polymer glue, although in some cases silicone sealants are used.
Drawings and assembly
You can use this drawing for your canoe
First of all, to make parts you need to cut out paper patterns that will exactly match the geometric parameters specified in the drawing you have chosen. It is best if it is thick paper such as cardboard, since the permissible error in this case cannot exceed ±1 mm. Otherwise, the parts will leave a large gap when docked, and this is an exception for any watercraft.
To cut pieces from lumber, use a jigsaw or circular saw. When transferring the contours, fix the template to the lumber with buttons or office glue so that it does not move when tracing (then wash off the glue with water or sand it with a grinder during assembly).
The edges of the cut need to be processed immediately so that there are no chips there - when assembling the parts into a single structure, you can get hurt on them.

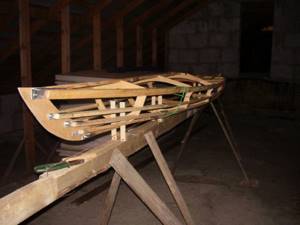
The upper part (contour) of the frame on stocks in the form of goats
For ease of assembly, you will need slipways, but at home they can be replaced by the most ordinary sawhorses made of boards and/or beams. Then, according to the project you have chosen, assemble the upper, contoured part of the frame of the future canoe, as shown in the top photo.
Next, install it on the stocks - now on this basis you will assemble the frame and cover it with plywood.
Frame assembled
Perform the final assembly of the frame - in this case, as you can see in the top image, metal pads were used to secure the fixation. When the assembly is completed, you definitely need to check the frame for strength - there should be no play at any connection. To check the strength, use your own weight - if everything is in order, then the frame will simply spring back elastically.
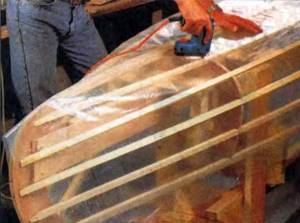
Covering the frame with waterproof film
To increase the reliability and performance characteristics of the watercraft, the instructions recommend additionally protecting it with a waterproof film, which is fixed with a furniture stapler from the inside and outside of the hull. The film should be stretched completely, without wrinkles, but you need to be careful not to tear it.
Note. In some cases, instead of such a film, wood primers are used, masking all the seams and covering the surface and interior of the body.
Now you can start covering the assembled frame with plywood and the best option for such boats is two layers each inside and outside. Here they are glued together with epoxy glue.
This is a very difficult and crucial moment, since the sheets must meet exactly at the joints. Moreover, you first need to install the first layer, sew the joints and seal them with glue, and then put another layer on top and again sew the sheets at the joints. Of course, you could use 10mm thick sheets for this, but they won't be as flexible as 5mm ones.
Now you need to carefully seal all the joints - you can use glue or silicone sealants for this. And for reliability, seal each joint inside and outside with a strip of fiberglass - it is glued to the sealing compound and closed with it.
If you did not use a special moisture-resistant film for waterproofing, you can now prime the body on both sides, and this will need to be done at least 2-3 times. Remember, each layer must dry before applying the next one.
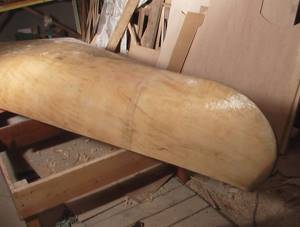
The canoe was coated with waterproof varnish
After all seams have been sealed, you will need to sand the body with a disc or belt sander. This way you will level all the joints sealed with epoxy glue or sealants with a common plane, and the boat will look like it was hollowed out from a tree trunk.
But that's not all - the canoe you make needs to be coated inside and outside with a urethane or alkyd waterproof varnish. Moreover, this needs to be done in two, three, or even four layers, each time allowing the previous coating to dry. After the varnish has completely dried, the canoe can be launched into the water.

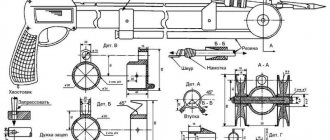
Drawing of a canoe oar with a blade: a) straight; b) rounded
You can also make oars yourself, using the drawing that you see above - there are two options for blades:
- in one case it has a straight edge;
- and in the other case – rounded.
They can be made from the same plywood and timber, only it will need to be given a round profile in the form of a shovel handle. However, you can buy them in the store.
Boat materials
The fundamental difference between a canoe and a regular boat is the absence of rowlocks. Otherwise, both buildings are not particularly different from each other. It can be single or multi-seat - just remember sports competitions. In everyday life, of course, the first option is more common.

To make a plywood canoe with your own hands, you will need the following.
- The material is no less than 5 mm thick. For frames you will need sheets 15 mm thick. A grade of at least 1 is needed, and preferably an elite one: the higher the quality of the material, the better its mechanical strength and resistance to water. In addition, taking into account the last factor, it is necessary to choose a waterproof brand: FSF or FSF-TV in this case, the fact that the glue used here is formaldehyde does not matter, or even FB - impregnated with bakelite glue. The last option is the best.
- Boards and beams with a cross section of 10*5 mm for installing lintels and framing the sides. You can use quite affordable pine wood, but it must be of high quality - knots are unacceptable. The wood is impregnated with antiseptic compounds.

- Thick fishing line - needed to sew patterns for a boat.
- Fiberglass and polymer glue or silicone sealant - for sealing and sealing seams.

Description of the design and basics of boat design
The canoe is one of the most comfortable and practical small vessels. Its tare weight to load capacity ratio is very high, as is its driving performance. The vessel has exactly the same contours of the bow and stern, the bottom is flat, which determines the low draft and the ability to sail in shallow water.
The elongated hull, widened amidships, gives the boat greater capacity.
You can find drawings of a plywood canoe on the Internet or in specialized literature. Descriptions and sketches of individual parts will allow you to correctly cut the material. The proposed project has a number of improvements that make it possible to correct certain shortcomings and features of the boat.
Shifting the maximum expansion of the hull contours towards the stern will compensate for some of its instability when sailing alone.

One of the boat design schemes
The method of manufacturing a watercraft is adhesive on a longitudinal strength set, which is called a matrix. Individual parts in the form of strips create permanent connections with the base and give the structure the necessary rigidity against bending and torsion.
This technology makes it possible to create durable hulls of complex shapes, for example, the sides can be convex with their upper part inclined inward.
Making patterns

Figure 1. The staple can be made from any available materials, but wood is most often used.
So, when all the materials and tools have been purchased, you can get to work. First you need to install the staple. This is a special structure made of very strong boards on which the canoe will be made. In order not to bother with making a staple, it is best to rent it, as it will cost you much less. The design looks something like this (Fig. 1).
Now let's start cutting out the details. We start with patterns, which must first be made on large pieces of cardboard. First we draw everything out with a pencil, and it is best to do this work using a computer drawing program. This will give you better lines. Then we print and cut out the templates. The pattern looks something like this (Fig. 2).
Once you have cut out the cardboard template, you can transfer it to the plywood and cut it out using a jigsaw. At the same time, try to process the edges well so that you don’t get hurt on them later. Now, using these templates, you need to cut the boards to make the power frame. Ideally, for a small canoe there should be 4 frame strips on each side. In this case, the top bar should be thicker.

Figure 2. To make patterns from plywood, you need to use a jigsaw.
The hardest part is to make a bottom that smoothly blends into the height of the canoe. The frame will look like this (Fig. 3). If you cannot cut out the main part yourself, which can be very difficult due to the required smoothness of the lines, then it is better to turn to specialists. Another plank will be needed for the back to position it transversely to the base. The entire frame is fastened using special metal plates and corners, which connect the boards using self-tapping screws, as shown in Fig. 3.
Lastly, the membranes are attached inside the canoe between its sides. They are needed so that over time the frame does not fall apart or become deformed. They need to be fastened with self-tapping screws or the same metal corners. There should be three membranes in total, and they must be located at an equal distance from each other.
DIY kayak

A kayak is a type of boat. It is perfect for fishing conditions and more. It can really be used for hiking trips and just for walking along rivers or lakes. This is due to the fact that in comparison with other analogues, this boat has a number of advantages.
A kayak is not that difficult to make with your own hands, so there is no need to buy one, although this option can also be considered. The information in this article is aimed at at least somehow helping those who decided to make a kayak with their own hands.
This is interesting: How to tie an Albright knot: diagram
DIY fishing kayak

What do you need to have?
First of all, you should determine the availability of tools and materials. For such work you need to have the following tools and materials:
- Electric jigsaw.
- Electric belt sander.
- Electric drill and electric screwdriver.
- Construction hairdryer.
- Scissors of various sizes with a good sharpening of the cutting edge.
- Construction knife with a sharp blade.
- Pliers and wire cutters.
- About 4 sheets of plywood, at least 4 mm thick, of appropriate quality.
- Fiberglass, up to 20 square meters in size.
- Waterproof varnish – up to 1.5 liters.
- Aerosil A300 – about 120 grams. It must be added to the epoxy resin a day before using it.
- Epoxy resin – up to 10 kg.
- Flexible rubber spatula for working with epoxy resin.
- Durable connecting wire.
- Disposable plastic cups.
- Brushes of various sizes - up to 5 pieces.
- Solvent up to 0.5 liters.
- Hardener for epoxy – up to 5 kg.
- Disposable rubber gloves.
- Several pieces of wooden sticks, similar to those used for ice cream.
- Cargo.
- Masking tape.
- Working drawings that are needed to build a boat. They can be found on the Internet and downloaded, and then redrawn on a 1:1 scale, which will greatly simplify the construction process. It will be enough to transfer the design to plywood and cut out the blanks with an electric jigsaw.
Procurement of materials

The main materials are plywood, epoxy resin and fiberglass. When purchasing, you should pay attention to their quality. The features of these materials are indicated below in the text.
Plywood
To make a kayak, you need plywood, which has the appropriate dimensions (2240x1120mm) and is not sold in our stores. Therefore, you will have to turn to the Internet for help and place an appropriate order through it, although this does not provide any guarantees.
Even through the Internet, such sheets are difficult to purchase, since not all organizations carry out such trade. This is due to the fact that plywood of similar sizes is not in great demand due to transportation problems.
Despite this, there are companies that sell these types of goods online.
An example would be . There are 2 types of plywood suitable for making a kayak. For example:
- "LauroVermelho", which is produced in Brazil. It is considered a very high-quality material on which you will hardly find defects or knots. Plywood is particularly durable, and its thickness is almost the same over the entire plane.
- "Amesklao", which is an analogue of the Chinese manufacturer. The price of plywood is slightly lower, but the quality is also slightly worse.
This is interesting: What are the methods of transporting a victim on water?
At the same time, it does not matter what color the plywood is, since this will not affect the construction process. After construction is completed, the kayak can be painted in any most attractive color. The color “Zhotoba” is suitable for making a boat.
Fiberglass
The quality of this material also plays a significant role in the process of self-manufacturing such a watercraft. When choosing a material, the main criteria are:
- The manufacturing process requires the use of fiberglass with a specific gravity of about 130 grams per square meter.
- Much more common is material with a specific gravity of 100 or 200 grams per square meter. In this case, you should opt for a material with a specific gravity of 200 grams per square meter. As a result, you can actually get a high-quality and durable product.
- To obtain a high-quality final result, you should take those pieces of fabric that do not have bends, as they will interfere with obtaining a flat surface. Fabric with cross-bend marks will cause a lot of problems when opening it with epoxy resin.
Epoxy resin

As stated above, you will need about 10 kg of epoxy resin, although many instructions indicate less material consumption. In this case, it is better to rely on the results obtained practically, and they indicate that the consumption will be about 10 kilograms. If there is any left, it will not be much, and if there is not enough, this may affect the quality of the product, since epoxy resin hardens quite quickly. It is better if the entire surface of the boat is covered in one go, without stopping the epoxy resin application process.
Etal-370 epoxy, for which Etal-47F5 hardener is suitable, is suitable for the job. If we evaluate the price-quality ratio and its basic technical data, then this is the most suitable technical product.
Construction stages

First you need to start preparing the workplace, materials and tools. Given the size of the boat, a car garage is suitable for its construction. In any case, there must be enough space, and working with epoxy resin requires special conditions.
The construction of such a watercraft consists of the following technological stages:
- Based on the available drawings, they manufacture all components. An electric jigsaw and other tools are used for this.
- The individual parts of the parts are assembled using masking tape.
- First of all, the decks and lower part of the future kayak are assembled.
- After both parts of the product are ready, they are connected together and assessed how well they fit one another.
- A layer of epoxy resin is applied to the internal surfaces of both parts.
- An unsinkable compartment is formed at the bottom of the boat, which consists of several partitions. They should also be treated with epoxy.
- After this, the deck and lower part of the structure are adjusted again. As a result, they should fit together perfectly.
- If everything is fine, then both parts are glued together and the joints are treated with epoxy. After this, the entire surface of the boat is covered with a layer of epoxy resin.
- At this stage, hatches are formed.
- The final stage is gluing fiberglass to the entire surface of the craft. At the same time, you need to monitor the quality of the fiberglass gluing. After the epoxy resin has hardened, it is advisable to sand the building and then paint it in any color.