Outdoor recreation, hunting or fishing in an area surrounded by bodies of water is an activity that is impossible without a floating device, so a boat is not a luxury, but an urgent necessity. Buying your own mini-ship can make a significant dent in your budget, which is why few people are attracted to this option. However, the exorbitant prices of small boats do not become an insurmountable obstacle for enthusiasts, since making a boat with your own hands is much easier than it might seem at first glance. Independently creating a practical small boat is an entertaining process, but it requires a serious approach from the author of the future boat.
Selecting materials and type of boat is the first step
This is not to say that the future builder has a lot of options, but there is a choice. A homemade boat can be made from:
- aluminum;
- wood;
- plastic;
- rubber (rubberized fabric);
- become;
- plywood.
There is no ideal material, each of them has its own advantages and is not without its disadvantages, but most often craftsmen choose wood and its “colleagues”, since the advantages of these options are undoubted. This:
- environmental friendliness, light weight;
- buoyancy, reliability, strength;
- noiselessness, maneuverability;
- relatively low cost;
- long service life with proper processing of the material and storage of the vessel;
- the ability to use oars, install a motor and/or sail.
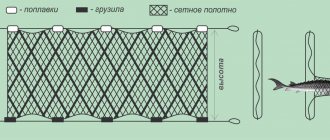
There are two types of wooden boats:
- keel structures;
- flat-bottomed (round-bottomed) vessels.
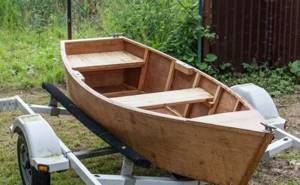
The latter are held in greater esteem by fishermen, since punt boats have better stability, allowing them to hunt fish even while standing. These boats are easy to turn around, and there is enough space for everything that fishing fans need: both gear and a very large catch.
Self-made keel mini-vessels are distinguished by better maneuverability in difficult sections, speed, and practicality. However, these boats are more demanding, since passengers and the “driver”-rower first need to learn how to maintain balance, correctly distributing the center of gravity.
You can also see prices for finished boats:
Features of wooden “boat work”
The creators of these boats have several requirements that will have to be taken into account. Among them:
- Ability to handle wood, knowledge of all the nuances. This concept includes the optimal selection of boards, the ability to calculate in advance the future maximum loads on the wood, as well as awareness of how the workpieces bend.
- Correct choice of other materials: in addition to wood, you will need means to protect it from leaks, from the harmful effects of water, and elements to hold all the parts of the structure together.
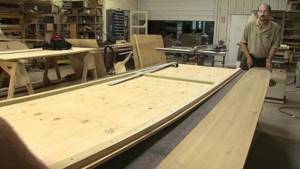
- Availability of space for assembly. Since all the blanks and the vessel itself are quite large in size, and assembly will take a beginner a lot of time, you need a room or area that is reliably protected from rain.
- The need to have all the tools to work with wood.
- At least one assistant will definitely be needed.
This is a minimum list of what is needed, so other conditions may arise as you work.
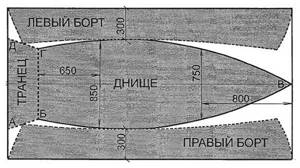
Correct dimensions and drawing
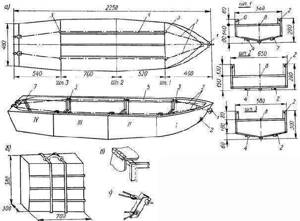
They are a separate discussion, because the weight, capacity, carrying capacity and stability of a small vessel on the water depend on the size. If we write about recommendations, they are as follows:
- Side height. The optimal value is 500 mm, but no one prohibits a slight change up or down.
- Length. This parameter depends on how many people will be in the boat at the same time. If the craft is designed for one person, then a length of 1800-2500 mm is enough. For a duet of “seafarers”, 3000 mm is needed, for 3-5 people 3500-4000 mm is enough. The latest design can accommodate six people, but in this case the question is different - the comfort of such a large company.
- Width. Here the recommended value is 1000-1500 mm, but it must be taken into account that the maximum figure will significantly reduce maneuverability, but will make the vessel more stable. You need to take into account the weight of people, the potential cargo that will be transported on the boat, and the length of the craft.
Based on the recommended (or chosen by the builder) dimensions, it is necessary to make a drawing. If the master is not good at drawing up such diagrams, it is better to stick to ready-made, proven sketches that are easy to find on the Internet: just enter just two words into the search engine - “boat drawing”, and then switch to “Pictures”.
Preparation: tools, materials
After theory, practice begins - purchasing materials and finding all the necessary tools. The main thing for a boat is the boards. In this case, it is better to buy spruce, larch or pine lumber that does not have cracks or knots that might fall out. Those that hold tight do not pose a threat to the future ship. It’s easy to check their reliability; just hit them with a hammer or sledgehammer. The optimal wood is one that has been stored in a dry place for at least a year and has been lying on a flat surface for the entire period.
The rest list includes:
- wood antiseptic;
- beam for spacers and triangular - for the bow of the boat;
- water-repellent paint - Pentacryl, Progress, Raptor (for cars), brushes (spray gun);
- nails (preferably galvanized self-tapping screws) of different lengths and a hammer for them;
- primer;
- low power drill, screwdriver;
- glue (polyurethane), its replacement is resin, a syringe for application in hard-to-reach places;
- varnish (yacht) - Alpina Yachtlack, Belinka Yacht, Eskaro Marine lakk 90, Premia;
- sheet metal for the bottom and fastening elements of the boat;
- sandpaper (or grinder);
- file;
- tow (sealant);
- paracord (Kevlar, nylon, polypropylene) - to give the sides of the boat the desired shape;
- roulette;
- clamps;
- jigsaw (hacksaw).
Step-by-step manufacturing instructions
A wooden boat consists of the following parts:
To make the nose part, the following operations are performed:
- Take boards without defects and measure the length according to the calculated dimensions.
- The edge is sawed off at 45° and planed.
- A chamfer is removed near the sawn edges. When pressing the boards, there should be no gap between them.
- The ends are coated with a protective antiseptic substance.
- The base of the bow is made of a triangular beam, taking into account that the length should be 1.5 times the height of the vessel. The timber is planed and treated with an antiseptic.
- 2 sides and a base are assembled, lubricated with wood glue and fastened with nails or screws.
- All excess protrusions are cut off.
Algorithm of actions for building a tailgate:
- Choose a board 5 cm thick.
- The sides are made from the boards. A margin is left at the top and bottom for subsequent processing.
- Stiffening ribs are inserted between the structures according to the boat diagram with your own hands. Their length is equal to the width of the craft, the height is similar to the height of the sides, otherwise the side elements will burst when bent.
- To bend the sides you will need 2 assistants. The edges of the side boards are attached to the stern; at this time, assistants carefully bend the side parts using a rope. Marks are made where the chamfer needs to be removed so that there are no gaps. Then they chamfer according to the marks, try them on and adjust them.
- The joints are treated with an antiseptic and connected with glue, screws or self-tapping screws.
- Excess material in the lower part of the stern is sawed off and the top is formed.
- In wooden boats, holes are made with a drill for the engine on the rear side, seats and permanent spacers in the sides. Then the jumpers and seats are installed. The engine is attached after assembling the entire structure.
To create the bottom of a wooden boat, a galvanized sheet is best suited. The frame is placed on it with the bottom down, outlined with a pencil with a margin of 1.5 cm and cut out with a special tool. Then the craft is turned over, chamfered from the side parts and spacers adjacent to the bottom, and treated with an antiseptic.
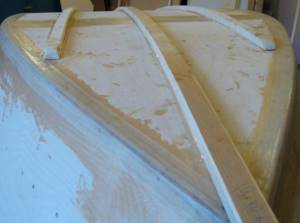
A mooring beam is glued along the sides along the upper edge, protecting it from damage when mooring to berths and other vessels. The keel, which ensures safety when turning, especially in devices with motors, is mounted to the bottom and placed along the centerline. It can be made from several slats.
After the structure is completely assembled, it must be tarred or caulked, then painted. Resin treatment occurs only inside the vessel.
This requires heated resin. To improve the viscosity, add a little machine oil. The resin is poured into all cracks, previously cleaned of dirt, and left to dry for 12 hours. Then it is treated with drying oil.
Painting is done after the product is completely dry.
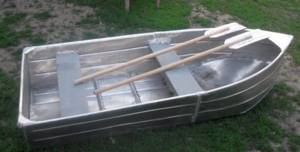
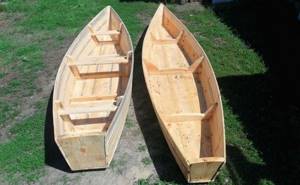
Making a wooden punt
How to make a boat with your own hands, reliable, strong, unsinkable? There is only one answer: all stages require precise implementation, since haste, any shortcomings, and the traditional Russian hope “at random” are contraindicated. Attention to even the “small details” is a necessary condition.
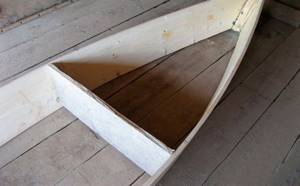
Manufacturing of boards
- First, according to the drawing, all the blanks are cut out. Parts, including the sides, are processed with a file and then sandpaper. Impregnated with antiseptic.
- On one side of the side boards, a cut is made at an angle of 15-30°, then the ends are chamfered to ensure an ideal fit (without gaps) of the workpieces in the bow.
- The bow of the boat is fixed with a triangular beam, attaching it with nails or self-tapping screws to the joint of the boards from the inside after a perfect fit. The edges of the contacting parts are first impregnated with an antiseptic, then lubricated with glue (resin).
- They call an assistant and give the sides of the boat the desired shape using paracord or its replacement. The sides are tied with a cord, having previously installed spacers between them of the same width as the future boat. The rope is then tightened.
- The transom is attached (the rear element of the boat is the flat stern part). It is connected to the sides using glue (resin) and self-tapping screws (nails).
Creating and fixing the bottom
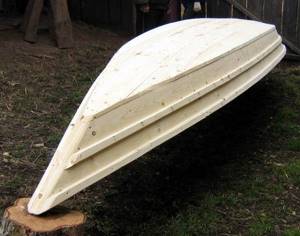
The bottom is made of wood (it is better to find a wide solid board), waterproof plywood (FSF, 12 mm) or sheet metal.
- If a metal sheet is used, then the part is cut out so that its dimensions exceed the bottom by several centimeters. They are needed for attachment to the bottom of the sides. Since leaks are the biggest threat here, all joints are generously coated with glue or resin, and tow is used. The edges of the metal are bent using a hammer. Self-tapping screws are planted in increments of 15-20 mm along the entire perimeter of the boat.
- If a wooden board (plywood) is found, then an element of the desired shape is cut out of the material, and then proceed in the same way - treated with glue or resin, tow and fasteners are used.
Final processing of the material
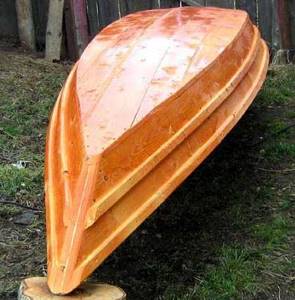
Now the elements of the boat are again generously treated with an antiseptic, and all potential gaps are eliminated using tow or sealant. Then they prime twice, apply paint in several layers, each of them is given time to dry.
Then the vessel is coated with varnish, also in 2-3 layers. The last stage is the installation of bench-cans, installation of triangles for the stern, they are processed - primed and painted (varnished) - separately. At this point, the production of the punt boat is considered complete.
Checking the water tightness of the boat
This operation is necessary to ensure the reliability of the vessel before its first long voyage. There are several ways to do this, but it is better to conduct a comprehensive test.
- Inspection at the construction site. In order to ensure the quality of the work, the boat is turned upside down and placed on a long bench or on several stools. Then a large amount of water is poured onto it from a hose. The recommended duration of this test is 5-10 minutes. The boat is turned over and inspected for leaks.
- Testing a mini-ship in big water. If a homemade punt has not proven itself to be a leaky trough at the “shipyard,” then it is first sent for free swimming to shallow depths. When the first water tests are successful within 30 minutes, the boat is ready for any body of water.
Some tips
They can be useful for those who do not like to make mistakes in their work, which always require additional effort to correct them. Therefore, some recommendations can (and should) be “wound up” in advance:
- when making a homemade boat, it is better not to skimp on the quality of materials, since the best wood is synonymous with the longevity of the future of your own watercraft;
- It is recommended to cut all blanks with a small margin, because it is much easier to cut off the excess, otherwise you will have to cut out a new element;
- sealant, glue, resin or tow - something that needs to be purchased in large quantities, the joints of the sides with the bottom are especially important;
- In all wooden parts for fastening, you need to pre-drill holes of a slightly smaller diameter than nails or self-tapping screws, the goal is to prevent possible cracking of the material.
Material selection
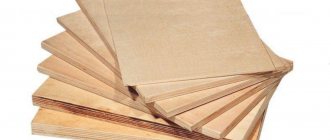
We will construct the entire structure using basic materials such as plywood and larch boards.
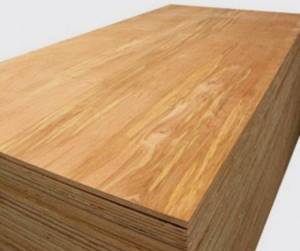
Plywood is formed by veneer layers, which are glued in production using phenolic glue and pressed. There are several types of plywood, but not all are suitable for making a homemade boat.
Important!
The highest quality and waterproof plywood is plywood marked FSF. As a rule, it is made from birch veneer. Using such plywood, you can count on the reliability and durability of a boat or any other product. At the same time, sanding and finishing your vessel will require significantly less effort.
If for some reason you cannot get plywood from high-quality brands, and you can only choose a material that is not of such a high class, then you should pay attention to the end parts of the plywood sheets. They should not have through cracks, knots, holes or other defects.
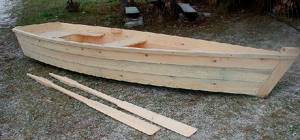
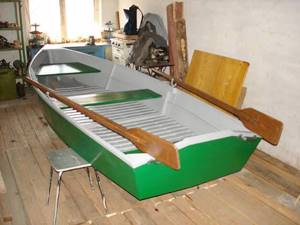
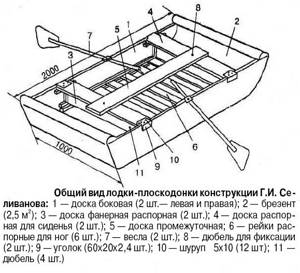
Prototype, drawing of my future boat - punt
Plywood boat
Plywood floating craft has its advantages, which include:
- light weight, since the lightweight version of such a boat weighs only 10-15 kg, and such a vessel is quite easy to carry even with two people;
- maximum capacity is 5 people, but it all depends on the chosen project;
- the durability of the mini-ship, but only if the technology is followed;
- affordable price of all required materials.
If the master has a desire, but can’t find any reason to abandon his plan, then he just needs to allocate free time to create a boat.
Materials, tools
Furniture plywood (FP) is not suitable for the construction of this vessel, so you need to purchase one of the following brands: BK (impregnated with bakelite varnish), BS (bakelite glue) or, if it is not possible to buy BK and BS, FSF (resin formaldehyde glue). It is necessary to pay close attention to the quality of the material: cracks are not allowed at the ends, and there are no knots or other defects on the surface. Thick plywood is not suitable, since the sheet must be able to bend, so the maximum (or optimal) thickness is 6-9 mm. Other necessary materials and tools:
- timber - high-quality, dry;
- larch slats - for the keel and stringers (longitudinal stiffeners);
- fiberglass in rolls;
- waterproof paint;
- primer and putty (also waterproof);
- epoxy adhesive;
- yacht varnish;
- pencil;
- copper wire (paper clips);
- chisel;
- wire cutters;
- hammer;
- pliers;
- plane;
- roulette;
- self-tapping screws;
- clamps;
- Grinder;
- putty knife;
- jigsaw, files (for curved cutting).
Plywood structure drawing
It’s simpler and easier to choose a ready-made sample, which can be found on the Internet without any problems. But before “hunting” for him, you need to think about a few details. These include:
- The appearance of the boat, its shape.
- Capacity of the future vessel and its dimensions.
- Level of design complexity. It is better for newcomers to “shipbuilding” to look towards simple models.
After a drawing you like is found, the master has the right to slightly correct it: for example, change the size or shape of some elements.
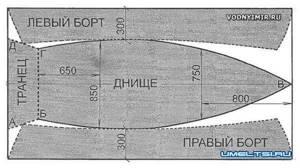
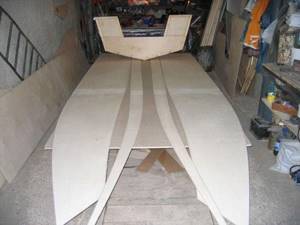
The simplest of the drawings is the one in which all the parts are placed on 1 plywood sheet.
- First, the axial (longitudinal) line is marked on it, then those located between the letters A, B, and C. Half of the bottom is transferred to paper, cut out, then the pattern is applied to the second half of the sheet, outlined with a pencil so that the bottom is symmetrical.
- Draw a line separating the transom from it. The bottom is cut out with a jigsaw first, the rear side follows.
- In a similar way, they draw and then cut out the side boards: mark one element, put it on the second blank, then both are immediately clamped in clamps and cut out. The cut areas of all workpieces are treated with sandpaper.
- The slats for the keel and stiffeners (stringers) are cut out, then they are ground.
If you are not satisfied with the small size of the craft, then two sheets of plywood are glued together before the cutting operation, treating the joints first with a plane and then with a grinding machine. A weight is placed on the resulting seam.
Assembling boat elements
The step-by-step process of connecting parts looks like this:
- Holes are drilled in the lower part and on the sides of the transom, their diameter is 1.5 mm, pitch is 150 mm. Do the same with the bottom from the stern side. Both parts are connected with wire, twists are made from the outside.
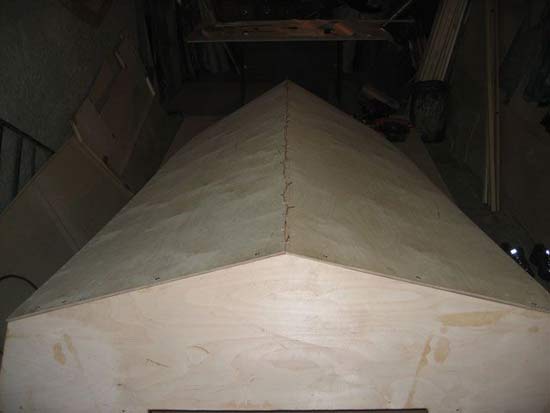
- The bottom is laid on 3 stools, and boards or books are placed on the outer chairs to ensure the required deflection. The assistant's name is. Together, holes with the same diameter and pitch are made along the edges of the side and sides of the bottom.
- The side elements are attached with wire to the bottom and transom. After checking the geometry of the boat, the staples are fitted with a chisel at the internal joints. Temporary spacers are inserted between the sides in the places where partitions (frames) and bench seats will be installed. They are temporarily secured with self-tapping screws.
- All joints are glued three times with fiberglass using epoxy glue. The width of the first strip is 25 mm, the second is 40, and the third is 50 mm. All twists of wire on the outside are cut off before gluing from the outside, and the joints are rounded.
- Temporary struts are removed, frames and cans are installed. The holes from the self-tapping screws are “masked” with wooden dowels mounted on epoxy glue.
- The slats intended for the keel and stringers are secured with glue and screws, then placed under a press.
We make a small-sized watercraft
You can use this drawing of a CADET boat made of plywood with your own hands
Note. We will not consider a specific design, for example, do-it-yourself drawings of a folding plywood boat. Our goal is to tell you about the general principles and methods of making small watercraft.
Required materials and tools
Plywood range
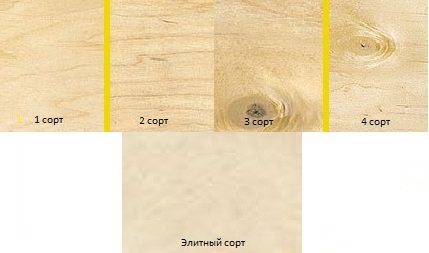
Plywood selection:
- to make a boat from plywood with your own hands, you will naturally need this same plywood, only of different thicknesses;
- for the hull you will need a sheet thickness of 5 mm, but for the keel and frame you will need 10-15 mm of thickness (select the length of the panel depending on the length of the hull);
- as you understand, high-quality products are needed here, therefore, you will have to choose either elite E or 1st grade for work - the price, of course, will be higher, but the quality will rise along with it;
- In addition, the impregnation of wood veneer is important, on which the waterproofness and strength of plywood depends - the best brands here can be called FSF or FSF-TV (flammable), FB and BS (aviation - also used in shipbuilding).
Solid wood:
- to decorate the sides, install seats and arrange spacers inside the boat hull, you will need solid wood;
- An edged board made of pine is best suited for this purpose - it is lighter than larch, but due to its resin content, it tolerates wetness well.
Suture material:
- to tighten the body and connect other parts into a solid structure, you will need suture material;
- for this you can use thin knitting steel or copper wire, thick nylon fishing line or plastic clamps.
Sealing:
- in order to prevent the boat from leaking, all seams must be sealed with water-repellent glue - there are a lot of them on sale at the moment;
- as practice shows, compositions based on polymer resins are best suited for this purpose;
- To seal seams, fiberglass is also used - a tape made from it is placed on the glue along the joint;
- You can also use fiberglass for this purpose, covering the sides and bottom with it;
- to protect against swelling, water-repellent varnishes and adhesives are used, impregnating the body and jumpers with them - for this you can, for example, use bakelite varnish or glue;
- In addition to impregnation, you will also need polymer paint, which will complement moisture resistance and decorate your boat.
Electric jigsaw
Tools:
- to make a boat with your own hands from plywood, you will, of course, need tools and, first of all, a circular saw and/or an electric jigsaw (a hacksaw will also come in handy);
- a set of hand carpentry tools in the form of a hammer, chisels, pliers, etc.;
- disc or belt sanding machine;
- tape or steel clamps;
- paint brushes for applying impregnations and paints and varnishes.
Select a drawing
You can use these DIY plywood punt boat plans
Important! Before you start assembling, find the drawings that are suitable for your case - how to make a boat from plywood with your own hands, it could be a flat-bottomed fishing boat that you will use on weekends or a kayak for hiking during your vacation. But if you are already experienced in “shipbuilding”, then you can try to draw such a project yourself, but here it is very important to calculate the carrying capacity so that the watercraft does not capsize during operation.
DIY boat drawings made from plywood with details
So, if you know specifically for what purpose you need a boat, then you can search in specialized literature, magazines, the Internet, or draw up a drawing yourself for making a boat from plywood with your own hands, which will suit you best. When the choice is made, do not rush to immediately draw the outlines of the part on plywood or board - first make paper templates of all the parts in accordance with the dimensions of the project you have chosen.
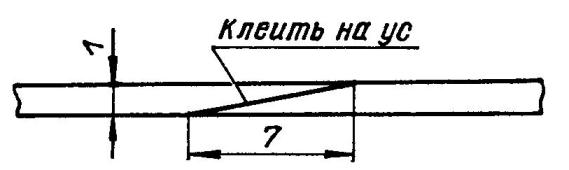
Gluing "on the mustache" is carried out in a ratio of 1/7
Of course, it is best if you use solid material to make parts, but, unfortunately, it is not always possible to choose a sheet of the required length. Then the two blanks are glued together, as shown in the top image. The main requirement for forming a joint is that the length of the oblique cut be approximately 7-10 times greater than the thickness of the workpiece.
For example, if this is a side part and you are using 5 mm thick plywood there, then the cut length should be from 35 mm to 50 mm. To make the connection strong, it is smeared with glue and clamped with clamps for the period of final hardening of the composition you are using (the manufacturer always provides instructions indicating the hardening time).
While the connected blanks are drying, you can start preparing wooden blocks from which, according to your drawing, the frame of the future watercraft will be made.
Recommendation. It should be noted that it is very inconvenient to assemble plywood boat projects with your own hands on the floor or on the ground. Therefore, to make assembly easier, you can make the sawhorse 60-80 cm high (depending on your height). For this design, 50x50 mm bars are suitable.
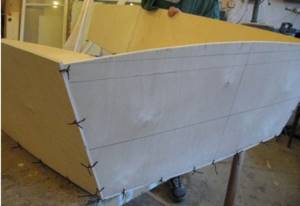
Assembling the body
Parts for housing assembly
We will assume that you have already cut out the paper templates and now transfer them to wood - plywood and boards. To prevent the template from moving when tracing the contours, you can fix it with buttons or even with office glue, which you can then wash off or clean with sandpaper.
Please note that the maximum tolerance for dimensional error can be no more than a millimeter in one direction or the other. Otherwise, the details simply won't fit.
Cut out the parts with a hacksaw, circular saw or jigsaw, and then glue the transom parts and frames to obtain the desired thickness and strength. You will likely notice that the glued parts have an unusually large mass, but this is not significant for the project as a whole.
If you plan to use a motor for the boat, then the transom stern should be reinforced with fiberglass, and the edges should be boarded with hard wood, for example, larch.
Recommendation. To increase the strength of the joints of transoms and frames, the joints can be reinforced with self-tapping screws with an anti-corrosion coating. But the length of the screw should be such that it cannot pierce the part through, that is, it should be a little shorter.
Here you can see how the bottom is stitched
Now install the transom on the trestles and begin to attach to it the prepared parts for the sides and bottom, which are brought together in one place on the bow of the boat. Fastening the parts, as you already understood, is done using your suture material. It is very important that all the joints fit together, and if you cut them correctly, then there should be no problems.
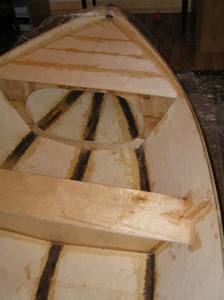
Fiberglass on seams
In this case, for gluing the seams, epoxy resin and silicon dioxide were used in a ratio of 1/1, with the consistency of thick sour cream. Corner joints are reinforced with fillets in the form of a triangular profile.
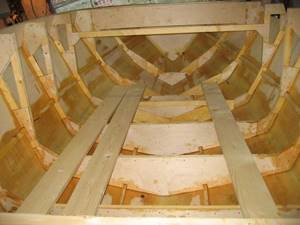
Glued frames
After the seams, sealed with fiberglass inside and outside, have dried, we insert and glue the frames (the glue remains the same). If the width of the boat is large, then the connection of the frames can be reinforced with overlapping fiberglass strips.
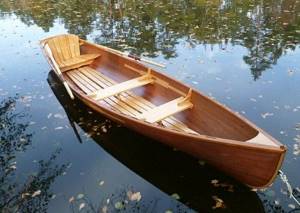
After this, we lay flooring from boards on the bottom of the boat, and also install rowlocks and seats. In cases where the do-it-yourself plywood boat pattern drawings on a watercraft provide for a cockpit or a cover to create a niche in the bow, then this part is fixed with glue or self-tapping screws to the sides and frames.
In the photo - the cockpit and seats are installed
Now you need to wait until the entire assembled structure is completely dry. After which the boat is turned upside down (on trestles or placed on the ground) and the entire surface is sanded from the outside using a disk or belt sander.
By the way, the seams on the outside are sealed with fiberglass cloth after sanding the wooden surface. And, although this type of work has already been mentioned, it is performed in advance only on sanded plywood of the Sh1 or Sh2 type.
Now you can begin impregnation and painting work. Targeted preparations for marine and river structures from . The entire surface is puttied with a special primer, so that the seams are not visible. After this, you can paint the boat in the color you like.