Carp rig options
Many different types of equipment are used for carp fishing. They differ according to the following criteria:
- Depending on the type of load used : either feeders of various structures, or a simple sinker.
- By type of installation: blind - characterized by rigid fastening of the sinker (feeder) to the fishing line; sliding - when the load moves freely along the line.
- By type of bait presentation : sinking, floating and neutral buoyancy bait. The latter usually consists of two boilies, one sinking, one floating.
- According to the location of the leash : either before the load (feeder) or after the load (feeder).
Knots for carp equipment
Regardless of the type of equipment chosen, it still contains nodes. Any knot reduces the strength of the tackle. Therefore, you need to try to minimize the number of knots and tie them correctly.
Tying all the parts of the tackle with the same knot is not effective, and the tackle will not function correctly. Depending on the purpose, different forms of the node are used:
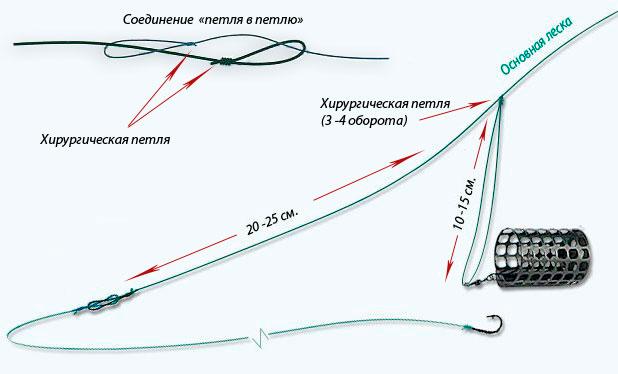
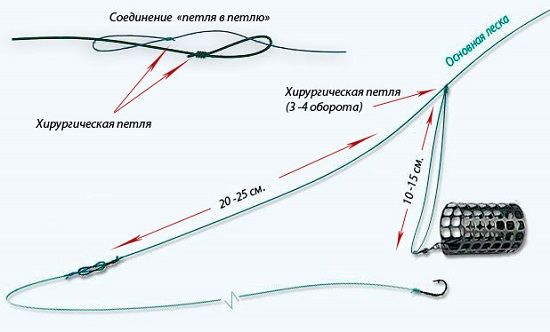
- "Surgical loop" or double knot if a tightening loop is needed. They are well suited for tying a load or feeder.
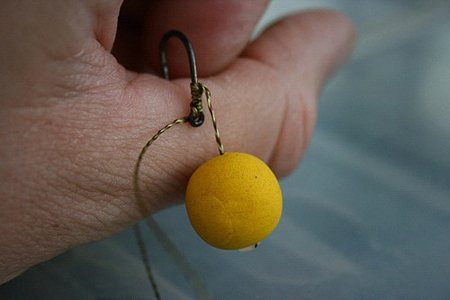
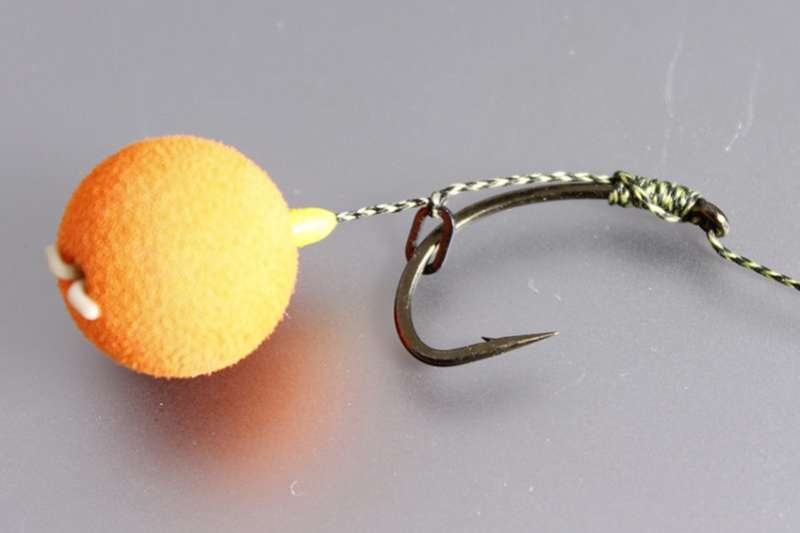
- To tie a hook and attach boilies, a knot is used, which is called a Knotless knot . It allows you to easily adjust the distance from the hook to the nozzle. Although everyone measures this distance at their own discretion, it is better that it is no more than 2.5 cm. Otherwise, the hook may not get into the fish’s mouth right away. This type of bait attachment is called “hair” and means that the bait is tied next to the hook, rather than put on it. Ideal for carp fishing.
- For tying swivels to the main line or to leashes, the Palomar - this is one of the simplest and most proven options. Practically does not reduce the strength of the fishing line. Some people think that it is only suitable for braid, but this is not at all true. It is universal for all types of fishing line. Grinner knot is perfect for braided fishing line. When it is tied, it needs to be slightly moistened with water and tightened, then the fastening will be even more reliable. Clinch knot (grabbing) is also simple and universal, however, it is not so well suited for braided and monofilament fishing line with a diameter greater than 0.4 mm.
- Albright knot is suitable for tying monofilament lines . It is important that the fishing lines do not differ very much from each other in diameter, otherwise the knot will turn out to be very voluminous. The optimal difference in diameters is 2 times. A thick fishing line is folded in half and a thinner one is wound on it. It is important not to get confused.
- Mahin knot (carrot) is used It thickens the line only 2-3 times and passes through the rod guides without any problems. Grinner and Uni nodes are also good The last option, as the name suggests, is very versatile. However, it is worth considering one feature: when tying two lines of small diameters, the strength of the connection is 73-75%, which is far from a record.
The most catchy carp rigs according to fishermen
It is very difficult to say which equipment is considered the most catchy. Since their type is selected exclusively for fishing conditions and depending on the preferences of the fisherman himself.
Accessories for float rods
One of the most exciting moments of fishing is watching the float. That is why, when searching for carp, it is recommended to choose float equipment wisely.
Namely:
- a mast rod is exclusively within the range of 3.6 - 4.5 m. Otherwise, you will not be able to moderate the jerks of particularly powerful specimens and will have to worry about how to comfortably fish for a large trophy. Naturally, today there are specialized carp tackles up to four meters long, which differ in heaviness and power from their counterparts;
- inertia-free reel for long-distance casting;
- monofilament with a thickness of 0.22-0.3 mm, which can support fish weighing up to twelve kilograms. Plus, winding the latter should be done exclusively to the edge of the spool to ensure unwinding after casting. Threads of great thickness are noticeable in the water column, and carp is a cautious fish, so it will never get close to such equipment;
- the float should be inconspicuous, small in size, light and sensitive. Some fishermen advise using a standard goose feather. Cheap and cheerful;
- a small amount of lead weights of medium weight in the form of pellets. Since fishing for the carp family is supposed to be in still water or in a small current. A sinker that is particularly heavy can simply get lost in the muddy bottom of a reservoir;
- hooks No. 2-6, which involve fixing to monofilament without leashes. Experienced fishermen in this case very rarely use leashes, attaching the hook directly to the main monofilament thread. And this is very smart, since the leash will only worsen the sensitivity of the cat.
Accessories for feeder rods
Feeder equipment has high sensitivity and precision in feeding feed over long distances.
Namely:
- It is recommended to select a feeder rod for specific fishing conditions. Very few fishermen decide to fish in large reservoirs, since in this case it is necessary to use ultra-long casts with heavy equipment. For example, for fishing on medium-sized ponds, a rod 3.2 m long with a test load of 60 g is suitable;
- inertia-free reel with bayrunner;
- monofilament thread with a thickness of 0.25-0.28 mm;
- fluorocarbon leash with a thickness of 0.22-0.25 mm;
- hooks No. 8-10.
This feeder rig is suitable for fishing in still water, on a reservoir with a strong current and a muddy bottom. If you decide to fish in the current, it is recommended to use a “helicopter and two knots” rig, while in still water you should give preference to an asymmetrical loop; for a muddy bottom, a paternoster or “helicopter” is suitable. It’s not difficult to create these types of equipment, you just need to set a goal.
Features of the shape of carp hooks
A carp hook must be sharp and made of good, durable steel. It’s easy to check its sharpness; it should cling well to your nail. If the hook is a little dull, you need to take the time to replace it with a new one. The strength of a hook is not always directly proportional to its thickness.
According to the laws of physics, the smaller the size and distance between the fore-end and the sting, the smaller the lever for applying force and the less likely it is that this element will break.
When choosing a hook shape, it is important to consider where exactly the carp will be caught. There are four variations of the form:
- The eye of the hook is bent inward. The tip of the hook faces the eye. This is the most versatile option. Well suited to various carp equipment and for various fishing conditions. It reliably detects fish - the main thing is to tie it correctly. The likelihood of hooking is higher if the shank is shorter because it is easier for the hook to turn in the fish's mouth.
- The eye of the hook is bent outward. Used when using hard leashes. Thanks to this shape, the equipment is located on the bottom in the correct way and, as a result, the likelihood of hooking fish increases.
- Hooks with straight eye. Rarely used. Mainly for catching carp in mid-water or from the surface. The carp will swim up to the bait from below, which means that the hook must be above the bait so that the fish does not notice it.
- Hooks with a straight eye and a long shank curved inward (banana). They are excellent at hooking carp, thanks to the rapid rotation of the fish in the mouth. However, they seriously injure the fish when playing. If the place where you are fishing is likely to get caught or the carp in the pond is cautious, then this option will be very useful.
Equipment for carp and terrain conditions
The success of carp fishing also depends on the right place on the pond.
When making such a choice, the fisherman must take into account the following characteristics of the reservoir:
- flat or uneven bottom;
- are there any snags, algae, or other obstacles;
- is the bottom covered with silt?
- Is there a complex bottom topography?
According to experienced fishermen, a good catch is obtained in difficult areas of the reservoir. If you want to become the owner of a big fishing trophy, go for carp to reservoirs where the bottom is silted, covered with mud or branches.
Smooth bottom
The most favorable option for successful fishing.
When going to such a place for a trophy, be sure to take with you:
- feeder rod;
- barbed hooks;
- high-strength monofilament;
- light weight (shaped like a stone);
- bite alarm;
- swivel;
- large tank for carp.
If a river, reservoir or lake has a flat bottom, you can fish there without using fancy elements with a complex design. Just equip your fishing rod with a sliding or hair rig.
Bottom with difficult terrain
Fishing in areas with difficult water topography is complicated by the fact that the float and sinker give incorrect signals, and the hook can get caught on stones or snags. With sudden movements of the rod, the tackle completely breaks. To avoid such troubles, choose good equipment.
Your fishing rod should be designed for long casting and equipped with the following elements:
- strong fishing line;
- a hook with an eye bent inward;
- bite alarm with high sensitivity;
- short leash;
- Oval sinker that promotes good line tension;
- hair equipment;
- a safe clip that helps, if necessary, remove the sinker quickly and easily.
Silted bottom
The river bottom, covered with silt, poses the greatest danger to fishing gear.
To catch carp in a reservoir where the bottom is covered with silt, use a fishing rod with the following set of equipment:
- a leash 15-20 cm long (on the edges of which a marker weight and a swivel are attached);
- swivel;
- marker rod;
- marker float that does not stick in the mud due to the presence of a leash;
- a marker sinker with the same weight as the feeder (such characteristics make it possible to lower the feeder to the depth that the fisherman needs);
- “helicopter” carp rig with a self-hooking function is an ideal solution for fishing in silted waters (during hooking, the compact and lightweight rig does not create resistance from contact with silt, which facilitates the process of landing prey);
- feeders for carp fishing should have a large width and at the same time be light;
- the sinker is selected in such a way that its weight is light and does not provoke failure of the equipment element in the water.
A large amount of silt at the bottom of a reservoir can be useful for a fisherman. Carps prefer to settle in areas where the bottom is covered with a good silt layer. And therefore, fishing in such a reservoir will bring a good catch if you choose the right equipment for the fishing rod.
Criteria for choosing leashes
The length of the leash and the material from which it is made depend on the fishing conditions and the preferences of the fisherman. Today, many specialized leash materials have appeared in addition to the usual braid and monofilament line. If we talk about material, leashes can be divided into four classes:
- Rigid leash made of fishing line. The advantage of this leash is that its very rigidity prevents the carp from spitting out the hook. Also, in places with a high probability of snagging, this option, which has a large margin of safety, reduces the likelihood of the gear breaking. It is better to attach a rigid leash to a loop, then it will have greater freedom of movement.
- Composite leash made of fishing line. The leash is made of two lines - thick and hard on one side, and soft on the other. Thanks to this, the bait becomes more attractive to carp, which can be scared away by a regular hard leash. On the other hand, a more rigid design than in the case of a soft leader reduces the likelihood of the tackle becoming tangled. The fishing lines are connected in this case using a swivel or an Albright knot.
- Soft leash. Made from wicker. It is highly durable, although it has a small diameter. The main advantage is that such material does not scare away fish when taking bait. The thinner the diameter of the leash, the greater the likelihood of entanglement. Therefore, very thin structures are recommended for use when catching shy fish and at short distances.
- Combined leash. Lately they have been gaining popularity. The principle of operation is the same as that of composite ones, only the manufacturers of these materials did most of the work for the fisherman. Such materials contain a soft braid inside and are coated with a special polymer on the outside, which can be easily removed if desired. Thanks to this design, you can very accurately measure the length of the soft part of the leash, without the need for any additional components in the equipment. One such material is Black Silt from Sufix
Selection of equipment
There is no universal carp rig that can be used with equal success in different fishing conditions.
In the current, feeder equipment of the “helicopter” type is more suitable for carp fishing. The same installation is unrivaled when casting bait long distances. When fishing in snags or in areas of a reservoir heavily overgrown with algae, this tackle is practically doomed to constantly snagging on underwater obstacles.
For areas of the pond that are too cluttered, a safe clip is more suitable.
On clean reservoirs without current, inline is more often used, especially in cases where this equipment is used in conjunction with a feeder feeder.
When fishing from a boat, you can successfully use inline or hair rigging. These types of rigs do not have high aerodynamic qualities, so this fishing option is more preferable.
Carp often live in reservoirs with a muddy bottom, but when casting a bait whose leader length is very short, the bait with a hook can be immersed in a layer of silt and be completely inaccessible to this fish.
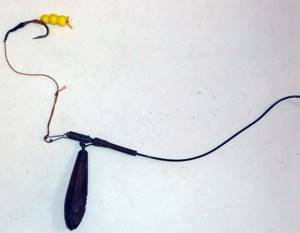
To eliminate the possibility of the hook sinking into the muddy layer, the hook can be slightly raised above the bottom using a piece of foam tied to a thin fishing line. Gear that uses a leash with a hook of at least 40 cm can be successfully used in such conditions.
Even if a heavy sinker sinks into the mud, the bait will remain above the bottom level. In this case, the likelihood of a bite increases due to the fact that the hidden sinker and part of the equipment will not scare away the fish.
Carp installation “Line Aligner”: step-by-step manufacturing process
Line Aligner is translated as “line straightener”. In fact, this is a piece of plastic or shrink-wrap. The principle of operation of this equipment is that when the fishing line is tensioned, the hook rotates in the fish’s mouth and clings to the lower lip.
If the shank of the hook is short, then a piece of heat-shrinkable tubing at the end of the shank can serve as its extension. If the forend is long, then there is no need to further increase the distance from the tip to the fishing line.
Manufacturing:
- A loop for the boilie is tied at the end of the leash.
- Next, tie a knot around the forend.
- Then two more knots are tied near the hook ring.
- We pierce the tube on the side with a special needle, and attach the fishing line of the leash.
- We drag the leash through the tube.
- The tube is put on the shank of the hook and bent.
Hair rig
What is the most important meaning of hair rigging? It is precisely in attaching the bait to the hook in such a “cunning” way that the latter’s tip does not close, and the bait itself is able to move naturally and freely. When carp suck up our bait, by the way, just like any other type of food, then, as soon as they feel the “resistance” of the sinker, they try to get rid of the potentially dangerous food, i.e. in fact, they immediately spit it out. And, just at this moment, the sting of the hook is “notched” in the lower lip of the fish. That is, in essence, the carp “self-hooks” - both under the weight of our sinker, and under the weight of the bait located below the hook, as well as due to the “spitting force”.
If the hook was bad, it may mean that the “hair” was too short and the carp was not able to “suck” the bait deep enough before spitting it out sharply (and powerfully). Continuous observations of the place/position of the hook in the lip of the carp will help you analyze the situation normally and choose the most optimal length of the “hair”. The ideal place/position of the hook in the mouth of a carp is considered to be the central part of the lower lip (approximately half an inch deep). Depending on the nature of the reservoir, the characteristics of the bottom topography, the specifics of the food supply, as well as some nuances of the carp’s feeding behavior (on a particular lake), the length of your “hair” should be selected. That is, taking into account all these important factors.
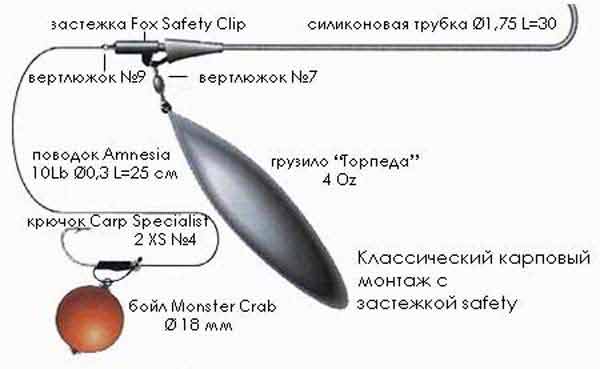
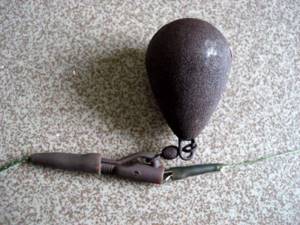
Carp installation “Safe clip”: step-by-step manufacturing process
A very convenient and popular type of carp mounting. The principle of operation is that when the load (feeder) is hooked, it is easily detached from the rest of the equipment if you apply a little effort.
This can protect the fisherman from losing all the equipment, but, most importantly, it helps the carp, in the event of a line break while fishing, to easily get rid of the load, and subsequently the remaining equipment.
Manufacturing:
- We knit a leash. At one end we attach a hook and make a loop for the boilie. From the other end we put on a conical tube with the sharp part towards the hook. After this we tie a loop.
- It is recommended to make leadcore (a braided lead core) as the main fishing line, which we will then connect to the shock leader At one end of the leadcore we tie a swivel and attach the leash to it using the loop we made.
- We thread a special clip through the other end of the leadcore. This clip is a key part due to the special fastener for the weight. We drag it to the swivel and pull it onto it so that it is almost completely closed. We close the remaining part of the swivel with a conical tube.
- We put a weight on the clip clasp and close the clasp with a cap. The safety clip is ready.
Carp rigs with feeder
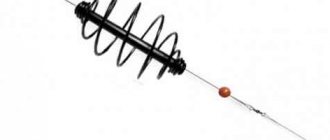
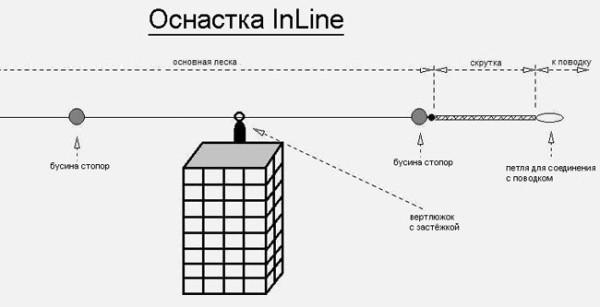
In-line
One of the simplest, most effective and popular options for installing equipment. Its essence lies in the fact that the anti-spinner passes directly through the center of the sinker. Inline is often used when fishing on a pond or small lake, because there is no need for long casting.
Another advantage, in addition to the simplicity of knitting, is the fact that when using this type of installation, the carp will encounter the mass of the entire pear-shaped sinker. Therefore, hooking will be very effective.
This is achieved due to the close location of the leash in relation to the center of gravity of the sinker. If you change its shape from pear-shaped to flat or even use a “bump”, then the inline will be suitable for fishing in the current.
Thus, when using different sinker configurations, this type of installation becomes unique. The main disadvantages of inline are unsatisfactory aerodynamics during casting and limited range.
Assembly method:
- The swivel is tied to the fishing line.
- After this, a rubber stopper is firmly tied.
- The line is pulled into the feeder.
- The fishing line is stretched 35 centimeters further and a loop is made from it.
- For a leash you need monofilament 10-12 centimeters long.
- Next, the hook, which has a hair rig, is attached.
Carp equipment In-line
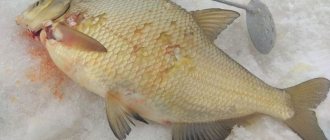
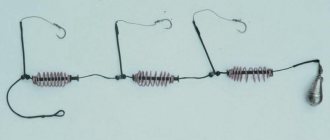
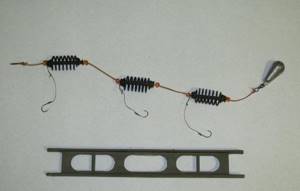
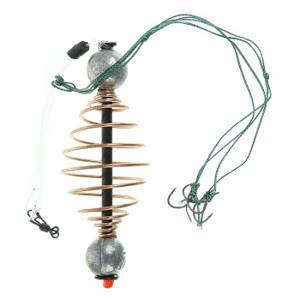
Killer of crucian carp and crucian carp
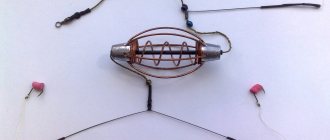
This equipment is a modernization of standard equipment equipped with a feeder weight. Usually these are 3 feeder springs that are connected by a fishing line. Each spring is equipped with a hook on a short leader on which the bait is placed.
There is bait on the spring. When submerged, it will begin to erode and attract fish. When eating bait, the fish will swallow the hook and, when trying to spit it out, will hook itself. All that remains is to get the prey by making a control hook.
You can construct a killer with your own hands. Advantages: high chance of catching prey and ensuring self-hooking. Disadvantages: imperfect structure and poor sensitivity.
How to assemble:
- A fishing line is passed through the springs.
- Using rubber stoppers, springs are fixed every 10 centimeters.
- The sinker is tied at one end of the fishing line.
- On the other there is a swivel equipped with a latch.
Equipment “Killer of crucian carp and crucian carp”
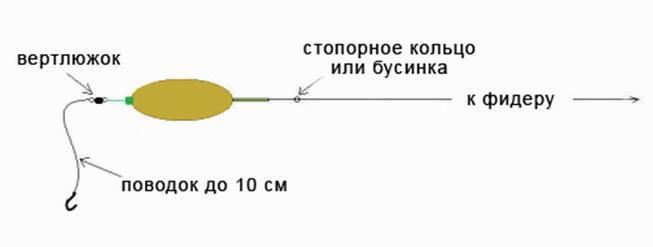
Blind equipment
The main difference from previous installation options is the length of the leash. It is very short, which allows you to increase casting distance and increase sensitivity.
Such a leash guarantees a quick hook, so the carp will not be able to react in time. Such tackle does not slip. Blind equipment is used when fishing at shallow depths.
Assembly order:
- The hook leader is tied to the swivel.
- The fishing line is passed through the silicone pipe and clip.
- Its beginning is attached to the swivel.
- The end is pulled to the main part of the line through a swivel.
Blind equipment
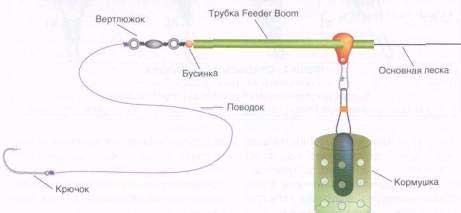
Equipment with anti-twist
This kind of installation for a feeder is perfect for fishing in strong currents, as the bite is transmitted well and the reel holds well. The main argument of opponents of equipment with an anti-twist is the presence of a foreign object that can scare the fish.
The assembly proceeds as follows:
- The monofilament thread is inserted into an anti-twist machine equipped with stoppers at the ends.
- The lower swivel is fixed, after which there is a leash with a hook.
- Mounting the feeder on a carbine.
- As a result, the long end should be in the direction of the leash.
Equipment with anti-twist
Helicopter
A feeder installation of this type will be optimal for fishing from long distances and in the current. Even in cases where a lot of effort and a lot of patience are spent during creation, the helicopter will pay off.
To create a montage, prepare:
- leadcore with a clutch and an igloo for it;
- two rubber beads;
- cargo;
- swivels;
- thermal shrink tube (length - from 40 to 60 millimeters);
- PVA bag.
Installation process:
- The sinker is installed on the shock leader.
- A coupling is put on the swivel and leader using a needle.
- The weight is attached to the thermal tube.
- The leash is attached to the swivel ring, the shock leader is attached to the monofilament.
- We must not forget about ensuring the free movement of the beads along the thread to the knot.
- The sinker and bait are poured into a PVA bag.
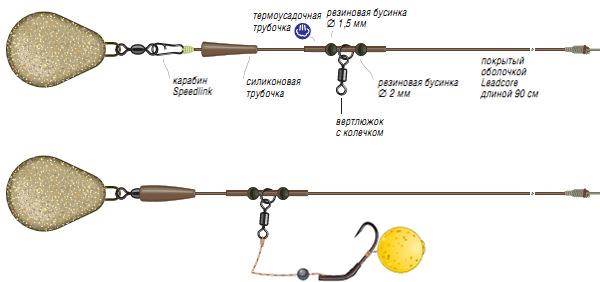
Equipment “Helicopter”
Safety clip
This installation technique is particularly popular. If it catches tightly, the weight will move away. To create a secure clip, you need a clip, a weight, a cone-like coupling, a swivel and a rigging house.
Assembly instructions:
- A monofilament thread is inserted into a 300 mm tube.
- Its end is threaded through the coupling and compressed into a tube.
- The swivel and coupling are mounted on a clip.
- The swivel is attached to the other end of the monofilament.
- Then it is threaded through the clip and attached to the leash.
“Safety clip” accessory
Harvester
There are almost no differences between this equipment option and a standard carp spring, but there are additional advantages:
- Firstly, the combine is easy to make.
- Secondly, casting can be carried out over long distances.
- Thirdly, the system is simply convenient.
Creation instructions:
- The springs are made cone-shaped. At the narrowest point their size should be no more than 2 mm, and at the widest point - 4 mm.
- The total length of the feeder is up to five centimeters.
- The eyelet is made on its upper part, the swivel is attached to it.
- The main line is tied to the swivel.
- 3-5 leashes, up to 8 centimeters long, are attached to the carbine.
- It then fits onto the swivel at the top.
- One of the leads is pulled out through the spring.
Harvester equipment
Flat method
A very famous installation option. The appearance of the feeder resembles a balalaika, one part of which is flat. The equipment is perfect for fishing in those reservoirs where the bottom is covered with marshy silt or deep algae, because it will not fall into them.
Flat feeders provide good casting accuracy and range. You can also make them yourself.
For this you will need:
- stainless steel wire;
- metal pin;
- plastic tube;
- the mold in which the lead base will be cast.
How to assemble:
- A bent wire with a pin is placed in a mold into which molten lead is poured.
- After cooling, the product is pulled out, the pin is removed, and a plastic tube is glued in its place.
Carp rig “Flat method”
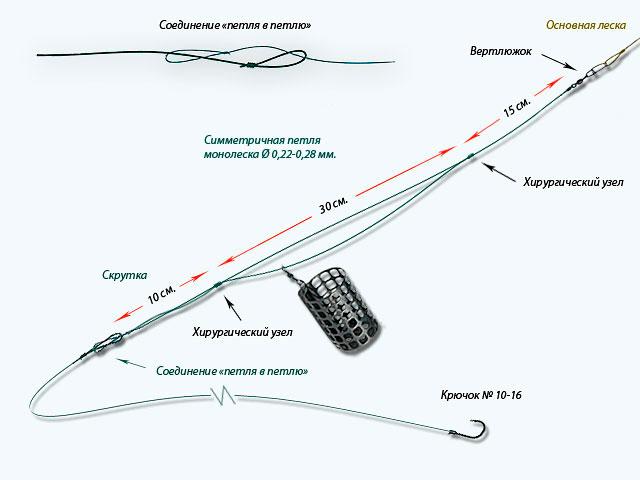
Symmetrical loop
If there was an official list of popular rigs for carp fishing, the symmetrical loop would consistently be in the top three. This is a popular feeder rig with the effect of self-hooking fish. As a standard, it is used in reservoirs where the current is very weak.
For self-assembly you will need:
- monofilament;
- a pair of swivels with clasp;
- sinker;
- feeder;
- fluorocarbon line for the leader;
- hook.
The assembly process has the following sequence:
- The main line is folded in half, and its ends are turned in any direction.
- This operation (twisting) is repeated ten times, after which a knot is made.
- The swivel is threaded through the fishing line, and a free space is left twenty centimeters from it.
- The knot is twisted, then the line is rolled up again. A second swivel is attached to its other end.
- At one end of the fishing line, a loop is folded and a leash 50 centimeters long is tied to it.
- The hook is attached at its tip.
Equipment “Symmetrical loop”
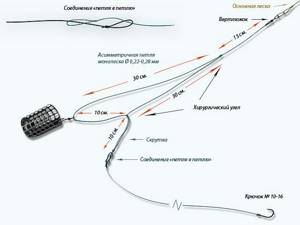
Asymmetrical loop
The main feature is high sensitivity and efficiency. It is usually used for fishing in large currents in a body of water. Materials to make: monofilament line, a feeder, a pair of swivels, a sinker, a number 8 hook and fluorocarbon line to create a leader.
To assemble such an installation you need:
- The beginning is the same as that of a symmetrical loop. The main part of the fishing line is folded in half, and the ends are wrapped in either direction.
- At the first end one of the swivels, a feeder and a sinker are attached.
- On the other there is a second swivel. This is where the knot is tied.
- A leash is attached and a hook is tied at its end.
Equipment “Asymmetrical loop”
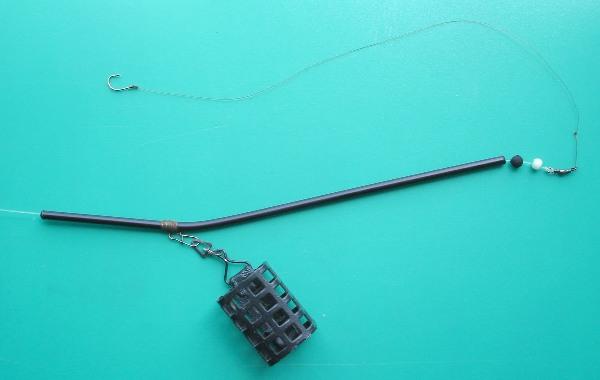
Paternoster
Almost the easiest equipment to implement, which at the same time remains very effective, is the paternoster.
For installation you will need:
- braided line with a diameter of 0.13 mm;
- monofilament with a diameter of 0.2 mm;
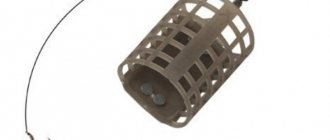
- “cage” type feeder, which is equipped with a clasp.
The choice of hooks will depend on the size of the fish:
- Number 12 or 15 are suitable for small fish;
- 7 and 8 - for a larger catch.
Build process:
- The line is wound onto a reel, after which it is pulled into the rings of the rod.
- Then the line is bent in half a meter from the end of the fishing rod. A knot is tied 20 centimeters from the edge.
- The sinker along with the feeder is attached to the resulting loop.
- A twenty-centimeter long segment is tied to the remaining segment. It is designed for a leash.
Equipment “Paternoster”
Hair hook rig
The main feature is that there is no need to put bait on the hook. It will go down the carp's throat when it swallows the boilie. You'll have to use auto hooking. Hair equipment requires a hook for installation, which must have maximum strength, and hair (soft and small in diameter).
The assembly proceeds as follows:
- The bait is attached at a distance of 2 centimeters from the hook.
- The hair is wrapped several times to be able to lengthen it later.
- The hair rig is ready!
Hair hook rig
Hair knotless installation on carp: step-by-step manufacturing process
With this type of installation, the carp is always caught by the lower lip. This is much less traumatic for the carp itself and reduces the likelihood of empty hookings.
Manufacturing:
- We take material for the leash. We cut off the length we need (25-30 cm) and thread it through the ring of the hook. You need to thread it from the tip side.
- Using a mounting needle, we put a piece of silicone tube onto the shank of the hook. We put it through the sting. The diameter of the tube must correspond to the thickness of the forend and fit tightly to it. We place it on the fore-end opposite the hook point. We thread a leash inside the tube.
- Make a loop at the tip of the leash threaded through the tube. Cut off the unnecessary part of the leader material. As mentioned above, the loop should be no more than 2.5 cm from the sting.
- We take a boilie, thread a loop through it using a mounting needle, and use a stopper to secure the boilie to the hair.
- We wrap the free part of the leash along the fore-end 6-7 times and thread it into the ring so that it comes out from the side of the hook tip. We measure the length of the leash we need and make a loop there. The hair knotless leash is ready.
Safety clip for carp
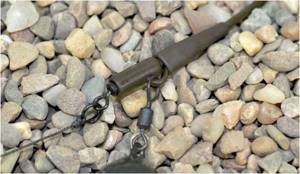
The main advantages of a safe clip are the ability to use virtually any sinker (in shape, size, and other parameters), as well as to throw the equipment as accurately as possible to the fishing point. Moreover, both at short or medium distances, and serious distances.
Another advantage: provided you correctly install the sinker in the clip, you will be able to “program” the future behavior of your equipment. Let's give examples.
Option #1 : for comfortable fishing for large carp, and even in difficult conditions, the sinker will be “shot” immediately after the bite.
Option #2 : the sinker will “unfasten” only in the most extreme cases (if it gets tightly stuck in snags or dense aquatic vegetation).
Main purpose: hard/solid bottom type (thin layer of silt allowed)
To install the safety clip, the following items are required:
- directly, the clip itself;
- cone coupling (naturally, to match the color of the water);
- heat-shrinkable tube up to 30 cm long;
- as well as a small sinker and swivel.
Advice: when installing any gear, try to select all the elements from one manufacturer so that they fit together well without any problems, creating a “monolithic” and reliable design.
Next, with the presented set of components, we do the following:
- First, we pull the tube onto the fishing line (i.e., right up to the clip).
- Then, we pass the fishing line through the cone coupling, and with a slight force we press / “hide” the whole thing into the tube.
- We snap the swivel onto the clip and also fix the coupling.
- We “connect” the leash through the wire eye of the clip and, in principle, everything is ready.
Better to see once than hear a hundred times. Therefore, in order to properly understand how the safety clip is installed, you need to take a couple of minutes to watch the video material.
A short summary: this method of attaching sinkers is very popular in the world of carp fishing, but (!) , unfortunately, many fishermen do not fully understand the essence of the mechanism of action of the clip. Therefore, they use it in the wrong place or completely incorrectly. In order for it to become a powerful weapon in your hands, you need to learn to accurately recognize the nature of the fishing point and creative thinking.
Carp installation “In-line”: step-by-step manufacturing process
This type of equipment has an excellent serif. Better than “helicopter” and “safety clip”.
Thanks to the special shape of the load with a shifted center of gravity, the carp is effectively hooked. However, this option does not have the best flight characteristics. It is not recommended to use it in silted reservoirs.
Manufacturing:
- We attach the swivel to the leadcore or main line.
- Next, from the other end of the leadcore we put on an “in-line” weight and drag it to the attached swivel.
- We put a silicone tube on the leash and attach the leash to the leadcore.
- We lock the swivel by pulling the silicone tube over it.
Leashes
Various materials that have appeared recently are used as leashes. The length of the leashes also varies and depends on the fishing conditions. And given the many sizes, shapes of hooks, and bait supply options, it is not possible to tie leashes in advance.
Rigid fishing line leash
The material for the leash is a very thick, rigid monofilament line or a specialized line for leashes. Rigid leashes have advantages; they help to prevent the carp from spitting out the hook, which in this case is more difficult to break.
But there are also disadvantages. The bait on such a leash does not lie “naturally” on the bottom. The leash is attached to the rig using a loop, which gives a certain freedom of movement.
Composite leash made from fishing line
To increase the “presentability and insensitivity” of the leash, it is made composite.
The main part of the leash is made of rigid fluorocarbon or monofilament fishing line, and the section of the leash directly next to the hook is made of soft braided cord.
Connect the hard line and soft cord using an Allbright knot or swivel.
Soft leash
Soft leashes are made from soft braided cord. Used during active biting, when the fish takes the bait while moving. The softness of the leash allows the fish not to be wary when taking the bait. But when using it, the likelihood of tangling and overlap increases.
Combined leash
Recently, the use of composite leashes has been gaining popularity, in which a small part of the hook is soft and the main part is hard. This avoids the leash becoming tangled, which is typical for leashes made of soft materials. At the same time, the soft part does not alarm the fish when biting.
For such a leash, a special soft material with a rigid braid is usually used.
Carp installation “Helicopter”: step-by-step manufacturing process
In this rig, the feeder is tightly attached to the main line (or leadcore). A leash with a nozzle is attached above the feeder or load. It rotates around the main line and can move along it. This design is used on reservoirs with a current.
Manufacturing:
- We take the main fishing line and attach the feeder tightly to its end.
- At the other end, we put a stopper on the main line and move it to a distance of 15-20 cm from the feeder.
- We tie a swivel to the leash and thread the main line into the free eye of the swivel.
- We put the second stop on the main line and place it a couple of centimeters above the first.
- We knit a loop at the end of the rig.
Simple hair installation
The simplest installation of rigs, with which almost all carp fishermen begin their study of tying rigs, is a knotless hair rig. Soft material is used as a leash. The nozzle is not attached to the hook, but to a special short leash (a continuation of the main leash) next to the hook.
Manufacturing
- At the end of the leash we make a loop for attaching and holding the boilie.
- We thread the free end of the leash from the forearm into the eye of the hook.
- We make several (5-7) turns around the forend and the end of the leash with a loop pressed to it.
- We thread the free end of the leash back into the eye of the hook and tighten it.
- Place a heat shrink tube onto the eye of the hook.
- At the free end of the leash we make a loop to connect to the main fishing line.
Tips and tricks
- Elements of equipment should be minimized in terms of their strength. There is no point in fishing with gear designed for ten-kilogram carp in a reservoir where they do not grow more than one or two kilograms. But it makes no sense to use too weak gear in places where you can catch respectable specimens.
- The color scheme of the fishing line, sinkers and other elements must match the environment in the pond. There are many shades of monofilament fishing line, which allows you to choose the right one. There is also a flucarbon line - it is almost invisible in the water.
- Elements of equipment should not have any odor. Carp, like other fish, has an excellent sense of smell. Therefore, strong odors can scare away fish.
- The equipment should lie tightly on the bottom. Otherwise, it will be carried away by the current, and the likelihood of noticing a bite and hooking the fish correctly is reduced.
- Practice is the best teacher. Try different types and combinations of rigs. Customize the gear for yourself. Then achieve excellent results in this type of fishing, which some have come to call “carp fishing.” And don’t forget to take care of the fish you catch and the environment.
Feeder equipment
Feeder carp fishing allows you to combine all the advantages of both a fishing rod and a spinning rod. Inertia-free reels and a rigid rod inherited from a spinning rod allow you to significantly expand the possible fishing area thanks to the longest and most accurate bait casts. A heavy feeder (or a feeder with a sinker), which has been transferred into the design of the feeder from the donkey, allows you to effectively lure fish to the fishing spot.
Feeder rigs have recently gained popularity in carp fishing. One explanation for this is the fact that every day there are more and more options for purchasing cheap feeder gear.
The design of feeder gear for carp (more precisely, its surface part) is not very diverse. Since carp is a large and strong inhabitant of reservoirs, it will require sufficiently strong tackle.
Usually, for fishing on rivers with currents, it is recommended to use rods of the medium-heavy or heavy class, about 3–4 m long. The test of such a rod is from 100 to 150 g. The action is medium.
When fishing in lakes or when fishing in reservoirs with very slow currents, where the fish are less active due to their lifestyle, the requirements for gear are less serious - a rod no more than 3.5 m long, medium class, with a test weight of no more than 100 g is sufficient.
The feeder reel used for carp fishing is a regular spinning reel with a ratio of at least 5.0 to 1. The spool capacity of such a reel should be about 4000–4500. The thickness of the fishing line when fishing for carp should be at least 0.3 mm (with the indicated capacity this will correspond to 120–150 m of fishing line).
In order not to lose the feeder when casting, it is advisable to use reels equipped with a clip on the spool. If there are fears that a large specimen will tear the tackle, break the form, or simply drag the feeder into the water during a sharp bite, you should use a reel with a “baitrunner” system.
But the part that is under water can have a huge number of design options. Which one should be used depends on the nature of the reservoir and the behavior of the carp.
Equipment for carp fishing or carp rigs, currently used with feeders, can be assembled according to various schemes.
The most commonly used is the classic paternoster or its modification in the form of a Gardner loop.
Specialized types of equipment are, for example, inline and helicopter. The first is mainly used in stagnant reservoirs, the second - in strong currents. And also one of the advantages of the “helicopter” is that it can be used for catching carp on a muddy bottom. In this case, the feeder is equipped with a wide lower part so that it does not sink too much into the silt.