Fly fishing gear for beginners
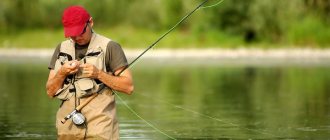
Fly fishing gear and catching fish with it is a fascinating and interesting activity that is characterized by exciting emotions and excitement.
Fly fishing is not difficult, but experienced fishermen consider it an art. Even in ancient times in England, aristocrats loved to fly fish, and today this type of fishing is popular in many countries around the world. You can use fly fishing gear to catch fish:
Fly fishing tackle consists of the following components:
- Rod.
- Coil.
- Cord.
- Additional cord (backing).
- Connector.
- Undergrowth (leash).
- Front sight.
- Backing is simply a cord that is wound onto a reel in order to increase the level of line on the reel with something.
- The fly line is a heavy piece of structure that flies well.
- Leader piece of main line
- Leash made of thinner fishing line
Without looking for specific examples, let's watch a good video that eliminates ignorance regarding the composition of fly fishing gear.
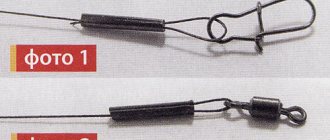
Installation of fly fishing gear
When assembled, such gear has the following appearance.
The numbers indicate the types of nodes that are used to connect the components. The most common type of knot for attaching cord or backing to a reel is the arbor knot.
As you can see from the figure here, this knot is quite simple. In this case, another knot is additionally tied at the end of the cord or backing in order to increase the strength of the connection.
Next you need to tie the cord to the backing. For this purpose, the use of a special albright knot is provided.
Tie it like this:
Fly fishing gear components
Let's take a closer look at each of the components of fly fishing gear.
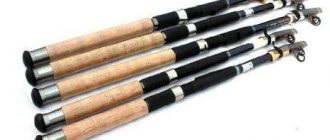
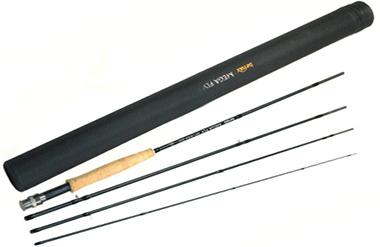
Fly fishing rod
Rods are made of bamboo, carbon fiber and fiberglass.
For beginner anglers, the best choice is a carbon-fiber rod, two-armed, class 6 or 7. It can withstand the weight of fish from 50 g to several kilograms. You need to make sure that the rod is not too flexible. Be sure to cover the handle with cork, leather or rubber.
The price of a fishing rod depends on the manufacturer and ranges from $60 and above. For 2000 rubles you can choose a very good option, which, if treated with care, will last a long time.
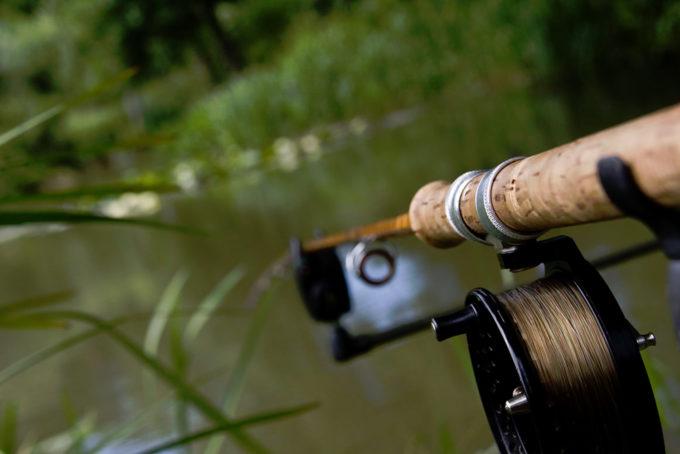
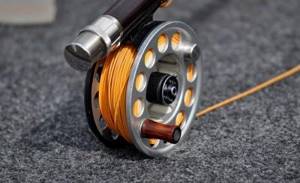
Coil selection
There are several (three) types of reels: ordinary inertial, automatic and multiplier. For beginner fly fishers, a regular reel model is best suited. Be sure to ensure that the brake is adjusted. It can be equipped with a ratchet. An important thing in choosing a reel is that the class of the rod must match the class of the reel.
The price of a good reel will vary from 1500 rubles and above.
Cord and its features
The most expensive element of fly fishing gear is the line. Just like the reel, it must correspond to the class of the fishing rod. Everything must be in balance. , a floating model cord is best suited (it will be easier to cast). The best color to choose is white . It will be clearly visible on the water.
Additional cord (backing)
The additional cord is intended for training, as well as for catching large fish. For a beginner angler, it is best to have two sets: one for training, the other for fishing. The first option can be chosen from cheap models.
Connector
A connector is a fly fishing attribute that allows you to easily disconnect the line from the leader.
Leash (undergrowth)
An important part of the fly fishing equipment is the leader. Thanks to it, a smooth transition from the cord to the front sight is achieved. You can buy undergrowth or make it yourself at home. The length of the undergrowth depends on the place of fishing and casting. Usually it is 2 or 2.5 meters.
The leash is an equally important part of fly fishing. After all, it is to this that the hanging fly is tied. The first leash should be shorter (50-60 cm), and the second longer (100 cm). This is convenient, the leashes will not get tangled. If this happens, in order to untangle the fly faster, you need to make leashes of different colors.
Front sights
For novice fishermen, training should be carried out frequently, and tampons (cotton wool) should be tied on instead of flies. If the craft is mastered, then it is best to have two types of flies: wet and dry. Size is also important for beginners: you need to start with a size of 3.5 or more.
Remember: flies wear out very quickly. To extend their shelf life, you need to thoroughly dry the flies after each fishing trip.
The average price of one fly is from 30 to 60 rubles, but, of course, you can also find works of art with additional zeros in the price.
Fly fishing tackle - Rod
This is the basis of fly fishing gear. Depending on the power, fly fishing rods are divided into 14 classes.
Class 1 and 2 rods are the lightest. If we draw an analogy with the spinning classification, then these are ultralight tackles designed for catching small fish in small bodies of water. The average length of such rods is about 2 meters.
This option is not for a beginner, so you should not consider class 1 and 2 rods as your first tool, even if you are a big fan of delicate gear.
Class 3 and 4 are analogous to light spinning rods. In general, drawing an analogy with spinning rods is not entirely correct (fly fishing is a completely different fishing), but for your better understanding, I decided to go this way.
Important! These rods are suitable for fishing with dry and wet flies, as well as nymphs.
The length ranges from 2.4-2.7 meters. In principle, class 4 rods can be considered as the first gear if you plan to catch relatively small fish at short distances.
Class 5, 6 and 7 fly rods are the most versatile tools that I would recommend all beginning fly fishers to pay attention to.
They can be used for fishing with all types of flies; they can easily cope with nymphs and streamers measuring 4-7 cm. The average length of the rods is from 2.6 to 3.1 m.
With such tackle it is easy to make fairly long casts, it is pleasant to fish for small fish, but at the same time, with a 5-6 class rod, you will feel confident when fishing for large chub, ide or trout.
As for rods of class 8-14, these are powerful gear designed for catching large fish with heavy nymphs and large streamers.
In the conditions of our reservoirs, their use is impractical. Buying such gear only makes sense if you will be catching salmon, taimen, sea and ocean predators.
Rods for catching large fish
Fly fishing rods are also distinguished by their action. Let me make a reservation right away: do not try to choose a rod structure based on your spinning experience (especially if you fished heavily with jigs).
The structure of a fly fishing rod works exclusively for casting, and not for providing wiring and tracking bites.
Wiring in fly fishing is done with a cord. Through it, the fisherman determines when the bait is in the fish’s mouth. Therefore, fly fishing rods must have a whip action.
Buying an expensive fly rod as your first fishing tool doesn't make any sense. Pay attention to budget and mid-budget models of class 5-6, costing up to 100 USD.
Learn how to handle such all-rounders first, and when you begin to understand some of the intricacies of fly fishing, you can think about buying an expensive fishing rod.
Of the specific models that are often found on sale, I can recommend the following fly fishing rods:
- SALMO Diamond FLY class 6/7 2.85 m Price: 1850-2000 rubles;
- Mikado FLY CAST 270 #5 Price: about 1500 rubles;
- DRAGON TEAM muchowka 2.90 m AFTMA 5-6 Price: 5200-5500 rubles;
- SALMO DAIMOND SKY FLY 5/6 class 2.70 m Price: about 2000 rubles;
- VISION CULT FIBER 5-6 class 2.28 m Price: 5500-6000 rubles.
Collecting fly fishing
If you have purchased all the components, you can start assembling the fly fishing rod.
- The first thing you need to do is attach the reel to the rod.
- Second, you need to tie an additional cord to the reel. This can be done using a trusted node.
- The third stage of assembly is to wind the cord onto a reel.
- Fourth, you need to attach a connector to the cord.
- Fifth stage - use a special loop to attach the undergrowth and connector.
- The last stage of assembly is to attach several flies, or leaders with another bait.
Construction of forms
The structure of a fishing rod intended for fly fishing is a very important characteristic that determines its performance when casting bait, hooking and landing fish. Based on their structure, these forms are divided into four types:
- Quick build. Such forms bend in their upper part under load. Most convenient for making long and accurate bait casts. To unlock their full potential, they require the angler to have refined casting technique. Such fishing rods are chosen by experienced fly fishers.
- Medium-fast action. Bending under load occurs in the upper third of the length. Requires tougher and faster work. Designed for heavier baits.
- Medium build. These rods bend in the upper half. They are considered the most universal, suitable for most baits and fishing conditions.
- Slow build. These forms, when swung sharply and when played, work with their entire length, bending approximately equally from the handle to the tip. It is most rational to use them in calm weather, at medium distances. They require not sharp, smooth movements for accurate casting.
Most often in the hands of fly fishermen you can see forms of medium or medium-fast action, which are considered the most practical and versatile.
To collect gear, you need to acquire a rod, reel, fly cord, leader and leader, and flies. This is the most necessary thing that fly fishing requires for beginners, not to mention the ability to use this set.
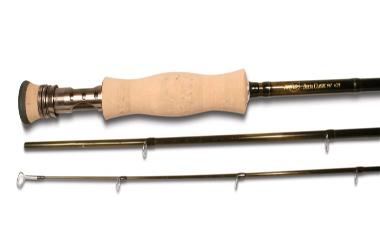
Rod
Fly fishing rods or blanks are usually divided into classes. As the class increases, the strength of the blank increases, and the rod is able to withstand greater loads. It is best to take your first steps in fly fishing with a 6-7 class fishing rod. Its strength is enough for both 200 gram grayling and 4 kilogram lenok.
Fishing rods usually consist of 2 or 4 legs: Two-piece models are more reliable because they have fewer connections, which reduces the number of breakdowns. Four-piece fishing rods have the advantage of being longer. The form can be made from different materials:
- bamboo
- fiberglass
- carbon fiber
You can successfully fish with a rod made of any material, as long as it is not too flexible. Particular attention must be paid to the handle. If the material used is leather or rubber, then it is better to refuse such a fishing rod. Only a cork handle is worthy of consideration for fly fishing.
Coil
There are three types of reels: ordinary inertial, automatic and multiplier. For beginner fly fishers, a regular reel model is best suited. Be sure to ensure that the brake is adjusted.
Due to the fact that fly fishing is an active type of fishing and a large load is placed on the reel during operation, the following requirements are imposed on the reel for a fly fishing rod:
- ease
- small size
- simplified design (the simpler the design, the more reliable)
- dynamic balance of the rotating elements of the coil
- anti-corrosion material or coating (especially for sea fishing reels)
According to its classification, the reel must correspond to the class of the fishing rod on which it will be installed.
Fly line

The cord, like the reel, must also correspond in class to the fishing rod. Increasing the numerical sign for the cord class implies increasing its weight. The inconsistency of the assembled elements will certainly affect the quality of casting.
The main difference between spinning fishing and fly fishing is the principle by which the bait is delivered to a promising fishing spot. An artificial fly lags behind the spinners in weight and there is no chance of casting it without weighting, so the cord acts as a weighting agent. There are two types of cords:
- single-cone (for long-distance casting)
- double-cone (for casting bait over short distances)
The geometric characteristics of the cord are indicated in Latin letters with the following designations:
- Cord DT (Double Taper, double cone) - represents cones that are absolutely similar in symmetry with a cylindrical part located at the base in the middle of the cord. It is used for delivering bait over a short distance, in conditions when the fish is especially cautious and refuses to take the fly, as well as for teaching beginners in fly fishing.
- WF cord (Weight Forward, torpedo) - the weight is concentrated in the part of the cord closest to the bait (the so-called head). The design of this type of cord facilitates casting bait over long distances; it is used in strong gusts of wind or for casting large flies with a large volume.
Leader or leash
The correct selection of these components is very critical. The undergrowth, as the logical conclusion of the cord, should be conical. This is necessary to smoothly lower the fly onto the water. The leash should be thin and unnoticeable, but strong enough to land fish.
In the past, conical leaders were made by anglers by joining lines of different diameters together. To maintain equal rigidity of the entire undergrowth, which is very important, it is necessary to use segments of fishing line of the same type and from the same manufacturer.
The length of the leader should be slightly less than the length of the rod. Knots connecting sections of fishing line often lead to tangling of the gear. With the advent of conical undergrowth on the market, this problem has disappeared. Ready-made leaders are a monofilament conical piece of fishing line of a certain length and thickness.
It is imperative to check the condition of the fishing line on the leash after a series of casts for any knots. They reduce the strength of the fishing line, so such undergrowth must be replaced immediately.
Connector
A connector is a fly fishing attribute that allows you to easily disconnect the line from the leader.
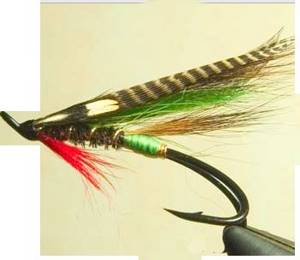
Their variety is impressive. They are divided into wet and dry. Wet ones are used when fishing in mid-water, dry ones when fishing on the surface. Experienced fly fishermen make their own flies, but a beginner should have a set of ready-made dry and wet baits.
Collecting fly fishing
- The first thing you need to do is attach the reel to the rod.
- Second, you need to tie an additional cord to the reel. This can be done using a trusted node.
- The third stage of assembly is to wind the cord onto a reel.
- Fourth, you need to attach a connector to the cord.
- Fifth stage - use a special loop to attach the undergrowth and connector.
- The last stage of assembly is to attach several flies, or leaders with another bait.
Practical recommendations for assembling fly fishing gear.
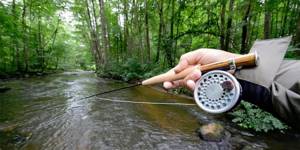
Fishing technique
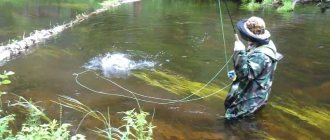
The most important point in fly fishing is casting the line with the fly. This technique requires persistence and time. Repeated training will give positive results in the end.
When casting from a reel, part of the cord unwinds, which must be held with your left hand. With your right hand, move the rod back behind your head and then forward. Movements forward and backward should be smooth and slowly increase. When the maximum is reached you need to cast the fly.
A fly that has fallen into the water imitates a living animal. An important aspect at this stage is that the leash matches the speed of the water flow. If not, then the fish may become wary and there will be no bite.
The best option for a beginner is to go bleak fishing . This fish bites on any bait. Another advantage of catching bleak is that you don’t have to cast a fly fishing rod far, because this fish is not a shy fish. The bleak bites well, with passion.
The second important stage of fly fishing is retrieving the bait. It must be remembered that the angler’s actions will vary depending on the bait (fly) and the area where fishing takes place (presence of current). Despite this, the cord must be well tensioned under all circumstances. This is to hook the fish when it bites.
The third important point is landing the catch (fish). When fly fishing, there is no need to rush, you need to tire the fish first, and also make sure that the line does not become loose or tangled. Be sure to have bait with you if you have information about catching possible giants.
Fly fishing. Assembling fly fishing tackle
Fly fishing is a rather specific type of fishing. It is based on attracting fish, which prefer to feed on various insects that have fallen into the water.
A fly fishing rod also differs from all forms designed for fishing by other methods, although from a distance it very much resembles a regular spinning rod. Some people call it that - spinning rod for fly fishing. There are both telescopic (less commonly) and plug-in ones.
The effectiveness of fishing with this method depends on how and what type of fly fishing rod to choose for beginners and experienced fly fishermen. Here are the most obvious distinguishing features of a fly fishing blank:
- Reel seat location. Here the reel is attached at the very butt, below the handle.
- Dimensions and shape of handles. Depending on the class of rod used for fly fishing, they can be very different.
- Fly fishing poles have their own original classification, similar to the division of spinning forms according to test characteristics, based on the properties of the cord used and the intended trophy.
Otherwise, such forms are characterized by parameters characteristic of other types of fishing rods. They differ in:
- Length;
- I'm building;
- Material of manufacture.
In order to better understand what a fly fishing rod is, let’s define their main distinguishing parameter – classification.
It is important to start choosing a fly fishing rod by determining the class to which it belongs. The scope of application of the form depends on this parameter. Classes of fly fishing rods are determined depending on the weight of the cord used in the equipment.
Important! When classifying, only the mass of the first nine meters of the cord is taken into account. In this case, the weight of the cord is more important than the weight of the bait used, which is often very light.
The peculiarity is that the cord does not have the same diameter along its entire length, and when thrown, its mass is not constant.
Since their inception, fly fishing forms and their classification have constantly changed. Initially they were divided according to power into fifteen classes. Now there are already 21 classes of fly fishing forms. They have numerical designations from “000” (the lightest) to “18” (the heaviest).
Let's look at them in a little more detail:
- Rods of classes from “000” to “2”. These are the lightest and most sensitive blanks. Designed for catching small fish with dry and medium-sized wet flies in small rivers and streams. They are short in length and light in weight. They are rarely used due to the difficulty of controlling the tackle with such a light form. Even a slight wind can change the trajectory of the cast and the performance of the bait.
- Rods of “3” and “4” classes are considered transitional between light and medium blanks. They are recommended for beginner fly fishers to learn fishing techniques.
- The average fly fishing rod has classes “5” and “6”. These are the most common forms with a length of more than 2.1 m. They can be used for catching medium-sized fish in various conditions using all kinds of flies, streamers and other baits up to 5 cm in size.
- Classes from “7” to “9” are assigned to forms intended for hunting large fish. The cord used already has sufficient weight for long-distance casting of large artificial baits. But casting dry flies will be difficult. They are intended for fishing in large bodies of water: rivers, large lakes, reservoirs, and in the coastal sea zone.
- Forms “10” class and higher are intended for catching large fish in marine conditions. The largest baits and the heaviest lines are used. The butt of such a form must be equipped with a mushroom-shaped plug to allow it to rest against the belt while fishing for trophy specimens. Often, anglers modify fly fishing rods of such classes with their own hands, making their handles and stops more ergonomic.
We collect fly fishing tackle. For this you will need a fly line, backing, leader, and fly rod.
This video will show a detailed report for beginners on how to properly assemble a fly fishing rod.
Each fly fishing rod has a limit on the weight of lures. To classify according to this parameter, there is a division of fishing rods according to AFTMA (Fishing Products Manufacturers Association).
Each form is marked with a number from 1 to 15. The higher the class of the rod, the heavier the bait can be used. A novice fisherman should choose classes 5-7, which will provide comfortable fishing with small flies and medium-sized streamers.
For sea fishing, models of 12-15 classes are recommended. It should be understood that the rods become heavier as the class increases. Some manufacturers, in order to reduce the weight of the blank, thin the walls. At the same time, the rod becomes weaker, so it is better to give preference to proven companies.
Classic fly fishing is surface dry fly fishing. Later, when such fishing became widespread, they began to fish with wet flies, nymphs, streamers, and so on. Other baits: poppers, wobblers, spinners, are much less commonly used for this type of fishing, but are still used.
There is a significant difference in fly fishing; it is a completely special way of presenting bait. The fly fishing equipment includes a cord that works like a whip. Using a fly fishing line, the bait is delivered to the fishing spot. Thanks to the presence of this cord, a unique casting technique is achieved.
Fly fishing for beginners includes mandatory training in casting. This is where the first fly fishing lessons begin. Training can be independent; it will be useful to train first on land, then on a body of water. But as I already said, the best option is an experienced instructor.
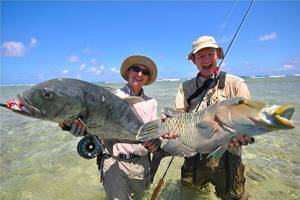
With fly fishing you can catch fish from the salmon family, grayling, roach, sorog, dace, ide, crucian carp, carp; perch and pike are often enough for the fly.
Leader or leash
It must be remembered that movement and play of the fly are very important. In particular, it must correspond to the flow of water.
When choosing a fish with which to begin your improvement, it is recommended to pay attention to the bleak. Catching it is much easier than for other types of fish.
An important point for achieving success in fly fishing is the correct execution of fishing. First the fish needs to be tired. Then you need to move it, making sure that the tackle does not sag or get tangled.
How to avoid mistakes as a beginner fly fisherman
- To learn how to cast a fly rod correctly, it is best to take a few lessons from a real professional.
- The bait should be chosen depending on how the fish feed in a given body of water.
- It is possible to master fly fishing only on a river or reservoir.
- In your free time, train and train again.
It is impossible to immediately learn the skill of fly fishing. Hard work and training will give good results in the end. This type of fishing is considered more sport than commercial. Mastery comes only with experience and the desire to achieve it.
zusha-fly.ru
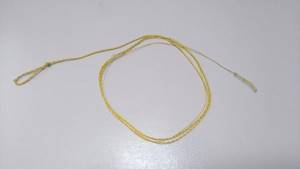
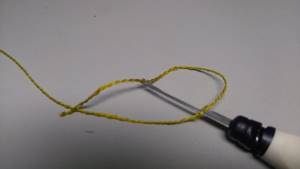
While fishing with friends from Bryansk yesterday, our homemade twisted leaders (more often called simply twisted leaders) aroused great interest.
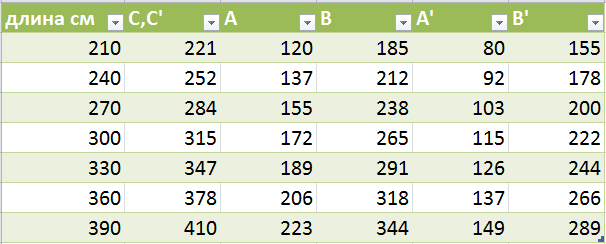
Since the last publication, additional information has appeared, which we will try to present in this article. To work, you need a board with four pegs and three hooks, a drill with reverse and a couple of different hooks for twisting. The length of the board is determined based on the fact that when twisting, the length of the undergrowth is reduced by 10%. Those. for a 2 meter long underbrush you need a board longer than 2.2 meters. I used two plastic ceiling curtain rods as the base. In the photo there are points “C” and “C'” - “thick part”. Distances are calculated from the thin part. Depending on the configuration of the undergrowth, we arrange the pegs to the required lengths. Each of the two parts of the undergrowth consists of three knees. By arranging the pegs at intervals we get a taper. I made the pegs from PVC tubes and screws with a wide head. The head of the screw is placed in the groove of the cornice, then moved to the desired location and tightened. The location of the pegs can be taken from the table.
The material for torsion in the simplest case is 0.18 fishing line or thread. Winding the line starts from the “thick side”. We make the simplest loop, throw it on the hook and wind 5 full turns with constant tension until the first peg (“A”), this will be the first loop. 5th turn pull up to the 2nd peg (“B”). Next comes the subtlety. We make the next two turns around the second peg and into the first loop, this will be the second loop (photo with the spool). We start the second turn on the third peg, and in the second loop. We make a loop at the free end of the fishing line and put it on the third peg (“C”). Repeat with the second side.
We clamp a thick hook into the drill. Using a hook, carefully remove the loop from the “thick side” hook. Carefully remove the loops from the two remaining pegs. We tighten it, and if we understood the previous paragraph correctly, then the weaving will not fall apart.
Turn it up to the -10% mark. Remove the hook from the drill and secure it temporarily.
We clamp the thin hook into the drill and repeat with the second leg (in the same direction) to the same mark.
We transfer the first twist to a thin hook. Turn on the drill in reverse and turn it to the ~ -5% mark.
The resulting undergrowth will be slightly twisted and will need to be relaxed.
Now about sealing the ends: it is better to use a simple perfect knot for the thread. For Shorb Loop Technique fishing line. The thin part can be tied into a perfect knot or ring.
Briefly, Shorb Loop Technique: we pass the twisted part into the loop that was removed from the hook and we get a “tight loop”. It is adjustable to the desired size. Next, insert a hook between the strands and make a loop, as in the photo. We pull it out and get a beautiful loop without a knot.
In the photo, the knot appeared after the experiments; in a simple case, in its place there will be a loop from the hook.
Results of work and “peg”
Datalife Engine Demo
On a light, sultry afternoon, the bite seems to finally subside. The floats and bells freeze. However, we see that the fish, having migrated closer to the surface, “plays” there, excitedly hunting for insects hovering above the water, and there is zero attention to the various exquisite baits we offer. Even a grasshopper, sent by a float rod, receives only a slight tug at the small change. Connoisseurs will say that it’s all about the “presentation” of the dish, and they will be right. But how to simulate an “accidental” fall of an insect? Yes, you just need to take a very sporty fishing tool - fly fishing - and the door to the midday bite will be open.
The structure of fly fishing and casting techniques are described in detail in many publications. But how, for example, to create an undergrowth or make a homemade fly cord? Anglers know that you won’t find branded fishing line in sporting goods stores during the day. Let's try to fill this information gap. Schemes of two undergrowth options are proposed.
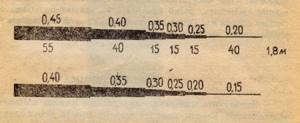
Wonderful advice: how to make a double-cone fly fishing line at home, was given by V. Makarov in the book “Fly Fishing”. To make twisted line from silk threads you need: 10 spools of sewing silk (“silk on a tube”), impregnating substances, scissors, nails and a piece of wire. The line will have two descents, 27 m long, weighing 20-25 g. Its color will depend on the color of the threads. You can make it two-tone by choosing soft colors, for example, brown, dark yellow, dark green. The scaffolding will consist of 9 bends of 3 m each. Its diameter will change abruptly every 3 m. This does not affect the purity and casting distance. A diagram of the scaffolding indicating the number of threads in the knees is shown in the figure.
Work on twisting the scaffolding begins with two nails being driven into a board about 3.5 m long at a distance of 340 cm from one another: the right one with a head, the left one without it. The third nail, also without a head, is driven in 20 cm from the left in a straight line between the first and second nails. After unwinding the bobbin, tie a loop at the end of the thread and put it on the first (with head) nail. After slightly pulling the thread, it is secured with the same loop on the second (leftmost) nail and cut off. In the same way, three more threads are pulled onto the nails. Then take a piece of wire 10 cm long, 1.5-2.0 mm in diameter and bend a hook at the end of it.
Sukaev Zufer Ibragimovich
- Profession geologist, topographer, surveyor, teacher
- Education School 49Novocherkassk Geological Exploration CollegeNovosibirsk Institute of Geodesy, Aerial Photography and Cartography Engineers (NIIGAiK)
-Music
—Categories
- +++ THIS IS WORTH WATCHING. (18)
- sensations, finds, inventions (5)
- EDUCATIONAL VIDEO!! (2)
- music (0)
- +++ GIF - pictures== (83)
- congratulations (1)
- decorations (3)
- animations-gifs-glitters (49)
- Emoticons (3)
- snow stars (8)
- humor-jokes (4)
- frames (4)
- creating gifs (6)
- flash pictures (16)
- arrows, transitions, frames. (2)
- +++ JPG - photo== (48)
- sunsets (2)
- winter (2)
- summer (1)
- insects (2)
- sky-clouds (4)
- cool photo (1)
- nature (17)
- birds, animals (4)
- flowers (15)
- +++ PNG - pictures== (78)
- Streets, houses, forest and much more (1)
- backgrounds (21)
- CLIP ART (9)
- birds, animals, (3)
- frames (9)
- scrap sets (7)
- decorations (5)
- flowers (25)
- +++ PNG-GIF-JPG Backgrounds== (107)
- cliparts (22)
- BackgroundsWallpapersPaintings (19)
- +++ SITE ADMINISTRATION (21)
- problems-questions (21)
- +++ there was such a country: USSR (12)
- postcards-various-childhood (5)
- miscellaneous (7)
- +++ ATTENTION! Fraudsters!== (27)
- Attention-viruses (10)
- YOU HAVE BEEN HACKED (2)
- attention-AIDS (1)
- Gentlemen! This is too much. (6)
- +++ ALL ABOUT BLOGS== (111)
- link addresses (18)
- earnings (5)
- open your website (1)
- decoration (42)
- useful little things (77)
- useful sites (20)
- +++ CHILDREN'S PAGE== (69)
- video films (7)
- GAMES (general) (42)
- Let's play with water.. (3)
- entertainment (27)
- coloring pages (4)
- shadow theater (2)
- +++ LIKBEZ == (103)
- Note for dummies (84)
- Aibolit for computer. (5)
- computer - exploring possibilities (40)
- +++ MEDICINE-folk recipes== (89)
- “arthrosis-osteochondrosis, etc.” (9)
- energy, health (1)
- reference books, encyclopedias (1)
- tests (2)
- Attention-AIDS (1)
- bad habits (4)
- beauty, health (10)
- pressure reduction (7)
- medicinal herbs (16)
- +++ MUSIC== (39)
- musical cards (3)
- +++ HOLIDAYS== (3)
- new year (2)
- others (1)
- +++ JOKES. Cool! (51)
- VIDEO (10)
- Putin and Medvedev (6)
- various tests (3)
- hidden images (2)
- smart speeches!! (16)
- +++ PROGRAMS== (45)
- GIMP - program (4)
- Antiviruses (8)
- dating browsers (9)
- recommended programs (17)
- photoSALON (2)
- +++ PSYCHOLOGY (31)
- signs, superstitions (1)
- VIDEO (13)
- +++ FISHING== (18)
- fly fishing (1)
- proverbs and sayings (1)
- recipes (3)
- fisherman's bowler (4)
- fish of our waters (3)
- homemade products (5)
- tips for beginners (2)
- +++DO IT YOURSELF== (144)
- Live and learn!! (76)
- create a video clip (2)
- anything you drink (5)
- homemade preparations (29)
- from tires (2)
- Cooking recipes (38)
- interfloor stairs (2)
- miscellaneous-funny (12)
- different frames (4)
- scroll frames (5)
- DIY repair (1)
- create your own test (2)
- flash comments (1)
- bread machine (1)
- +++ SCHEMES FOR DIARIES (76)
- BACKGROUND - Backgrounds, backgrounds, backgrounds. (2)
- how I create such pictures (2)
- seamless pictures (3)
- mine are copyright (59)
- mine are copyright (many) (9)
- photos for diagrams (10)
- What is my page size? (2)
- +++ PHOTOSHOP== (107)
- gradients (4)
- brushes (7)
- Cliparts for Photoshop (5)
- translation of PHOTOSHOP commands (2)
- color code tables (6)
- screen photo (1)
- photo albums-design (8)
- photoshop - lessons (67)
- watch (8)
- templates (6)
- fonts (4)
- +++ ENCYCLOPEDIA LiRu (73)
- worth watching (9)
- review-Diaries on LiRu (2)
- design usefulness (64)
- +++ ENCYCLOPEDIA OF SEX== (31)
- design and decoration (3)
- EROTICA (1)
- +++MESSAGES - on any topic (96)
- everyday affairs (30)
- zodiac signs (1)
- pictures on RADICAL (1)
- my garden-dacha (4)
- on the other side of life (2)
- laundry soap (19)
- indoor flowers (3)
- killer flowers (1)
- Healing properties of trees. (1)
- Yandex photos (3)
- +++ AKVIS PROGRAMS== (321)
- general data (21)
- akvis - Coloriage (46)
- akvis - Enhancer (32)
- akvis - MultiBrish (11)
- akvis - Noise Buster (12)
- akvis - Retoucher (11)
- akvis - Sketch (45)
- akvis – ArtSuite (28)
- akvis – ArtWork (18)
- akvis – chamelion (33)
- akvis – Decorator (11)
- akvis – LightShop (25)
- akvis – Magnifier (3)
- akvis – NatureArt (17)
- akvis – SmartMask (9)
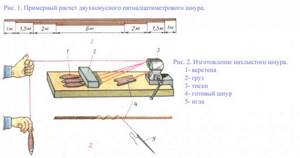
HOMEMADE FLY CORD
You can make a durable fly fishing cord for casting a fly at a target yourself from threads. To do this, you need a vice, spindles according to the number of threads, a weight for holding the threads twisted on the spindles, waterproof glue, a needle with a large eye for sewing in the ends of the threads when forming cones, a rubber gasket from motor chambers (for the jaws of the vice, so as not to damage the threads).
The rules of casting competitions regulate the length and weight of the cord: for men - a minimum of 15 meters and a maximum of 38 grams, for women, respectively, 13.5 meters and 30 grams.
In Fig. 1 shows an approximate calculation of a double-cone fifteen-meter cord with a taper of 4.5 meters (the length of threads with a diameter of 0.4-0.5 millimeters on each segment is indicated). Considering that the threads are shortened by about 30 percent when twisted, I wind them on spindles with a margin: two spindles of 18, one spindle 16, one spindle 12 and one spindle 9 meters.
I clamp the ends of the threads of two 18-meter spindles in a vice, unwind 1.3 meters from each and secure the threads on the spindles with copper wire so that they do not unwind further
Then I twist one of the spindles to the right. When the thread is completely twisted, I secure the spindle with the tensioned thread with a weight. I twist the thread on the second spindle in the same direction. Then I connect the spindles together, secure them with copper wire and twist them in the opposite direction.
I take the twisted end of the cord into a vice and then clamp the end of the thread of the third spindle with a margin of 16 meters and the thread of the two previous spindles in the vice. I unwind 1.6 meters from each spindle. I fasten the threads to the spindles and begin to twist to the right. I secure the twisted sections with spindles sequentially with a weight, and then I fasten all three spindles together with wire and twist them in the other direction.
I put the twisted cord in a vice, and in the vice I clamp the thread of the fourth spindle (with a margin of 12 meters). I unwind 2.6 meters from each spindle, twist it to the right and sequentially secure it with a load, that is, I repeat the procedure.
I lubricate the ends of the threads that stick out to the side after the cones are formed with waterproof glue, sew them with a needle inside the cord and cut them flush.
When all five spindles are clamped in a vice, you should not twist 6 meters of cord at once, but rather do it in two or three steps to avoid uneven twisting.
When the second cone is formed, the number of threads decreases.
The weight of the cord after twisting is insufficient. Therefore, having first wetted the cord, I stretch it, hanging the load, and after drying, I cover it with varnish or paint (once or twice).
I make a floating cord for fishing from synthetic fibers (which are used to package goods in stores). If the fibers are thin, you need to increase the number of spindles, twist several thin cords and twist them together. For fishing, I braid a cord 17-18 meters long.
Fly Lines for Beginners
Author: Pavel Kuptsov
As practice shows, few beginning fly fishers know how much the line can influence the speed of mastering casting techniques, as well as comfort and performance directly during fishing.
In this article you will learn which cords are suitable for beginning fly fishers and on what parameters they need to be selected. At the end, the three best models of cords for mastering fly fishing will be given, which have repeatedly proven their high efficiency both in learning casting techniques and directly in fishing, when the technique is still in its infancy.
Choosing a cord. How does it happen for a beginner?
Many beginning fly fishermen, at the stage of assembling their first gear, often wonder how to choose the right fly line. Which model to choose from all the variety that the modern fly fishing industry offers.
In most cases, the choice is made based on such important parameters as the class and configuration of the cord. And, in general, for an accomplished fly fisherman, this is the right approach, since these two parameters are responsible for the balance and ability of the gear to work comfortably in the expected fishing conditions with certain types of flies.
However, taking into account only the class and configuration of the line, beginning fly fishers quite often encounter a situation where the first tackle they assembled, despite all its ideal balance, turns out to be of little use for learning casting, which has an extremely negative impact on the speed of mastering fly fishing.
The consequences of this are very dire. Faced with serious difficulties in training and fishing, many make erroneous conclusions about their inability to master casting, and some even lose interest in fly fishing.
Which cords are suitable for beginners
The biggest mistake that beginning fly fishermen make is that when choosing a line, one very important input is excluded - this is a complete lack of casting skill. If we take this important point into account, then out of hundreds of varieties of cords there will only be 5-6 models left that will be most effective for mastering casting.
The most important parameter, after the gear class, that beginning fly fishers need to take into account when choosing their first cord is the length of the head (the thick part of the cord). It should be between 7 and 8.5 meters, taking into account the front and rear cones.
Such lines are usually called short-headed, and their specialization is fishing at short and medium distances in limited space.
The advantage of short head cords
The main advantage of such cords for beginners is the short length of the head, in which the bulk of the cord is concentrated. By releasing only 6.5-7 meters of line from the tip of the rod, from the first minutes of training you will get a confident feeling of loading the rod, and with it a faster understanding of the basics of any fly casting.
For beginners, short-headed lines not only speed up the process of mastering casting, but are also extremely effective in the process of fishing itself, which will allow a fly fisherman, even with minimal skills, to confidently cast a fly at a comfortable distance.
To summarize, we can highlight the main advantages of short-headed cords:
- You will be able to master fly casting many times faster, including double casting;
- These lines are ideal for fishing at distances that are comfortable for beginners, as they were originally designed for casting over short and medium distances;
- They are easy to shoot even with unstable casting technique;
- You will be able to fish comfortably in strong wind conditions;
- You can use any type of flies (with the exception of very bulky and heavy streamers);
How to choose a fly fishing cord and make it yourself?
Braided fly fishing line has many advantages over monofilament fishing line, but the main advantage is sensitivity. After all, the fisherman will notice the most careful and delicate bite. Fishing with micro feeders with thin braided fishing line is a pleasure. There is no alternative to thin braided cords for this use.
To compensate for the inextensibility of the cord, appropriate leashes, reels and rods are selected so that they compensate for this shortcoming of the braided fishing line. In addition, depending on the bait used, not only the class of the cord depends, but also the shape, as well as buoyancy.
With a large selection of braided lines on sale, you need to know how to make the right choice for your upcoming fly fishing trip. There are many nuances, for example, the depth of fishing depends on the speed at which the bait sinks, because the adhesion of the braided line to the water is the basis of fly casting.
In addition, not every beginner knows that when casting in a ring, the bait should describe the trajectory as low as possible. It’s easy to make such a cast from a boat or wade, but when casting from the shore you have to kneel down.
Fly rod length
The length of a fly fishing rod, depending on the class and fishing conditions, can be from 2.1 meters to 3.6 meters.
The lightest fishing rods up to power class “2” are rarely longer than 2.1 meters. This ensures a harmonious combination of the weight of the rod and the weight of the line used with the bait. It is also rational to choose fishing rods of this length when fishing from a boat.
Forms from “3” to “6” classes are offered in lengths from 2.1 to 2.7 meters. From this category, it is best to choose a fly fishing rod for beginners. The optimal length for learning fishing techniques will be 2.4 meters.
Sticks of heavy classes, from “6” and above, can be up to 3.4 meters long. They can already provide long-distance casting of heavy baits. Some advanced fly fishermen, in order to make ultra-long casts, make their own fly fishing rods of even greater length (up to 4 meters).
The best way to start learning fly fishing is with a one-handed rod in your hands. Such models are made in lengths from 2 m to 3.6 m. If you need a larger fishing rod, you will have to look for a two-handed modification.
- The length of the fly fishing rod should be selected based on the nature of the reservoir, fishing methods, as well as the type and size of the expected prey. As a beginner, you should realize that there is no one-size-fits-all fly fishing rod. If in some cases a long tackle is required, then in other cases it is more convenient to work with a short model. But when you have to choose only one rod, I would recommend stopping your eyes on rods with a length of 2.4-2.8 m. They are capable of excellent performance when fishing with wet and dry flies. But when using streamers, the spectrum of 2.75-3.2 m looks better.
- The advantage of short gear is the ability to fish under overhanging tree branches. Such conditions occur on small rivers with a lot of vegetation on the banks. By the way, if there is tall grass or low bushes, it can be more convenient to maneuver with a long fishing rod.
- The type of fly line cast also influences the choice of rod size. For example, it is easier to make a ring cast with a long fishing rod. At the same time, with vertical technology, preference is given to fishing rods with a length of 2.8-3 m. When choosing the length of a fishing rod, it is important to take into account the physical characteristics of the fisherman, for example, height, hand characteristics, etc.
- To catch big fish in northern rivers, many people buy rods measuring 3.6-4.5 m. Thanks to this length, it is easier to pull a sinking line out of the water, and then cast the fly using the ring technique under a distant shore. When fishing in cool weather, you need to take into account freezing of the guide rings. A 4 m long fishing rod will cope with casting a line through icy guides.
What is it and what is it used for?
The cord behind the structure is woven or glued fibers into a braid . For additional protection, braid can be used, which increases the service life when fly fishing in salt water.
- Most often used for jigging and twitching fishing.
- Braided fishing line wins in terms of casting accuracy. The fisherman feels the bite.
- The cord may be soft or hard.
- Soft, pleasant to work with, but require attention.
- Hard ones lose in range, but almost never get tangled, and if a beard has formed, it’s easy to untangle.
Cord structure
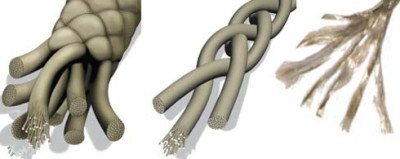
Behind the structure, the braided cord can be weaved like a stocking or like a pigtail , but it can also be without weaving: in this case, the fibers run parallel.
Then they are connected by a shell or fusion. When weaving jutes ( jute is a braid made from several lines . By the way, this type of binding is also done in thread. After weaving all the braids (jutes) they are woven together into one braided cord), there can be 4, 8, 10 or more of them in a braid. Moreover, jute itself contains an average of 45 fibers. The strength of the braid is affected by the diameter of the fiber itself. The fibers in jute can be impregnated with fastening compounds for rigidity, or they can be unimpregnated, which means that such a braid will be soft. Impregnation gives color to braided cord, although, for example, Hercu line is white because the impregnation does not have dyes. Please also take into account that the addition of dye reduces the mechanical properties of braided lines .
To increase rigidity and density, “sintering units” are also used, which come with a distance of one millimeter. This Fire line resembles a bamboo stem.
With an increase in the number of jutes, the strength of the braid increases , but the price also increases due to the rise in price of the material and the weaving technology itself.
Jute, in braided line, can have different physical properties. For example, Cannelle consists of three different jutes. Thanks to this, the braid is abrasion-resistant and has a low coefficient of friction, but is also soft and holds strength even if several fibers are damaged. Cannelle and the similar Reel tress can be used without metal leads.
The cheapest cords are those in which the fibers are not intertwined and glued, but such cords are the most short-lived, because the glue comes off after several fishing trips, and the jutes begin to delaminate.
The structure of the braided cord with a sheath is not only protected from wear, but can also be fluorescent ; for this, the sheath is coated with special dyes. The shell itself can be Teflon (Spiderwire fusion), polyamide or cheap materials.
Cheap cords have one important drawback . They begin to become shaggy when the shell is damaged, which entails a decrease in casting distance, increases windage, and deteriorates strength. But on the other hand, the braided cords in the sheath glide evenly from the spool and do not get tangled.
There are also related technologies in the manufacture of braiding. For example, Fire Devil from Byron, is a braided and impregnated braid of polyamide jute in a sheath. If we look at similar cords, we also come across Kevlar ones, although most often on sale are braids with polyethylene jute fibers. When purchasing such cords, professionals ensure that they are made from PE-grade ultra-molecular polyethylene . PE is superior to other materials of this class in durability, softness and density.
Characteristics
Properties are determined by the following parameters:
- Material;
- Weaving type;
- Joining fibers in jute;
- Using impregnation;
- Density;
- Surface;
- Wear resistance;
- Diameter _ If the American markings and their translation into SI are clear, then with Japanese cords problems arise for beginners. The thread weight number (dtex) is indicated on the spool . For example, cord index 1 corresponds to 245 dtex. 245 dtex –2.45 g per 100 m . And the conversion of the diameter in the ratio 1:0.3, that is, the number 0.2 is indicated, means the diameter is 0.06 mm;
- Test;
- Color;
- Strength, that is, elongation (sometimes they simply write that it is close to zero, in truth, 2–7% ).
- What waters will the fishing be in (salt or fresh, tropics or northern latitudes). There is no need to worry too much when purchasing. We sell cords that correspond to the conditions of the region, but if you plan to fish outside, then it is advisable to take a closer look.
DIY fly fishing cord
How to make a fly fishing line with your own hands?
This question sometimes appears in queries from Google, Yandex and other search engines... and I will try to answer this question. First, let's look at what a modern fly fishing line is. Its basis is a core made of many strong fibers coated with a special coating that determines its position on the water - from floating to quickly sinking. And at the very beginning, fly fishing lines were woven from snap threads and impregnated with water-repellent compounds. For long-term use, they had to be washed and dried after each fishing trip so as not to rot. So, in principle, you can weave a fly fishing line, which is what I did in the early 90s, when fly fishing gear was very rare. Below I will share the details of the process of making a fly line yourself, but for now, based on the experience gained, I’ll tell you why you don’t need to do this, but it is highly advisable to buy, even the cheapest, a line made using modern technologies. Braided cord has insufficient elasticity and a ribbed surface and, because of this, it is difficult to elongate and shoot when casting, and when wet, it becomes heavy, correspondingly reducing the working part of the cord. Fishing with such a line will not bring much pleasure, because it will require a lot of patience and ability to control it. On the other hand, having mastered casting with such a cord, in the future, when you change to a branded one, you will no longer have almost any problems.
The process of making fly fishing line with your own hands
I found this information in a brochure in the early 90s. I improved it a little and made a total of 4 cords, each about 20 meters long. Of these, three are double cone and one is torpedo-shaped. Let's focus on the double cone. The technology is generally simple and does not involve weaving, but twisting the cord. For production, threads were required. I found a large spool of nylon thread, approximately number 35 thick. I took and cut 5 threads of which one (or maybe 2) is 20 m, 2 are 18 m each (or one is 19 m, the other is 18 m) and another 2 are 16 meters each (or one is 17 m, the other is 16 m) and arranged like this:
The short ends were simply tied to the long ones. Then he gathered one side of the threads together and tied it to a hammered nail without a head (to make it easier to remove later), and secured the other side to a spindle (you can use a drill or just a wire with a hook) and began to twist the threads in one direction, for example to the right, making sure that the threads were twisted evenly. During the process of twisting, the length of the threads will decrease and when it is visually clear that it is enough, then without weakening the tension, you need to secure the end so as to prevent unwinding. I made two more blanks in the same way. Then I took all three blanks together. I secured the far ends together, took them by the nearest ones and, in a tense position, began to unwind them in the opposite direction (to the left if the workpieces were to the right) until the cord stopped unwinding and it became clear that everything worked out. Then one end remains tied, and to the other end, through a small block, I tied a load of several kilograms for final finishing. By wetting the cord with water, you will see how it lengthens and the threads fit more tightly to each other. I left it in this position for final drying. Then the cord was impregnated with a water-repellent compound. As a simple impregnation, I used this - 3 parts paraffin, 3 parts wax and 1 part technical petroleum jelly.
In conclusion, I must add that I did all this more than 20 years ago and I no longer remember all the subtleties, so some points may differ, but in general the process is exactly the same.
PS Time passes and at the moment the cord can easily be ordered via the Internet Inexpensive floating fly fishing cord on Aliexpress
To do this, you just need to have a post office in your locality, an Internet connection, an e-mail address and the ability to make payments via the Internet (simple Registration on AliExpress)
In what cases are mini fly fishing fasteners used?
You will need this miniature accessory if you are exploring a new fishing spot and selecting the “magic key” to your future catch, constantly looking for the one you need, replacing one or another piece of fishing equipment.
Also, the fastener will help you pass through all the obstacles in snags, leaving your equipment in unchanged condition.
DIY fly fishing fastener
Video about how you can make a micro fastener for fly fishing or ultralight with your own hands (author V. Bokarev)
And here is another visual video about making a fastener yourself (by leksii Chemerys)
A detailed article with photos on how to make a mini-fastener using a paper clip for a stapler https://mirnahlysta.ru/biblioteka-nakhlystovika/nakhlystovye-furnitura/64-mini-zastezhka-dlya-bystroj-smeny-nasadki-svoimi-rukami .html
Such a variety of methods for making fly fishing fasteners yourself is due to the fact that truly high-quality fasteners in small sizes are very difficult to find on sale.
How to attach a fastener for fly fishing and ultralight
Read everything about attaching knotless fasteners, including miniature sizes, here
Useful tips
If you didn’t find a fastener for fly fishing in the store, then it doesn’t matter, buy a hanger in the store designed for attaching winter lures, for example, like the one in this photo

The miniature size of the fastener causes inconvenience when attaching it, so we recommend using tweezers, which will greatly facilitate the installation process.
useful links
https://fishing-samson.ru/main/sovremennii-ultralight/654 - an informative article about different types of fasteners.