Making a float from a Chupa Chups stick
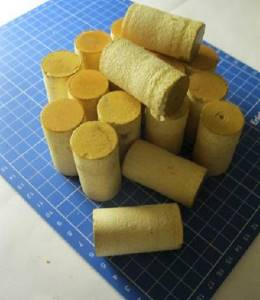
The body of the float will be a wine cork. We will also need a Chupa Chups candy stick. Take any wine cork and cut it in half.
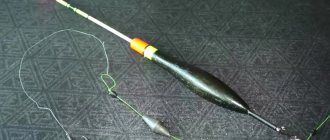
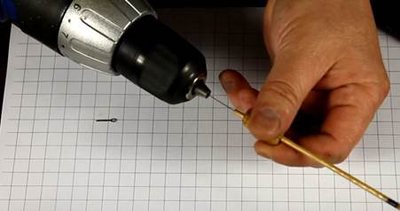
We make a hole inside the cork using a drill with a suitable drill or self-tapping screw so that the tube fits inside with force. We insert it halfway along with a piece of fishing line:
There is a slot on the tube. When we thread the float onto the main line, it is necessary that this hole is located at the bottom of the float. We will insert the lower part of the fishing line into it. As a result, it will fit tightly to the tube and you will get this situation:
This float can be used when fishing in waves and in calm places. It is well suited for fishing from a boat. You can use a longer tube and a whole stopper. Then we will get a more stable, but less sensitive float. Or vice versa, cut off only a third of the cork and thread it onto a shorter tube. This way we will get a lighter and more sensitive float.
Finding the right material
High-quality floats are made from materials that have buoyancy properties, because they must float well even under the most unfavorable fishing conditions. As a rule, they are made from:
- Cork or wine cork.
- Tree.
- Foam plastic.
- Plastic tubes.
- Bird feather.
- Reed.
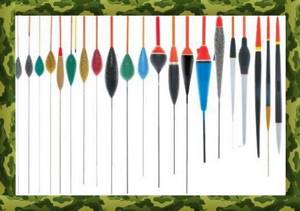
The huge selection of materials is due to the fact that floats are designed for various fishing conditions and a variety of gear. Let's consider the working qualities of some of them.
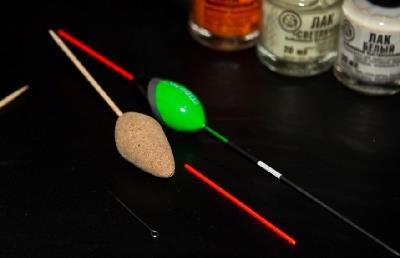
Sliding float made of cork and kebab sticks
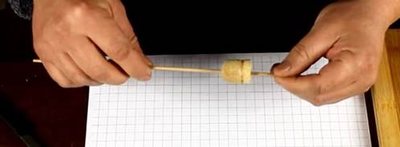
Let's make a more complex float. For this we will use a kebab stick of this type:
Next we take a drill and make a hole in the cork
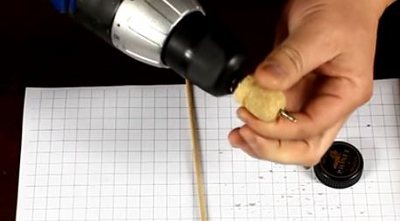
Then we thread the stick through the cork and see how tightly it fits to it:
After this, remove the cork and cut off the sides.
Our task is to obtain a neat oval workpiece with an elongated body. To do this, we cut off the sides and sand each side evenly with medium-grit sandpaper:
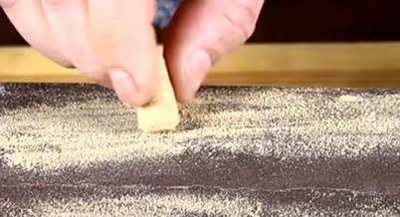
The work is not as tedious as it might seem. Cork lends itself well to processing. This is not a tree that takes a long time to clear. Within 10 minutes we will get this neat barrel for the float:
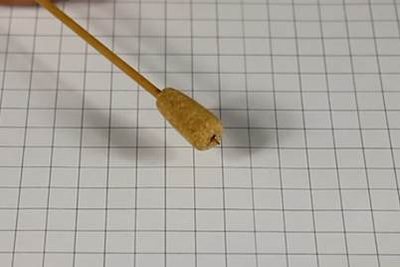
We thread it onto a stick and see how the elements will harmonize with each other. Against this background, we see how well the barrel turned out.
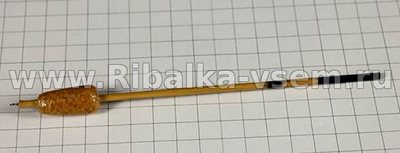
We extend the body of the float further and get the following situation:
Next, you need to coat the lower part of the float with transparent and water-repellent wood glue, onto which we will then stretch the barrel. Then we coat the entire barrel to protect it in the future from moisture and water getting inside:
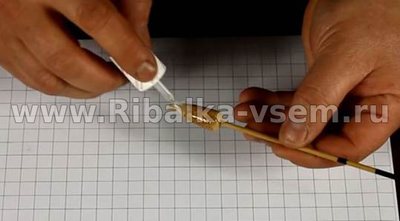
The antenna can be lubricated with varnish, which will protect it from water while fishing. After this, we make a hole in the stick on the side where the barrel is attached. To do this, take a drill and a drill bit 1 mm thick. We drill strictly in the center.
In this hole we place a pre-made ring and 0.8 mm thick wire.
First we coat it with glue and insert it into the hole. It should look like this.
The ring can be attached in another way - using threads. You need to attach it to the stick and make turns over the entire surface, and then coat this place with glue.
The top of the antenna can be painted with acrylic paint or a marker. As a result, we get a sliding float like this:
Don’t forget that the float should be immersed so that only the painted part is visible from the water.
Follow us on social networks
– through them we publish a lot of interesting information, photos and videos.
Popular sections of the site:
The fisherman's calendar will allow you to understand how all the fish bite depending on the time of year and month.
The fishing gear page will tell you about many popular gear and devices for fishing.
Fishing baits – we describe in detail live, plant, artificial and unusual ones.
In the bait article you will get acquainted with the main types, as well as tactics for using them.
Learn all the fishing lures to become a real fisherman and learn how to choose the right one.
Making a fishing rod with your own hands
You can make the simplest fishing rod from a wine cork if you follow the instructions:
- Before you make a fishing rod, you need to pick up a whip. For this part, you can use the top element of a spinning rod or a similar part of an old winter fishing rod.
- Now you can make the rod handle. We take several corks and make a hole exactly in the middle. The diameter of the drill used for this should be smaller than the diameter of the whip.
- Coat the thick end of the whip and the inner surfaces of the hole in the cork with glue (it is better to use “Moment”). Now the whip needs to be placed in the hole. Allow the structure to dry thoroughly.
- Now you need to make a nod. Cut a thin strip from the X-ray film, rounded at one end. Make a hole at this end.
- Pull a movable ring of cambric two-core wire onto the whip near the handle. A fishing line is passed through the cambric and then fixed. The nod is located between the cambric and the cork.
- The nod needs to be adjusted. First, position it so that the edge protrudes 5 mm beyond the cambric, and then bend it and glue it to the cambric.
- After this you need to lay the fishing line. This can be done in two ways: trim the sides of the cork and wind the fishing line around the circumference, or make notches on the cork and lay the fishing line along the base.
A homemade winter fishing rod made from a wine cork will not only save money, but also make a good catch without much effort. In addition, you can take a lot of such products with you, which means there will be no hitches in the event of a breakdown or other trouble.
Why make it yourself
So, why make your own float? Here are some good reasons:
- Full compliance with the requirements of the fisherman. In stores it is often not possible to select equipment for specific fishing conditions. For example, most of the floats offered for purchase are medium or heavy. But they are not always suitable. So, for fishing in conditions where there is no intense current or for catching bleak and other small and cautious fish, you need a light and very sensitive one.
- Saving. The materials from which you can make a float are found in every home. These are wine corks, polystyrene foam, and pen refills. There is no need to purchase anything separately. This allows the fisherman to save money. This is especially true if fishing often takes place on banks overgrown with trees and bushes, snags, when very often a complete loss of equipment occurs.
Application of various materials
The float can be made from the following materials:
- cork;
- Styrofoam;
- goose feather;
- tree bark;
- cane.
Let's look at the manufacturing process of each in more detail.
Cork
Wine corks can be found in every home, since everyone buys grape wine for holiday feasts. Their ease of processing, strength, moisture resistance and buoyancy make them an excellent material for a removable float.
It's very easy to make. For this you will need:
- whole wine cork;
- knife;
- ballpoint pen refill;
- clip;
- a piece of wire insulation.
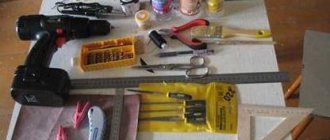
Tools and additional materials you will need:
The manufacturing process is as follows.
- Using a knife, cut off all excess from the sides of the cork and give it the desired shape. What it will be is determined depending on the purpose of the future product. The knife must be very well sharpened - otherwise it will not cut, but shred the workpiece, crumble it and render it completely unusable.
- Once the body of the float is cut, it must be made even. To do this, we evenly grind its entire surface using a stocked file.
- When sanding is completed, you can proceed to the next step. It involves installing the fastener onto the equipment. We make them from paper clips. To do this, cut two pieces from it - one 3 cm long, the second 1.5 cm long. We bend a ring at the end of the long one. We place the short one in it and also bend the ring so that it is in the first one. The result should be some kind of chain links. We stick the straight part of the long piece into the lower part of the float body so that it stays well there. We put a piece of insulation from the wire on the short one (it will be used to attach it to the fishing line).
- We make a hole in the upper part of the float's body, coat it with Moment glue and insert a piece of a ballpoint pen into it. To make it more visible on the surface of the water, it can be painted with white or bright red paint (for night fishing, you can apply a luminous composition).
That's it, the production of the float is completed. Now it can be mounted on the equipment.
A fishing rod float made of cork is universal. It can be given any size and shape (spindle, “vanka-vstanka”, waggler, floating, underwater and others), while maintaining a weight sufficient for high-quality casting. This allows you to fish in any conditions.
Styrofoam
In general, the process of making a foam float is no different from that for a cork. The only nuance that should be remembered is the great fragility and brittleness of the material. This requires special attention - the workpiece is very easy to spoil. Also, fragility precludes installation on the equipment using a piece of paper clip - it will not stay in the body. Therefore, the fishing line is passed through a through hole, secured with a feather or rod.
Unlike cork floats, foam floats are much lighter. However, they have the same resistance. This somewhat limits their use during strong winds or intense current conditions.
Homemade floats for catching crucian carp
Homemade floats for catching crucian carp are quite easy to make and do not require special skills. Direct hands and a little ingenuity will be enough. Today we want to look at making a float for catching crucian carp from materials that can be easily found. And we won’t delve into professionalism, but will show you how to make homemade floats for catching crucian carp at home, without having special equipment.
Many readers will be surprised to learn what items are suitable for making floats. Most of them are used in everyday life. In part, these items can be considered trinkets that are very rarely used. Well, let's look at it in order. Catching crucian carp with a float
Feather floats
Floats made from one tube of swan or goose feather can, of course, be purchased in a store, but they can also be made at home. For these purposes, you need to choose a feather tube of sufficient length and thickness. Clean it inside, then boil it for ten minutes in water so that it becomes less fragile. Then dry. After waiting until the tube is completely dry, you need to press a small piece of wax or paraffin into it and, using a thin stick or wire with a non-pointed end, press it into the blind end of the tube. For convenience, it is advisable to dip the pen into hot liquid at this time so that the wax sticks securely. The free end of the feather tube is closed with a pointed match coated with glue; A loop of non-corrosion wire is tied to the other, sharp end. All that remains is to coat the float with varnish and, after waiting until it is completely dry, use it for its intended purpose.
Homemade floats for catching crucian carp from cork
The basis of the float can be a cork from a bottle of wine or champagne, made of a special cortical material
Let's look at making a float in stages. Starting from preparation and ending with installation on equipment.
- The first step is to make a through hole in the plug. Or make one hole at the bottom and one at the top. This can be done using a thin drill or a heated nail.
- Then you need to stretch the base into the hole. Any item of oblong shape and light weight, from an ear stick to a match, can act as the basis for a float.
- Then you need to attach the float to the drill. This can be done by inserting a stick into the drill hole. Then you need to wrap the float with sandpaper (hold it with your hand) and sand it by rotating it with a drill. You can sand it by hand, but it takes a long time and requires a lot of effort.
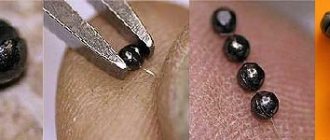
- The final step is to make a ring at the end of the float. For this, a fitting needle (such as the one in the photo) is best suited; you just need to pierce the base of the float in the middle, and you need to insert a fishing line into the ring that is already on it.
- Painting the float depends on the preferences of the angler, as well as varnishing the float. The main thing to remember is that the part of the float that will be immersed in water should not be painted brightly; for this it is best to choose black.
What is a cork fishing rod?
A homemade fishing rod consists of:
- handles, for the manufacture of which a champagne cork is used (for this purpose, not a plastic, but a natural wine cork is suitable);
- whip (average length about 40−50 cm);
- nod;
- reels (an optional element, since the fishing line can also be wound on the handle).
Varieties of design
Similar cork products may differ from each other in the presence or absence of certain parts. There are several design variations:
- float (suitable for fishing in one place, the fisherman holds such a fishing rod in his hand all the time, may not have a reel - the fishing line is wound around a handle, which is a champagne cork, the tackle is located on the base of the product);
- on a jig (has a short whip, since the fisherman constantly holds the fishing rod above the hole);
- for a spinner and a balancer (it is equipped with a capacious reel, a rigid and elastic fishing rod, and allows you to fish on the bottom).
Advantages of winter fishing
A homemade cork fishing rod has several advantages:
- low cost, thanks to which you can make several similar products at once and always have one on hand;
- small weight, which will allow the donka not to drown in the snow;
- ergonomic, such a product is comfortable to hold in your hand in different ways (three or five fingers);
- low thermal conductivity (even in frost the handle will not be cold);
- high strength when compared with other available materials, such as polystyrene foam;
- ease of repair.
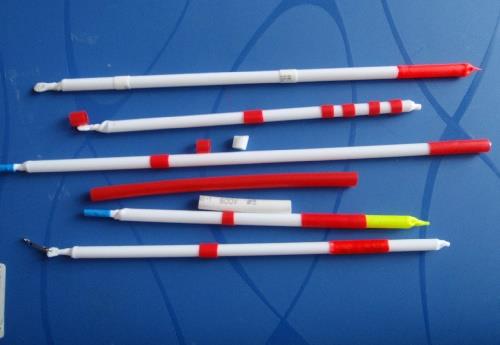
DIY floats for catching crucian carp from a tube
What kind of tube are we talking about? You can take a straw on which flags are attached or a soda straw (a regular drinking straw). Making such a float requires the fisherman to spend as little time as possible.
- First you need to heat the end of the tube (on fire) and twist it, you need to be careful, there is a high probability of getting burned.
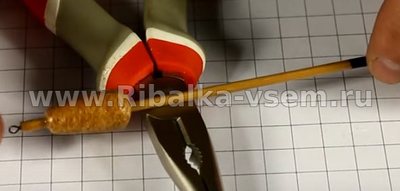
- Then you need to heat the second end and twist it, twisting it is a little longer than the previous one. After twisting, press the end with pliers. This is done in order to then make a hole in the plane for passing the fishing line into it.
- Then, in the flat area that resulted from squeezing the edge of the stick, you need to make a small hole. A hot needle is best for this.
- Then you need to thread a ring into the resulting hole (it can be made from a needle that is used for fitting, as in the example of making a float from cork).
- And of course, giving the float aesthetics. The end, which will be the top of the float, needs to be sanded with sandpaper and painted in a bright color. Instead of painting, you can mark it with yellow or red insulating tape.
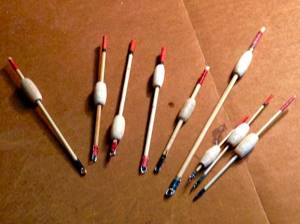
Cork float
Cork floats can also be easily made at home using available materials. The manufacturing process consists of grinding the selected piece of cork. It is given the shape of a barrel, a ball, an egg. Next it is drilled through. A tube, PVC or a tube made from a suitable feather is placed in the resulting hole. A fishing line is passed through it and the tube is closed with part of the same or another feather. Such floats are quite easy to make yourself, although, of course, they can be found on sale.
A properly made float will look no worse, and often much better, than the samples found on sale. Do-it-yourself floats will delight you with their appearance for a long time and pamper you with more and more new catches.
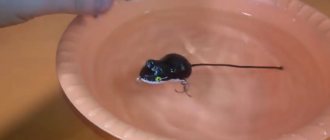
How to make a float from foam plastic
Foam floats are characterized by a high level of sensitivity. The most common are homemade spherical models, drop-shaped or olive-shaped floats.
To begin with, small square or rectangular blanks are cut out of a piece of foam plastic. Next, using a sharp utility knife, the float is given the desired shape and cleaned with sandpaper. Instead of a knife, you can use a drill with an appropriate attachment.
After cleaning the float from dust, we paint its body in the desired color or combination of colors. When the paint has dried, coat the foam float with varnish and again give the workpiece time to dry. Next, drill a small longitudinal hole in the center of the workpiece and insert a core (feather or wood) into it. The length of the core can reach 6-7 cm, the thickness on average is 1-1.5 mm. You can also slightly change the design by gluing a thin feather element only into the upper part, and in the lower part making a small loop for fishing line from thin wire.
Instead of wire, you can use an eye from a hook. Most often, a single sinker is used in the tackle, when using it, only part of the float rod is visible to the fisherman. Foam floats are quite sensitive, so they will notify the fisherman even of weak bites. For effective operation of the float, a fishing line with a thickness of up to 0.16 mm is required.
How to make your own float from cork or polystyrene foam
The manufacturing technology of such floats is identical, despite the fact that different materials are used. The only difference is that cork is easier to process, and under certain conditions it is not necessary at all. The sensitivity of such floats is somewhat lower, but they are suitable for catching trophy fish or predatory fish. The fish must be strong enough to sink such a float. When fishing with live bait, such floats are ideal because they do not allow the fish to move across a larger water area. When a pike or pike perch bites, the float will immediately react.
Any fisherman who has at least some skills in working with tools and materials can make a float from foam plastic or cork. In this case, you should take high-density foam, otherwise you won’t get a normal float. First, you need to cut out a workpiece of a certain shape, after which it is cultivated on a sharpening machine or other suitable method. A hole is made in the center of the workpiece (can be drilled), through which, for example, a lollipop stick or the same stick as when making a float from a bird feather is inserted. The only difference is that such a tube does not need to be sealed, since buoyancy will be provided by the materials from which the float body is made (foam or cork). Next, a nipple is attached to the tube, and the float itself is attached to the tackle. After this you can go fishing. Painting is optional, depending on fishing conditions. For painting it is better to use waterproof painting materials.
Video “How to make a float from cork”
Goose feather float
Most fishermen are also well aware of goose floats, which are distinguished by their excellent performance on the wave, good sensitivity and ease of manufacture. To make a float of this type, no complicated procedures are required. The only delicate point is removing the spine from a goose feather, since it is important not to damage its integrity. If everything went well, cut off the thinner part of the feather diagonally and bend it into a loop.
We insert a wire ring and a tongue from below, wrap it to the rod and coat it with varnish. The upper part is painted in the desired color if necessary.
Wooden floats
These models are highly sensitive, easy to balance, and can be used for long casting.
To make the right float, you will need to find a good and strong piece of wood. The best option would be balsa wood, but not every fisherman has such wood. In addition, the fisherman must have at least some basic understanding of woodworking. In addition to wood, bamboo floats show good results.
DIY cork float
According to the manufacturing scheme, this float is similar to the previous one. However, it must be remembered that the cork material is porous and gradually becomes heavier when in water. In this regard, all large holes in the workpiece must be closed using waterproof putty or alternative means. After this, the float is treated with sandpaper, degreased and painted. A rod with a loop is inserted into the longitudinal hole made. At the end of the loop, an eyelet from a large hook is put on.
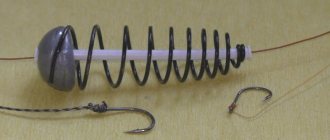
Such a float is fixed using a tube that is put on a fishing line. It is shipped with 2-3 weights to approximately half the rod of the upper part of the float body.
Important article on the topic: floats for crucian carp
Making your own floats
Homemade floats nowadays are not as relevant as they used to be. Today we can purchase floats of any type on store shelves. Few people now take on the task of making a float on their own. But in vain, because homemade is always closer and warmer to the soul, and the pleasure of catching fish with homemade gear is doubly pleasant than with purchased gear :).
Kugi floats.
The float, made of kugi, lays on the water practically without a single sound when casting, it has good sensitivity to bite, and since it has a well-streamlined shape, it provides very little resistance in the water. But they have one disadvantage, kugi floats are very light, so they must be handled with extreme care. As a rule, cylindrical-shaped floats are made from kuga (for those who don’t know kuga, this is a reed stalk). The material is stocked up in the fall and dried thoroughly (it should be taken into account that kuga, which grows in the northern regions, is unsuitable, since it has large air cavities inside, which makes it break very easily). To make a float, the material is cut with a blade (stationery knife) into small pieces, usually from 2 to 7 cm. A wooden twig 2-3 mm thick and 40-45 mm long is glued into the upper end of the future float so that it protrudes 2-3 mm long. 3 cm. A wire loop is glued into the lower part. After this, both ends of the float are tightened with a thin thread or wire, leveled, and then the float is covered with waterproof varnish. It is quite possible to use small pieces of bamboo for the rods. Of course, I doubt that anyone will invent such a design :) but for the general development, let it be.
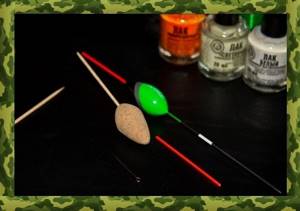
Foam floats.
Foam floats are very sensitive. You can easily make one of these sensitive floats yourself. A ball with a diameter of approximately 6-7 mm is made from polystyrene foam or cork, the bottom is painted blue and the top is orange, a hole is made in the center into which a beech rod approximately 7 cm long and 1.5 mm thick is inserted. The bottom of the rod is equipped with a “figure eight” for fastening (fixing) the fishing line. The upper part of the rod is painted with stripes of two or three colors; you should not use too bright ones. The immersion of such a float in the water is regulated by a sinker, which is located a couple of centimeters above the hook, while the weight of the hook and nozzle is taken into account; it is necessary to select the sinker so that only half of the rod peeks out. If a fish grabs the bait from the bottom, the float floats up, in the water column (in weight), then the float sinks. In any case, you need to immediately hook, but not hard, but only with your hand. The rod should not be made from light wood or feather. Such a float will sense the cautious bites of any fish. In this case, using thin fishing line (up to 0.15 mm) will greatly reduce the number of false bites. In order to make a foam float with a rod, we need to cut out a rectangle with a hacksaw, and it is necessary to take into account the desired diameter and length of the float in advance, then use a stationery knife to make a more or less rounded shape from a rectangular blank. Next there are two options. The first is to hold a hand drill with a 2.5-3 mm drill bit in a vice. The workpiece is carefully screwed onto this drill (strictly vertically). The workpiece should fit tightly on the drill and not rotate. Then they take the sandpaper in their hand and begin to rotate the drill handle and thereby, pressing the sandpaper against our workpiece, give it a beautiful rounded shape. The second option is more dangerous and you can lose your fingernails. First, carefully grind the workpiece using sandpaper, and then manually using sandpaper. The first method is preferable; thanks to it, the workpiece will turn out much smoother and faster. Next, the float is painted with gouache or tempera, then coated in PV varnish (you can simply dip it), and hanging it up, leave it to dry. We checked it and it stuck a couple of times! Dry? Great! A piece of thin bird feather is glued into the upper part of the float (glue will help you) (a pigeon feather is what you need; by the way, you can use an empty ballpoint pen, but keep in mind that it will be heavier), and in the lower part you need to make a hole with a needle, into which a loop of thin wire moistened at the same moment is carefully screwed. Instead of a wire loop, it will be very convenient and beautiful to insert an eye from a hook. We break off the eye and press it with glue into a foam blank, beautiful and practical; you should attach a loop to the resulting eye to secure the float to the fishing line (Fig. 3). The float is made of foam, simple in design, quite stable in ripples and waves, and will allow us not to miss a careful bite.
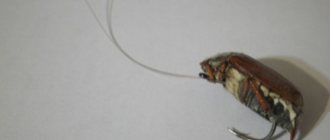
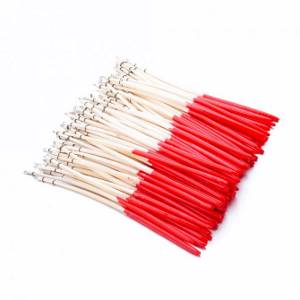
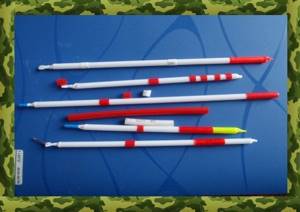
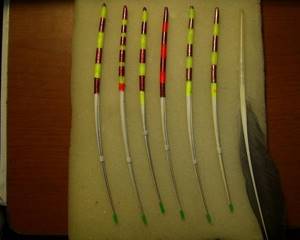
Plastic tube float
Floats of this type are also highly sensitive and durable. The manufacturing process is simple. You will need a regular plastic tube that can be used as a holder for flags, balloons or cotton candy.
Take the tube and shorten it to the desired length. Next, you need to seal the edges to prevent water from getting inside. Using a lighter or a regular candle, heat the tube around the edges. When the plastic softens and swells a little, twist the heated end of the tube into a kind of pigtail. Next, we wait until the heated parts cool down and a reliable seal is obtained.
Once again, slightly heat one of the edges of the tube, after which you need to flatten it using pliers to make a small hole. This hole is needed for a thin wire on which the nipple will be put on and the fishing line will be threaded. All that remains is to trim off the excess, clean and paint the surface of the float. In just an hour you can make a whole set of sensitive and reliable floats of different colors without spending money in stores.