Float stops
Various devices can be used as a stopper, such as rubber or silicone beads placed on the main fishing line. They are freely sold in fishing stores and markets, and they cost pennies.
But still, the most popular and widespread means of fixing a float remains the sliding knot, invented by savvy fishermen. Tying it, knowing at least one of the methods, is not difficult. Moreover, this can be done even at the fishing spot, having a piece of fishing line or even ordinary sewing thread on hand.
If you don’t want to knit a locking knot for a sliding float yourself, you can buy one. Yes, yes, fishing stores today even sell knots. Usually they are tied to a special tube, and the fisherman can only remove the knot, put it on the fishing line and tighten it.
But we will not be like lazy and inept fishermen, but will practice how to knit such knots ourselves.
Fastening
The mount is often popular with fishermen. Although experienced fishermen suggested tying a self-tightening knot for fishing line without additional parts, their use makes life much easier. The fastening helps to fix the loops during knitting, prevents the knot from unraveling abruptly, and simplifies the knitting process. On the shelves of fish stores you can now see reels with a stopper for attaching braid. Many anglers reel in the line held by the spool without unnecessary fasteners, but only those who have gained experience over many years.
Basic knots on baubles
The weaving of knots on baubles is based on several basic knots.
In the process of weaving baubles the following are used:
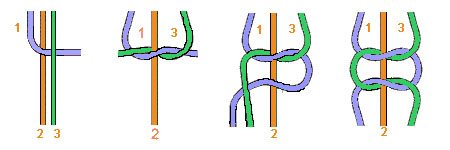
Left Knot (Straight Knot)
It is called left stitch because it is knitted with the left thread around the right one.
Like other knots used in this needlework, the left knot is knitted in two stages:
- Place the left thread over the right. Then we pass it from below into the resulting loop and tighten it tightly, after which we return it to its original position.
- Now you need to tie another knot on the same threads. After the second step, the return threads should change places.
Right Knot (Reverse Knot)
To tie the right knot, you need to do the same steps, only in a mirror order.
- Just like in a straight knot, we tighten the threads and return to the starting position.
- We knit the second knot with the same threads, after which the right thread finally moves to the left.
Tatting to the right (Turning knot to the right)
Tatting knots have elements of forward and reverse knots. To weave such a knot, you need to combine both knots.
Turn right. The first step is to weave a reverse knot. Then we return the threads to their original position and make a straight knot.
Tatting to the left (Turning knot to the left)
Turn left. The first step is to weave a straight knot. Then, without returning the threads to their original position, we make a reverse knot.
sdelala-sama.ru
The slip knot is an essential tool for creating simple jewelry. Having learned how to tie such a knot, you can turn any rope or cord that you find in the house into a bracelet or beads. And no special accessories! Even just the rope itself will be decorative. But jewelry with single pendants turns out especially great: beads, charms, large pendants. Moreover, you can also create these pendants with your own hands. For example, make a bead from felt and beads - using this example we will show how to make a decoration from a cord with two sliding knots. Even preschool children can be taught how to tie a slip knot and create simple DIY jewelry. After all, such a knot is no more complicated than a “bow” on a lace. And one more wonderful property of this fastening is that you can adjust the size of the bracelet or necklace according to your desire. And this size will be easy to change.
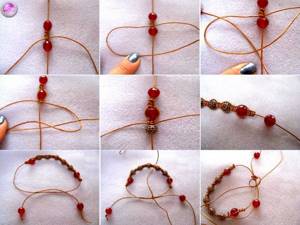
How to make a slip knot for jewelry.
In jewelry, the color of the cord is, of course, the same color, but for convenience we will show how to tie a slip knot using different cords. The red cord slides easily in the knot.
We lay the red cord flat, make a loop from the yellow cord and place it next to the red cord. We begin to twist the tip of the yellow cord around the loop and the red cord, rising up to the loop. Try to place the coils tightly next to each other.
Make three turns (you can make any number of turns, starting with one). Insert the end of the yellow cord into the loop. Pull the yellow cord from the bottom of the knot.
The loop will tighten and you will have a nice slip knot.
www.karakyli.ru
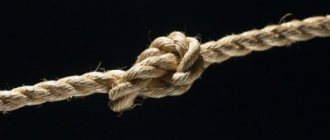
Nautical
Initially, a self-tightening rope knot was created by sailors to secure sails and various objects on deck. Reliable nodes are the key to success, because the seas and oceans are so turbulent. During the heyday of navigation, there were more than 500 types of knots. Tying sea knots is a whole science. But with the introduction of the steam engine, the need for sails disappeared, and knots began to be used less. And the change in the composition of the materials of cables and ropes caused some knots to lose their effectiveness. ">
A self-tightening knot was used in maritime affairs for fastening to cylindrical objects. It is simply called a noose, since the hanged noose was tied according to the same principle. In the event of no load or variable traction, the running end slides out, dissolving the entire assembly. This was the reason for refusing to use it. Therefore, the navy began to use a constrictor and self-tightening knot with half bayonets. The peculiarity of its knitting is that the knot itself is placed offset, so that the running end is directed towards the load. Due to this, it will not slip out so quickly.
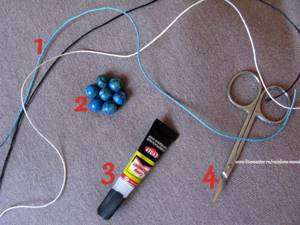
The main components for creating a Shambhala amulet
Weaving does not require complex and expensive materials; it is enough to purchase the following items:
- A strong rope or lace, leather, waxed or synthetic, as well as paracord threads are suitable;
- Wooden beads or stones in the desired color or colors. Materials of natural origin carry a much stronger energy charge, so you should give preference to stones and wood.
Also, don’t forget about the tools: scissors, ruler, tape, glue or lighter.
The color of the cord and beads is of great importance, because not only materials, but also colors carry different energies, which means they can serve different purposes.
How to weave a bracelet step by step
For the bracelet you will need three cords about 50 cm long, which must be tied together in a knot. For convenience, you can secure the ends of the threads with tape on a horizontal surface.
The algorithm for weaving knots is quite simple and consists of two steps that alternate with each other. In this case, the middle thread remains practically motionless. The beads will be placed on it in the future.
First step. We place the left cord on the middle one, creating a loop on the left. We shift the right cord so that it is on the free part of the left one, but under the middle one. Next, from the bottom up, carefully pull the right one into the loop formed between the middle and left cords. Now we tighten the resulting knot, in the middle of which there should be a middle fixed thread.
Second step. It is necessary to perform the same actions, but change the position of the threads: the left cord will go under the middle one, and the right one will go under the left one, but above the middle one. We pull the right cord into the loop again, but now from top to bottom. Tighten the knot. A knot formed after both steps will be considered a complete knot.
We alternate steps until approximately a quarter of the entire bracelet is ready. Now let's get back to the beads. We put the first bead on the middle cord, place it as closely as possible to the already completed knots, and then repeat step one again, braiding the bead with threads. Next, we weave several knots (depending on the size of the selected beads) and add the next one.
After the required number of beads are woven into the cords, you can return to repeating the first and second steps. In order to create neat ends, repeat step one, tighten the knot tightly, coat it with glue and, after complete drying, cut off the left and right threads. We do the same with the beginning of weaving, having previously untied the initial knot.
Schemes and tips
On the Internet you can find many weaving patterns that differ only in the algorithm for creating nodes
It is also worth paying attention to the various ways to attach a bracelet to your hand: adjustable clasps, various knots and ready-made fittings for fastening. In addition, you can make the lock yourself using the same knots, if you take a separate cord for this and instead of the middle thread use the ends of the amulet, folded together in opposite directions
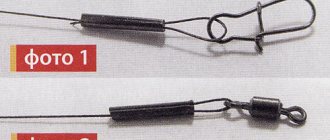
Use of the knot by anglers
A self-tightening knot for the top of the head is actively used by fishermen. It is a structure made from a block of tops with a weight. Tying such a tackle is quite simple. ">
To do this you will need a fishing line, a double leader and a sinker. A special sinker must be purchased at the store, otherwise the entire device may fail. Most often it looks like a horseshoe with a hole in the center of the product. The top bar is tightened using a self-tightening knot and hung with hooks.
To decorate the tackle, take a fishing line 4 mm in diameter and up to 50 cm in length. The line is pushed through the hole into the sinker to the middle, after which it is brought up. Insulation is put on it and a loop is made. After this, a self-tightening knot is formed, onto which the crown is attached. The insulation serves as a fastener for a long leash on the side of the free end of the fishing line, on which a swivel is attached to protect the fishing line from twisting in the current. Having secured the cake block with hooks, you can consider the task completed. The workpiece is attached with a carabiner to the main fishing line. The bait is ready to be cast. Getting into the water, it gradually gets wet, and the crumbling cake from the top spreads in the reservoir, attracting the desired fish.
Weaving a square knot for a Shambhala bracelet
The knots from which the bracelet is woven are made of waxed rope or leather cord.
The algorithm is as follows:
- Take 3 laces, each about 50 cm long. They don’t have to be monochromatic; you can take different colors.
- Place the laces together and tie them into a loose knot (we will untie it later) at a distance of 5 cm from the edge.
- We place the leftmost cord on top of the central one.
- We place the far right one on top of the left one, which is located on the central one. We stretch its edge under the lower (central) one and bring the end into the loop that was formed between the left and central cord.
- Tighten the side threads.
- Make sure the center knot is straight at all times.
- Now we begin to weave the second knot: the “vice versa” principle applies. The thread that was on the left became on the right side, and vice versa.
- Place the left thread under the center thread.
- Place the right one under the left one, and bring the end above the central one.
- Pull the cords - knot number two is ready!
The number of nodes may vary depending on your preference. Weave them until you start stringing beads.
Knots on bracelets between beads
If you tie knots on the bracelets between the beads, you can securely fix each link of the jewelry.
- Having retreated 7-8 cm from the edge of the thread, we tie the first double knot.
- We string the first bead, and then tie a knot close to the already strung bead. To do this, wrap 2 turns of the working thread around your finger.
- We insert the free end into the loops formed on the finger.
- We release the finger and straighten the future knot. A round loop with two turns inside should appear in front of you.
- Then, holding the loop with a sharp object (an awl or a large needle), we pull it towards the bead. When the loop slides towards the bead, gradually tighten the loop, holding the forming knot near the bead with your fingers.
- After all the beads have been collected, we tie the ends of the threads together.
- We cut off the extra long tails, and fasten the remaining short tails to the knot itself using a lighter.
Making a sliding loop
A sliding loop, as one of the connection options under the same name, is necessary for people of many professions. Thus, slingers and climbers use a set of loops on a rope for insurance, fishermen and hunters - for fastening hunting and fishing equipment and gear, for floats and baits, doctors - during surgical operations, handicraftsmen and jewelers - for making all kinds of jewelry, rescuers - for saving human lives.
And in everyday life we simply cannot do without this simple and reliable method of fastening - when lifting weights, carrying things, tying objects, etc. That is why it would not be superfluous to study the theory of how to make such a design and learn how to tie a sliding loop (Figure 6).
Figure 6. Sliding loop knitting options
Here is one simple method that includes the following sequence of actions to help you learn how to knit such a loop:
- A simple knot is made at one end of the rope, which is not tightened;
- Next, a loop is formed;
- The free edge of the rope is passed upward through the turns;
- The knot is pulled up while holding the bottom of the loop.
Kinds
There are 18 types of self-tightening knots in total, but using one rope there are only 4 types:
● Classic Prusik.
● Cross.
● With an “arb” carbine.
● Bachmann knot (with carabiner).
The number of turns is unstable; if necessary, it can be increased.
“>It is necessary to highlight one of the strongest knots - the constrictor knot. It gets its name from the zoological name for the boa constrictor, Boa constrictor, which defeats its prey by strangulation. This self-tightening rope knot is reliable and is made using rounded objects instead of support. As soon as the support disappears, it dissolves itself.
Tips and tricks
Advice from the experts will help you make elegant and luxurious jewelry in this style:
- If you want to weave a product as a gift for a man, choose decorative elements of darker and cooler colors. Not many representatives of the stronger sex would agree to wear red or green jewelry. But your companion will like an accessory in blue, black, or combined shades.
- To prevent the threads from becoming fluffy when working, you can burn them with a lighter, treat the ends with glue or colorless nail polish.
- This accessory can be one-color, two-color or even three-color. Choose contrasting and harmonious colors to suit your style.
- Before making double and triple products in the Shambhala style, practice well on single weaves.
- To make a single bracelet 18.5 cm long, an average of 12-15 beads are required, and a double bracelet - 24-30.
DIY men's bracelets: types and tips
Original jewelry is designed for daily wear and looks great both on vacation and in the office. Of course, you can always go to a jewelry store and choose a gift made of precious metal. But it’s much more interesting and enjoyable to make bracelets with your own hands.
Photo source: yandex.kz
Here are the types of accessories and recommendations for creating them:
Leather men's bracelets.
Popular with young people and mature men. They are preferred by both athletes and people in business suits. Jewelry is created by weaving from thin strips or made from thick strips. Bracelets look stylish with the addition of accessories: metal anchors, rivets, beads.
Manufacturing is cheaper than leather. Use waxed cords of any color. Black, gray, brown are suitable for everyday wear, bright acid colors are suitable for sports and recreation.
Bracelets for men with beads.
The products look like rosaries and are made from plastic beads or ornamental stones. If a man spends most of his time in a suit, choose beads in black, gray, neutral colors. For a casual style, you can add additional accessories from other materials.
Photo source: vidpoviday.com
Be careful when choosing jewelry for bracelets. To ensure that a man likes the gift, decide on the style in advance and choose the appropriate materials. It can be elegant classic, casual, sporty or gothic.
Choosing a durable bracelet material
The basis for such an accessory can vary significantly in shape and material. The most popular options include the following:
- cords (made of cotton, polystyrene, suede, rubber and other materials);
- rigid base (wire with memory);
- silicone (ideal for children's creativity);
- fishing line (elastic backing used in mass production of accessories);
- leather (this type of base is quite difficult to process, but jewelry created on its basis looks very noble).
Reference! Metal bases are considered the most durable, but laces and fishing line are considered the most popular.
Leather jewelry - ideas for beginners on what can be made from leftover leather (100 photos and videos)
An incredible versatile material from which you can make real masterpieces - leather! Indeed, it’s easy to find, it lends itself well to painting, cutting and gluing...
It doesn’t matter where you take it from - from a sheepskin coat, worn boots, a bag, and so on. There is not much difference in this, the main thing is that it is still in good condition
So, in today’s article we will talk about DIY fur and leather jewelry.
How to make a leather bracelet?
Making a leather bracelet with your own hands is quite easy. To make it you need to find strips of genuine leather. The easiest way is to braid an ordinary braid of three ribbons and tie it, wrapping it a couple of times around your wrist.
Another way. We take a wide strip of leather and stick whatever you want on it: a couple of stones, beads, sparkles... It depends on your imagination. Holes are made at the edges of the strip and a ribbon is inserted there. Tie your wrist and the decoration is ready.
If such bracelets are not your thing, then on the Internet you can find many more options for a wide variety of photos of leather jewelry.
DIY leather belt
Of course, you can buy a beautiful leather belt in a store, but you will have to pay a lot. So why not make it yourself?
To make a belt you will need a certain number of identical pieces. To do this, you can use a stencil.
Where can I get it or how to make it? It's simple. You need to take a leaf in a cage and draw a bow 10 cm high, define the edges at 6 cm, and leave 2 cm in the center.
Next you need to smooth out the corners, step back one centimeter from the edge and center and draw a small triangle. Make holes and cut out the finished template. To make it more convenient, you can transfer it to cardboard.
After you have made the blanks, you can begin assembling the decoration. Fold the bow in half. Insert the next piece into the central hole and fold it again. And continue this procedure until the belt length is most suitable.
You can attach leather ties or store-bought fasteners along the edges of the finished product. The belt is ready!
This is an ideal choice for women, and this product also applies to men's leather jewelry.
Real beauty made from leather with your own hands
In addition to simple products, you can also make real leather jewelry from this material for special occasions. For example, a necklace around the neck, an attractive pendant or beads. To make a beautiful pendant you will need leather laces, pieces of leather of different colors, scissors, glue and small stones.
First you need to prepare the foundation on which everything will be attached in the future. It can be of any shape. At the top of the back of the base you need to glue or sew a loop for the rope. Using hot glue, attach the beads to it.
After this, the colored lace is coated with glue. We will glue stones and beads on it, and fur in the center. The base is done. Next you need to make the core.
The skin itself does not burn, but its lower part, heating up, creates the volume we need. When the part is ready, this procedure is repeated with the remaining petals.
It will look very beautiful if you stick a beautiful pebble in the core of the flower. A flower is created from the petals around it. You can cut out green leaves from leather of a different color and glue them on. The pendant is ready!
A variety of handmade leather jewelry
As we have already said, you can make a huge variety of products from leather with your own hands. We will offer several more product options. For example, you can make a beautiful brooch from old leather. Also make a kind of leather bow and hair clip.
In addition, a leather jewelry box looks very beautiful. It’s not difficult to make, and it will serve you for many years. There are different ways to make it, which are very easy to find on the Internet.
Conclusion
So, we hope that now you understand how to make leather jewelry with your own hands. It's unusual and quite beautiful. Plus, they will look great with any outfit. Be beautiful!
Magnetic lock for a long bracelet
This type of fastener is not only a fastener, but also a decorative part of the decoration. Simply put, half of the bracelet is the metal part of the lock, and the other part is made of leather, textiles, beads, and so on. This fastening is much less common than all those listed, thanks to this, jewelry using it looks especially unusual.
Let's describe how to make a clasp on a beaded bracelet:
- With regalis cord. A lock is glued onto one side of it, then beads, figurines and other details are strung. Then the bracelet is applied to the wrist, the excess length is cut off and the other part of the clasp is glued in. If desired, such an accessory can be made without additional elements at all, while remaining simple and stylish.
- With thin cords. This type of bracelet consists of several thin plain or multi-colored stripes. Since the accessory is not heavy and loose, let’s consider how to make a clasp on a bracelet from threads. To do this, you need to gather one side of the cords into a bundle, grease the ends with a small amount of glue and wrap tightly with thread. Then a little fixing compound is applied again on top of it so that it does not unwind and holds the edge tightly. Wait until dry. After this, the tip is cut evenly with a knife, and the cut is again treated with glue. Repeat the same steps with the second side. To be sure that the edges fit into the hole, you need to check this before attaching the lock. If everything is fine, finish the job.
Self-tightening knot - what is it?
Most types of knots and methods of tying them came to the modern world from the navy, although in this area it is used infrequently due to its unreliability. The fact is that a self-tightening knot holds tightly only under constant load; at the moment of weakening, it is quite capable of coming undone. Despite this, there are areas for its application.
«>
This is the simplest original knot and in general represents one of the simplest types of noose. This unit reliably withstands heavy weight and traction, proportional to the strength of the cable or other material from which it is made. But you need to be careful when using it, making sure that the load on the node does not weaken.
For better reliability, there are several variations of this unit.
Rules for reliable connection of the swivel and fishing line
There are a number of principles that should be followed when attaching a swivel to a thread:
- Swivels with various defects on the rings, such as burrs, spikes or splits, should not be used. They will inevitably damage the line, slow it down, and ultimately lead to it breaking.
- The cross-section of the thread should not be flat, but round, because a round one twists less when tying and tightening loops, which means the fastening is much stronger.
- The thread should be lightly moistened with water before tightening the knot. Thus, it will not overheat and will not lose its elastic properties, the knot will hold better.
- The thicker the section, the more reliable and stronger the fastening will be, since thick fishing line is less susceptible to tearing, stretching and deformation.
- For thin lines, simple types of fastenings should be selected, since they have less impact on the structure of the fibers.
- When cutting off excess ends of the fishing line, leave ends of 1.5 - 2.5 mm.
- Open fire should not be used for circumcision.
- You should not tighten the loops unless necessary.
Where is it used?
He will find his place in all spheres of life. It is often used in mountaineering and in warehouses (they are used for hanging heavy objects). Fishermen use it when tying gear for fishing from the shore.
Shock-absorbing units are popular. They are formed on an additional rope, which is used to connect a spare fastening in case of destruction of the main one. There are also self-tightening units for transporting goods or for various rescue operations. These include the braking unit, “belts” and mariner. «>
There are two types of fastenings - simple and complex, for different life situations. In the navy, the original self-tightening knot is rarely used, with preference given to its variations.
Instructions: how to tie a slip knot step by step
To learn how to properly tie a slip knot, we suggest using the following step-by-step diagram:
- Fold the free end of the rope into a coil;
- By passing the running end of the cord over the main one, create a loop;
- Place the running end of the rope around the main one, passing it under the loop and bypassing both ropes from below;
- Complete a simple connection by wrapping the running end around the cord and passing it into a small loop;
- Tighten the simple knot by pulling on the running end;
- Adjust the position of the simple joint at the main end, which will allow you to control the length of the sliding loop.
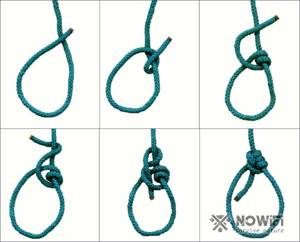
Figure 5. Step-by-step instructions for tying a slip knot
To avoid stretching a simple knot on the rope when the tension changes, it is recommended to tie the same one on the remainder of the running end (Figure 5). The latter will act as a brake and will not allow the running end to crawl through the downtime.
Tying a knot
The methods of tying this knot are among the simplest and fastest. All you need to create it is a rope with a running end and a support. Fishermen use a spool for this purpose.">
The end of the rope is wrapped around the support, thus forming an open loop. At the end of the rope or fishing line you need to form a loop. First make a winding around it behind the running end and create a closed loop. The running end of the loop needs to be made several turns and brought out through the main loop. Pull it, the knot will tighten and, when loaded, show all its power.
To improve the strength of the knot itself when knitting, a self-tightening knot with half bayonets is used. It is performed no more difficult than the standard one. After performing the basic knitting technique, two half-bayonets are formed on the weight side. This type achieves maximum effect when certain conditions are met:
- if it is formed off-center;
- if the running end should be directed towards the intended load.
Leather cord bracelets
Leather accessories always add solidity and nobility. Using different leather textures and color shades, as well as combining materials, you can get a very extraordinary result.
- Take a waxed rope 25 cm long, fold a small loop at the very end and tie a neat knot on it. Measure 5 mm from it and cut off the segment.
- Wrap the leather cord around the rope to hide the section. Make another turn, pull the end of the cord into the loop and tighten.
- Take a thick thread, attach its tip to the cord and rope and wrap the thread in a circle. Secure the thread by pulling the end into the loop and tightening.
- Continue weaving, alternating materials at equal intervals.
- Make a knot at the end so that it fits into the loop.
Leather jewelry is universal. Only for men, dark colors are preferred - black, blue or dark brown. If you add a few openwork elements and diversify the colors, you will get a stylish women's accessory.
Read with this
- How to tie fishing line together using various knots and methods
- A legendary fishing knot that can be used to tie any hook, bait, tie fishing line together, etc.
- Uyaa node
- The most reliable knots for braiding
- Outline of “tourist hubs”
- Bunny ears knot: knitting pattern
- How to tie an albright knot
- How to tie a belt on a coat beautifully
- How to connect threads when knitting securely and discreetly
- How to properly tie a tie with a Windsor knot, popular techniques
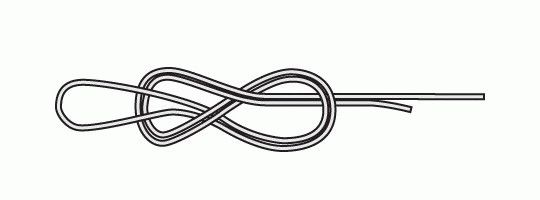
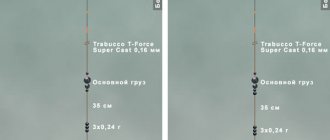
How to make a loop on the main line
This loop is needed to attach a leash to it. It is tied as follows:
1. To measure and mark the desired length, you can use a triple knot, which will act as a limiter. After this, the leashes are adjusted to the fishing line.
2. To the limiter knot you need to add another, double knot, which is not fully tightened. Thus, from a double knot, a figure eight is obtained.
3. The end of the leash is threaded into the resulting figure eight: first into one ring, then into the other. After this, the noose is tightened.
This is interesting: How to knit a Kalmyk knot: diagram