Float body
The material for the body of the floats will be construction extruded polystyrene foam; balsa can also be used.
We take pieces such that there is a margin of at least about 3 mm in size. Depending on the required load-carrying capacity, we use a knife to give the workpieces the specified thickness (from 6 to 12 mm) - use sawing movements.
On the prepared panels we outline the outline of the future float. You need to prepare a paper template in advance (I draw outlines on paper directly on the monitor, then cut them out). Ideally, you need to have originals of the floats, but there are also life-size drawings online.
We cut the workpiece with a knife, leaving an allowance of a couple of millimeters.
Using fine sandpaper, we grind the blanks along the contour and give the body of the float the desired shape.
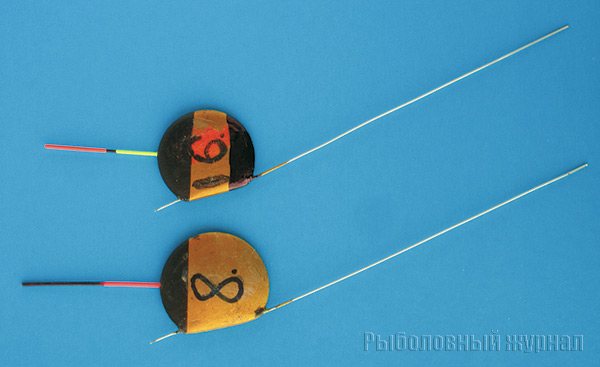
For our “bolo” this is a kind of wing in the form of a medieval shield, for “bubble” it is a complex drop (we have two different thicknesses).
It is not necessary to completely repeat the original; understand the meaning of the float and take into account the main points in its structure.
Flat floats: myths and reality
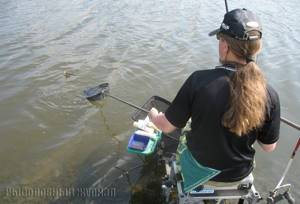
Flat floats are designed for fishing with a plug in the current, with rigid holding of the equipment until it stops completely in place. For proper operation, such a float must be flush with the rod tip. It is not advisable to cast it further: it will move towards the shore, like a simple float, until the angle between the fishing line and the rod becomes straight. In certain conditions, when the fish is not far away (for example, if it is near the shore or if you are fishing from a boat, from a gangway, from a bridge, etc.), it is possible to use a flat float on a fishing rod and reel.
What is the advantage of such a float? The fact that he himself stands still? No, he is held by a taut line, and when released, he floats with the flow, like anyone else. Maybe it holds the hook with the bait near the bottom? No again, the sinker presses the bait to the bottom. And the float - it only makes it possible to see the bite at the moment of holding the equipment.
An ordinary float of the same carrying capacity as a flat one can also be stopped in the current, but it will partially squeeze it out of the water and give it an inclined position. The fishing line will deviate even more from the vertical, and the sensitivity of the entire equipment will decrease many times. In this case, it is almost impossible to notice the bite in time.
A flat float , having low drag due to its shape, actually cuts the water, the water flows around it, and the pressure on it is minimal. The water pressure on the line is somewhat compensated by the tilt of the float keel. And one antenna protrudes above the water, the carrying capacity of which is insignificant. Therefore, the float reacts quite sensitively to bites.

So, in principle, the number of bites with a flat float and with a regular float can be the same, but only if in the first case you can recognize them in a timely manner, then in the second you won’t even know about them.
Loading
No matter how you distribute the weights along the line, the behavior of the float will not change; it will still be in a vertical position. Outwardly, everything will look fine, but as for the hook with the nozzle... Figure 2a shows how the rig behaves with a high-mounted main load and widely spaced small pellets and an undercut. The float maintains a vertical position, but the hook simply dangles in the current somewhere in the middle layers of the water. It’s unlikely that you should count on a bottom fish biting here, but even if it happens, you most likely won’t notice it.
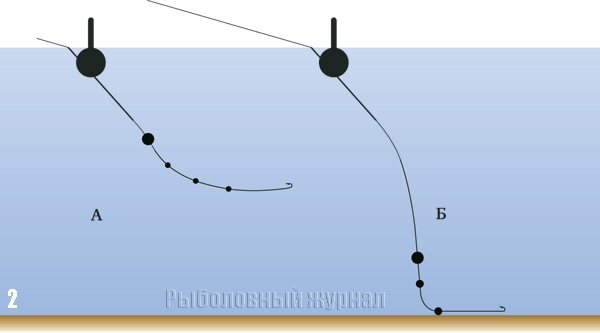
Figure 2b shows a typical correct load. In this case, the equipment holds the bait near the bottom and indicates a bite in time. The main load accounts for 70–80% of the total weight of the sinkers, and the secondary load accounts for about 10%. It is best to make a sub-grass from three approximately identical pellets, and a few more pellets should be placed between the sub-grass and the main load. All together, this allows you to fine-tune the tackle depending on the fishing conditions.
Loading schemes that I can recommend for everyday fishing are shown in Fig. 3.
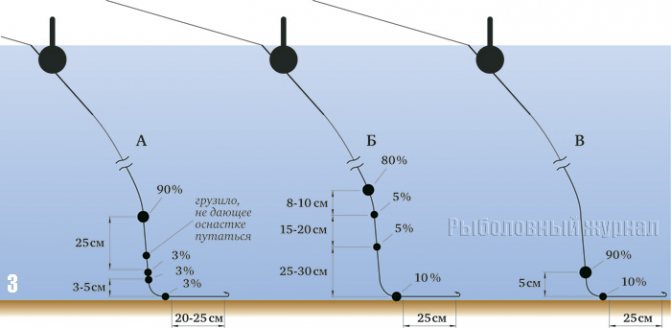
a) This pattern works well for holding bait in place. Short trips with and against the current are also possible. It is important to set the trigger very accurately; The lower of the three graze pellets should touch the bottom.
b) Equipment for wiring with short holds. Works well on roach and ide. Convenient at the beginning of fishing, while the bait is small - roach and perch. Bream are more likely to turn purple on it than to be caught correctly. When the bream begin to turn purple, it’s time to switch to rig (c).
c) The least sensitive, but the most stable equipment. Designed for bream. Allows you to hold the bait in place, but not move it downstream, unless slightly against the current. With a high wave, it is advisable to introduce an additional sinker (0.1 g) into the rig, attaching it in the middle of the leader. Now the float will be overloaded, so this trick will not work at competitions, it is prohibited there, but normal fishermen have nothing to worry about. Lying on the bottom, the shot coarsens the equipment, makes it less sensitive, but stabilizes it, which is very important for bream.
For the main load, it is better to take cut buckshot and clamp it on a cambric pre-attached to the fishing line. Olives work too, but they are more prone to tangling. Any high-quality shot can be used for grazing.
Load capacity of floats
In the conditions of the Moscow region, the most popular sizes of flat floats have a carrying capacity of 5, 6, 8, 10, 12 and 15 g. You need to have 2-3 of them all. Lighter floats are used very rarely in practice; they are kept more for collection, while heavier ones turn fishing into hard work. To tell the truth, there is little pleasure in fishing with a float with a carrying capacity of 20–30 g. In a strong current, sometimes you can’t do without it, but I prefer to just look for a quieter place rather than flex my muscles on the main stream!
fishing line
You shouldn’t get carried away with super-thin fishing lines, because in the current the fish are not so careful. I usually use the following snaps:
— rubber 1.4 mm + main line 0.16 mm + leader 0.12–0.14 mm + float 12–15 g;
— rubber 1.2–1.4 mm + main line 0.14 mm + leader 0.12 mm + float 8–10 g;
— rubber 1.2 mm + main line 0.14 mm + leader 0.10–0.12 mm + float 7 g;
— rubber 1.2 mm + main line 0.14 mm + leader 0.10–0.12 mm + float 6 g;
— rubber 0.9–1.0 mm + main line 0.12 mm + leader 0.10 mm + float up to 6 g;
Why do rigs with floats with a lifting capacity of 10–15 g use such thick rubber? Yes, because they are designed for catching large fish, not small fish.
Leash
As you can see from the layout above, I use leashes with a diameter of 0.10 to 0.14 mm. No 0.06! Maybe there would have been more bites, but imagine for a moment what it is like - a large bream in the current! He will instantly break the thin leash. Yes, and a five-hundred-gram white bream will have to be fished out for several minutes, while with a normal leash it will take thirty seconds.
The length of the leash, in my opinion, should be from 20 to 25 cm. If you make the leash longer, the number of bites will not increase, but they will become less noticeable. Putting eighty-centimeter leashes, as foreigners advise, is completely inappropriate. Maybe when catching some barbel this is useful, but with our bream it only does harm. Not only are no bites visible, but the bleak eats the slowly sinking bait with impunity.
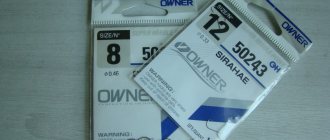
Hook
The hooks I use are quite large by sports standards. In strong currents, microhooks are not suitable. In addition, the size of the hook must correspond to the diameter of the rubber and the leader, otherwise there will be a lot of slips and empty hooks. The most popular numbers are 14 and 16. For monsters, sometimes it’s a good idea to put No. 12.
Wiring
It is impossible to describe all the nuances of wiring; sometimes you have to act at the level of instinct. But the theoretical foundations—here they are.
1) Hold. The rig is held in place, usually above or just below the bait itself. The main thing here is patience, because we are waiting for large fish, and they rarely start biting right away. Honestly, sometimes it can be very difficult not to give in to the temptation to let the rig downstream!
The rod should be held motionless, and a special stand on the platform helps a lot with this. If the wind interferes, then the tip of the plug should be lowered slightly into the water to further stabilize the equipment.
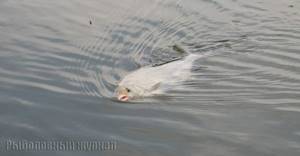
What about the loot? Most often you come across large bream, as well as... mini-perch and nanoruff!
2) He held it - let it go - held it again. Everything is clear here. The train of bait is caught, and the points of the most frequent bites are determined. They should then be used for rigid support.
This type of wiring is the most universal. Everything is caught - bream, roach, and the ubiquitous perch. This option is best suited when you only have one whale and want to catch everyone who eats your bait. Very large fish are found much less frequently, but roach is found more often.
3) Long retrieve at the speed of the current or a little slower - then a short hold - and again retrieve. This is for the laziest, even a flat float is not necessary. The main prey is roach, dace, and silver bream. Fishing occurs below the bait, often quite far from it. In this case, the bream often turns purple than is caught correctly.
When faced with frequent bites below the bait, stop fooling around and switch to a stationary rig! Then, instead of hungry breams, you will be dealing with decent bream.
True, sometimes this wiring works at a shallow depth, a little more than a meter, when large fish are afraid to stand on the bait and bite much lower, in the stern plume.
4) Wiring against the current. Very effective in moderate currents, sometimes irritating even passive bream. Such a technique used to bring me significant catches in winter in the lower reaches of the Moscow River. You can catch perch, pike perch (yes, pike perch, up to 2 kg!) and, of course, bream. It happens that fishing with the current is completely ignored by the fish, but as soon as you start fishing against the current, the bites immediately begin.
5) A combination of all of the above, at your discretion. No dogma. Try it - and you will find the best combination of different types of wiring, which will allow you to be with a catch even where, according to the general opinion, there are “no fish”.
Discs
There are many different types of flat floats on sale now. I will not list everything, but instead I will describe the main models from among those I fished with.
The original flat float is the classic disc. “Disk” by Edmund Gutkevich in the VX4 (2003 model) is quite sensitive and well controlled. If you bend the loop upward so that in the operating position of the float it reaches the water level, then the body of the float will not stick out above the water when moving. Such a modified “Disk” can be held and released a little, and the bites will be relatively clearly noticeable.
The disks behave well in turbulence, do not fall over, do not sink, and maintain the vertical position of the antenna. I have used similar floats for many years and am quite pleased with their performance.
Colmic Sail floats are very nice - it's a shame they are no longer made. In the photo you can see the “veterans”. These patched and patched “kolmiki” are still in service.
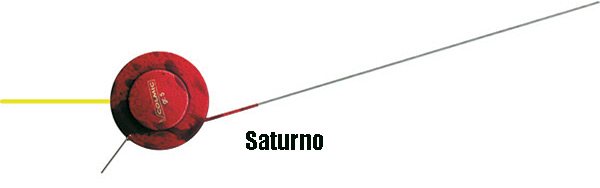
What is this?
A completely incomprehensible float is the “idiotic” disk Colmic Saturno . How they could at Kolmik , having discontinued the excellent Sail , launch such a cuttlefish with bulges on the sides into series is simply incomprehensible. Wide in cross-section, the Saturno behaves completely unconvincingly in the stream. Maybe this is the case when functionality was sacrificed for beautiful design?
Homemade products
The homemade JLA is sold in small quantities, and even then not everywhere. I pestered the manufacturer for a long time to get him to do what I needed. And here is the result.
This float is very thin, has the best keel deflection angle and, thanks to minimal drag, “cuts” the water well. Deprived of a stupid loop, it is attached to the fishing line with three cambrics. While holding, his body remains under water, even if the rod is raised. To date, I like him the most.

Cralusso
These floats are advertised so much that there is nowhere else to go. There are two main types of plug flat Cralusso - Bubble and Torpedo . The first one is suitable for wiring with short holds and is quite sensitive. Combining the advantages of flat and regular floats, it is equally stable both in free swimming and at a stop. This can be considered the most successful of the Cralusso .
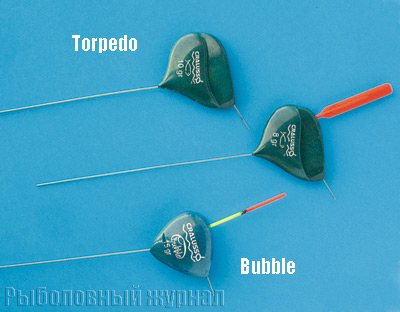
The second, Torpedo , is suitable for sticking and behaves very stable, but only in the absence of surface turbulence. Otherwise, the flows acting on the upper plane of the float submerge it and force it to fall on its side. In terms of sensitivity, Torpedo is inferior to conventional flat floats. Therefore, the angler is primarily interested in its larger versions, from 12 g, used in faster currents, where the bites are always strong and stability is not so much important as sensitivity.
Cralusso floats is that they are plastic and therefore cannot be soaked in water.
Myths
There are several myths about flat floats.
1) The flat float supposedly “stands” in the current. This is a very common, but erroneous idea: the float is held in place not by its special shape, but by the tension of the fishing line. The shape only allows you to reduce the water pressure on the float while holding it. It would seem that even the child understands it, but no.
2) There are, they say, models whose shape makes it possible to work with a smaller load capacity than usual. Most often they mean Cralusso Torpedo floats. It seems that the 6-gram “Torpedo” is suitable for currents that require the use of a conventional flat float with a lifting capacity of 8 g.
However, this is true only upon superficial examination, in the literal and figurative sense: above the surface everything is in order, the antenna is vertical. But this does not mean that all equipment behaves as it should! Many people forget that the weight in the current is needed not only to give the float the correct position, but also to keep the hook at the bottom.
Look at Fig. 4a. It shows a wooden cube, the shape of which from the point of view of hydrodynamics is simply absurd. Due to its huge area, it provides significant resistance to water flow and creates a large load on the rod whip. It doesn't work at all as a bite alarm. However, equipment with an appropriate current force and a correctly distributed load behaves exactly the same as in case 4b, where a classic flat float is used. That is, the behavior of the equipment depends on the strength of the current, and not on the shape of the float. The shape determines whether you notice a bite or not.
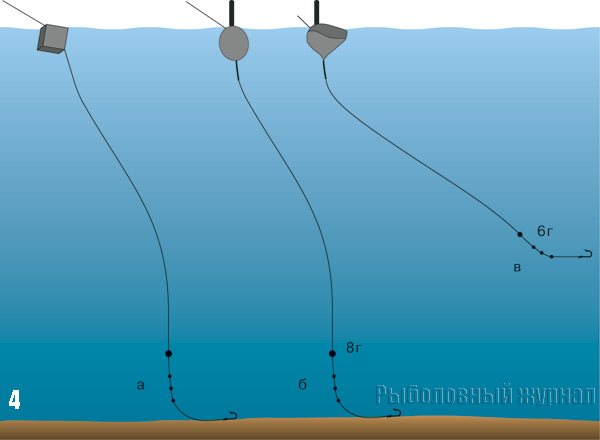
What about the “miracle float”? You see it in Fig. 4c. The load in this case is lighter than in option 1b. Thanks to its clever shape, Torpedo stays vertical in the water and - perhaps - even more stable than a classic flat float. But the equipment does not behave at all as we would like. Due to the lighter load, the current does not allow the hook to sink to the bottom and it hangs in the water column. In order to finally reach the bottom, here we would have to greatly increase the descent, obtaining a huge arc, and fish in a large deviation from the vertical. In this case, there is no need to talk about sensitivity. Draw your own conclusions.
3) So, we come to the biggest myth - about the degree of deviation of the equipment from the vertical. We found out that miracle floats do not exist in nature, that the most sensitive shape must be chosen, that the mass of the load is determined not by the shape of the float, but by the strength of the current and depth. But what about the vertical? It seems that everything is clear: the deviation must correspond to the inclination of the keel. Raising the float, we see that the line is almost in line with the keel. But this is over water. And further down?
Let's stop and look at this issue in more detail. What causes the line to deviate? Due to the current. What is the current mainly affected by? For cargo? No, its area is small and it is located in the bottom layers of water, where the current is much weaker. The main culprit for deviation is the line itself. The current presses on her like the wind on a sail. Have you ever seen a sail inflate? It bends most of all in the middle, because it is secured at the bottom and top. So is the fishing line: a rod holds it on top, a load on the bottom, and an arc is formed in the middle (Fig. 5).
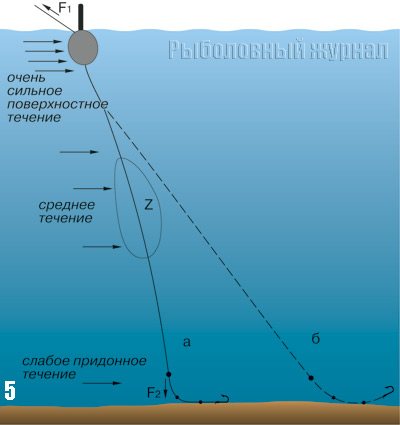
Figure 5a shows the true position of the equipment. F1 and F2 are forces trying to straighten the fishing line. Zone Z is the farthest from the points of application of these forces and, moreover, it does not have the weakest current. Here the line is bent in an arc.
In Fig. 5b the fishing line is on the same straight line with the keel. In life, this is only possible when hooking or biting a large fish.
Still don't believe me? Well, okay, measure the angle of inclination of the keel of the float relative to its antenna, arm yourself with a geometry textbook and, using simple calculations (see the topic about a right triangle), determine how long the second leg should be if the first leg is known, that is, with the measured depth. It turns out that when we fish at a depth of 4 m, the float must be held almost 3.5 m above the baited point for the hook to reach it. But anyone who frequently uses flat floats knows that this is not the case.
***
In conclusion, I would like to give some tips that may be useful to you.
Loading and installing the descent
When submerging flat floats, you should leave only the upper part of the antenna (about 5 mm) sticking out of the water. This applies to all floats except the Cralusso Bubble. It is surrounded like a regular float.
When measuring the depth, it is better to use a lot that is attached to the underlay rather than to the hook. The lot should be quite heavy so that you can properly tap the bottom with it.
When installing the release, increase it until the body of the float appears while holding it. After this, reduce the descent by 5–7 cm. With normal loading and proper descent, the body of the float on the hold is not visible, but if you sharply release the line, it will appear, but then the float will sink when the hook catches on the bottom.
Selective fishing
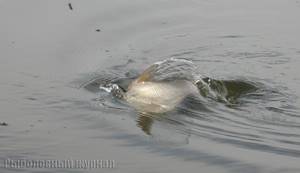
Fishing with a tight hold is leisurely, measured, there is no fuss inherent in fishing for small roach and bleak, but there is an opportunity to selectively catch large fish. There are much fewer bites, and the catch is much more significant than usual, and fighting with a large opponent is much more interesting than carrying around constantly pecking microroaches.
If the roach has stopped pecking or its bites have become less frequent and have shifted towards the end of the bait train, then do not rush to feed more. Perhaps someone big has taken over your bait. It’s just right to slip him a bait on the hook.
Yes, about the attachments. When held tightly, the so-called “non-sports”, “folk” attachments often work. For example, on a retrieve, a white bream refuses to take a worm; give him a bloodworm. But if you fix the worm in place and wait ten to twenty minutes, then the kind of bream that has not been pulled out of this reservoir for a very long time will bite. Don’t forget also about pasta “stars”, pearl barley, etc.
Equipment storage
Equipment should be stored on reels separately from floats. Then the floats will not deteriorate from friction and impacts on the edges of the reels, and the reels will take up less space in the box.
Each reel must indicate the carrying capacity of the float and its number, duplicated on the float itself. For example, “Col-8-2-0.14” - that is, the float “Colmic”, load capacity 8 g, number 2, equipment on a fishing line 0.14 mm. By the way, you can prepare several equipment for one float. If one gets tangled or breaks, there will always be another one at the ready.
Flat floats must be treated with care and stored in a hard case, because, despite their impressive appearance, they are easily damaged.
A few thoughts on the topic
— A serious fisherman is often faced with the task of cutting off small fish that interfere with the hunt for large prey. To solve this problem, selective nozzles can be used, or special equipment elements can be used, such as a flat float on a plug.
— At competitions, the goal is to gain maximum weight in a short time, and the choice in favor of fishing for large, medium or small fish (or all of them) is made depending on the situation. On regular fishing, there is usually more time, and large fish are always preferable to small ones. Hence the difference in equipment and even attachments. Many nozzles, disparagingly called “amateur”, are actually quite selective and often allow you to cut off small things when used correctly.
— Even very smart fishermen easily “buy” into rumors, advertising and other myths. We must not forget: if everyone around has the same opinion, this does not mean that it is true. Perhaps we are just dealing with one of the cases of mass delusion.
— Foreign experience should not be mechanically transferred to domestic water bodies. It is worth using it, but creatively processed, adapted to our conditions. Blindly copying foreigners rarely gives good results.
Author: Ivan Kutishchev
Originally published: “Fishing Magazine” No. 3/08, 4/08, section “Plug Players Club”. Reproduced with permission of the editors and with the consent of the author.
Flat float keel
The keel needs a long one - 150-200 mm. I suggest using bamboo as a material, which is characterized by high strength, good flexibility and elasticity. The original uses wire, you can take it (diameter 0.7-1 mm). I used an old “mat”, the sticks of which were sanded and matched in thickness to the rubber nipple.
For ultra-light floats I use incense sticks, from which the coating can be easily removed after moistening.
I prefer to make both the keel and the antenna from a single bamboo stick; it seems to me that this is more reliable.
However, it is possible to separate these elements, for example, to make the antenna replaceable (the rod must be inserted at least 20 mm) or positioned at an angle to the keel.
We pierce the body dry. Then we glue the rod to the body. I like to use a glue gun in this case.
At the polystyrene outlets, the melt can be formed into a cone with your own hands.
DIY current floats
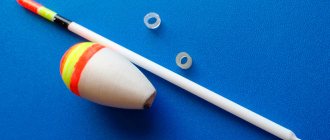
It is not difficult to make a float for the current yourself. To do this you will need:
- A small piece of foam.
- Wire or stainless steel.
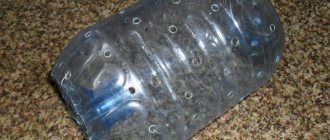
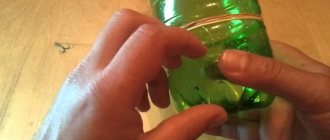
- Any plastic bottle (you can also use regular plastic).
- Special varnish for processing.
- Knife, file.
Manufacturing stages:
- Cut out a small disc-shaped piece of foam.
- Process its edges and surface with a knife and file.
- Coat the resulting flat disk with a special varnish (sold in a fishing store). Important advice: it is better to do this in several layers, ideally at least five.
- Take stainless steel or strong wire and make keels from them. The optimal thickness is 0.9 - 1 millimeter.
- Cut antennas from a plastic bottle.
- Attach an antenna to the upper part of the disk, and to the lower keel.
The approximate weight of such a float will average from five to fifteen grams. Important advice: it is better to make several of these floats so that at the time of fishing there is an opportunity to replace it if necessary.
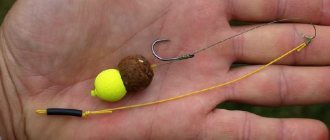
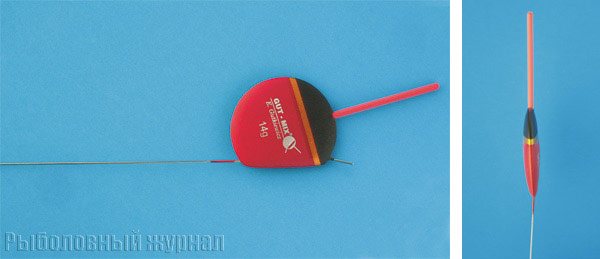
Second attachment point
An additional attachment point for large floats of this type is required. In a bolo, a thin wire outlet is located at an angle of 45 degrees relative to the plane of the float.
So, when the fishing line is pulled, the float turns to a certain position (in our case, the float is made for the current coming from the right side). “Bubble” is simpler: a wire 15-20 mm long extends clearly along the axis, perpendicular to the keel.
Material: paper clip. We glue it with hot glue.
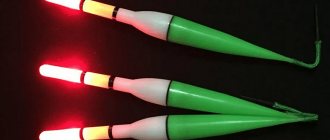
Painting the float
In fact, this procedure is completely optional, since these floats are loaded so that only the antenna, or even only a small part of it, sticks out above the water. But for the sake of decoration it can be done. I used automotive polyurethane enamel in a can that I had on hand. Sprayed it several times. I sealed all the “ends” with masking tape.
Can be painted by dipping. It is advisable to sand the body between layers. I know that some craftsmen also prime such floats with their own hands with “superglue” or coat them with highly diluted varnishes.
Loading the float
The main rule: a submerged float is one whose body is completely submerged in water, and its antenna is more than half above the water level.
Basic rules for loading during currents:
- Choose the right weight: if there is not enough weight on the float, then it takes a horizontal position; when, on the contrary, there is a lot, then the float will tilt forward too much.
- Choose a rod carefully - ideally with the tip as rigid as possible (the float behaves more stable).
- The diameter of the fishing line should be the smallest possible.
- Move the sinker as close to the leash as possible, this will prevent the movement of the float;
Important advice: when the current is strong, do not cast your fishing tackle too far. It should be remembered that incorrect loading can lead to the angler missing all the bites.
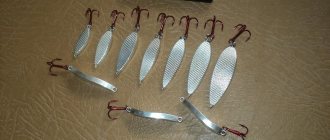
Homemade flat floats for river fishing in the current are ready
Basically, that's all. Now you can try to load the finished float, mark its working weight on it and place it in a protective tube.
Turishchev Anton, Ukraine, Slavyansk - Specially for the Samodelki FISH website
- Uniformly loaded float with balancer
- DIY match float