Loop:
Conductor
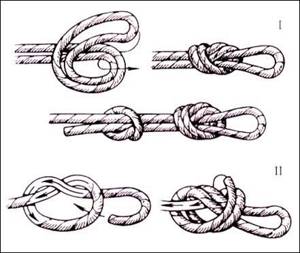
Easily knitted both at the end of the rope and in the middle, can be knitted with one end.
Under load it tightens strongly and “creeps”, especially on a rigid rope.
Used to attach a rope loop to something.
When using a knot to organize links, a control knot is required.
To make untying easier after use, it is recommended to insert a hook into the plexus of the knot, snap a carabiner or other object.
Step-by-step instructions for tying a wire:
Eight
Easily knitted both at the end of the rope and in the middle, can be knitted with one end.
Under load it doesn’t tighten too much, it doesn’t “creep”.
Used to form a secure loop.
Step-by-step instructions for tying a figure eight:
Bowline
A simple and reliable knot that does not tighten too much under load.
“Crawls” under variable loads.
Used for attaching rope to rings, eyes, and for tying around a support (tree, pillar, stone).
Step-by-step instructions for tying a bowline:
Method 2:
Binding:
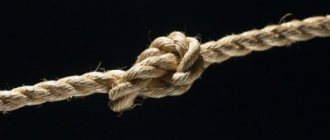
Grapevine
Reliable node.
It gets very tight under load.
Used for tying ropes of the same and different diameters.
Windlass knot
Reliable node.
It does not tighten under load and “crawls” under variable loads.
Used for tying ropes of both the same and different diameters.
Control nodes are required.
Step-by-step instructions for tying a brass knot:
Straight knot
It gets very tight under load.
Unties spontaneously - “crawls”, especially on wet, hard and icy ropes.
Used for tying ropes of the same diameter.
Use without control nodes is unacceptable.
For heavy loads, it is recommended to insert some object into the middle of the knot that prevents strong tightening (a piece of stick, branch, climbing carabiner, rock hook).
Step-by-step instructions for tying a straight knot:
Knot “Noose on a support”
This is a knot, as they say, for all occasions. This node is used by fishermen and sailors, as well as tourists. The support can be any object or a wet rope. Knotting technique:
- A rope is attached to the support.
- After this, a loop of three turns is formed.
- The short end makes 3 turns around the support.
- After this, an auxiliary rope is pulled up.
- Finally, the node is freed from its support.
Such nodes can slip, so each time you need to check the connection for strength.
Grasping:
Prussian Knot
Option 1
Option 2
The unit moves freely, tightens when loaded, and is easily returned to its original state after the load is removed.
It does not hold well on hard ropes, and does not hold on at all on icy ropes.
It does not like jerking, since slippage can cause the coils of the assembly to melt.
Used in mountaineering to organize self-insurance.
The knot is knitted with a rope with a diameter of 5-6 mm on a rope with a diameter of 9-12 mm.
When using a knot on an icy rope, you must complete the second (upper) half of the knot with one turn.
Austrian catching knot
Same as for the Prussian knot.
Used to tighten the rope when organizing a crossing.
Special:
bunny ears
They begin to knit in the same way as the conductor (figure eight conductor).
The second option is preferable, since in this case the rope is not tightened so much.
Forms a double loop, which increases its tensile strength.
“Does not crawl”; under load it tightens greatly.
Used wherever a strong loop is needed.
Loop Guard
Used for belaying, braking and rope tensioning.
Can be used for any rope condition.
Holds a loaded rope well.
The dynamic rope does not hold well when tensioning the crossing.
The braking force in the knot is regulated by feeding the free end into the knot or holding it.
Whitening knot (“Stirrup”)
Doesn't tighten under load.
It “creeps” under variable loads, but works reliably under constant load.
Convenient for tying a rope to any number of supports (poles, trees, etc.).
To increase the reliability of the connection, an additional turn is made with the free end around the support (d).
Easy to knit and untie.
The loops of the knot are used as a support for the legs when climbing along a fixed rope - 1.
Convenient during rescue operations to ensure braking of ropes and tying stretchers using improvised means. Can be used to prevent rope slipping (chafing) – 2.
Self-tie knot
Used when establishing a crossing.
Knitted from a piece of main rope.
Reliable, unfastens well even under heavy load (1 – tightening direction, 2 – untying direction).
To avoid accidental untying, the loop is secured with a carabiner or a reef knot.
Control units (sliding, blind, carabiner)
Prevents spontaneous unraveling of other knots.
They are always used when there is doubt about the reliability of a knot (especially on hard, dirty, wet and icy ropes).
To prevent the control node from sliding towards the main one, a blind (c, d, e) control node is used.
Carbine control units (from left to right):
single (1 – carabiner, 2 – end of the main rope under load, 3 – end of the rope for untying the knot),
with a control node (the second node from the loop of the first node),
using a carabiner as a control unit
Why do you need a carbine?
As mentioned earlier, a carabiner is a device that is used for spinning fishing. Its main task is to prevent the line from twisting, because this, in turn, affects the strength of the line.
It is also worth noting that twisting it can cause rupture, and this will be an unpleasant discovery for every angler. In addition, with the help of a carabiner you can quickly and, most importantly, easily replace various tackles and lures, and this is very convenient during the fishing process.
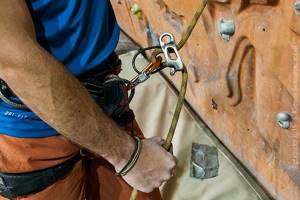
Locking the ASC (the order of tying the chest harness and the gazebo)
a, b, c – the sequence of tying a knot and passing the ends of the rope in the ears (loops) of the harness and gazebo;
d – finished unit.
1 – loops of the chest harness,
2 – gazebo hinges,
3 – a piece of main rope at least 5 m long,
4 – lanyard loops, knitted from the ends of a piece of binding rope (the length of the lanyards can be adjusted when tying a knot),
5 – strands of the tying rope onto which the connecting carabiner of the tying rope is fastened, snapped to the left or right of the knot.
For additional information on nodes, we suggest downloading the presentation
www.alpineasiateam.kz
In the first article we looked at knots that are vital for any climber. As you remember, the very, very, very minimum that you need to know and be able to knit, even during the day, even at night, even blindfolded, is the figure eight knot. I’ll give two knitting patterns here again just in case.
We use the node whenever we need it:
- tie to a rope
- tie a carabiner to a rope
- get a reliable hinge for any need.
We also knit a figure eight
instead of any other nodes that you do not know very well.
Loop in the middle of the rope
As you can see, a figure eight can be tied at both ends of a rope, but what if you need a secure loop somewhere in the middle?
As usual, if in doubt, just knit a figure eight, but due to the fact that in the middle of the rope the knot will work crosswise (i.e. the load will stretch it to the sides), it makes sense to tie a knot that is intended to work in the middle section and which tolerates lateral loads well. the alpine guide
knot , also known as the middle knot, or butterfly knot.
Knitting is so easy, you can teach it to a child. It is useful in the household, and in rock climbing (since we are talking about it) it is also useful: in addition to the aforementioned tying of the “middle”, this knot is used to isolate a section of the rope that has been broken (for example, by a stone).
How to tie a rope.
What else does a climber need to be able to do with a rope? Of course, tie it up. The reasons may be different, but, you see, the result should always be the same - a reliable connection of the two ends. Firstly, the figure eight is perfect for this (yes, that’s it, you can’t go anywhere without it), although tied a little differently - the ends go towards each other.
Secondly, the counter node l
. The principle of tying is the same as the counter figure eight, but the initial knot will be a “conductor”.
And the third one is the grapevine knot.
As you can read in any manual on tying knots: a very beautiful knot, the correctness of which can be easily checked visually. Grapevine is very reliable and knits quickly and easily.
How to knit laces: straight, mother-in-law or woman's knot?
There is one knot that everyone knows, even those who are familiar with knots only from the “bow” on the laces of their climbing shoes.
Most of us, without even knowing it, use a direct knot
.
This is one of the oldest knots, and in addition to its usual name, it is known by the nickname “bloody”. The fact is that it has two modifications that significantly worsen the characteristics of the unit: creep, the ability to tighten strongly, and so on. They are known as "woman's" and "mother-in-law" knots, and both of their half-knots are knitted in one direction, and not in the opposite direction, as in the "straight" one.
In truth, it cannot be used anywhere other than laces or irresponsible fixations: it was invented in the days of ropes made of natural materials, and on modern slippery synthetic cords it crawls even under load and requires the use of control knots at both ends.
That's all, in general, if he talks about the knots that a novice climber needs to know. In the future, of course, you may want to learn other weavings somehow, but the most important thing is to remember that practice and skill are everything, and as they say, you should be afraid of the one who performed one blow a thousand times than a thousand blows once.
lmstn.ru
How to use a harness
In my free time from the mountains, I go to the climbing wall. Recently I noticed how young climbers work with equipment. Well, well, only a few of us know how to properly fasten a rope into quickdraws and properly belay a Grigri. But everyone knows how to use a harness. So? No.
The carabiner is fastened incorrectly: at the bottom and at the top
The manufacturer says to put it in the ring
In the instructions for harnesses (Petzl,), manufacturers write that you need to tie them to the loops that go around your legs and to your belt, and fasten the carabiners to the ring. It's even called a belay loop. It is written on the Petzl harnesses that you need to fasten the carabiners to it.
I think that the manufacturer’s opinion in such matters should be taken into account. He is responsible for what he does.
The carabiner is fastened to the bottom and top, this is wrong
Safety ring
durable. According to the CE standard, it can withstand a minimum load of 15 kN (1.5 tons).
If the harness does not have a CE mark (CE0082, CE0123, etc.), the manufacturer does not have a quality certificate.
According to Black Diamond average
the breaking load of the safety rings on their (and some other) harnesses is 22 kN. Colin Powick, responsible for the quality of equipment in the database, conducted a study: he took 8 safety rings, rubbed some of them, and cut some. Then he tore everything up. And this is what happened:
| What's with the ring? | At what load did it break, kg |
| 50% cut on one side | 1578 |
| 75% cut on both sides | 1323 |
| 90% cut on one side | 352 |
| 2 of the 4 seams on the stitching are cut | 1800 |
| All 4 seams on the stitching are very frayed (different rings) | 2394, 2421, 3369 |
| The sling is very frayed | 2179 |
- What is this? I’m more used to two loops, and somehow more comfortable...
If you fasten the carabiner this way, it will not fit correctly, and the load will be across the main axis. So he is three times weaker. Let's add to this that Grigri and the figure eight periodically slide along the carabiner and, under load, work like a lever.
The combination of an incorrectly fastened carbine (bottom and top) and a figure eight is deadly (in English). Here is the same article in Russian: proclimbing.ru.
The belay device, if it is not a figure eight (which, by the way, is positioned as a descender), is positioned correctly, as the developer intended, if the carabiner is fastened into the belay ring.
So, why can’t you attach a carabiner with a belay device to the bottom and top?
- He will stand across and become three times weaker
- Eight or Grigri will slide down and act as a lever
- The belay device will not be in the correct position.
Why can't you tie a rope to a safety ring?
Because it will fray faster from contact with the rope. It's not about one climb, but about practice. There is a special place for tying, reinforced with an additional layer of material.
- Well, okay, tell me as needed.
Read the equipment instructions. In them, manufacturers write how to use it.
When climbing with a top or bottom rope, tie to two loops: the one that connects your legs and the one around your waist.
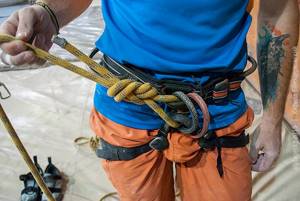
Tie this way: the rope is passed through the bottom and top
Fasten the carabiners to the safety ring. Always. When belaying and descending.
Carabiner in ring, basket positioned correctly
— There is only one loop on my harness. What to do?
Buckle up and get attached to her. But if I were you, I would buy a normal harness for mountaineering and rock climbing.
— And the safety ring on my harness is already old, it’s scary to belay with it.
It's time to throw it away. Surely you can spend 10,000 ₸ (3,000 ₽) on your safety every few years?
— My coach taught me this 15 years ago!
At that time he was wearing a dilapidated harness. Then the harness was older than the coach is now. He fastened himself to everything at once and in addition tied a piece of rope around his belt.
The carabiner is not fastened correctly. The main load will fall on the belt.
Now everything is different. You can buy yourself a harness every few years. This is provided that you often go to the mountains and climb rocks a lot. The harness lasts me 3-4 years even though I use it 100 days a year. If you walk less, the harness will last longer.
Kirill Belotserkovsky, instructor of the Tuyuk-Su alpine camp
Here's another:
- Difficulty categories: rocks How to understand the difficulty of a climbing route. Popular complexity rating systems, their advantages and disadvantages.
- How to behave on the rocks Fifteen rules for a conscious climber. They are all simple and make life on the rocks more enjoyable and safer.
- How to tie up at the top of a climbing route. How to pass a rope through a rappel ring on a climbing route without losing it or your lanyard.
- A chain hoist from a basket How to help your partner climb a difficult area using a basket, a gripping unit and carabiners.
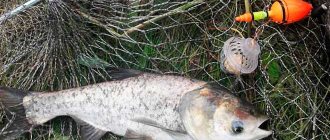
What is a fishing carabiner?
Remember that all additional connecting elements reduce the strength of the fishing line; they must be used with caution, but there are cases when you cannot do without them. One such case is the use of carabiners.
Additional connecting elements reduce the strength of the fishing line!
A carabiner is a small device that makes fishing with a spinning rod much easier - thanks to it, the line will not twist and changing gear is much easier. There are two types of carabiners - wire and plate.
What is a carbine used for?
Its most common use is as follows:
- The working part of the tackle is often connected to the main line in this way. Usually it is drawn up in advance, before the start of fishing. In the process of fishing, they already take the prepared tackle and attach it to the main fishing line.
- Another reason for using swivels is that the leader is more likely to become twisted. The simplest way to prevent this from happening is to use a carabiner to attach the leashes to the main line.
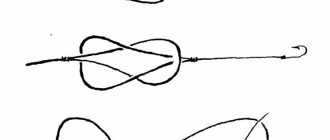
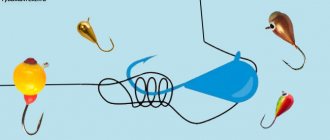
Carabiner binding
How to tie a carabiner to a fishing line? To secure it, most often, one of the following knots is used: hangman, offshore swivel-knot, Double Clinch and Palomar.
Hangman's Knot
Also known as the Lynch knot, it is distinguished by its simplicity of execution and reliability. The executioner's fishing knot for a carbine is no different from its classic design:
- Thread the fishing line into the eye of the carabiner.
- Make two loops directed in different directions. The carabiner should be on the second loop.
- The short end of the fishing line must be made at least 7 turns around the second loop.
- Then thread it through the first loop and tighten.
Offshore swivel-knot
- Thread a loop into the eyelet, which should be long enough for the carabiner to fit through it. The loop points up and the carabiner points down;
- From this position, the carabiner must be rotated around its axis through a semicircle formed by the fishing line, and so on several times;
- After several turns, the knot must be moistened and tightened.
Clinch
The clinch knot has several varieties:
- Single. It is used to connect the fly and the leader, and also to tie the fishing line to a hook, spoon or swivel.
- Single stop. Convenient for sliding float;
- Double. It is best to use it to tie a carabiner to a fishing line;
- Hardened. It is used in most cases of hook fixation, when a high load on the knot is expected.
- Improved. This knot is most often used to tie anchors to boats. Externally and in execution it is very similar to a single one.
Step-by-step instructions on how to quickly tie a carabiner to a fishing line using a double clinch:
- Pull the line through the eye twice to form a loop;
- Wrap the free side around the fishing line several times;
- Then it must be pulled through the first knot, thereby creating another knot, the fishing line must be pulled through it;
- When you pull on the tackle and line, both knots should tighten;
- We cut off the extra piece of fishing line or melt it.
Palomar
The palomar knot is simple and proven; with the proper skill, you can tie it even in the dark.
- Fold the fishing line into a loop and pass it through the eye of the carabiner;
- This loop must be tied around the main thread and as a result of this a second knot is formed;
- If we did everything correctly, we get two loose loops;
- The carabiner must be threaded through the first loop;
- By pulling on it and on the fishing line, we will tighten both loops.
prouzel.ru
According to their purpose, nodes are divided into three groups. 1. Knots for tying. In Fig. 218 shows a bowline, which is more suitable for tying a safety system (chest harness): the free end is passed through all the loops of the system (two loops of the harness) and approximately 60 cm of rope is laid with a simple loop - 1. Loop 2 passes through loop 1. The end of the rope 3 is pulled cut loop 2, and rope 3 through the loop to the left. In all cases, the bowline must be tightened tightly.
Rice. 218. Tying a bowline with one end of the rope.
Rice. 219. Knitting a conductor knot
The main advantage of the conductor knot (Fig. 219) is the ease of tying. It is easy to knit with one hand. The disadvantage of the knot is that it tightens greatly under load. It is recommended to insert a hook into the plexus of the knot, snap a carabiner or other object. The conductor is also used for tying to the middle of the rope, if there is no safety system (harness), as well as for tying ropes - two conductors at the ends of the ropes are connected with a carabiner. To tie a figure eight knot, after the initial stage of the conductor, you need to make an additional half turn with a loop and insert it into the knot from the opposite side (Fig. 220). The figure eight is a strong knot; control knots cannot be tied to it.
Rice. 220. Tying a figure eight knot
2. Knots for tying ropes and ribbons. A straight knot is designed for tying ropes of the same diameter (Fig. 221). Both ends of the rope are parallel on one side. Since the knot is susceptible to self-untying, control knots are required at both ends of the rope (see Fig. 217, a).
Rice. 221. Knitting a straight knot
The counter knot is widely used for tying two ropes, including those of different diameters. Suitable for tying ribbons and ribbons with rope. It holds well and is easily untied after removing the load (Fig. 222).
Rice. 222. Tying a counter knot: a - for two ropes; b - for two tapes; c - for tape and rope (recording cord)
Brampost knot, single and double, is used for tying ropes of different diameters. The knot pattern must be correct, the strands must be parallel. A control unit is required (Fig. 223).
Rice. 223. Tying a bramline knot: a-single; b-double (at the ends marked with arrows, knit control knots)
Rice. 224. Tying a grapevine knot: a-for tying two ropes of the same diameter; b-knitting a guy loop (rope, tape)
The grapevine knot is the most reliable for tying ropes of the same diameter, ribbons, knitting guy loops, and loops for bookmarks (Fig. 224). This knot is especially convenient when tying a loop for self-belaying; with the same knot you can adjust the length of the loop.
3. Auxiliary units. Recently, the gripping unit has lost its functions as the main one for a variety of insurance purposes, since in practice and a number of tests in extreme conditions, as a result of intense friction, cases of melting and breakage of the unit have become increasingly common. But for auxiliary purposes it finds application and successfully performs its functions when it does not experience significant friction (when descending, sharply passing the rope through a knot on a belay, etc.), when moving quickly along the rope. The knot is knitted both with a loop (Fig. 225,a) and with one end of the cord (Fig. 225,6). On an icy rope or if increased reliability is needed during rescue operations, it can be knitted in three turns.
Rice. 225. Grasping knot: a - knitting loops; b - knitting with the end of the cord
Bachmann knot and carbine knot (Fig. 226). The advantage of these knots is that they can be easily pulled along the rope when the load is removed. They are especially reliable in any type of work involving the transportation of a victim. Knitted on both single and double rope.
Rice. 226. Auxiliary nodes: a - Bachman; b - carbine
The stirrup is a universal auxiliary unit. It is used for support with legs when climbing on a fixed rope, for self-belaying and in rescue work. It is knitted simply (Fig. 227), does not tighten under heavy loads, and unravels easily after loading.
Rice. 227. Knitting the stirrup: a - sequence of knitting; b - securing the stirrup in the carabiner (self-belay, rope stop, etc.)
UIAA knot - used for dynamic belaying only on a soft, elastic rope. Not applicable on a hard rope. The main thing is to correctly insert the coils of the knot into the carabiner, taking into account the direction of a possible jerk (Fig. 228).
Rice. 228. Tying the UIAA knot: a - rope to the belayer; b - rope to the leader in a bundle
The Garda knot (loop) is an excellent means of belaying. Almost indispensable when transporting a victim. Easy to knit. Reliable in any condition of the rope (Fig. 229).
Rice. 229. Tying a Garda knot
A reef knot (bayonet) is simply irreplaceable when it is necessary to secure a rope in a carabiner under load. It knits easily, holds securely, and is easily untied under the heaviest load (Fig. 230).
Rice. 230. Tying a reef (bayonet) knot: A - safety carbine - instead of a control knot
Speaking about knots and rope, it is necessary to recall that any knot reduces the strength of the rope at the point where the knot is located. Due to this, about 40% of the average strength in the stirrup knot and about 25% in the bowline and figure eight are lost. The strength of a rope when bent at an acute angle (for example, on a carabiner) is approximately 30% lower than the static strength. A rope dramatically changes its strength properties when it gets wet or freezes. Mechanical damage to the rope is dangerous: impacts from stones, abrasions of the braid at the bends. The rope should be handled carefully, dried and inspected after exercise and climbing. In case of obvious violations of the braid, the rope must be replaced. A rope that has withstood the force of at least one tug when broken must be immediately removed from use.
Rice. 231. Preparing and dropping the rope for descent
You need to work with a rope clearly and dexterously, which requires training. Fastening the rope to hooks, protrusions and embedded elements must be carried out clearly and quickly, the knots must be tied correctly and quickly. Consistency in working with the rope and efficiency in arranging belays significantly save time when completing the route. The rope should not get tangled underfoot or hang in bunches on hooks and carabiners. The belayer, receiving the partner in the rope, immediately carefully lays the rope so that, without stopping the partner, he can immediately give him the rope and let him go forward along the route. When descending, the rope should be gathered into rings and carefully thrown down (Fig. 231), having previously warned the partners who are there. If you descend carelessly, the rope can get caught on the rocks or even jam, and then the rope will cause a lot of trouble. The ends of a double rope must be tied, otherwise it can “escape” through the trigger carabiner. When not in use, the rope should be carefully rolled into a coil and tied with 3-4 turns of the mark (Fig. 232). Carry the rope under the flap of the backpack or tied to its side outside. The same figure on the right shows the technique of carrying a rope on your back.
Rice. 232. Marking a rope into a coil. On the right - special markings for carrying the rope on the back
MOVEMENT OF LINKAGES The technical preparedness of partners in a combination, moral and volitional qualities largely determine victory in the ascent. Accidental, ill-considered formation of a ligament is unacceptable. The guarantee of the success of the ligament is its similarity and teamwork in training. The main condition for the safe operation of the team and the group as a whole is mutual insurance. When driving on terrain, one of the essential safety elements is self-insurance, which is necessary in any case where there is a suspicion of danger. The self-belay connects the climber to the terrain; during a jerk, it must take on part of the load falling on the safety rope. Self-belaying is organized on relief ledges, hooks and does not allow any conventions. The connecting link between the “relief and the climber” is a piece of rope, tape, or loop. So that the length of the loop can be easily changed, use a loop tied with a grapevine knot, or a universal safety loop made from a double cord (Fig. 233). First you need to knit a closed loop from the turnip cord, fold it in half into two uneven parts and tie the conductor knots. The long end coming out of the knot is 125 cm, the short one is up to 45 cm. With the short end, but not like a loop, a grasping knot is tied around the long end, and the resulting conductor is snapped into the carabiner of the chest harness. The tip remaining after tying the knot is secured in a carabiner.
Rice. 233. Universal safety loop
To shorten the safety loop, you need to pull it through the gripping knot to the required length and secure the gripping knot. The large loop increases to 150 cm, and the small one is practically adjacent to the safety carabiner or hook. You should pay attention to the correct line of self-belaying in relation to the line of the jerk when the first one in the bunch is broken, to the position of intermediate fastening points (protrusions, hooks, carabiners, embedded elements, etc.), with the help of which the safety chain is organized. The lanyard loop should not have any slack to prevent the belayer from falling from the belay point. At the same time, it should not interfere with the actions of the belayer. As a rule, the “whiskers” of the lanyard are spread across two or even three attachment points. The first is the actual self-insurance for the person who comes to the insurance point, his personal (individual) safety. The remaining points are located in the line of the expected jerk in the event of a fall, and their task is to compensate for the jerk and insure the belayer in case of a fall with the force of the jerk falling on the belay point. Such separation of self-insurance points will largely allow the belayer to avoid the consequences of a jerk and remain capable of helping a fallen partner. Belaying your partner is carried out only with gloves on: even the slightest tug of the rope can seriously injure (burn) your palms. On light rocks, ridges, and in areas with a large number of protrusions, the team, moving simultaneously, should not neglect the insurance, which is carried out by laying the rope through the protrusions of the relief. Each partner carries 2-3 rings of free rope in his hand. This allows you to maneuver on simple terrain and navigate if you need insurance for your partner. With this movement pattern, a lot depends on the length of the rope. Rope 30-40 m long, getting tangled Fig. 233. A universal safety loop in the protrusions can interfere with movement, and friction will be significant. Use a long rope to casually throw down loose stones. In such cases, it makes sense to shorten the ligament rope by half. The rope is shortened as follows: one or both partners put on several rings of the rope, after which the rope going to the partner is attached with a carabiner to the chest harness with a guide knot (Fig. 234). Another way is that one of the partners, usually the second in the rope, puts the free part of the rope, neatly folded into rings, into his backpack. The rope going to the partner is attached to the chest harness.
Rice. 234. Shortening a ligament rope: a - conductor knot on the shortened part of the rope; b - conductor knot at the end of the rope
Simple bayonet
The diagram shows a non-tightening knot - one of the simplest and most reliable knots. The knot can be used when the cable needs to be temporarily attached to some object for strong traction, for example, to a hook when towing a car.
Bayonet with drift
Wonderful reliable unit. Useful when you need to tie a rope under tension.
A bayonet with a carryover, unlike a “simple bayonet” knot (which does not have a second turn of the rope around the support), does not slide along the object around which it is tied under pendulum loads. It is advisable to secure the working end to the main, control node. When the root end is loaded, the knot will not tighten, and it will remain possible to untie it without removing the load from the root end.
Austrian guide.
It is used to secure the middle of the rope on the terrain or on the safety system of the middle participant in a bundle, when making rope stretchers. The first stage - the rope is laid in a figure eight, the second stage - the upper loop is bent to the base and removed from below from the lower loop (Fig. 106), after which the knot is tightened .
"Mountaineering Federation of the Nizhny Novgorod Region" Nizhny Novgorod
www.alpnn.com