Breeding worms at home for beginners is attractive due to the minimal start-up capital and the simplicity of the equipment used. The growing technology is simple and does not require special knowledge. Also tempting is the lack of dedicated breeding facilities. At the initial stage, you can start a business in an ordinary apartment.
If you decide to do such an unusual business, you should know that you can sell the worms themselves, vermicompost and worm tea. Vermicompost is an excellent fertilizer.
Worm tea is a unique product that will increase productivity by at least two times. It is effectively used for growing strawberries, indoor plants, and for growing vegetables and fruits both in greenhouses and in open ground. In order for a business to develop effectively, it is necessary to create the most comfortable conditions for the life and reproduction of worms. How to breed earthworms at home and how to make this activity grow into a business - this will be discussed further.
What benefits do worms bring?
Earthworms are soil animals that feed on rotting plant debris and animal excretions. They absorb bacteria, algae, protozoa, nematodes, fungi and their spores. Passing food through their intestines, the worms destroy it and mix it with the soil.
By processing compost heaps, they leave in the soil the most valuable forms of humus with high microbiological activity. Processes occur in the intestines of the worm, as a result of which the breakdown products of organic substances are converted into molecules of humic acids. The molecules combine with the mineral components of the soil, forming calcium humates. These substances give the soil structure.

The soil processed by worms contains a wide variety of enzymes, amino acids, vitamins, antibiotics, and biologically active substances that disinfect microflora. And worms play a dominant component in this process. In addition, these animals take an active part in loosening the soil, which makes it water- and breathable.
Earthworms are an indicator of the health and fertility of garden soil. If they feel good on your site, then the harvest will be good. Their normal density should be no less than five large worms per 1 square meter of dug area. If this amount is less, then the land needs organic fertilizer.
You should know that worms help neutralize the acidity of the soil, since they prefer a neutral environment. They eat straw, loosen the soil, and reduce the number of nematodes.
How to feed worms or what do these animals eat?
It is very difficult to accustom earthworms to new food. This is the main difficulty in breeding them, because... worms are programmed to digest food immediately after birth, and then adult individuals take a long time to get used to unfamiliar food. If possible, it is better to colonize new substrates with cocoons of worms or their white larvae. But, if this is not possible, adult worms need to be given enough of the food to which they are accustomed so that it lasts for a long time, during which they must undergo adaptation.
Therefore, I recommend that gardeners use local worms that are accustomed to the local climate and pesticides that do not contain foreign nematodes.
Where can I get local worms?
Look for worms in old manure piles and accumulations of last year's leaves. If you are going to recycle bulk compost, it is better to take them from the top layer of the compost heap. For a worm cultivator, you need at least 500-1000 worms per 1 sq.m. cultivator.
Types of worms
Let's look at what types of worms you need to buy for breeding and how they differ.
Regular rain
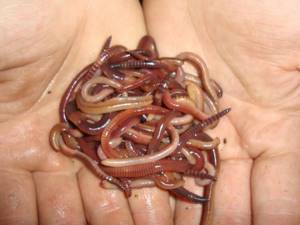
Earthworms are invertebrate animals whose body consists of ring-shaped segments with short bristles. The body is smooth, slippery, cylindrical, 15-30 cm long. The body of the worm moves based on the bristles. The ventral side is flat, the back is convex and dark in color.
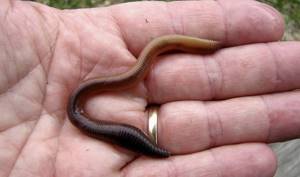
The earthworm is a hermaphrodite but reproduces sexually through mating. The thickening on the front is called the girdle. There are glands that secrete a sticky liquid. The animal wraps its eggs in mucus during reproduction. A cocoon of mucus protects the eggs from dampness and adverse factors. After a while, small worms come out of it. The lifespan of an earthworm is 3-4 years.
The earthworm does not have sensory organs, but perceives irritations with the help of the nervous system and reacts to them reflexively. It also has no organs of vision, but it perceives light stimulation. Earthworms sense odors and are capable of regenerating lost body parts.
California red
One variety of earthworm is the California red worm, which is often bred at home. Compared to earthworms, Californian ones have many advantages in breeding, growing, and feeding. This animal reaches 6-8 cm in length and weighs 1 g. Reproduction occurs at three months of age.
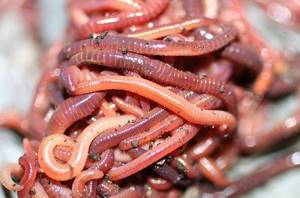
With proper care, each individual produces up to 500-1500 pieces of its own kind per season. The Californian worm is distinguished by both high fertility and longevity. Its lifespan is about 16 years. The only drawback of the California worm is that it is very thermophilic and does not crawl deeper into the ground when the temperature drops.
Prospector
The prospector worm is the result of selective breeding. This species was obtained in 1982 as a result of crossing southern and northern dung worms. A distinctive characteristic of the animal is the presence of the instinct of self-preservation. At low temperatures it goes to a safe depth. This species reproduces in a much wider temperature range - +8...+29 °C.
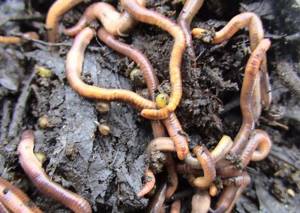
The productivity of the prospector worm is higher than that of the ordinary earthworm. He is unpretentious, does not get sick and is distinguished by his perseverance in the substrate. Unlike the California red worm, the prospector worm easily switches from one type of food to another. The reproduction rate and life expectancy are the same as the Californian one, but this species retains high viability and productivity at a high density of the substrate.
General information about worms and the peculiarities of their breeding
Not all types of worms can be grown artificially. Good for home breeding:
- Red Californian.
- Ordinary rain earthen.
- Prospector.
- Flour.
- Dung.
- Dendrobena.
Worm farming is a profitable business idea. Beginning “businessmen” grow worms to feed fish, and some use them as soil fertilizers. Each individual passes a substrate through its entire intestine, which in the external environment is saturated with useful microelements.
First you need to study each type of worm and its breeding conditions.
California red worm
It is bred to obtain high-quality vermicompost. The worm quickly adapts to its environment and reproduces. It does not leave its place, you don’t have to worry about the population decline, grow it in open areas.
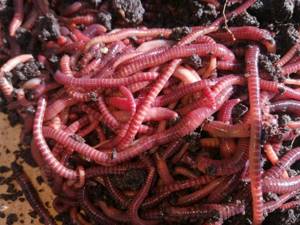
A little about this species:
- The lifespan of a worm is no more than 16 years;
- an organic substrate should be used as a habitat;
- easily tolerate temperature changes;
- about 20 cocoons are laid in one season;
- very gluttonous.
It is enough to create all the conditions to get 2 tons of fertilized soil.
Regular rain earthen
Start-up capital can be obtained by breeding an ordinary earthworm at home. Individuals, their vermicompost and worm tea are suitable for sale. Worm tea is an excellent fertilizer for soil under strawberries, vegetables and fruits. Biological humus contains digested remains of spores of fungi, bacteria and algae.
The earthworm droppings, processed and equipped with microelements, are mixed with the soil. The composition of vermicompost includes humic acids, calcium humate, vitamins, amino acids, biologically active substances and antibiotics.
Prospector
Prospectors are classified as earthworms. They are the most cost-effective, as they have many advantages:
- fertility;
- do not leave their habitat;
- tolerate winter well, entering suspended animation;
- one individual gives several generations;
- life expectancy is 14 years;
- high performance.
Advice. A good place to start is by growing this particular population.
Flour
Artificial breeding of mealworms is painstaking work. Biology books say that these worms are the larvae of the mealy beetle. A month passes from the moment the larvae form. The main thing is not to miss this moment.
Dung
The most attractive bait. The inhabitants of dung heaps have a specific smell that freshwater fish like so much. Finding individuals is difficult for many fishermen who live far from farming areas.
Dung beetles tolerate temperatures of +30 degrees well, so it is advisable to breed them in a dung substrate in winter.
Dendrobena
Dendrobena attracts fishermen with its vitality and active movement on the hook. Well-prepared breeding conditions will help increase their lifespan and population numbers. A win-win option for business.
The population can tolerate low changes in ambient temperature. Reproduction must begin in the spring, then the worm is able to reproduce without a pair.
Technology for growing worms at home
In order to obtain the required amount of vermicompost to fertilize your garden, you should think about breeding earthworms at home.
The recipe for a fertile soil mixture is simple. You should add 1 kg of sand and 5 kg of vermicompost to 1 square meter of black soil.
How to choose a place
If you decide to start breeding worms, you should know that for this you need a mini-farm or vermicomposter. The worm coop can be placed anywhere: on the balcony, in the apartment, in the yard, in the garden, in the garage or any utility room. It should be a place without noise and vibration. During the processing process, the structure does not emit any unpleasant odors. The main thing is that the temperature in the room is within acceptable limits.
At temperatures above 36 °C the worms will die.
The food may give off an odor. In this case, it must be sprinkled with vermicompost or soil.
Types of worms
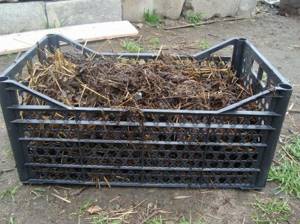
For breeding worms, wooden or plastic boxes made of food-grade plastic 30-40 cm high are often used. The containers must have ventilation. To do this, use a drill to drill holes in the top of the box around the entire perimeter and in the lid along the entire area. Boxes must be installed on legs at an angle. Then the vermicelli can drain through the hole in the bottom. Place the container to collect it under the hole.
Worms also do well in cardboard boxes. They feed on pieces of cardboard. True, the boxes get wet, and they often have to be replaced with new ones. An old refrigerator is also suitable for breeding. It is installed with the door facing up. Don't forget to make holes for ventilation.
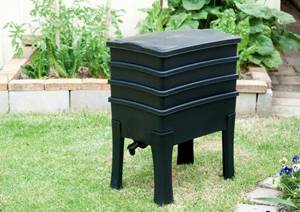
The most convenient, but expensive equipment for breeding worms is a special vermicomposter. It consists of several plastic boxes that are placed on top of one another. Each has side vents and slots at the bottom to allow water to pass through. The bottom drawer is placed on legs. There is a tap installed in its bottom for draining the vermicelli. The top drawer is covered with a blanket to maintain humidity and a plastic lid.
Instructions for making a homemade worm trap
Let's look at how to build a worm farm with your own hands, where to start making it and what tools you will need.
For a homemade worm trap, identical plastic food boxes are most suitable. They fit well vertically and fit into each other. The box must be solid, without holes, size 60 × 40.
The bottom box will be used to collect the soil solution, the top ones will be used to contain the worm. On top you can place three compartments for growing a worm. In the bottom drawer, use a drill to drill a series of holes on top of the sides. But you should not make holes in the corners (up to 10 cm), since the soil solution will drain through them.
In the second box you need to make the same holes, but around the entire perimeter. In the bottom of the second box we make slits parallel to the stiffening ribs using a grinder (approximately 8 pieces). Use a chisel to clear the surface of burrs. We produce 3 boxes of the second type.
At the bottom of the boxes we lay a row of wooden rods as thick as a finger. They will prevent the bottom holes from clogging. It is necessary to sew bags from high-density spunbond fabric. They are laid on top of the rods. It is necessary to cut out plastic mesh to move the worms into a new box. They are used when there is 5 cm left until the box is full, and continue to feed the worm. Then, when the box is full, the worms will be in the net and can be moved.
We repeat the relocation procedure three times until the worm is completely captured. The top cover is made of plywood. Using a drill we make its perforation.
What equipment will you need?
To breed worms at home, you need to purchase a small amount of equipment: scales, a wheelbarrow, a sieve, a shovel, a pitchfork, a bucket, thermometers for measuring soil and air temperature, a device for measuring soil acidity, racks, boxes for growing worms.
Soil selection
The reproduction and life of worms depends on the quality of the soil. Half the container must be filled with humus with the addition of crushed cardboard. The soil should have a moisture content of 70-80%. It's easy to check. To do this, take a handful of soil in your hand and squeeze it tightly. If 1-2 drops of water are released as a result of compression, then the soil has the required moisture.
Preparation of the worm farm
When starting a business, you should not immediately buy expensive vermicomposters. Use a wooden or plastic food box. It is necessary to make a hole in it for fluid drainage and ventilation. The room must have a temperature range of 18-25 °C, lighting of 60 W at 20 m, ventilation no more than 0.5 m/s. You should be aware that chlorinated water inhibits worms, so use water containers. Take care to protect worms from pests. They are eaten by moles, rats, and other rodents.
Purchase of breeding stock
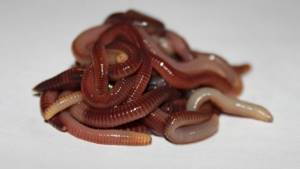
You can buy worms for breeding both on the Internet and from local worm farm owners. When purchasing breeding stock, you should pay attention to the appearance of the worm. It should be red and mobile. The breeding stock includes at least 1500 worms. The calculation must be made from the following ratio: 1-3 families are needed per 1 cubic meter of soil for breeding.
How to check in
2-3 days after preparing the soil, it is necessary to make a hole in it and move the first inhabitants there. After this, carefully spread the soil and close the lid. After a couple of days you need to add food.
In order to determine the required acidity of the soil and check whether the worms will take root well in the new home, it is necessary to do a test colonization in a small container. Based on the results, you can determine whether the optimal acidity level has been reached or needs correction. The optimal acidity level for breeding worms should be in the range of 6.6 - 7.5 pH.
If there are a lot of dead worms, then the acidity needs to be changed. It is increased by adding straw, sawdust, and plants. To reduce the acidity of the soil, it is necessary to add chalk, limestone, and shells. Within a week after moving in, you need to check how the worms feel in their new home. If the surface of the substrate is clean and they are mobile, then the relocation was successful.
What to feed
What to feed worms at home? Worms are not picky about food. They feed on dead or beginning to rot plants. It is recommended to give potato peelings, cabbage leaves, banana peels, stale bread, tea or coffee grounds, straw, grass, water from a container washed from sour cream or kefir, and chicken droppings.
Worms can be classified as vegetarians. Citrus fruits, meat, and eggs should not be added to their food. You should not add fresh manure to the worms, as it generates heat up to 70 ° C.
All food you give to worms should be ground up. They cannot process it in solid form. The feed composition should be maintained at a constant level. Worms are better attuned to the food that they tried for the first time in their lives. When food changes, individuals must adapt over a period of time.
Rules of care
Growing and caring for worms at home includes feeding, maintaining a favorable temperature, watering and loosening the substrate.
The first feeding is carried out a few days after settlement. To do this, feed 3-5 cm thick is placed on a quarter of the surface and distributed evenly. Next time, the food is applied 5-7 cm thick over the entire surface of the box.
Feeding is added to the worms every 1.5 - 2 weeks, as they are eaten, until the box is filled to a height of 50-60 cm. The frequency of feeding depends on the number of worms and the temperature of the contents. Worms must be kept at a temperature of +15…+25 °C. Worms reproduce quite quickly, so it is necessary to have prepared boxes for transplantation. One family after overwintering increases 10 times.
It should be remembered that worms need moisture. Therefore, the substrate must be watered regularly. The optimal humidity should be 80%. This procedure must be done using a watering can with small holes and settled or rainwater at a temperature of 24 °C. Worms need oxygen, so if the substrate layer is 20 cm or more, it must be loosened regularly. This procedure is carried out with special forks with round ends. To do this, the substrate is pierced without mixing the layers twice a week to the depth of the worms.
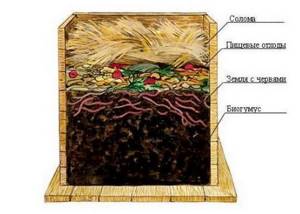
As a result of their active activity, the substrate in the box is divided into three zones.
The top layer contains nutrients and organic residues. The middle layer is for worms to live in. The bottom layer is the most valuable. It collects all the products of soil processing, which are used as vermicompost and worm tea. As the worms work, the bottom layer constantly increases. The duration of the complete recycling process in one box is 3-4 months. After this, the worms with part of the old substrate are transplanted into another container, and everything starts all over again.
Caring for your vermicomposter
The composter can be placed in an apartment, utility room, outbuildings or outdoors. The main thing is that the conditions are met:
- air temperature not lower than +8 and not higher than +30°C (optimally - +15 - +25°C);
- the composter is not affected by direct heat sources (radiators, stoves, sunlight);
- There is no sharp noise or strong vibration nearby.
In winter, composters are moved to heated rooms or insulated. At temperatures below +4°C, the worms go deep into the soil and hibernate, and below 0°C they die.
Pets do not like light, so the boxes are equipped with lids (this measure will also save the soil from drying out). Further care for the worms consists of maintaining moisture and acidity, periodically loosening the substrate (once a week), feeding and timely resettlement.

What and to whom to sell from the vermifarm
The main advantage of a worm farm is that you can get valuable fertilizer and good income from unnecessary waste. To do this, you need to study the market and potential buyers.
To fertilize the soil
To fertilize a plot of 3-4 acres, it is enough to purchase 1.5 - 3 thousand worms. Throughout the year they will produce the required amount of vermicompost. This valuable fertilizer can be sold to neighbors and friends. When expanding the worm farm, it can be offered to specialized stores and farms.
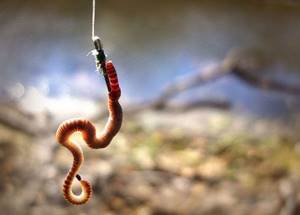
For fishing
Growing worms for fishermen and selling them at bazaars or selling them to specialized stores is also profitable, since this is part of the worm business. A fisherman rarely takes the time to dig up the soil in search of a worm. It's always easier to buy it. Fishing stores will take your product because the worm's lifespan is long and demand is strong. The main thing is that the packaging facilitates the life of the worms for a certain period. The worm is the most valuable product for fish. Therefore, real professionals often breed worms at home for fishing.
To the pet store
The pet store also needs a constant supply of fresh worms and vermicompost. Worms are used there as food for fish, birds and other inhabitants.
For fish farms
For effective operation of fish farms and normal growth of fish, it is necessary to use live food to feed them. Therefore, the need for worms as an irreplaceable product with high nutritional value is constantly increasing.
For feeding plants
The vermicompost obtained from the vermifarm can be used for growing indoor flowers, seedlings, vegetables in a greenhouse and in the garden, for planting fruit crops, grapes, and medicinal plants. Vermicompost is especially valuable in greenhouses, since it is important to eliminate the possibility of disease. If worms get into flower pots, there is no need to worry. Worms cannot cause any harm to plants. Since the use of vermicompost is quite widespread, the demand is obvious.
To expand the range, you can also offer vermichai. It is made in worm farms by slowly passing water through a stack of containers or using a recipe. To do this, mix vermicompost with water in a ratio of 1:10. Saturate it with oxygen for good bacterial growth. This can be done using an aquarium compressor. Infuse for 24 hours at room temperature, after which the solution is settled and filtered. The sediment can be used as fertilizer, and the solution can be used for foliar and root feeding.
Vermicelli should be used within 4 hours after turning off the compressor. With further storage, the bacteria die, the effectiveness of the solution decreases, and it emits an unpleasant odor.
How to prepare worm farm products for sale
- The main products of the worm farm for sale are:
- worms;
- vermicompost;
- worm tea.
To prepare food for sale, it must be properly packaged and stored. You can pack worms in thick plastic bags with holes for ventilation. They need to be stored in a cool place to avoid excessive worm activity. A sufficient amount of soil must be added to the bag.
Royal colonies for sale are best packed in cardboard boxes. The family should consist of cocoons, fry and adults.
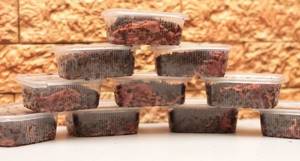
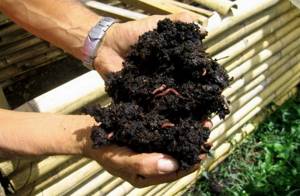
Biohumus is a dark-colored spreading mass. After removing the worms, it is collected with a scoop, dried to a moisture content of 40-50%, sifted using a sieve and packaged for storage. Vermicompost can be stored at temperatures ranging from -20 to + 30 °C. To prevent the fertilizer from losing its biological activity, you should not freeze it.
Vermi tea is packaged in plastic bottles before sale. Do not forget to indicate the expiration date of the solution.
Own vermifarm
You can make a vermifarm yourself. Wood, plastic or glass, or regular cardboard are suitable for the design. It should be changed constantly. If you have a broken refrigerator lying around your dacha, you can use it.
The height of the worm farm should not exceed 40 cm. To supply the worms with air, small holes are drilled in the box. As for a plastic box, it will last longer than cardboard. The principle is the same: fill the soil, populate the “tenants”, feed it.
Where to buy worms
Purchase from other businessmen or from a fishing store. It is more profitable to buy them in bulk. If you install several worm farms, you need to immediately purchase worms in boxes. You should not be zealous and put a lot of worms in one room - there is a risk of being left without a population.
Settlement technology
You need to make several holes and add biological humus from the old place of residence of the worms. Place one worm in each hole, level the ground with a rake, and moisten it. The main thing is not to forget to drill several holes for air access. 50 individuals inhabit 1 m2.
Feeding the worms
Chopped potato peels, baked goods, tea leaves, coffee grounds, and kefir are suitable as a top dressing.
Compliance with the conditions for keeping worms for fishing
Maintenance is simple:
- do not forget about fertilizing and loosening the soil;
- monitor the acidity of the soil using a special sensor and thermometer;
- maintain moisture and heat levels;
- gently mix the soil, maintaining the structure of the layers;
- Collect worm tea regularly.
If several individuals died, it means that not all conditions were met.
Reproduction of worms
Worms reproduce without a mate and vice versa. The first and new population appears within 3 months after moving into the worm farm.
Growing in a summer cottage in a vegetable garden
It is optimal to breed worms in the garden plot in spring and summer. After constructing the “worm housing,” the structure itself should be placed under a canopy, in a barn, or cellar. You can make housing from a large pile of humus up to 50 cm high. Then moisten it and cover it with straw. During hot periods, water frequently with warm water.
If possible, it is necessary to protect the prepared composter with worms from direct sunlight. Feeding is no different from feeding at home. From 1 m2 about 10 kg of populations, 450 kg of biological humus, 950 kg - 1 ton of compost are grown.
Profitability calculation
From 1 cubic meter of nursery you can get up to 10 thousand worms and about 0.5 tons of vermicompost per year. When selling 1 worm for 2 rubles, you can get 20 thousand from the sale of worms alone, not taking into account the profit from vermicompost and vermicelli. Calculating the profitability of the business, we get 150%. As you can see, the revenue is quite decent.
Is it possible to make money in a business like growing strawberries all year round in a greenhouse? Let's try to answer this question in a separate article. Champignons lend themselves well to cultivation under artificial conditions. The demand for champignons in the food market makes them attractive for entrepreneurship.
Pros and cons of business
Breeding worms is a profitable and useful business. This business involves minimal risks, so if you are interested, you should try it first in an old refrigerator or wooden box. Having mastered the cultivation of worms at home from videos and in practice, having studied all the intricacies and having worked with the sale of products, you will decide whether it is worth expanding your business. There are practically no disadvantages to running a worm business, as evidenced by reviews from entrepreneurs. If taken seriously, the business will generate considerable income.
Scheme of an earthworm breeding business
The scheme for breeding a worm for further sale looks like this:
1. Site preparation; 2. Purchase of breeding stock (family); 3. Check-in at the nursery; 4. Processing compost into humus; 5. Reproduction of individuals; 6. Collection of soil, liquid and worms for sale; 7. Adding nutritious bedding for further reproduction.
After this, the cycle can be repeated.
Sales of finished products
Before starting a business, you need to decide on the category of product buyers. In addition to the worms themselves, the by-products of their vital activity are also extremely popular. For example, humus formed as a result of the activity of worms is actively used in agriculture as one of the best fertilizers. Worm tea is no less popular among summer residents and gardeners for feeding indoor, greenhouse and outdoor plants.
At the same time, the main clients of werm farmers are considered to be:
- Gardeners and summer residents who turn to breeders for humus and vermicelli - fertilizers that increase soil fertility and crop quality;
- Owners of fishing shops. Based on how much worms for fishing cost, modern fishermen prefer to purchase them in specialized stores. The fairly long lifespan of the earthworm ensures a constant demand for this product;
- Pet store owners who use worms as food for animals, fish and birds. It is worth noting that pet stores prefer to purchase worms in bulk;
- Owners of fish farms in need of huge quantities of feed. Unlike pet stores, representatives of fisheries purchase worms wholesale in large quantities from several suppliers at once.
That is why the cultivation of earthworms can bring profit, although small, but stable, since the worms themselves, as well as the products of their vital activity, are in great demand.
Breeding worms is a cost-effective and profitable type of business
With minimal investments throughout the year, growing worms as a business allows you to earn up to 40 thousand rubles from worms alone, because today the cost of one individual fluctuates between 2 rubles, and 2 cubic meters. m. the nursery has the potential for 15-20 thousand individuals. In addition, about a ton of vermicompost and several hundred liters of worm tea are collected from the same nursery. To start a business, it is better to immediately buy 2-3 families of worms; the cost of such an acquisition will be from 3,000 rubles. To populate 1 m3 of soil you will need 1-3 families.
The high profitability rate and potential of the vermifarm is explained by:
• absence of production waste; • minimal costs for complementary feeding; • rapid reproduction; • low production costs; • availability of materials; • extensive sales markets; • steady demand not only for worms, but also for fertilizers.
It is worth noting that worm breeding as a business pays off by optimizing production capacity and expanding the number of nurseries.