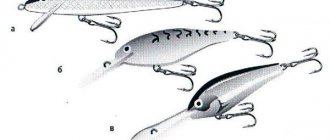
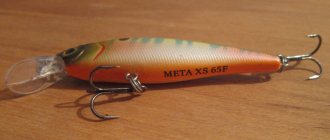
Making wobblers
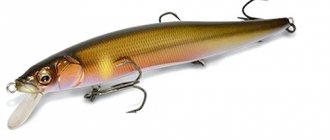
To make a wobbler with your own hands, use hardwood 5 cm long in the form of an oval, narrowed on one side.
- To begin with, we obtain a workpiece by sawing off a 1.5 cm block from the main board.
- On the block we draw the outline of the future wobbler fish with a pencil, after which all excess is gradually cut off with a knife.
- In the front part, as shown in the figure, we first mark it with a pencil, then cut out a cavity for the future blade.
- The belly is also sawn through the entire length of the wobbler, where we will insert a fastening made of wire, as shown in the figure. 1. It is advisable to use stainless steel wire. 2. If you do not want to use rings to attach tees, take care of inserting them before twisting the wire into the rings.
- We insert the wire fastening, filling it with epoxy glue.
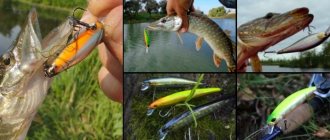
- The wobbler is coated with waterproof varnish, and after drying, tees are hung on it.
- To select the level of buoyancy, lead weights are used, attached to the holes of the abdomen between two loops: nasal and abdominal. Then the wobbler can be sanded and varnished so that its body does not absorb water.
- Using thin and soft aluminum from drink cans, a blade is created that is glued into the wobbler.
What are the most catchy wobblers for perch - see our rating. Also about how to make a homemade wobbler for perch.
Asp baits, what they should be, you will find out by reading the article.
Basic materials
Before making a wobbler with your own hands, it is important to decide on the choice of materials for the future bait. Basic materials can be divided into three groups:
- for making the body;
- for equipping a wobbler (blade and accessories);
- to protect and decorate the bait.
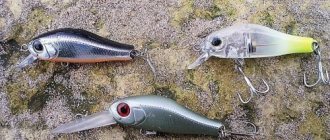
One of the main criteria for choosing a material for a wobbler body is the buoyancy of the material. In this regard it is worth mentioning:
- wood (linden, balsa, alder, spruce);
- hard foam;
- plastic, plastic and other polymers;
- silicone;
- plexiglass (plexiglass).
Recommendation! It is better to choose a type of material that the angler can process to give it the appearance of a fish.
Lures made of wood, plexiglass and polymer materials are considered the most durable. But to process these materials you will need a special tool and some skills. To make wobblers from foam plastic, no special skills or equipment are required; this material is easy to process. But the teeth of pike and pike perch quickly render it unusable. A silicone wobbler looks realistic, but after a few bites the product breaks down.
Among the materials for making wobbler blades, it is worth noting organic glass, duralumin and hard types of plastic.
It is important! The fisherman must take responsibility when making the blade. The performance of the bait depends on precise geometry and high-quality processing.
In order for a homemade wobbler to please its owner with a good catch for a long time, one cannot do without paint and varnish materials. First of all, this applies to wooden models. The body can be painted with waterproof acrylic paint, and the finishing coat is made of hydrophobic varnish. When selecting paints and varnishes, their compatibility should be taken into account. It is better to mix the paint and varnish in a small amount before applying it to the bait. If no coagulation of the mixture is observed, then the liquids can be used for comprehensive body protection.
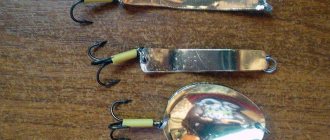
Manufacturing of oscillating spinners (oscillators)
Oscillating spoons or spinner spoons can also be made with your own hands.
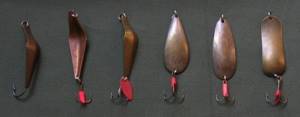
For their manufacture use:
- a cross-shaped hammer with balls at the ends and a metal handle;
- wooden boards with a spoon-shaped recess;
- rubberized steel shaft for “rolling” part of the product;
- metal ball;
- drill and drill bits;
- hacksaw for metal;
- steel stylus.
How to make a vibrator petal:
- Create the desired fixture template on cardboard.
- Draw a contour using a stylus on a sheet of metal with a given thickness of 1.5 mm.
- Then the sheet is clamped and the template is cut out with a hacksaw.
- The workpiece is fixed in the recess of the board, beaten with a hammer, and rolled to strengthen one of the sides of the spoon.
- Correct with a hammer.
- Uneven edges are removed and holes are created for factory-type rings.
Manufacturing technology
Each angler has his own approach to creating a masterpiece. It all depends on the right combination of the craftsman’s skills and the chosen material.
Wobbler made of wood
When using wood, the sequence of actions will look like this.
- Depending on the size and shape of the wobbler, it is necessary to select the appropriate blank. By applying a stencil, the outline of the future bait is transferred to the tree. Excess parts are removed using a hacksaw, jigsaw and knife.
- After rough processing, it's time for sanding. This work can be done on a grinding wheel or using sandpaper. After processing, there should be no burrs or roughness left on the body of the bait.
- Now you need to make a longitudinal cut in the abdomen. Wire loops will be inserted into it for hooks and weights. Then the fittings in the cut are fixed with a wedge made of the same wood and glued.
- To install the blade, you need to make a cross cut in the head. The width of the cut should be equal to the thickness of the blade, and the depth of the “mouth gap” should be 1/3 of the length of the piece of plexiglass or plastic. When the processing of the body is completed, it must be protected with a paint coating.
- The blade should be made strictly symmetrical. When using duralumin or aluminum, it should be taken into account that the part will become an additional load in the front part of the wobbler.
- To make wire loop elements, you need pliers. It is better to use stainless wire with a thickness of 0.5...1.0 mm.
- The weight is made from sheet lead or flattened weights. First, the weighting agent is suspended from the body and the rate of immersion of the workpiece in water is determined. The bottom bait should sink faster than the surface bait. Once the mass of lead is determined, it must be introduced into the longitudinal cut. The lead piece can simply be inserted and secured with glue and sawdust. Some anglers prefer to pour in molten metal.
Homemade foam
A foam wobbler is easy to manufacture. The peculiarity of this material is that all work has to be done manually. Use of machines or power tools may cause the surface to melt.
- At the first stage, the sketch of the bait is transferred from a paper stencil.
- To give the desired shape you will need a sharp knife, a fine-toothed hacksaw, a file and sandpaper.
- It will not be difficult to make a longitudinal cut in the lower part of the body. The wire structures and the load are fixed with glue.
- The blade is mounted in the same way.
- Epoxy glue is used to fill the voids; after drying, the excess is removed with a file and sandpaper.
- After equipping the wobbler with hooks and winding rings, it is necessary to proceed to testing on water. If the wobbler is displaced to one of the sides, the situation can be corrected by bending the nose ring. If the bait begins to spin along its axis or goes into a tailspin, then the blade should be shortened.
- Once satisfactory performance is achieved, the body is painted.
Lure made from a disposable lighter
A wobbler made from a lighter can be a good bait. As soon as there is no gas left inside, you can start working.
- First, you must remove all metal and plastic parts from the lighter, including the wick. It is preferable to choose products with a transparent body.
- Now, using a hacksaw for metal, an oblique cut is made, which starts in the middle part of the bottom and ends at the top of one of the sides. This will be the belly of the bait.
- The wick is cut at an angle of 30 degrees towards the back of the workpiece.
- A blade in the form of a triangle with rounded corners is made from plastic or plastic 1-2 mm thick. The wide part of the blade should protrude from the lower part of the body. Fixation is done using glue.
- Three through holes are drilled in the center of the blade so that they come out in the belly of the bait. The burrs are removed.
- The main line is passed through one of the holes, after which a double or tee is tied to it.
- If you make such a wobbler for pike, it will withstand the sharp teeth of a predator. You can install LED lighting inside the lighter, then you can use the bait to hunt nocturnal predators.
Casting wobblers
Casting enthusiasts can make the body of the bait out of plastic or epoxy resin. To do this, you will need a special plastic mass, a matrix and Vaseline.
- First, a mold of a catchable wobbler is made in silicone compound. It is better to do the work in a small plastic box, where the body of the bait is first placed.
Recommendation! Filling is done slowly to avoid the formation of air bubbles.
- When the mold is completely dry, it is carefully cut in half and the sample is removed from it.
- The finished formwork is lubricated from the inside with Vaseline, after which the plastic mass is poured.
- As soon as the body becomes hard, it is sanded, fittings and weights are installed, and painting is done. These works are performed in the same way as when making wobblers from wood.
A homemade wobbler can become a real work of art if the angler shows intelligence and patience.
Thanks to the adjusted load, the play of the bait will seduce the most cautious predator into a confident bite. Source
Spinner spinners
Wire. You need a spinner frame based on rigid stainless steel wire with a length of at least 100 mm. Diameter – 0.8 mm. The bent shape of the wire is straightened using pliers, slings and clamps.
Petal. As a petal, you can use aluminum from 0.33 liter cans. You can even cut the petal with scissors; aluminum is very soft. Holes for inserting the petal onto the main wire are made with a thick needle and pliers.
Assembly of the structure
- A ring is created at one end of the wire by bending the end of the wire with pliers.
- Then the bead is put on.
- Then the petal.
- Then another bead.
If you want to make your spoon heavier for fishing at depth, use a longer wire and insert a sinker with a hole between steps 4 and 5.
5. A tee is inserted and a ring is created in which this same tee will be. Or you can use small rings, for example, to change a tee to a fly.
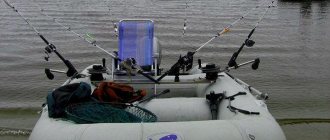
Spinning fishing - methods
There are three main methods of fishing using spinning rods:
- Fishing from the shore . This fishing method is considered the most common. This method gained its recognition mainly due to its easy accessibility for every person, because not many people have the opportunity to have a means of transportation on water, and in many reservoirs fishing from a boat is prohibited. Casting is much easier to do while standing on the shore from a convenient place. Although practically fishing is more productive in hard-to-reach places. Having made several casts of bait with a spinning rod and not detecting the presence of a pike in a given place, the fisherman easily moves to another place and continues the search for luck.
- Fishing from a boat . Of course, the method of fishing with a spinning rod using a swimming device is the most convenient. It allows you to cast bait in almost all areas of the reservoir, catching pike both from the bottom and in mid-water and even on top. Using a boat is especially effective when fishing in the summer heat, when pike are located in deep places far from the shore. From a boat you can fish while at anchor, drifting with the current or “on the track.”
- Trolling . This type of fishing is very similar to “track” fishing, when the bait moves behind the rowing device. The main difference is the use of motor boats or speedboats. You can place the bait along steep banks or along the river bed at any depth.
Homemade castmaster
Castmaster is made independently based on a metal hollow tube with a cross-section of 16 mm (for example, a spout from a faucet mixer) and lead.
The available tools include a hacksaw, a drill, a drill (D 2.5 or 3 mm), a flat file, a vice and a caliper, including the original castmaster model. The vice is clamped into the pipe, the workpiece is sawed off, the cut angle is made as in the original castmaster and measurements are taken. Holes are drilled exactly in the middle at the ends of the workpiece, and the inside is tinned so that the lead does not fly out during fishing. The holes are sealed with masking tape, after which the workpiece is placed on a flat surface to dry, the remaining cracks are covered with molten tin using an electric soldering iron. If necessary, sandpaper is used and lead is drilled through the holes on the metal tube.
Foam rubber in the shape of a fish
Homemade foam fish bait of domestic know-how.
Household sponges of various colors are required. Before processing, moisten and squeeze. Using a blade, the required block of a certain shape is cut - in the form of a fish 3-8 cm in size. Then they are painted with waterproof markers, or not painted; now you can buy sponges in stores for every taste and color. The jig head is attached without the intervention of glue. And if you want to fix a tee in the fish, you need to make a small cut, insert the tee and seal it with waterproof glue.
The best Ultralight spinning rods - what a rod for light lures should be like.
Spinning reels are the main parameters of a high-quality reel.
How to make winter floats yourself.
Making jigs with your own hands
Homemade jigs are made using casting (lead, lead-tin alloys), soldering (tin and lead alloys), and the instrumental method (tungsten).
The latter method cannot be used at home. You need a form that can be made from plaster poured into matchboxes, and put a jig in the center. After the plaster has dried, remove the jig, clean off any uneven surfaces and cut channels for supplying tin to the hollow area for the future jig.
It must be remembered that lead is a toxic alloy and it is better to smelt it outdoors, or in a special mask, so as not to inhale the fumes.
Leashes
We all know that pike has very sharp teeth, with which it can easily bite through various fishing lines. To protect against such troubles, the use of leashes made from a variety of heavy-duty materials is provided.
Leashes are:
- steel wire;
- steel stranded;
- fluorocarbon;
- titanium.
The use of different types of leashes depends on the experience of the fisherman, location and time of year.
Some useful tips
- When fishing with a spinning rod, success depends on the ability to make long and accurate casts of bait, so for a beginner it is advisable to first master the casting technique and then start fishing.
- After casting the bait, you need to wait a little for it to sink into the water. Most often, it is during such a pause that the pike attacks the bait.
- For successful fishing, you need to look for promising places , and not cast anywhere.
- It is better to free the prey with the help of a special tool, so as not to damage your hands with the sharp teeth of predators.
Artificial baits (baits)
For fishing with a float rod, artificial baits simulating worms and maggots are sometimes used. These baits need to smell appropriate, so take care to wet the bait with a very small amount of scent. For example: garlic drops, anise, vanilla.
When there are no baits for fishing, professional fishermen use artificial baits:
- wet and dry flies based on wool, feathers, colored threads;
- bugs based on cork or foam;
- "goat beard"