For making your own, two designs of homemade fishing bags or, as many old fishermen say, pouches are offered. The first bag is suitable for storing fish for summer and winter fishing.
It is advisable to use the second waterproof bag only in the cold season or for short fishing for two to three hours on a summer morning or evening.
The first bag was sewn with my own hands on a sewing machine from a dense material that does not allow fish mucus to pass through, but is highly breathable, making the catch less likely to spoil when fishing, even in warm weather. Especially if the carcasses are topped with fresh nettles or sedges.
The second waterproof pouch is also sewn with paraffin threads with your own hands in the full sense of this expression, that is, by hand. This soft container is waterproof, more versatile and is intended not only for storing fish for winter fishing.
One or two side compartments are sewn into the design of a homemade bag made of rubberized fabric for carrying a fishing rod and a hook from a tube or other structure separately from the fish. That is, everything is provided so that during winter fishing, without a box or backpack, we can walk along the old holes.
You can get acquainted with the appearance of a homemade bag by watching a video called Homemade fishing pouch made of rubberized fabric.
To make a waterproof rubberized bag with your own hands, the topic contains patterns for a soft container.
DIY fishing bag
As I allowed myself to notice, the generally accepted Spartzmen’s bag for caught fish made from OZK’s trouser leg is not convenient for me.
Well, I don’t like it – that’s all. It distracts from the fishing process and directs the mood in the wrong direction. Especially when walking. And if you go for a run, then in general: oh! Even: oh-oh-oh. Apparently this is why most of the Spartans bite only in the first half of the round. I threw a kilo-one and a half perches into the bag, moved to another hole and sit back and let the bubbles bubble with pleasure... Skeptics, of course, will shake their bald heads: why reinvent the wheel? After all, from time immemorial, the entire fishing sport has been based on the OZK! Both glamorous and practical. And angrily. And you don’t have to fasten your fly...
The stern and firm will resolutely declare: the sled is our “fso”! They include both fish and appetizers. And you can take a nap in them if necessary. Because “we are not Spartsmen”!
The seasoned ones will think: “Whatever the child enjoys, as long as he goes fishing more often. Communication with nature is peaceful and ennobling.” And, with a smile in their eyebrows, they will phlegmatically begin to screw another fish case onto the snowmobile...
Realizing perfectly well that against the backdrop of a fragile girl with a drill, a man with a needle and thread doesn’t look good, I finally decided. The first idea was, of course, to involve my wife in the process, but having heard in response something like that if she does something for me for fishing, then I will owe her... and then a list of 32 pages, I had to retreat. And to be honest, I was doing cross stitch when I was 6 years old. But I caught my first crucian carp only at eight...
Yes, and the buddies are hammering: you raised the topic - come on, give birth to something already!
Since the process of making a fishing bag is far from industrial, there was no point in buying a roll of tarpaulin. Fortunately, there was plenty of available material after the Krasnoyarsk-Tomsk-Kemerovo corporate event on the Ataman coast of the Yenisei. Spartan fishermen and just fishermen met, talked, went fishing, fortunately there is plenty of fish in the Yenisei:
In the evening, as usual, we sat by the fire and talked. About fishing, about trophy fish. About sports, even about women... We sat there heartily. True, after the gatherings, one of the nurses became unusable:
It’s no wonder. With a seat like this:
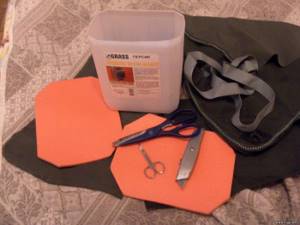
I saved on the material, but had to buy threads with a zipper. Since I have been a member of the “crazy hands” circle for almost forty years, pieces of the sling were found at home. And in different colors. I chose gray.
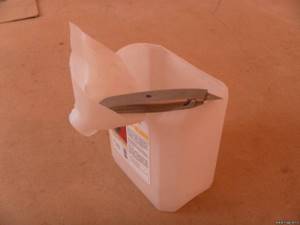
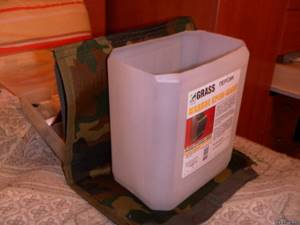
Naturally, you need to start doing any work with clean hands. I’m not an angel, so five liters of liquid soap for cleaning my hands turned out to be just right. What remains of the soap is a canister, which is perfect for our bag. Using a sharp knife, cut off the top of the canister and trim the edges with scissors:
To “reinforce” the future bag, we take foam from the long-suffering tourist mattress:
Because The work is supposed to be delicate, so we will do without patterns. True, we’ll take a little extra fabric. This is not a cosmetic bag with which they go to an appointment with the Queen of England. You can always trim off the excess. Everything is ready - you can start:
We sew the back wall from two layers of fabric. To improve performance characteristics (well, I just wanted to) we insert foam inside. I was afraid that the machine would not be able to cope with such a thickness of firmware. It turned out - in vain. True, the drive made a disgusting crunch a couple of times.
The supply of fabric was even enough for the bottom.
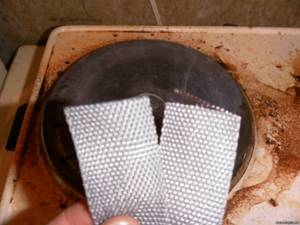
Yes, for now I remember - we sew the loops under the belt at the back. To do this, we cut off two pieces of suitable length from the sling; the ends, so as not to unravel, are melted on a tile or burned over an open fire.
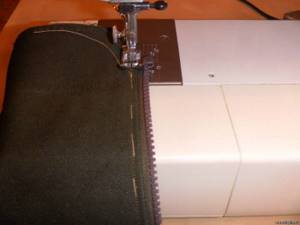
Making the front wall. In our case, the “tolerances” should also result in sidewalls. We sew a zipper to the long side of the front wall. I can't sew it straight the first time. From the second - too. Cursing loudly, we take the thread and needle and tighten it by hand. And we pass from above with a typewriter. And we duplicate. To be sure.
Place both resulting parts on the canister and secure with a needle and thread.

We turn it inside out and, carefully listening to the strained grinding of the machine, sew the sides. For two times. We insert the canister and are glad that it fits in there at all. But for some reason the sewing machine didn’t fit inside. Apparently I made a mistake somewhere with the calculations. Therefore, the bottom had to be stitched manually.
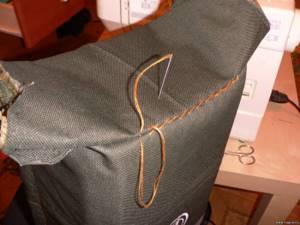
OK it's all over Now. All that remains is to attach the lid. But in reality everything turned out to be much more complicated. The angles don't match. The karemat crawls out from inside. The zipper falls off. We sew, cut, cut, sew. And so - three times. A little practice was not enough. Well, okay. I'm a man! Tile - I can. Home - I can. Doesn't anyone need a son? I can too. It’s not like sewing on a button; it doesn’t require much intelligence. And here are threads and needles. It’s no good for a man to deal with all sorts of bullshit. Therefore, we attribute the resulting asymmetry to the cross-armed Japanese who made the sewing machine.
Using a sharp knife, cut a hole in the lid and another one crosswise. We turn the edges of the fabric and hem them. It turns out a kind of “wind rose” with a predominance of air mass movement in the western and eastern directions. Now you can push the perch across. And even a BREAM will climb along it if desired!

There's only one thing left to do - field testing! To do this, we will simply organize the “Golden Mormyshka 2012” Championship. We gather 30 teams, mark out zones, order a sauna...
PS: Four kilograms are included in the bag. It hangs on the belt and does not dangle. It doesn’t hit…the knees. Can be worn on the front or side. It doesn't hurt to catch fish. Perches fall through the hole remarkably well:
To remove your catch, just unzip the zipper (on the bag, of course!) and pull out the canister.
According to Spartan logic, it’s a very secret thing: having below:
...at the top you can smile idiotically:

In short, I’m happy. Even though I had to do some modifications to make it look beautiful and pull out the extra threads. Let's assume that this is a “Boomer” among the “offcuts” from the OZK. Next time I’ll “draw” a Bentley!
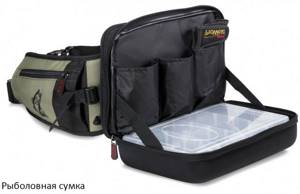
Types of fishing bags
Today there is a large selection of different fishing bags. They differ in size, shape and what type of fishing they are used for. For example, the bags of a spinning fisherman or a carp fisherman have functional differences. The following varieties are distinguished:
- Versatile, medium-sized products with many compartments and pockets. Such models are suitable for both winter and summer fishing. They are used to catch predatory and peaceful fish.
- Carp models are spacious. The products are equipped with several compartments, side and internal pockets. They have convenient handles for carrying. This is an excellent option for both beginners and experienced carp fishermen.
- A universal bag for running fishing - a compact and lightweight model that fits comfortably on the body. This is an excellent bag for a spinning fisherman, since catching a predator requires a person’s maneuverability and frequent movement. Some products are equipped with a special compartment for the spinning rod, so you don’t need to hold it in your hands while moving.
- Classic waist models. The device holds the necessary small gear. A fishing belt bag is convenient for both movement and fishing from a boat.
- The model for feeder fishing is spacious, with many compartments for bait. A type of additional equipment can be equipped with plastic boxes and have a pocket with a valve on which a cold accumulator is placed. This compartment is convenient for storing live baits.
- Frame products provide additional preservation of the shape of everything that is inside.
Sewing a bag from rubberized fabric
It is better (stronger) to sew all the seams of a bag made of rubberized fabric using two lines.
First, run a row of stitches along the length of the stitched surface of the pouch, say, with stitches 5 mm long. The distance between stitches should also be 5 mm.
Then sew another line of thread through the rubberized waterproof fabric, the stitches of which should lie in the gaps between the stitches of the first line already sewn.
As a result of such sewing, you will get a seam similar to the one that is sewn into the fabric by a sewing machine, which with a large margin will withstand the weight of the fish catch in your rubberized bag while fishing.
Choose the location for the buttons on the valve and on the front wall of your fishing bag yourself. Instructions for their installation, as well as auxiliary devices for flaring buttons, are included in the kit packages.
For strength, I recommend sewing a homemade fishing bag along the top edge with an overcast stitch, which will increase the strength of the rubberized fabric along the edges of the rubberized fabric patterns.
You have already read the recommendations for choosing a belt or braid and buckle for a hand-sewn fishing bag from rubberized or canvas fabric at the beginning of the page.
What are the requirements?
Due to the large number of varieties of models, it is easy for a novice fisherman to get confused when purchasing a product, so you need to know the selection criteria.
First, you need to decide what type of fishing requires additional equipment. This is important because bags for spinning, carp fishing, feeder fishing, etc. differ in functionality, size and general appearance.
Secondly, it is worth considering the quality of the material. It is desirable that it is dense, durable, holds its shape and does not allow water to pass through. It is necessary to pay attention to the strength of the lining fabric.
Thirdly, it is important to decide how many pockets, niches and compartments are needed for comfortable placement of gear: fishing bags can have either one large compartment and several small pockets, or with many small cells, but without a main large section. It is advisable that the model be equipped with comfortable handles and carrying straps.
Fourthly, the dimensions of the bag must correspond to the size of the gear that will be in it. It is recommended to take into account the manufacturer’s brand, the quality of the seams, the color of the fabric, and the presence of additional cases.
Let's compare all the pros and cons of a purchased and homemade case
The advantages of purchased products include:
- Big choice.
- Optimal quality.
- Ease of use.
The disadvantages include:
- High prices.
- You can't always find what you're looking for.
The advantages of homemade products include:
- Possibility of making a case of the required size.
- Possibility of manufacturing from unnecessary components, which saves money.
- Possibility of forming the required number of pockets and compartments.
- Make handles and secure them in a convenient place.
If you analyze everything, homemade production has more advantages, especially since the process is not at all complicated. Making fishing accessories at home is an opportunity to demonstrate your imagination and skills. As life shows, products made by handicraft are no worse than factory-made ones.
Homemade fishing bags
Some fishermen prefer not to buy, but to sew the accessory themselves. This solution will help you save money and get equipment that exactly meets the requirements and is easy to use.
Before you start making it, you need to decide exactly what fishing lures and equipment will be in the bag. This is necessary for calculating the dimensions of the product and drawing up a pattern. After the pattern is drawn, you need to purchase suitable materials.
Materials for production
To make equipment, you will first need the following materials:
- Textile. It is recommended that it be thick (canvas is suitable) and preferably a practical color.
- Lining material. Must have high strength and not fall apart.
- Zipper, buttons, Velcro and other accessories.
- Belt, adjusters and fasteners for it.
- Strong threads.
You will get a high-quality product if you make it using sewing equipment. If the craftsman has perseverance and patience, then a small model can be sewn by hand.
Accessories
The choice of accessories must be approached responsibly. Small details ensure the convenience and functionality of the item.
So, if a spinning version is being made, with equipment secured, then it is advisable to supplement the bag with elastic fixing elements. It is recommended to equip a fishing bag for winter fishing with frost-resistant fittings. It is important that all fasteners and fasteners are strong and can withstand heavy loads.
Pockets and zippers
Details such as pockets are sewn only after careful calculations. If they are designed for containers, they must exactly match their size.
Connecting seams are laid smoothly so as not to disturb the geometry of the part. Pockets are made with flaps or with zippers.
The zipper tongues can be supplemented with plastic carabiners for attaching light and small items.
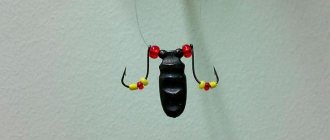
Pouch for winter fishing - patterns
Patterns of a homemade pouch for winter fishing, sewn from rubberized waterproof fabric, are presented in the sketch drawing.
In the simplest version, three patterns are enough for sewing a pouch: the middle part-A and two side walls-B.
If you want to carry fishing rods separately from the mucus-covered fish you catch during winter fishing, then when sewing a pouch you will need one or two more patterns-B.
Sewn to the sides of a waterproof pouch, they are pockets designed to carry a cutter, a pair of fishing rods and a small box of jigs or lures.
First, let's look at all the pattern elements of a homemade pouch for winter fishing indicated in the drawing. And then we’ll figure out how you can sew a soft container used for fishing with your own hands.
A vertically elongated large rectangle “A” with an orange perimeter outline belongs to the pattern of the front side, bottom and back wall of the future homemade waterproof pouch.
These three components of an ice fishing bag are cut into one strip of waterproof rubberized fabric. Although you can sew them with your own hands from three composite strips. Just like the canvas pouch shown at the beginning of the page is sewn.
The pattern under the letter “B” with dimensions 8x12x24 centimeters belongs to one of the sides of the fishing pouch. You should have one or two such patterns (according to the number of pockets). At the bottom, the corners of the pattern are slightly rounded, which is not at all necessary.
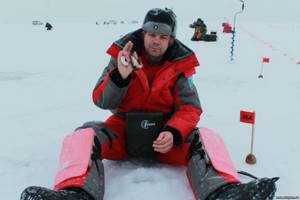
DIY fishing bag
As I allowed myself to notice, the generally accepted Spartzmen’s bag for caught fish made from OZK’s trouser leg is not convenient for me. Well, I don’t like it – that’s all. It distracts from the fishing process and directs the mood in the wrong direction. Especially when walking. And if you go for a run, then in general: oh! Even: oh-oh-oh. Apparently this is why most of the Spartans bite only in the first half of the round. I threw a kilo-one and a half perches into the bag, moved to another hole and sit back and let the bubbles bubble with pleasure...
Skeptics, of course, will shake their bald heads: why reinvent the wheel? After all, from time immemorial, the entire fishing sport has been based on the OZK! Both glamorous and practical. And angrily. And you don’t have to fasten your fly...
The stern and firm will resolutely declare: the sled is our “fso”! They include both fish and appetizers. And you can take a nap in them if necessary. Because “we are not Spartsmen”!
The seasoned ones will think: “Whatever the child enjoys, as long as he goes fishing more often. Communication with nature is peaceful and ennobling.” And, with a smile in their eyebrows, they will phlegmatically begin to screw another fish case onto the snowmobile...
Realizing perfectly well that against the backdrop of a fragile girl with a drill, a man with a needle and thread doesn’t look good, I finally decided. The first idea was, of course, to involve my wife in the process, but having heard in response something like that if she does something for me for fishing, then I will owe her... and then a list of 32 pages, I had to retreat. And to be honest, I was doing cross stitch when I was 6 years old. But I caught my first crucian carp only at eight...
Yes, and the buddies are hammering: you raised the topic - come on, give birth to something already!
Since the process of making a fishing bag is far from industrial, there was no point in buying a roll of tarpaulin. Fortunately, there was plenty of available material after the Krasnoyarsk-Tomsk-Kemerovo corporate event on the Ataman coast of the Yenisei. Spartan fishermen and just fishermen met, talked, went fishing, fortunately there is plenty of fish in the Yenisei:
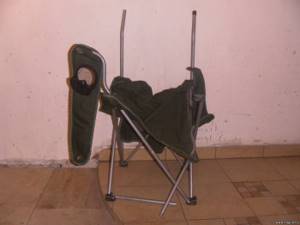
In the evening, as usual, we sat by the fire and talked. About fishing, about trophy fish. About sports, even about women... We sat there heartily. True, after the gatherings, one of the nurses became unusable:
It’s no wonder. With a seat like this:
I saved on the material, but had to buy threads with a zipper. Since I have been a member of the “crazy hands” circle for almost forty years, pieces of the sling were found at home. And in different colors. I chose gray.
Naturally, you need to start doing any work with clean hands. I’m not an angel, so five liters of liquid soap for cleaning my hands turned out to be just right. What remains of the soap is a canister, which is perfect for our bag. Using a sharp knife, cut off the top of the canister and trim the edges with scissors:
To “reinforce” the future bag, we take foam from the long-suffering tourist mattress:
Because The work is supposed to be delicate, so we will do without patterns. True, we’ll take a little extra fabric. This is not a cosmetic bag with which they go to an appointment with the Queen of England. You can always trim off the excess. Everything is ready - you can start:
We sew the back wall from two layers of fabric. To improve performance characteristics (well, I just wanted to) we insert foam inside. I was afraid that the machine would not be able to cope with such a thickness of firmware. It turned out - in vain. True, the drive made a disgusting crunch a couple of times.
The supply of fabric was even enough for the bottom.
Yes, for now I remember - we sew the loops under the belt at the back. To do this, we cut off two pieces of suitable length from the sling; the ends, so as not to unravel, are melted on a tile or burned over an open fire.
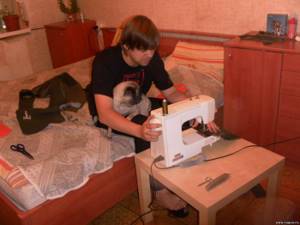
Making the front wall. In our case, the “tolerances” should also result in sidewalls. We sew a zipper to the long side of the front wall. I can't sew it straight the first time. From the second - too. Cursing loudly, we take the thread and needle and tighten it by hand. And we pass from above with a typewriter. And we duplicate. To be sure.
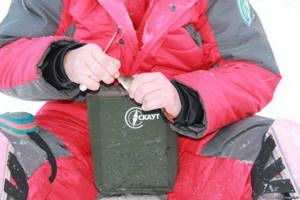
Place both resulting parts on the canister and secure with a needle and thread.
We turn it inside out and, carefully listening to the strained grinding of the machine, sew the sides. For two times. We insert the canister and are glad that it fits in there at all. But for some reason the sewing machine didn’t fit inside. Apparently I made a mistake somewhere with the calculations. Therefore, the bottom had to be stitched manually.
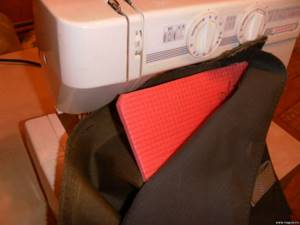
OK it's all over Now. All that remains is to attach the lid. But in reality everything turned out to be much more complicated. The angles don't match. The karemat crawls out from inside. The zipper falls off. We sew, cut, cut, sew. And so - three times. A little practice was not enough. Well, okay. I'm a man! Tile - I can. Home - I can. Doesn't anyone need a son? I can too. It’s not like sewing on a button; it doesn’t require much intelligence. And here are threads and needles. It’s no good for a man to deal with all sorts of bullshit. Therefore, we attribute the resulting asymmetry to the cross-armed Japanese who made the sewing machine.
Store-bought or homemade?
The modern market offers a large number of cases and tubes for fishing rods of various models, sizes and materials from which they are made. When purchasing such products, you should pay attention to the internal diameter so that the fishing rod with all its protrusions can fit freely.
Buying a product in a store will save time; at the same time, making a cover for fishing rods with your own hands has a number of significant advantages:
- It is more reliable , since it is made from high-quality materials selected by the owner himself, the threads and seams made can also be made as strong as possible;
- There is confidence that the cover will serve for a long time , will not tear at a critical moment and will protect fishing gear well;
- It can be made practical and convenient specifically for the person who will use it;
- This also applies to the appearance of the product , it can be created in accordance with your taste: color, model, individual details and decorations;
- The cost of a handmade product will be significantly lower than that purchased in a store, while the manufacturer leaves a piece of his soul, which makes using such an item especially enjoyable.
How to sew a soft case: materials, pattern, tips
Sewing a soft cover for fishing rods begins with making a pattern. The figure shows the simplest option in the form of a rectangle.
For sewing you will need:
- 2 meters of waterproof fabric (Oxford, Taslan, Avisent, Tafetta). Its standard width is usually 140 cm, so to reduce material waste it is more profitable to sew two covers at once;
- 2 meters of dublerin (material with an adhesive layer). It comes in several types; for a cover it is better to choose one based on dense fabric, this will give the finished product additional strength and wear resistance;
- 3 meters of corsage or belt tape for one handle or 6 meters for two (it is better to take with a small margin);
- 3 “zippers”: two 40 cm each (they will go on pockets), one – 1.5 meters.
It is better to choose synthetic threads, marked “100% polyester”. They are characterized by high strength and elasticity.
There are two most common ways to make a fishing accessory.
Option 1
1. Lay out the fabric on the table or floor, use a marker or chalk to transfer the pattern onto the material, cut the fabric along the lines. You can do it easier by making marks directly on the fabric. To do this, fold the fabric in half, from the wrong side of the fold, measure 12 cm on one side, 23 cm on the other and connect the resulting segments. We will get a truncated cone 150 cm long with a wider lower part.
2. Place the dublerin on the main fabric with the adhesive side down, put on top an auxiliary material that is usually used for ironing (for example, gauze). Iron the surface evenly with a hot iron.
3. Sew ready-made pockets to the bottom (wide) part of the future cover. They are made from the remnants of the main fabric, with a zipper or Velcro fastener sewn along the edge.
4. Sew 2 handles from grosgrain ribbon across the entire length of the workpiece, along the bottom.
5.Attach straps to the bottom part to tie the rods together (you can buy ready-made ones or make them yourself by sewing Velcro to a strip of fabric).
6.In the direction from the narrow side of the cover to the wide side, sew a long zipper. Then sew the side edges of the cover.
Note! Sewing is done from the reverse side of the product. After completing the work, turn the cover right side out.
Option 2
The pattern is made in the form of a rectangle. To do this, 50 cm is cut from the base material reinforced with dublerin (the fabric will be used for pockets). After this you can start sewing the cover:
- cut the fabric lengthwise into 2 equal parts (you will get 2 pieces of 70*150 cm)
- sew pockets and handle;
- sew the zipper in the direction from bottom to top. Advice! You can take two zippers of 75 cm each and sew them towards each other.
Sewing fishing pouch patterns
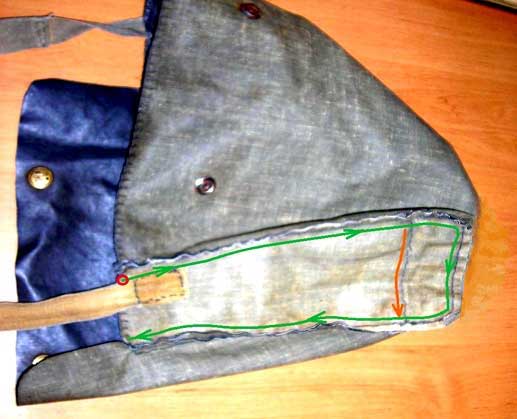
The technique for sewing a pocket pattern and a side wall to the edge of the cavity of a fishing waterproof pouch with your own hands is shown in the photograph.
First, we sew together the above-mentioned pattern elements along one side wall of a homemade fishing pouch. then on the other. In the photo, the seam is shown with a green line. The red dot indicates the beginning of the seam. Although it will not be possible to sew the patterns differently without distorting the finished pouch. And don’t forget about hemming the pocket bottom patterns.
Finally, we sew the folded bottoms of the pockets on both sides of the homemade fishing pouch to the side walls. On one side, this seam is shown in the photograph with an orange line.
Our waterproof fishing pouch, sewn from patterns, is almost ready for use on winter fishing, but for those fishermen who are doing sewing for the first time, I will describe some of the nuances of sewing the segments of the pouch in detail.
Case for fishing rods and reels: sewing nuances
The cover for fishing rods and reels is cut according to the same principle as conventional soft models, but an additional recess pocket is attached to the outside of the lower part where the reel will be inserted.
When making a reel chamber, it is important to consider the size of the fishing tackle. In addition to the width, you need to measure the length from the tip of the fishing rod to the reel and apply the corresponding marks on the fabric.
The pocket is made according to the size of the coil. It can be soft or hard. In the first case, the compartment must be reinforced with a piece of foam rubber or polyurethane to additionally protect the reel from mechanical damage.
The hard pocket is made from a plastic box lined with waterproof fabric.
The pocket is sewn to the base of the cover in such a way that when laying the gear, the reel fits exactly into the slot intended for it.
Some anglers do it easier. They buy round insulation for pipes made of foamed polyethylene of the required diameter in specialized stores and put it under a heavy press for several hours. The pipe takes on an oval shape, after which it is inserted into a soft case. According to reviews, a fishing rod and reel are protected in such a bag no worse than in a hard tube.
Spinning baits are always at hand
When fishing with a spinning rod, you have to change baits quite often in order to find the most catchy one for a given day and even hour.
Spinning baits that have been in water are sent back to the box, not dry, where they quickly become unusable. Winding rings and hooks, especially self-sharpened ones, rust, and foam fish turn yellow from rust right before your eyes.
But there is a way out of this situation. Make yourself a similar simple device for spinning baits. Take a sheet of polyethylene foam or polyurethane approximately 20x12 cm in size and 8-10 mm thick. If you are fishing from a rigid boat, glue the “foam” from the inside of the side, and on an inflatable boat, glue it to the bottom of the plywood can (seat) using double-sided adhesive tape.
Stick the hooks of the used bait into the “foam”, so it will not get lost and its hooks will not get caught on anything. At the end of fishing, put the dry spinners, foam rubbers or wobblers into the box. The “foam” can be glued to the valve of the backpack using Velcro tape, which is convenient when fishing from the shore.
Spinning baits on a homemade device are always at hand and dry quickly
How to sew a voluminous pocket
Feeders, large wobblers, a box with hooks - these and many other bulky fishing gear are advisable to store in a large pocket. To make it, we take pieces of fabric measuring 35*35 cm and get to work:
- Fold the side edges about 1 cm and stitch;
- Sew an insert made of folded material to both sides, its width depends on the desired volume, usually 1.5–2 cm is enough;
- The bottom of the pocket should be turned up 3 cm and stitched with a double seam.
Using these instructions, you can sew a separate bag for the feeder if the tackle is large in size.
The fabric pattern is made according to the size of the feeder, adding 10 cm on each side. The insert is stitched on the sides and bottom. A zipper is sewn on top. You can equip the fishing bag with a handle or attach it at the bottom on the outside of the case.
Pockets of a waterproof homemade pouch
Superimposed on the pattern for the side of a homemade pouch is a sketch of a pocket pattern (a dark burgundy outline), which has the same length as the side wall, but the width should be greater by the height of the two sides of the pocket.
The sides of the pockets on my waterproof pouch are approximately two centimeters, which is indicated in the sketch. But in the finished (sewn) form, with the same length of the patterns of the side walls and pockets - the latter on the sewn pouch will be a little shorter.
This will happen because part of the length of the pockets intended for carrying gear during winter fishing will be spent on forming (bending) the bottom planes. So you have several options here.
Or initially decide: let the pocket on the bag be a couple of centimeters shorter than the side wall of the waterproof pouch. In this case, the cavity of the cut pocket is sewn two centimeters above the bottom of the homemade pouch, as I did.
Personally, this height is enough for me to carry the necessary gear and small fish for winter fishing. To catch pike and pike perch while fishing in winter, I take a waterproof pouch (also hand-sewn) made of larger rubberized fabric when fishing, or I do without it altogether, putting the large fish I catch in a backpack.
If you are fishing for a perch on winter fishing with tackle with a removable reel, which takes up a relatively large amount of space, then lengthen the size of the pockets to the bottom of the pouch, and raise the sides to 3 centimeters.
Making a hard case: step-by-step instructions
The presence of fragile tips and a large number of guide rings on spinning and feeder rods make the gear especially vulnerable. Fans of these fishing methods prefer to use a hard case to transport gear.
- plastic plumbing pipe;
- 2 plugs with a diameter equal to the diameter of the pipe (you can purchase special plumbing plugs or use a low plastic jar). A piece of foam rubber must be glued to their bottom in advance; it will serve as additional protection for the rods;
- a piece of foam rubber 2 cm thick or polystyrene foam;
- special glue for plastic or epoxy resin;
- accessories (bolts, handles, zipper);
- hacksaw for metal.
Note! The length of the tube should correspond to the length of the longest leg of the rod plus 20 cm (a tube of 1.4–1.5 m is considered the most convenient). The diameter is selected so that the rod and reel fit freely inside the pipe and there is a gap (about 4 cm) for gluing the seal.
- Use a hacksaw to cut a piece of pipe. Note! The sawing location will be the bottom of the cover;
- Glue a plug to the bottom of the tube so that the side with foam rubber is inside the tube;
- Glue foam rubber inside the case (it’s more convenient to work with polystyrene) to protect the rods from impacts against the walls of the tube;
- Drill holes at the top and bottom of the pipe and attach the handle using bolts. You can take it from an old bag or make it yourself from a corsage or belt ribbon.
If desired, the cover for the spinning rod can be covered with waterproof fabric. The length of the material should be 10 cm greater than the length of the tube, and the width should be equal to the diameter of the pipe.
Note! If a stretch fabric is chosen for work, then its width should be 3–5 cm less than the diameter.
The bottom and longitudinal part are sewn in a straight line. The width of the seams should not be more than 1 cm. The finished cover must be turned right side out and the tube inserted into it (the process is quite labor-intensive).
Fish storage bag strap and buckle
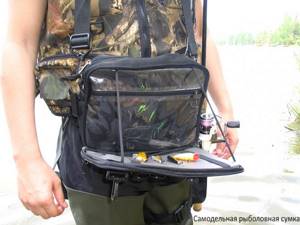
The belt and buckle to the side wedges of the bag, as far as I remember, were sewn from an old gas mask case. And the homemade canvas bag itself for storing and carrying fish while fishing is very similar in appearance to a different case, only larger in size.
Instead of a branded belt, you can sew a wide braid to the side walls of a homemade bag. To adjust the length of the belt while fishing, sew a buckle into the braid. Both are sold in stores. For a waterproof pouch made of rubberized fabric, the buckle is made by hand - cut out of duralumin 2 mm thick.
It is better to sew the buckle that regulates the length of the bag belt on the side rather than on the top. Then the metal will not rub off the impregnation of the jacket on your shoulder, both during fishing and when moving with a catch of fish along the pond.
If some of the fishermen don’t really like carrying boxes with spoons and other small fishing gear in their jacket pockets while fishing, then you can sew an outer pocket on the front side of the canvas bag, and sew a zipper on top of it.
You can sew such a homemade container with your own hands and without a sewing machine using the same technology that a bag for storing fish in the winter is sewn. It is shown in the photograph in the following article.
Under the pocket of a waterproof bag made of rubberized fabric, the picture shows a very convenient detacher for spinners and jigs.
If you seriously think that sewing a homemade pouch from rubberized fabric will take too much time, then it means that you have never had the opportunity to sew with your own hands (by hand) with many pockets of a canvas backpack.
Hunting and fishing
Many fishing fans have encountered the unfortunate situation of fishing rods getting tangled or caught in plants or tree branches when passing through areas with dense vegetation and bushes. Hooks and fishing line cling to any obstacle, which in most cases ends sadly - torn fishing line and torn hooks. Very often, spinning rods and fishing rods are broken or pressed under the doors and trunks of cars, they are stepped on, or accidentally sat down. Unprotected fishing rods and spinning rods, no matter how expensive and durable they are, can suffer significantly, and very quickly.
To avoid such troubles, you can make your own fishing case for fishing rods and reels, which will help keep the fishing rod safe and sound, and also prevent moisture, dust and dirt from getting on it.
Every fisherman knows that it is very important to have a strong and good-quality case that will effectively protect the fishing rod from breakage, extend its service life, and protect it from scuffs and chips. Naturally, not only the rod itself needs protection, but also the fishing line, reel, and spare spools, since damage to these elements can fail if a large fish bites. A high-quality case should have several chambers, which should be separated by partitions - in order to prevent breakage of the tip and shock loads on the form.
In addition, you should take into account this rule: if the fishing pond is nearby, then it is best to purchase a case with handles, and if you have to go far, then it is better to have a case with wide straps to put it on your shoulders.
Fishing with girders in winter - “oil” float
Fishing with girders in winter has its own weather characteristics; the holes freeze overnight, firmly freezing the fishing line. In this case, the tackle stops working, and if a fish is caught, you have to cut out the ice hole with an ice pick very carefully so as not to cut the line.
All sorts of tricks to “insulate” the hole, such as sprinkling it with fluffy snow, covering it with newsprint or twigs, do not always bring the desired result and litter the pond. Use an “oil” float and all problems will be solved! Make a conical float from dense foam plastic with a diameter of 16-18 mm and a height of approximately one and a half to two times the same diameter.
Form a spherical depression at the base of the cone using a steel ball or round lead weight heated in boiling water. In the center of the body of the float, use an awl or just a nail to make a through hole with a diameter of 4.5 mm and insert a 4-5 cm long piece of helium pen rod into it. When fishing, put the float on the fishing line, passing it through the tube.
Having installed the tackle in the working position, pour 5-8 drops of vegetable oil into the float funnel, which is very convenient to carry with you in a plastic disposable syringe with a volume of 10 ml. The “oil” microhole does not freeze even in severe frost, the tackle remains operational, and you can cut out the float located in the center of the hole with an ice pick without damaging the fishing line.
The “oil” float prevents the line from freezing to the edges and preserves the functionality of the tackle
Classification of fishing rod covers.
Depending on the material from which fishing rod covers are made, they are divided into hard and soft .
Hard cases include , for example, tubes. This is perhaps the most win-win type of cover, since with it the fishing rods have nothing to fear, they are reliably protected from various troubles.
A soft case is usually made of fabric, and it, of course, takes up less space than a hard one. The rods are simply placed and tied in such a case. This case is an economical option, as it is not fully capable of protecting the fishing rods from moisture and dirt.
But regardless of which case the fisherman prefers, attention should be paid to its volume and length, and also, in the case of carrying the case with fishing rods on the shoulder, to the presence of a strap.
Sand inflatable boat anchor
When you are going on a long fishing trip across the water on a small, portable “boat”, then you absolutely need an anchor for an inflatable boat. Carrying “extra weight” with you when every kilogram of equipment counts is not always convenient.
In addition, most industrially produced or home-made anchors tend not only to hold the boat well, but also to get tightly stuck in underwater snags. And as you know, it is “strong” places that attract fish like a magnet.
In this case, a sand anchor will help out, for which you only need a bag of polypropylene “sackcloth”, a strong rope and ordinary river sand. Fill the bag with sand, tie the neck of the bag securely - and the anchor is ready.
The mass of such an anchor will be 5-8 kg, depending on the volume of the bag, since one liter of sand has a density (specific gravity) almost twice that of water. You can put stones, bricks or pieces of iron in a sandbag - in short, anything heavy that is at hand.
“Sand” anchor for an inflatable boat, which you don’t mind losing
Such an anchor lies tightly on the bottom, holding the boat even in a fairly strong current, and does not get caught on anything at all. The only note: do not leave such an anchor at the bottom or on the shore, do not litter our already tired reservoirs.
Source: fishcom67.ru
| [Add article] |
| Video [440] | Competitions and BTT [135] | Summer fishing [833] |
| Winter fishing [296] | on Baikal [16] | Fishing in the European North [105] |
| Fishing abroad [47] | Fisherman's Encyclopedia [63] | DIY [64] |
| Travel [131] | Hunting [35] | expeditions of the Jurassic period [33] |
| Lyrical digression [141] | Other reports [136] | Fishing bases [5] |
| About fish [28] | to the Competition [70] | Technical reports [16] |
Source: www.Bylkov.ru
Making a hard case
Materials
So, when starting to make a hard case, you need to prepare the following materials:
- PVC pipe (you can also use polyethylene or cardboard tubes, which are usually used to wrap linoleum in a store);
- adhesive tape;
- bolts;
- belt;
- plugs;
- washers.
Manufacturing process
First, you should cut off a pipe with a length corresponding to the length of the fishing rods, but it is advisable that the pipe be several centimeters longer. After this, the pipe must be covered with adhesive tape, leaving the ends free on both sides (approximately five centimeters each) - plugs will be placed on these areas. Moreover, if the plugs do not fit very tightly, then one of the ends of the pipe can also be wrapped with tape.
Next, on the end that is wrapped with tape, you need to attach a plug, which should fit very tightly, since it will play the role of a permanent bottom. Just first you need to drill a hole for the bolt approximately 20-25 centimeters from the edge and tighten it, and do not forget to attach the belt holder in advance.
Then, near the other end of the pipe, you need to drill two holes opposite each other. You need to drill slightly away from the edge of the pipe - approximately 3 centimeters.
Now you need to screw on the upper belt holder. Insert a smaller bolt into the other hole, with the thread directed outward - to fix the removable cover, the second plug.
Bolt with thread directed outwards to secure the cover
In order to install the top plug, you must first make two notches in it, which must correspond to the tightened bolts.
The hard case for fishing rods is ready for use.
Why are tubes and cases needed?
Expensive fishing rods, as a rule, are initially sold in a case or hard tube, mid-priced products are equipped with a fabric case, and inexpensive ones are sold in polyethylene or without packaging at all, since a good case in this case can cost more than the fishing rod itself.
But even the cheapest fishing rod needs protection so that no unforeseen situations occur while fishing. For example, a fishing rod damaged during storage may break at the most inopportune moment.
Tubes and cases are an indispensable attribute for protecting fishing rods and other fishing gear, both during storage when not in use, and during transportation and wear.
The cover protects the joints of the fishing rod from dust and dirt, thus making assembly of the tackle easy and quick, while the rod avoids dangerous cracks and scratches. Dust and debris at the joints subsequently lead to breakage of the rod during the fishing process or when casting . A bare fishing rod can be seriously damaged when transported in a car among other things.
The ideal option for protection, its high degree, can be called placing a sheathed fishing rod in a hard tube. In this case, there is a double level of protection from contamination and mechanical damage, as well as from moisture and other adverse effects.
Making a soft case
It is recommended to make soft cases for spinning rods and fishing rods with reels from durable, moisture-resistant materials. Such cases are very practical to use; you can sew a lot of pockets on them for storing and transporting fishing trinkets and bait.
Materials
This cover can also be easily sewn at home. For this you need the following materials:
- waterproof fabric (preferably tarpaulin, canvas, bologna, etc.) measuring approximately 2 x 1.5 meters;
- belt tape (15-17 meters);
- zippers: 4 pieces 70 centimeters long and 4 pieces 25 centimeters long;
- sewing machine.
Purchased or homemade option?
A very interesting question that many fishermen ask themselves. Naturally, it is easier to buy a factory-made product, but you will have to pay a tidy sum for it. With certain skills and desire, you can make a cover yourself, at home. In addition to being interesting, it is also economical. This is especially true if you don’t want fishing to be “golden” in terms of costs. The fact is that you have to pay for everything, and real fishing requires a lot of different accessories. By making a case or tube for fishing accessories with your own hands, you will always be able to make the product that was intended and that is more suitable for specific fishing conditions. In addition, for many anglers, fishing is a hobby into which they put a piece of their soul.