Why do you need a bloodworm?

The bloodworm, first of all, will help preserve the bait, especially in conditions when it is frosty outside, especially since you have to travel far for fishing. It will be a great pity, and fishing simply will not take place if the bloodworms turn into larvae unattractive to fish. If it freezes and immobilizes, then it will no longer attract fish. In this case, the fish will only be interested in live bait, and only in this case can you count on a catch.
In this regard, certain requirements are imposed on the bloodworm. For example:
- The moth bottle must be made of durable material. Very often, fishermen place bloodworms in matchboxes, which cannot withstand loads, especially unexpected ones, and the bait becomes unusable. In addition, in the process of moving such a matchbox can simply get lost.
- The lid in such a homemade product must fit tightly to the base of the box, otherwise the bloodworm may fall out of it or crawl out: after all, it is alive.
- The device must provide proper thermal conditions with air access, otherwise the larvae will either freeze or die.
What is the purpose of the bloodworm?

The bloodworm is an important fishing device, especially if it is winter fishing. After all, this little thing will allow you to transport and store bloodworms without any difficulty.
It will be a great shame if the bait, which is so difficult to obtain or purchased in a store, is spoiled. Consequently, there will be nothing to do while fishing.
What properties should a truly high-quality device for storing bloodworms have?
- First of all, you should pay attention to the strength and reliability of the material from which the blood cell is made. Because it should not allow the bait to be crushed, as often happens with a matchbox. It is here that fishermen choose as a place to store bait;
- It is also very important to ensure that the lids fit tightly to the walls of the homemade product. Since it is necessary to prevent bloodworms from falling out;
- Plus, you need to monitor the thermal conditions in the bloodworm. It must be warm enough so that the larvae do not die. And to supply air, small holes are made in the device.
Making moth bottles with your own hands
Mothworm
Fishermen make most of the devices with their own hands, and the bloodworm is no exception. The thing is that the amount of fishing equipment that is really necessary for fishing is simply not realistic to buy for money. This is despite the fact that some of them don't cost a lot of money. But if you add up all the funds, you get a solid figure.
This is a very simple device in design, which is made from scrap materials. Of course, anyone who doesn’t want to waste precious time on this process can go to a fishing store to buy such a simple device.
What you need
It is very important that the blood cell has the ability to maintain temperature conditions. Alternatively, this can be organized by placing this device on the fisherman’s knee. The strength of the moth can be ensured if it is made of polystyrene foam. Moreover, only dense foam plastic is suitable. Such foam will not only be durable, but will also be able to retain heat inside the device. To ensure that the heat from the fisherman’s foot easily penetrates inside the moth, its lower part is made of summer, non-dense fabric. The material from which thermal mats are made is also suitable for the manufacture of the case. This material is not expensive and a device of any shape can be made from it, as it is easy to process.
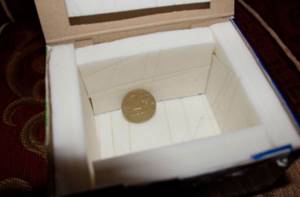
How to make a moth bottle from foam plastic?
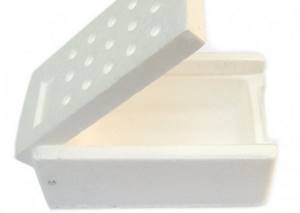
Polystyrene foam is an inexpensive but practical material that is easy to process and retains heat well. Therefore, it is quite possible to make a moth bottle from polystyrene foam in the form of a small box. It should be recalled that only dense foam plastic, for example, the one used to make floats, is suitable. Although many fishermen make do with ordinary polystyrene foam, but with a higher density.
What is needed for this:
- Styrofoam.
- Steel wire.
And also tools:
- Hacksaw.
- Stationery knife.
- Sandpaper (zero grade).
Large mothbox with your own hands. 11th issue
How to do it:
- Taking a piece of polystyrene foam, the dimensions of the future box (mothbox) are marked on it. The box may differ in the following dimensions: 8 by 5 by 3 centimeters.
- The workpiece is cut out along the lines of the applied pattern using a hacksaw. It is better to use a hacksaw, as it has very fine teeth.
- Stepping back 5 mm from the edges of the cut-out workpiece, you should draw another rectangle, which will later turn out to be the inside of the bloodworm, where the larvae will be stored.
- The inner part is cut out using a stationery knife. It should be pulled out so that it does not reach the bottom of the workpiece by 5 mm.
- After this, you can begin making the lid for this box. Its dimensions: 7 by 4 by 5 centimeters.
- After manufacturing, the cap is tightly adjusted to the hole using sandpaper.
- The lid and the box are connected using a wire 1 mm thick.
- To do this, a hole is drilled in the back of the box and lid. It is better to drill the box together with the lid so that the holes match exactly.
- After drilling the hole, you can begin to connect the box and lid. To do this, insert the lid into the box and insert the wire into the hole.
- If something prevents you from making a connection, then it is better to treat suspicious areas with sandpaper.
To protect the bait from the cold, you can put a piece of flannel on the bottom of such a bloodworm.
Creation of one - and three-section knee bloodworm
To create such a homemade product you will need some materials and tools. In this case, there are no special requirements for materials, therefore, each angler using this model will be able to make a device from any suitable material. The main thing is that the product performs its main functions.
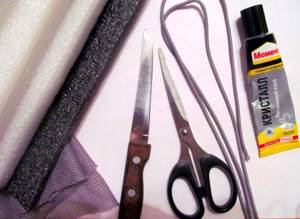
You will need the following materials:
- Glue.
- Thin material.
- Thermal saving material.
- Karemat.
- Plastic for gaskets.
You will also need the following tools:
- Stationery knife.
- Scissors.
Do-it-yourself knee moth. 15th edition.
Manufacturing stages
Before starting production, you should carefully consider all the stages of production, and also decide on the shape and size of the future bloodworm. The advantage of making it yourself is that you have the opportunity to do exactly what is needed. It is not possible to buy what you need in a store. This is another factor that forces fishermen to make their own gear. Options for the most common homemade products will be discussed in this article.
Making a simple bloodworm
- At the initial stage, three rectangles should be formed from heat-resistant material.
- “Windows” of the required size are formed in the center of these rectangles. The thickness of the walls of the future moth chamber should be about 10 mm.
- The fabric is attached to the bottom, and then the elastic band is attached with glue.
- Some anglers make the mistake of not securing the elastic between two layers of fabric, which prevents heat from flowing inside the box. Due to the elastic band, reliable contact of the bloodworm with the fisherman’s body is ensured.
Now all that remains is to test this device on winter fishing, in the midst of real cold. As a rule, fishermen keep bloodworms in their bosoms, which is very inconvenient. Every time you have to reach into your bosom in search of bait. What to do if the bite is quite intense? If you make a moth like this and attach it to your knee, then fishing will be not only exciting, but also enjoyable: after all, the bait will always be at hand.
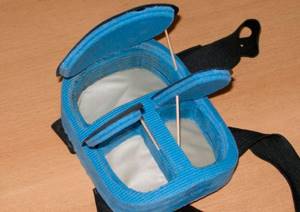
There is another homemade product designed for three compartments. The bloodworm for bait is stored in one compartment, the feed bloodworm is stored in the second compartment, and the third compartment is used for jigs and maggots. Sometimes this approach works.
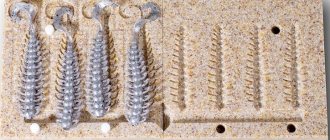
Moth tray with several compartments
To make such a box, you will have to follow these steps:
- Small blanks are created, measuring 150 by 170 mm from karemat.
- The lower layers, and there should be three of them, are carefully glued together with glue.
- After this, small “windows” are formed in the blanks.
- After this, the fourth layer of karemat is glued.
- Next, the homemade products must be carefully cultivated using fine sandpaper.
- Finally, rubber bands are attached to the homemade products, which serve to secure the bloodworms to the leg and to secure the lids.
- But that’s not all, you should secure the linings to the lid, after which the bottom layer of fabric is glued. The bloodworm for winter fishing is ready and all that remains is to cultivate the product a little and then try it out on fishing.
DIY sports moth
Storing bloodworms for winter fishing
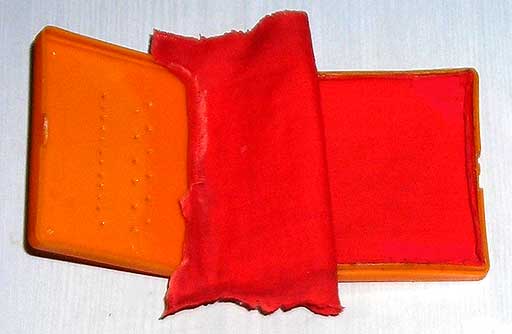
I recommend storing bloodworms in thin-walled homemade bloodworms of a similar design for winter fishing only in a rag for several reasons.
Firstly: cotton or wool material is, although weak, a thermal insulator. Therefore, the bloodworms in your homemade bloodworm will tremble a little less from the frost in the harsh conditions of winter fishing.
Secondly: the rag will prevent it from falling into the gap of the hinge joint between the box and the cover of the mothbox. This means that the larvae will have a chance, when stored in a frost-free pocket of winter clothing, not to be crushed when the lid of the moth bottle is closed.
Thirdly: when you open the bloodworm, the bloodworm will remain inside the box under the materials. Otherwise, it can be scattered on the snow. When the moth bottle is closed, the rag should protrude from under the lid.
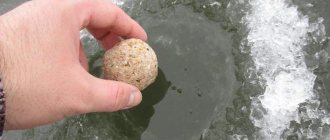
At home, a jar of water is used to store bloodworms. Before going on winter fishing, the larvae should be dried and lightly sprinkled with starch. Then, until the end of the fishing day, 80 percent of the bloodworm supply can be kept alive.
Every fisherman can adapt a suitable-sized plastic box for storing bloodworms during winter fishing. But such attributes of fishing equipment have significant drawbacks.
Firstly: low thermal insulation. You can’t put a moth like this on ice or snow for a long time. This means that you will have to store bloodworms during winter fishing, even in the last ice, in your jacket pocket.
Secondly: in order to prevent the larvae from constantly rolling from one side of the moth to the opposite and crushing them in the process, the box must be placed in the jacket in the same position.
The most convenient location of the blood bottle in a pocket is when the hinged connection of the lid with the cavity of the blood bottle is always located at the bottom.
And, nevertheless, I often use similar bloodworms myself. True, mainly before and after the winter fishing season. I store bloodworms in a box on the shore or in a rubber boat when I go fishing for crucian carp in spring or autumn.
You can look at a bath for sorting larvae in the article: Storing and washing bloodworms. And, taking into account the above disadvantages, it is still better to make a moth tray with your own hands from a material that insulates cold air. And probably the most suitable for this would be hard foam.
What should you pay attention to when making
Even such a simple production of simple boxes requires certain rules. For example:
- There is no need to apply glue over the entire surface of each layer. It is enough to apply it where the walls of the entire structure are located. In this case, a considerable amount of glue is saved.
- To form a compartment in a 3-layer workpiece, it is better to use a stationery knife with a narrow blade. If there is no such knife, but there is a knife with a wider blade, then the blade can be narrowed using pliers.
- To give all layers a certain shape, you should use an auxiliary form. A tin can or other unnecessary container is suitable for this.
- When forming the windows of the fourth layer, the knife should be held at an angle, towards the center of the product. The result is a window with a slope towards the center. This will make it possible to hold the lid in a fixed position without special clamps.
- After completing the final operations, the product is sufficiently processed to remove burrs or sharp edges.
- The elastic bands on the leg should be connected with Velcro, which will prevent snow from getting into the moth.
- The presence of special linings on the covers of homemade products makes them somewhat stronger. In addition, special linings will allow you to open the crankcase without much effort, and they also close the gap where unnecessary cold can penetrate.
- The material for the plastic pads must be dense. Plastic from ordinary plastic bottles will not work.
- The fabric for the bottom layer should be thin, otherwise it will not transmit heat inside the mothbox. On the other hand, it must have a special impregnation so that the juice that the bait secretes does not get on clothes, as stains may form.
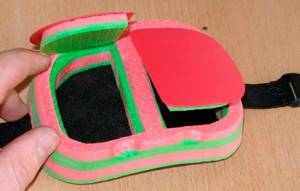
Knee moth
There is no secret in manufacturing, I wrote an article on Salapin two years ago:
This article will focus on making a knee-mounted bloodworm for bloodworms or other live bait, which is used for winter fishing from ice.
The most important task of such a moth is to bring heat from the leg to the nozzle and prevent it (the nozzle) from freezing. To accomplish this task, the bottom of the mothbox is made of thin fabric, and the body is made of thermal insulating material, the best of which is recognized as the one from which travel rugs are made. It is quite cheap in cost, easy to process and holds its shape well.
So, it’s not difficult to make a knee-mounted moth for one compartment, because its dimensions are small. It is enough to cut out three rectangles, glue them together, cut out a “window” of a suitable size in the middle, leaving the walls at least 1 centimeter thick. Then glue the fabric and elastic on the bottom. Having made the first moth, I made a small mistake - I slipped an elastic band between two layers of fabric, thereby blocking the access of some of the heat inside the compartment.
I appreciated the convenience of this device on my first fishing trip - you don’t have to reach into your bosom for every bloodworm every time, just throw a couple of pinches in your knee and that’s enough for an hour of fishing with a good bite. But last year, at competitions, I saw other athletes using such larger-sized moth boxes - with two or even three compartments, one of which is quite voluminous. The idea turned out to be simple - one compartment is used for baited bloodworms, one compartment for feed ones, the third is also used for live bait - jigs, maggots or burdock moths.
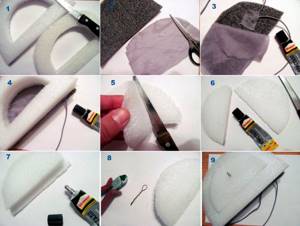
After analyzing photographs from various competitions, I began to think about the manufacturing process. I’ll give it briefly at the very beginning, but you can read it in detail further: We cut out blanks from a 15x17cm karemat. Glue the bottom three layers together. We cut out the windows. Cut out the lids in the top layer. Glue the fourth (top) layer. We grind the workpiece. We glue elastic bands for fastening on the leg and for the lids. We glue plastic covers onto the lids. Glue the fabric underneath.
The area of the lower surface of the enlarged model is much larger and the “flat” option is not suitable here; it is necessary to make it curved according to the shape of the leg. I once read on the Internet that the best way to form a bend is a three-liter glass jar. But the thought that it would be necessary to cut out not just one layer, but several, and besides, the cut would have to be made at a certain angle, haunted me and the idea came to make some kind of rigid shape. I came across a small piece of galvanized iron. A few manipulations with metal scissors and a hammer - and two forms for the template are ready!
The dimensions of the moth tray blanks for three compartments are 15x17 centimeters. This size fits very well with the size of a rug with a width of 60 centimeters - just cut a strip of 17 centimeters from it and divide it into four parts. I also found a piece of an old mattress of the same size and made a sample with slots from it.
And then it’s a matter of technology. Clamping one piece at a time into an iron mold, I cut off the excess along the edge, forming the required angle along the edge of the mat. You can do this after gluing, but it’s easier to work with one layer.
Next, we glue the bottom three layers one by one, applying glue only to the places where the walls will be located - why waste extra glue if then these places will be thrown away anyway? Three layers are glued together - it is necessary to cut through holes in them - these will be our containers. As in the version with one compartment, a wall thickness of about 1 centimeter will be sufficient. You need to cut through it with a sharp stationery knife, preferably with a narrow blade (I had to break off the excess with regular pliers), holding it vertically all the time.
Now we take the fourth top layer and cut out the same windows in it, but 2-3 millimeters larger around the perimeter, so that later the lids do not fall inside. This stage is very important - I laid this layer on an iron mold to give it a bend, and cut it so that the knife was always slightly inclined towards the middle of the “window”, i.e. The cut out lid should look like a skirt along the edge. This is what will keep the lids closed without any additional latches.
Glue the fourth layer on top.
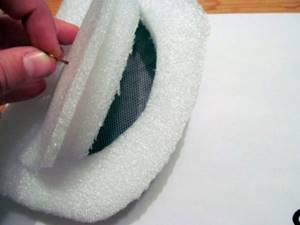
Next, you need to process the entire workpiece on the outside with sandpaper or electric sandpaper to fit all the layers and remove any irregularities and burrs.
The next step is to glue the elastic bands for fastening on the leg. To do this, between the first and second layers we make a through slot along the width of the elastic (2.5-3 cm) and glue it inside. Cut off the excess from the inside. The elastic bands on the leg are fastened together using Velcro, which is located in the middle. This was done so that when used, snow would not fall on the Velcro if it was located near the edge of the moth. Various plastic “fastex” and “self-reset” devices will be inconvenient here, because... will put pressure under the knee and are overweight.
We also need to glue the lids. I use the same elastic band, 2.5-3 cm wide. I make a cut in the middle of the lid and glue the elastic into it. I also make slits in the walls of the case and glue them there. I cut off all the excess.
The next step is gluing the plastic covers to the lids. These linings give rigidity to the lids, they are easy to open using their edges, and they cover the gap between the body and the lid, preventing excess cold from entering the mothbox. The plastic you need to choose is quite hard; I luckily came across an empty plastic bottle of dishwashing powder - its walls had just the right curve and sufficient thickness. The size of the pads is 3-5 mm wider than the size of the lid on three sides. The side where the elastic is glued must be cut flush with the lid so that the plastic does not interfere with opening it.
There is one small step left - gluing the fabric underneath. I advise you to choose a fairly thin one so that it transmits heat well, but with some kind of impregnation, otherwise the juice from the bloodworms will become saturated and leave stains on the clothes (which is what happened to me with the first fabric - raincoat fabric). We take a piece slightly larger than the size of the bloodworm, glue it and then cut off the excess.
You can use it!
PS: As far as I know, this idea came from Novosibirsk from an athlete named Abramov. Unfortunately, I don’t know him, but he came up with such a good bloodworm, for which I thank him.
PSS: Vladimir already knows Abramov, he’s a good man