| Part 1: |
Part 2
The fishing net can also be placed in such a way that the upper floating cord is longer than the lower one. In this case, the upper part of the net becomes loosely stretched and more catchable than the lower part of the net. This method of setting fishing nets is usually used for bottom and near-surface whitefish fishing. Working with such a network requires certain skills. Of course, such a network has its disadvantages, but its advantages, which we present below, can completely compensate for these disadvantages:
+ when bottom fishing, the lower weight cord rarely gets caught, for example, on stones; + the loosely stretched upper section of the net is free and holds large fish well; + when fishing with a floating fishing net, there is no twisting even in strong waves, and debris passes over the net without getting stuck in it.
The difference in the lengths of the upper and lower cords of a fishing net is created by providing different distances between the nodes of the net. To a shorter network cord, the cells of the network fabric are attached with smaller distances between the nodes, and to a longer one, vice versa. The greater the distance between nodes in the network, the longer the landing and selection will be.
When planting a fishing net, the mesh cells can be given different shapes. A cell is called symmetric if its width is equal to the distance between nodes. A cell is called wide if its width is greater than the distance between nodes. If the width of a cell is less than the distance between nodes, the cell is called narrow.
The initial cells (5-10 pieces) can be tied directly to a previously prepared cord, and after that the “linear” planting can be continued. It makes sense to tie the first two cells to one point. This solution will allow you to set the angles of the network and increase its strength.
If a previously made vertical (end) cord is not used to plant the width of the network, then the outermost 3-10 cells of the network fabric can be tied together. After this, all cells located vertically along one line are connected from top to bottom into one bundle (cord), forming a vertical fit.
It makes sense to make knots in the corners before planting is completed. If planting starts from the top corner, then it is recommended to use the nodes shown in Figure 11.
Rice. 11. Recommended nodes.
How to plant fishing nets with your own hands
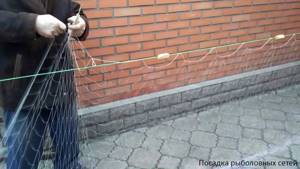
Planting fishing nets with your own hands is a long process compared to the machine method. But this type of gear is more catchy and softer to work with.
How to plant a fishing net
Landing is the attachment of the net fabric to the cord, which can be done manually, by shuttle or by machine.
In order to make a fishing tool out of canvas, the net fabric must be placed on the upper and lower selection. A floating cord is used for the top selection, this makes it easier to set up the nets and unravel them.
Upper and lower cord length
The lower cargo cord is 20-30% longer than the upper one. This difference in lengths causes the net to sag. But such sagging is undesirable for the top, because the fish will become entangled. If the top floating line is longer than the bottom one, then the top part will be more catchy. This landing can be used for catching whitefish at the bottom or near the surface of a river; How to make a landing correctly can be determined by knowing the weight and buoyancy of the cords.
Due to different distances between network nodes, the lengths of the upper and lower cords also differ. The larger the gaps between the nodes, the longer the fit. Fishing gear with different cells has a different landing coefficient (PC).
Nodes used
The strength of the knots is influenced by the method of tying them and the materials used. Knots for planting fishing nets are made in several ways:
- Make 2 turns around the edge with the cord. Then the working part of the cord comes back and is threaded through the fishing line that remains behind. It drags on.
- The "Pig's Hoof" knot is tied with a safety loop at the back. The cord is threaded under the edge and wrapped behind the base to form a loop around the edge. The other end of the line makes a turn after 2 loops when counting from right to left.
- The Triple Hoof Knot is performed in the same way, but there will be 3 loops.
The line is tightened in the direction in which it twists itself.
Planting methods
There are several planting methods:
- “on the run” method - without fastening nodes, which will allow the net fabric to move along the landing thread;
- drift method - using a special leg, thanks to which the canvas does not twist into the collection;
- “in a knot” - used for large-mesh fabric;
- landing on cords is typical for fabric with small cells.
There are several ways to plant a network - using the Finnish method or the rectangular one. With the Finnish style, the length of the upper selection is reduced, and the length of the lower selection is increased. When rectangular, the length of the cords of the upper and lower selections is the same.
Using shuttle
The shuttle is used for manual weaving of mesh fabric and for planting it on pick-ups. The shuttle is passed through the outer cells, which are tied to a picking cord. Again it is skipped and fixed. This must be repeated until all the cells are secured.
There is no need to make large gaps between nodes to speed up work, because this will disturb the position of the canvas in the water.
Using special machines
Fishing gear can be produced using machine knitting. The entire weaving process is performed automatically. One knitting machine can produce products with different mesh sizes. The cell size depends on the set parameters and is adjusted manually. The machine can knit with any type of thread.
Planting a network with your own hands
To make fishing gear with your own hands, you need the following tools:
- ruler;
- shuttle;
- monofilament scaffolding or strong thread.
Weaving is done like this:
- a fishing line is attached to the shuttle;
- the end of the thread from the shuttle and the outermost cell are tied to the cord;
- then you need to thread the cells into the shuttle;
- after this, the shuttle thread is attached to the adjacent markings on the cord.
In order to position the net correctly in the future, sinkers and floats are used when landing.

What is a milestone for?
A milestone is a special ruler with notches made on both sides. Then mark the values of the intervals between the nodes by applying a pole to the power cord.
Landing requirements depending on the purpose of the network
Fishing gear is as follows:
- A canvas with thick cells is used when planting a seine. Strains the fish.
- Those that wrap around fish by the gills are used in bets; it is advisable to use this type of fishing net in bodies of water without a current.
- Three-walled - they have large cells on the sides and small ones in the middle. These are used to catch large and small fish.
- Floating - a rectangular canvas with a cell size corresponding to the size of the prey, used in currents, drifting with the boat.
- Spawning - the mesh fabric is cut into 2 or 3 parts. Used in shallow water.
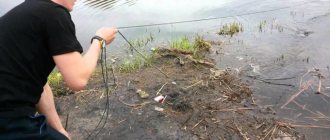
Before placing a net on the river, it is necessary to determine the location of the concentration of fish. There are no clear recommendations on how to set up a fishing net, but you need to consider in which rivers it is recommended to use certain gear.
Photo tips on how to weave nets
Read here How to make a casting network? Stages and schemes for making effective models with your own hands (125 photos)
Help the project, share on social networks 
0
Features of equipping a fishing net - correct fit and choice of net materials
Types of networks
In a broad sense, the word “nets” means fishing gear of various designs and purposes. They can be divided into two large groups:
- Fishing gear that strains fish are seines, dragnets, trawls and other tools that, as a rule, have thick, durable, but small-sized cells.
- Fishing gear that ties fish by the gills are fixed nets of various designs, floating nets and a number of other gear.
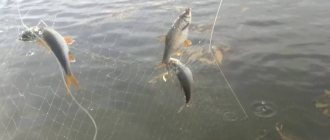
Let's look at the usual, most common gill fishing nets for recreational fishing, which is carried out under licenses. Such networks are also divided into several categories:
• fixed nets (single-wall, double-wall and three-wall, frame nets) – these are lightweight nets that are used in low currents, on lakes, ponds and reservoirs;
• floating nets with different numbers of walls - heavier nets that are used in the current; thanks to a special float-cross (loon), the nets drift with the current along with the boat.
Any person who is interested in fishing can apply for a permit to fish with nets. to buy fishing nets is in our online store. To study this seemingly simple fishing, it makes sense to buy the simplest, budget nets in ready-made, or as they say “planted” form. But it’s much more interesting to plant the networks yourself.
Nowadays no one knits mesh fabric with their own hands, as it was half a century ago. At that time, there were almost completely homemade copyright networks, which were passed down from father to son, they were looked after, they were constantly repaired during the long winters. Now the market is filled with antipodes of ancient nets - the so-called “Chinese”, affordable low-quality nets made of thin weak fishing line, intended not for fishermen, but for poachers. Such nets break due to the fish being taken out, they are inexpensive and such “fishermen” often forget to remove them from the water. A lot of fish are dying. The very concept of net fishing is being discredited.
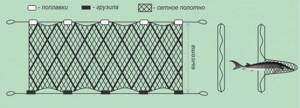
Network device. Upper and lower selection
Any simple single-wall network consists of several elements:
- Mesh fabric (del, doll) is a machine-knitted product made in the form of uniform rows of cells of the same size - cells. The fabric is made from nylon threads ( nylon mesh fabrics ), monofilament and curly fishing line ( filament mesh fabrics ). To turn the fabric into a full-fledged fishing net, the mesh fabric must be placed on the upper and lower thicker cord (selection), and not in a stretched state, but in a free, seated state (in a ratio of 1:2, less often 1:3). Therefore, the planted network looks like a lot of diamonds, not squares.
- The top pick is made from durable netting cord called a net. It serves to secure the net and has hard foam floats (floats). a floating cord is more often used for the top selection . This makes the work of setting up networks and unraveling them much easier.
- The lower selection also serves to secure the mesh fabric and secure sinkers (steel rings, lead). Recently, instead of individual sinkers, a weight cord .
A network of several walls differs from a simple network by the presence of an additional mesh fabric (one or two) with a very large mesh, on average 150-200 mm. Such fabrics are called “ryazh” and serve to form bags from a seated main fabric with a small mesh, which themselves are formed when large fish enter.
Frame networks are ordinary single-wall networks, which are additionally shrinked in height by 20%. This is achieved using vertical veins of thicker thread or fishing line. In addition, frame networks can also have horizontal veins, which also shrink the fabric a little. As a result, a very catchable system of rectangular pockets is formed in the network, which act as bags in a multi-walled network.
The choice of cargo and floating cord depends on the material and mesh size of the mesh. Floating nets are used to catch some species of riding fish. Therefore, the weight of the sinkers or cargo cord, together with the weight of the netting and the cords themselves, should be less than the displacement of the floats or floating cord. For most sinking nets the situation is reversed. The weight of the equipped net must be greater than the carrying capacity of the floating cord or floats. The net should sink slowly, so the difference in weight should not be more than 20%.
The selection of floats and sinkers for fishing in various conditions also follows the principles that are set out for the selection of weights and floating lines.
Rafting nets are widely used on large rivers. They have stronger rebounds, heavier weights and lifting floats. In the lower reaches of Siberian rivers, the main fishing for all types of whitefish is carried out with sinking rafting nets. Their strength is such that with a bottom hook, the net holds a large motor boat in a strong current. Naturally, the upper bridle, which goes to the boat, must be passed through the bow bollard.
Independent planting of nets and choice of mesh fabric
To plant networks yourself, in the absence of experience, you need to consult a specialist or read the literature and relevant materials on the Internet. It is necessary to make preliminary calculations on the mesh size and the shrinkage coefficient of the canvas. This will allow you to correctly determine the selection length.
Then the necessary network materials are purchased. For beginners in this business, it is better not to mess with sinkers and floats. A floating and weight cord is the right solution to the problem. The mesh should also be taken simpler, for example, from monofilament. It is much easier to work with a net made of thick fishing line when planting nets.
Fishing nets made in China have a straight sliding fit. The cells of the fabric are simply put on for selections. Such a network is not suitable for repair. This is a one-time item.
Real nets are mounted on an intermediate nylon thread (string), with a diameter of 0.3-0.7 mm. At certain intervals - flint, this planting thread is attached to the selections using special knots made with a shuttle or a “needle”. The length of the flint depends on the mesh size and the network landing coefficient.
There are various ways to plant nets on flint. Most often, there are 4-5 cells per flint. The length of the flint is determined by a simple calculation. Let’s say the fabric has a mesh of 30 mm, fit 1:2. One flint contains, for example, 4 cells. We multiply 30 mm by 2 (mentally stretch the network into a line) and multiply by 4 again. We get 240 mm. If the planting is carried out 1:2, then the length of the flint will be 120 mm. Usually they strive to make the flint length close to 200 mm. This means that for a 30 mm cell, you can put 6 cells on one flint. Then for a 1:2 landing, the length of one span or flint will be 180 mm - the approximate length of the shuttle. They measure out where to tie the next flint with the collected cells to the selection.
Planting nets on your own develops your hands and eye; this activity calms your nerves. All necessary materials can be ordered in our online store “Your Catch”. There you can ask questions and get advice.
The sequence of starting knitting nets.
Next, the template is removed from the cell (2), the auxiliary loop is cut and removed. The first loop is removed from the nail, turned 180 and hung on the nail again. The next knot is tied in the same way, forming a cell (3). The following cells are knitted in the same sequence.
The resulting garland should consist of even and odd loops, the number of which should be equal to the estimated number of cells in the network row. Then a cord is pulled into the even cells and its ends are tied. Hang the loop on a nail and begin forming subsequent rows.
A small loop is tied at the end of the thread so that the shuttle fits through it. A lace is inserted into this loop and, having tied its ends, the loop of the lace is hung on a nail. Throwing the thread coming from the loop knot (1) onto the template and passing the shuttle into the lace loop, pull the template to the first loop knot, tie and tighten the slip knot, thereby forming a loop (2).
The slip knot is tied in the following sequence: after pulling the template, the last two threads going up are clamped on its edge with the thumb and middle finger. The thread from under the thumb is thrown onto the index finger, the shuttle is passed under the two threads of the resulting loop and over the thread thrown over the index finger. The knot is tightened on the upper edge of the template between the thumb and middle finger, next to the first knot.
Read also: Compressor power for car painting
DIY fishing net planting
The cells can be made in different shapes - symmetrical, wide or narrow.
One of the most important stages in the manufacture of a fishing net is equipping the net fabric, or rather, placing it on floating and weighted pick-ups. Planting can be done manually using fishing shuttles or by machine.
Often the bottom line is made 20 percent longer than the top line to provide slack, which increases the catchability of the net and protects it from skewing. The upper part of the net is rarely made longer than the lower one; this is mainly used for drift nets and also has a number of advantages: the upper part of the net becomes more catchable due to the weakening of the tension and the net breaks less. In this case, the weighting cord does not catch on branches and stones, does not twist, and the net itself does not catch debris and holds large prey well. In order to plant the net on selections of different lengths, it is necessary to plant fabric cells with a smaller distance between the nodes on a cord that should be shorter.
As a rule, for fixed nets, the upper and lower pick-ups are made the same in length - this ensures ease of installation and easier pulling of the net. This is how all standard networks are planted, including Chameleon Standart.
When planting a net, the cells can be made of different shapes - symmetrical, wide or narrow, this depends on the type of fish being caught and is regulated by the landing coefficient. The landing coefficient is determined by the shape of the cell and has a numerical designation. The length of the finished network can be determined by multiplying the length of the mesh by the landing factor. The value of the landing coefficient is usually set initially in order to obtain the desired rhombus shape: if it is necessary to completely extend the cell in length, then a coefficient of 1 is set, in which case the cell will have no height.
For smooth networks, it is recommended to use a landing factor from 0.6 to 0.67. For medium-sized fish, it is better to use a coefficient from 0.35 to 0.45, for taller ones - from 0.3 to 0.4, and for more rounded ones - from 0.5 to 0.67. Recommended landing coefficients for catching various types of fish: bream - 0.33; vendace – 0.5-0.6; salmon – 0.5-0.65; flounder 0.65-0.75; the universal network is usually planted with a coefficient of 0.5. A net with this landing coefficient can be used to catch almost any type of fish.
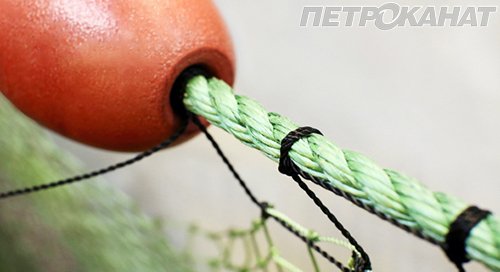
The photo shows a method of planting fixed nets using L-100 floats and attaching them to the upper catch, as is used in the Japanese Chameleon Profi nets for salmon fishing in the Far East.
At the beginning of planting, you can tie the first 5-10 cells in advance to the cord you have chosen, and the first two cells in general to one place to increase strength and in order to set the desired angles of the finished network. Often, for correct fit, stakes are used (a ruler with marks on it to measure the exact distance between the nodes), which are applied to the cord to determine where the selections are attached to the mesh fabric.
Typically, the fabric is placed on the pick-ups while sitting, and the pick-up cord must be tensioned to increase the strength of the knots. A large-mesh mesh can be planted by first attaching a rope or cord to the outer cells, for which you need to separate the cells with your hands and thread the rope inside.
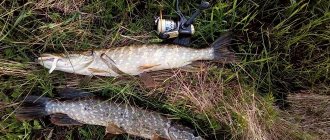
Autumn fishing with nets
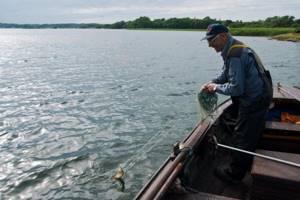
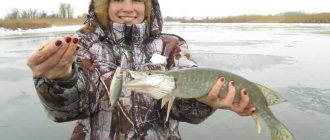
In the fall, it is best to cast nets from a boat or boat, since the water level in most types of reservoirs rises significantly. It is also recommended to purchase fairly large and strong tackle, because all freshwater inhabitants begin to stock up on fat for the winter at this time of year and increase in size. This advice is especially relevant when hunting predatory fish (pike, perch), since it will actively resist and tear the net with its powerful tail. It is recommended to use a boat with a motor, which will allow you to quickly walk through the fishing spots, with a net attached to the stern. However, make sure that the tackle does not get into the motor - you will break the net and destroy the engine.
Landing a net for rebounds
Landing a net for rebounds
The main tool for making (hand-knitted) nets and for placing net fabrics on selections is a shuttle (see Fig. 43).
The shuttle is made from a variety of materials: planed from a thin linden board, sawn from plywood, sheet plastic or plexiglass, cut (a hole is cut out) from sheet metal... The main condition is the absence of burrs, cracks and other irregularities; for metal shuttles it is necessary to blunt and round all the edges, otherwise during operation such a shuttle slides through the net as it should, without catching, but imperceptibly cuts the threads of the mesh fabric, depriving them of most of their strength.
The dimensions of the shuttle are quite arbitrary: the width depends on the mesh with which you have to work - a shuttle completely filled with thread should slide freely through the mesh. The length is determined by the convenience of work, or rather, by two opposing requirements: the shuttle should accommodate as much landing thread as possible, but should not be too long, making it difficult to move during work. When planting amateur nets, the length of the shuttle usually does not exceed 25 cm; for the production of large professional gear, shuttles of more impressive sizes are used.
It is convenient to use the shuttle as a ruler - make a mark on it with a waterproof marker, measuring the distance between the nodes attaching the landing thread to the selection. At the end of the work, the mark is washed off with a solvent.
For planting a landing thread wound on a shuttle is used. The correct landing of the net begins with this very winding... And the wrong one too. If the shuttle is not rotated around its vertical axis, as shown in Fig. 43.1 – one turn for each turn of thread wound on the shuttle - when planting, the thread will begin to curl and interfere with work.
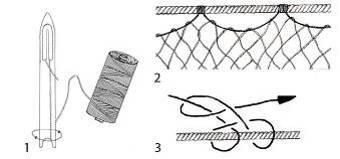
Rice. 43. Planting nets: 1 – shuttle and landing thread; 2 – “sliding” landing of the net; 3 – “pork’s hoof” knot (shown for right-handers, left-handers knit it in a mirror image).
In one of the letters I was asked a question: is it possible to use monofilament (fishing line) as a landing thread? In particular, for planting a forest network? The answer is categorical: it is impossible. Thick does not have the necessary elasticity, thin does not have the strength. “Braid” will probably be suitable, but the mesh will turn out “golden”.
There are several types of net landing, that is, several types of seams with which the net fabric is attached to the cargo or floating cord.
The main type of landing used for amateur networks with small and medium mesh, “running” or “sliding”, is shown in Fig. 43.2. In this type of landing, the shuttle is passed through several outer mesh cells (usually 4–6 for a medium-mesh fabric), without securing them in any way, then fixed with a fastening unit (Fig. 43.3) on the selection, then passed through again and fixed, etc. Sometimes they come across seating threads (for example, made in Belarus), quite suitable in thickness and strength, but too slippery in the knots. Then on the fastening unit shown in the figure, you need to make another loop to insure the unit from spreading.
In coarse mesh nets, the planting thread is threaded through two or three, sometimes even through one cell.
With a “sliding” landing, the net receives some limited freedom of movement relative to the lower and upper cords, which increases its catchability (fish get entangled much worse in a tightly stretched net).
To speed up work, you should never excessively increase the distance between the fastening units - of course, you will make the net faster, but in the water its configuration will be disrupted, and the time saved will result in losses in catches.
The network is considered to be planted evenly if the division cells are stretched in the form of rhombuses, the length of the horizontal diagonal of which is equal to the side of the rhombus, and the length of the upper selection is equal to the length of the bottom. Such a net catches fish equally with its lower part, its middle part, or its upper part - that is, it is quite universal. Sometimes they are planted unevenly - so that the diamond-shaped cells are divided diagonally in the lower rows, and vertically in the upper ones, or vice versa: the length of the selection is different.
Uneven planting of nets serves to increase catchability when catching certain types of fish, and in the chapter on catching bream, it will be described in more detail how uneven planting is done.
The length of standard amateur networks is usually 25–30 m, which is quite enough, because if necessary, you can always connect several networks into a network of the required length. In addition, the fishing rules of many regions (especially central, densely populated ones) limit the total length of nets to the same thirty meters per amateur fisherman.
The length of the net is always calculated by the fit, and not by the length of the workpiece, that is, the net fabric (“dolls,” as they call it). When the mesh fabric is stored in the form of a “doll”, it is maximally elongated in length, and the diamond cell actually has no height - its upper corner is in contact with the lower one. It is not difficult to calculate that from a 60-meter “doll”, if planted evenly, a 30-meter net will be obtained, and with more catchy types of planting, its length will be less. These ratios must be kept in mind when purchasing materials for making the network.
Winter fishing with nets
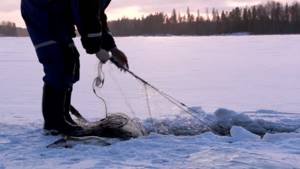
How to place a fishing net under ice? This type of fishing can only be implemented in a reservoir with a strong current, since it will be needed in order to pass the buoys under a thick layer of frozen water. It is best to do this on rivers, after drilling several holes. Through these same holes, the edges of the net are pulled with the help of improvised buoys, which will be easiest to construct from plastic bottles or polystyrene foam. It is first necessary to calculate the trajectory of the buoy, otherwise the net will float in the wrong direction. The method is quite complex, but exciting. In addition, it allows you to catch fish in large quantities even in winter.
Main methods of planting a fishing net
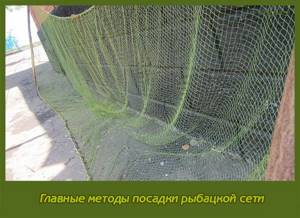
Main methods of planting a fishing net
You can’t easily catch a fish from a pond... Do you think that fishing is a real vacation? Throw your nets into the river and enjoy a good, plentiful catch in a few hours?
Those who hold opinions to put it mildly are mistaken. It turns out that in reality everything is not so simple. Fishing has many ingenious features and secrets that skilled fishermen under no circumstances neglect. One of these “experienced” secrets is the correct landing of a fishing net. It’s about her that the appeal will be sent later.
What is network landing?
In simple words, planting a network is the process of tying a network fabric to a cord. The lower cord (must be larger than the upper one) is called the cargo cord.
Planting a fishing net can be done:
– mechanically (when machine knitting a network); – manually (using a shuttle).
Network planting methods Through milestones . This is one of the most popular methods. The milestone is used as an auxiliary tool and is a special ruler with notches at the ends, which correspond to the distance between the nodes. Skillful net knitters, as is true, do not need to use poles. But novice fishermen, in order to universally use the pole for nets with different cells, will be able to stick a couple of tapes on it indicating the corresponding values. Planting a network “on the run” . This network planting method is used primarily in manually connected networks. The main advantage of landing while “running” is the absence of securing nodes. This allows the net to move along the landing thread; at the same time, the net becomes more catchy and more mobile.
Drift net landing . This type of landing is in many ways similar to landing a net “on the run.” The main difference is the presence of a “leg” from the trim to the landing edge. When drift landing the net, the “leg” performs the function of reducing the twist of the web during the pick-up, while the last cell at the bottom of the leg is captured into a knot in the flint.
Landing "in a knot" . This is the simplest type of landing for fishing nets with huge cells. But the hardest and most reliable. The method involves threading a cord through the cells. The knot is a necessary element of landing. Avid fishermen are much more likely to choose a double knot, which is often used when landing a seine.
Landing on a cord . It is primarily used for fine mesh fabrics. The mesh fabric strung with an edge is evenly distributed along the cord. After this, the cord is fixed with a landing thread at small intervals on the selection. Among the shortcomings of this method is the possibility of distortions of the canvas.
Fishing nets can be considered weapons
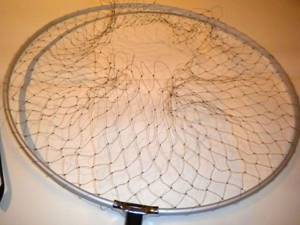
Landing net
A fishing net is a fairly serious structure that not everyone can weave and then “land.” But you can easily weave a landing net or cage from fishing line. For the landing net, a seamless “stocking” is knitted, which is then attached to a ring with a handle. Such a landing net is practically invisible in the water and does not alarm the fish when landing.
To weave a seamless network from which you can make a landing net, watch the video:
The Momoi Fishing company not only produces net fabrics, but also produces other accessories for fishing, and hand-knitting is used. Landing nets for landing fish of various sizes and designs are very popular among fishermen. All designs of this company are designed in such a way that they are easy to use, reliable and durable.
Any gear can be knitted from fishing line: nets, tops, etc. Their advantage is durability and lightness, and their invisibility in the water for fish makes them very catchy.
The mesh fabric consists of intersecting threads fastened with knots. For knitting nets, linen, cotton, nylon, silk and other threads are used that have the same thickness along the entire length and tensile strength corresponding to the future product. The thread for weaving nets must be smooth, elastic, and resistant to environmental influences.
Read also: How to properly cut a log on a band sawmill
Knitting of nets begins with the first row of cells. The number of them in a row depends on the width of the network and the size of the cell. The required number of half-cells is tied to the first row of cells to obtain a fabric of the required length. The net is knitted using a shuttle and a template. The shuttle is designed for placing thread, performing operations such as tying knots, sewing together net products and repairing them.
Direct weaving
First, one layer of thread is pulled through the prepared ring. A small loop is made from it. It should reach six to eight centimeters in length. It is necessary to quickly attach a bar to the bottom of the knot - it should always be at hand by the worker.
Now the shuttle is inserted into the lower part , directly under the template. After all this, the thread needs to be pulled back through the ring. It should seem to envelop the shuttle. You shouldn’t tighten it too tightly, but you shouldn’t loosen the thread or leave it hanging either. In everything you need to notice the golden mean.
Here you can tighten the thread and gently press it with your finger. When working with fishing line, there is a risk of cutting yourself and even seriously injuring yourself - you should be extremely careful in this process. After all the operations performed, the resulting loop is carefully tied into a small knot. You shouldn’t tighten it too much either - everything is done in moderation.
Time to create nodes
First you need to create the first cell for the future fishing net. But the action must be continued. All techniques for knitting net knots are discussed in some detail in order to understand how to knit a fishing net. The thread from the ring, passing under the template, is pulled from above it to the surface of the shuttle. Further, parallel to the previously laid section, part of the fishing line is also stretched. Three threads are clamped with all fingers on the left hand.
The shuttle is then pulled between the fishing line, which is tied directly to the ring, and two subsequent threads. It is imperative to store enough material between the fingers and the shuttle so that there is some sagging of the part. If you try to push a shuttle into it, you will get a knot. When the loop is completely on top of the template, the knot can be considered tightened.
If the appropriate operation is repeated several times, the following nodes will be obtained. They are then tightened more firmly to ensure greater reliability.
It's time for strapping
After the formation of the first cell in the order and its node, it is necessary to tie the entire ring in the same way. Any experienced fisherman can give the author excellent practical advice on how to knit a net. The thread is laid along the top of the template. It is then passed underneath and threaded through the ring. At this stage, the thread is brought to the finger and pressed. Next, make 2 knots. If you want to make a network with cells 60 by 60 millimeters with a total of 25 pieces, there will be 21 loops on the ring.
All nodes must be performed at a strictly fixed distance. After 21 loops (or other required number) have been cast on, the threads are carefully removed from the template. The next row is knitted. So, it is repeated exactly until your entire product is tied around the perimeter of the network.
Over time, the weaving process will take very little time. Therefore, creating a Delhi on your own will not be particularly difficult for a trainee. When using nets, the fisherman does not have to take an active part in the process all the time. After the fishermen have installed all the prepared gear, you can enjoy the beauty of the surrounding nature, and in the evening return to your own home with a large amount of catch. Having mastered at least several mesh knitting techniques well, you can not only make it, but also repair it if the need arises. Big catch!
Business Basics
A wide variety of gear is used for such things as fishing. Nets are the most popular way to quickly and easily get a large amount of catch. That is why, if you want to combine your favorite hobby and a pleasant pastime, you can choose the method of fishing using fishing nets.
It's quite easy to create them even with your own hands. Weaving nets by hand for beginners, as well as for professionals, will not be difficult - anyone can master this craft.
The process of knitting fishing nets will be helped by experts, videos, of which there are a huge number on the Internet, as well as many different and very detailed step-by-step diagrams. Here are a few main points:
- Strong fishing rope. The best material for weaving in this case. But you can take other materials.
- Shuttle for knitting nets with your own hands. Here it is better not to skimp and choose a really high-quality tool - the total size of the catch will ultimately depend on this.
- If you don’t want to weave a rope net, then you can learn how to knit a net from fishing line. Accordingly, for such an event you will need to first purchase a sufficiently strong fishing line.
- For any case of weaving, you will definitely need a nylon thread.
The weaving of the networks themselves is always carried out according to a huge variety of patterns. If the reader is just beginning to understand the basics of how to knit a fishing net, step-by-step instructions will be quite simple and understandable. You should not immediately take on complex and intricate ways of doing this work. A seine needs a machine, a scarf - these are the primary preparations. In a fishing store, the buyer will definitely not be left unattended and will be helped to choose everything he needs.
So, when starting to complete the task, first of all you need to stock up on threads. Professional fishermen and people who weave nets for sale call this material delhi. In the modern world, fishing nets are most often woven using synthetic fabric materials. Usually there are two options in this role:
- Nylon derivatives.
- Nylon and other elastin-containing tissue structures.
What is the advantage of such threads? Almost every experienced fisherman will never go fishing without a set of fishing rods among his gear. And all fish lovers, young and old, know how to weave a net from a fishing line.
In order for the mesh to hold its given shape well and efficiently, it should be woven using specialized auxiliary ropes. Most often they can be found in fishing stores under the name "landing laces." You can also try using wire. You need to take it of medium thickness. You must remember that wire is not as reliable a material as a professional tool made in a special factory.
After all this, be sure to pay attention to selecting the right size sinkers and at least several types of floats. It will be best if the selected samples have a smooth surface without roughness or nicks. The rounded shape also fits perfectly into the overall picture of how to weave a fishing net.
Read also: How to set up a satellite dish head
List of basic materials that can be selected for the float:
- Polystyrene foam and any of its derivatives. Particular attention is paid to the paint. There is no need to save money with this item - otherwise the product will quickly lose its attractive working appearance.
- Birch bark. An excellent alternative to polystyrene foam. It holds its shape well, but will soften over time, so it is better to cover the float with several additional layers of waterproof varnish before use.
- As an alternative to the first two options, you can also try using wooden floats. There is even specialized paint for wooden wobblers.
Sinkers can be made with your own hands. Cuttings of old pipes or baked clay are perfect for these purposes.
In order to avoid the sharp edges of the sinkers breaking through the mesh, they must first be treated with sandpaper. A special metal file is also required.
The preparation process begins
Knitting for beginners at home implies a mandatory detailed consideration of the available tool that will be used. The first thing is, of course, the shuttle. It is a kind of similarity to a large fishing needle. With the help of it, the process of knitting the network takes place.
Now attention is drawn to the presence of a bar and at least one set of rulers. The plank is popularly called a template, so in the store you can ask about the availability of items under these two names. The object looks like a kind of plate, which has very smooth, jewelry-turned edges. This device will subsequently determine and fix the size of the cells in the finished fishing net.
The item can be purchased in a special store or made with your own hands at home . To do this, you need one basic item: a large pre-prepared plywood sheet. Plastic is also perfect for solving the task of making a shuttle.
It is better to produce the workpiece using a previously produced standard template. You can find and download it on the Internet. Fortunately, there is plenty of such goodness there. After all the preparatory work, it is imperative to spend a little time processing the tools. Its edges need to be sanded in great detail using the same sandpaper.
The middle of it is reproduced using a strong chisel. The material from which the future shuttle is made must be very strong and quite rigid so that under the influence of a chisel, sandpaper and human force it does not crumble into pieces, and then withstand its period of operation.
For such purposes, you need to take plastic or plywood measuring at least three centimeters in thickness. It is these three centimeters that will make up the total width of the shuttle. Its length can reach from thirty to forty centimeters.
You need to keep in mind: if the bar (prepared template) that is used in knitting a fishing net with your own hands has certain dimensions, then the size of the resulting product will be two to three centimeters smaller than the template. This aspect must be taken into account in the process.
Manufacturing of the product
If the manufacturers have correctly completed all the previous points, then how to tie a fishing net with your own hands is no longer something unusual and at least somewhat difficult. Now that all the necessary materials and tools have been purchased, you can safely get down to business. Be sure to review the technique chosen by the performer on how to knit a fishing net - for any unclear aspects or sequence of work.
First of all, the selected rope, thread or part of the fishing line is wound onto the base of the shuttle. Performing these actions, the author seems to alternately apply a piece of weaving to one side of the instrument, then to the other. All threads must be placed strictly in the center - otherwise the network may unravel already in the first stages of working on it.
Before you start winding, be sure to tie a thick rope or something similar in a convenient place. This needs to be done in the form of a small ring. In some cases, you can replace this rope with wire. You should select it carefully - looking closely at fairly thick and dense specimens like numbers ten and twelve.
The work is carried out while sitting: weaving a net is a rather long and painstaking process. It will take a lot of time. But you shouldn’t regret it under any circumstances. The result will be a very high-quality product that will serve its owner for many years of excellent and comfortable fishing in all weather conditions.
The hand-woven mesh turns out to be quite dense - not a single fish will be able to break through it. The product will be reliable, meeting all the criteria that a picky owner will put forward for its use. Fishing with such good equipment will only be a joy for every lover of this action.
Fishing is not an easy business. It will be very nice to make your task a little easier, even knowing that the incumbent is not doing hard work in order to feed his family, but his own weekend hobby. And yet, no matter what the current situation is, it is always nice to get a big catch, while spending less effort on catching the fidgety fish itself.