Winter float fishing is not so popular in our area. Most people prefer to fish with a jig, some prefer a spoon or a balancer. For some reason, even live bait is caught using jig tackle. And completely in vain! For small fish, which make up the majority of a fisherman's winter catch, a float rod is much more suitable. And a large specimen like bream bites on it more readily than on the same jig. Unfortunately, during Soviet times, traditional Russian winter float tackle was forgotten. Societies of sports fishermen considered it unsportsmanlike, since it involved simply sitting and watching the float, only occasionally playing along with the bait. But recently, a forgotten tradition has been revived.
Meet the winter float tackle
A winter float fishing rod consists of a short winter fishing rod, the length and material of which are not significant. In its simplest form, it is simply a fishing rod, consisting of a whip and a reel handle. You can also use a reel rod, but it must be equipped with a stand, at least in the form of a flyer.
Filly is a fishing rod shape traditional for winter float fishing. Such gear was used back in the century before last and was described by a number of naturalists and researchers, for example, Sabaneev and Aksakov. The advantage of a fishing rod over a fishing rod and reel is that you can measure the amount of fishing line on it in advance without removing the depth on the float, and reel it in at the end of fishing on a reel. Then, when you come to the same place, you don’t need to set the depth; you just need to unwind the fishing rod and immediately start fishing.
It should be noted here that the most convenient are fillies with two reels - one for storing a supply of fishing line, the second for reeling in equipment at the end of fishing. Unfortunately, these are rarely found on sale and fishermen usually make them themselves. There are no special requirements for the material of the whip - the main thing is that it is not too soft and allows hooking. He does not participate in landing the fish - it is pulled out by the fishing line with his hands.
The disadvantage of the filly is that the line on the reel itself can freeze - this is bad when you often move from place to place. However, in winter float fishing you have to do this infrequently; they mostly sit on the same holes. And unwinding frozen fishing line is not too much of a problem - it comes off quite easily, cutting through the ice. By the way, about the fishing line. When winter fishing with a float, it is not at all necessary to use ultra-thin line, which jig anglers often use. If the game is played here, it is usually in the form of a single toss of the nozzle followed by a smooth lowering and will not be hidden by the neutral buoyancy of the fishing line. A fishing line with a thickness of 0.14 and even 0.2 mm would be completely “legal”, although the latter may already alert the fish and will require the use of a leash. However, when catching rotan and some other fish with a float, the thickness of the fishing line does not matter. The author usually uses 0.14, which was purchased with a large supply, both in current and in still water.
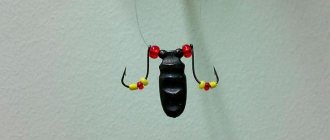
The hook is selected according to the type of fish and bait. For example, when fishing for crucian carp, it is better to put a larger hook - a small one simply does not cut through its thick lip. The same applies to rotans. For the latter, it is better to use a large round jig even with a float due to the specific nature of the bite - it usually stands in place for a long time, swallowing the bait, the float moves only at the very beginning of the bite, and then freezes, as a result the fish can swallow the hook deeply, causing it to bite when If you are fishing with two or three rods, you can skip it. And with a jig, the float will float up, and it’s immediately clear what needs to be pulled out.
Sometimes they use a tackle with two hooks. The author believes that historically the same Sabaneev describes a similar equipment when fishing for ruff, however, in modern conditions it is easier to have one more fishing rod than to sculpt more hooks on them. However, when exploring a reservoir, it is possible to use two hooks, when it is necessary to test two different baits; multi-hook tackle can also be used for fishing in the horizons at great depths.
The float and weight are the main elements of the gear. In the classic version, a float is placed, then there is one weight and below it, 10-15 cm, a hook with a nozzle. The load is taken such that it is slightly larger than the carrying capacity of the float, that is, it should sink it. The float in this case is located just below the crust of ice in the hole, it is visible, it does not freeze into the ice. There is no need to overload the tackle, as it will be difficult to see the bites on the rise. The load should only slightly exceed the carrying capacity of the float, taking into account the weight of the hook and nozzle, and the weight of the jig instead of the hook, if one is used.
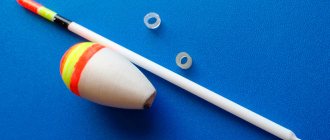
The winter float must be attached to the fishing line at one lower point. It must have a movable hinge mount or a movable upper part - the fish bite is determined by its movement. This can be seen as the movement of a float under water to the side. If the float is fixed at two points, or a fishing line is passed through its body, then the bite will be difficult to see - its movement up and down is not as noticeable as wagging to the side for an angler looking down.
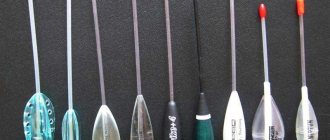
For the same purpose, the top of the float is often made flat and beveled - it will turn the float during a “crushing” bite. However, even cheap store-bought floats with a round tip are good - they work fine if they are attached only at the bottom point to the fishing line. A beginner should not use floats that are too complex - it is better to start with simple single-body floats, although they come in two or more parts connected by a hinge.
Read: Pike fishing in winter
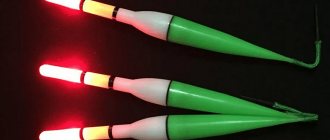
It should be painted only in light colors - white or yellow. They are best visible on the dark surface of the water in the hole, even in bright light. As a last resort, you can sit with your back to the sun so that the fisherman’s shadow covers the holes and you can clearly see the floats. It should be borne in mind that not only the top, but also the side of the float should be clearly visible. In this case, the top is made a little darker than the sidewall, since when biting the sidewall shows, and this should be noticeable.
Winter fishing rod sinker
The lowest part of the equipment of a winter float fishing rod is a sinker, which plays an important role in setting up underwater tackle and, in theory, should be placed on the tackle in the first place.
The weight in the water of the remaining sinkers or single lead pellets located under the winter float is selected taking into account the weight of the sinker.
The speed of delivery of the lowest section of the winter float fishing rod to the bottom of the reservoir without flow depends on the total weight of the sinker and bait in the water.
The bait is usually located on a short leash no further than 5 centimeters from the end hook of a winter float rod and, due to its low weight commensurate with the mass of the bait, does not alarm the fish.
Sometimes, in the slot of the sinker, a knot is hidden that connects the leash and the main line of the float rod.
If during the fishing process you are not going to change (remove) the fishing rod sinker, then the weight of the winter fishing rod with a float should be adjusted to the lightest bait.
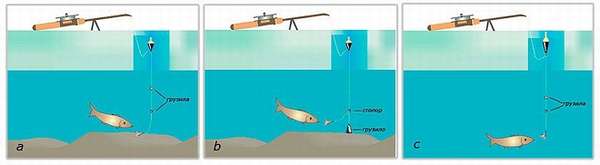
Equipment for fishing on the current
The main feature of float gear is that it can also be used for fishing in currents, even in strong ones. However, it will require special equipment. The fact is that when fishing in the current, the line is dragged down the river. In this case, it can rest against the lower edge of the hole. If this happens, the bite will be very difficult to notice. To prevent this from happening, use an additional small load. It is placed just below the float - the main thing is that it is further than the thickness of the ice. It will hang at the bottom of the hole, creating tension on the fishing line and preventing the small piece of fishing line under the hole from the float to it from going too far forward, and will allow it not to cling to the lower edge of the hole. The rest of the equipment is classic, a weight and then a hook. Of course, when using additional loading, the float must also be larger.
Articulated float
The third float is articulated. Of the presented models, it is the most informative, since when bitten it floats up, turning in a vertical plane. Well suited for fishing with a rocker.
To make a hinge, we take two wires and twist them into two loops, and during manufacturing we insert the second loop into the first. We drill a hole in the body and attach one of the hinges in it with glue. The second hinge will be inserted into the cambric that slides along the fishing line.
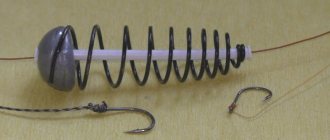
Equipment for fishing “in the horizons” - a load lying on the bottom
Most often, in winter, fish bite in the bottom layer - this is where most of the food for it is located, and this is where it prefers to stay. However, often schooling fish, bleak, bream or roach, move through the reservoir at different depths. At the same time, she will not refuse food on the hook. Each time changing the depth of the fishing line behind the float is inconvenient and time-consuming; in order to be able to fish at different depths, fishermen came up with multi-hook gear with a weight at the bottom.
The main line is attached to a weight that lies at the bottom. In this case, the float will be more overloaded than in classic gear, and the line will be stretched from the very tip of the fishing rod. From the main line there are several short leashes with hooks from the float to the weight. You can use either a rigid mount or a sliding rig of such a leash, but it is easy to “lose” the depth, since the sliding leash can slide up or down. It is more convenient to have several loops on the main line every half a meter and attach leashes through them as needed. The leashes should be attached to swivels so that the fish does not twist them when pulling them out. Usually they put two or three leashes for different depths.
The fishing rod for such fishing is exclusively “filly”. A line with loops will be difficult to wind onto a reel; the loops will get in the way. But you can reel one of these on a reel without any problems. The float must have a removable mount that will allow the loops to be moved through it. The author uses a fairly thick “leg” with an elastic band that is spacious enough for the loop to pass through it. The body of the float is attached to the leg on a hinge; this float is homemade and quite large. During the fishing process, you can pull out the fishing rod and rearrange the leashes, remove excess ones or add new ones. Long leashes are not needed here - the length of the leash is no more than 15-20 cm. The line for the leash is 0.14, the main line is 0.2.
This gear should be considered quite rough and insensitive, since all this equipment has a large area of contact with the water, provides resistance to fine, delicate bites and is used only when searching for fish in the water column. When fish are found at a certain depth, you should switch to fishing with conventional gear.
Manufacturing
Materials and tools
The following materials will be used to make the floats:
- low porosity foam;
- thin wire for installation;
- set of cambrics;
- toothpicks or other elements made of wood or plastic for antennas;
- waterproof glue;
- multi-colored varnishes.
Tools that will be useful to us:
- hole saw;
- knife;
- scissors;
- sandpapers and files;
- boilie drill;
- pliers.
Blanks for floats
In pieces of foam plastic up to two centimeters thick, we make holes with a small diameter hole saw (one to one and a half centimeters) without a drill. In this case, small cylinders remain inside the saw, from which we will grind the body of the float. However, you can cut out bodies with a knife or on a lathe, depending on who has what and what they have.
Polished bodies
Then comes the most tedious and lengthy process in the manufacture of any foam products - grinding using various “sandpapers” and files.
Fishing technique and tactics
When fishing, much fewer holes will be drilled than when fishing with a jig. Be sure to have a comfortable box for sitting, or even better, a tent. You can fish from a soft mat or sled, but when fishing from your knees, your legs will get tired from kneeling in one place for a long time.
First, the angler drills several holes and checks the depth. In your arsenal you need to have at least five or six fillies with preliminary settings for different depths - so that you do not need to reconfigure them too much and you can only tighten the float a little. It is advisable to sign the fillies by numbers - from the smallest depth to the largest. Then they sit near the hole and wait for a bite. If it’s not there, go to the next one.
A feeder and a depth gauge are the float angler’s best friends. When fishing with a float, you can’t immediately understand whether there will be a bite from this hole; more time is spent than when fishing with a jig. Therefore, initially it is worth taking places at the beginning and end of the dumps, where an interesting bottom, pits on a flat area are determined by tapping. It’s better to drill a couple of dozen holes at the beginning than to start fishing from the first and waste the whole day. Only interesting holes are fed, and not all, and this must be done wisely, without overfeeding the fish, using animal components.
If there is a bite, they stay here and drill a couple more holes, laying out an additional two fillies without numbers, setting them to the appropriate depth initially. At the same time, they look at the float of the first fishing rod: if it bites, we pull it out. An interesting detail: you should not sweep away the crumbs around the hole; it will serve as a natural support for the fishing rod. You need to slam it down a little with a scoop, creating an ice mound of small height.
Read: Winter fishing. Fish bait
This is necessary so that the fish cannot drag the fishing rod into the hole, so that it is initially rested against an obstacle. In the old days, for this they used an ice pick placed in front of the holes, which was used to chop the ice; now they use an ice drill, which is much more convenient. When biting a large fish that has caught itself, a fishing rod being dragged under the water is not that uncommon.
Bait can affect fishing success, but not always. Usually the fish stay in their “winter quarters” and it is quite difficult to lure them to some other place. It is easier to find a good place by drilling additional holes. It is advisable to drill them when searching every ten to fifteen meters, then, when there is a bite, you should drill a few more around the “successful” one, perhaps in some of them there will be a more active bite. There is usually no point in leaving this place.
At first, when there are no bites and the fish have not yet been found, you can sit on one hole for about 10-15 minutes. Then, when the fish is found, the place of more active biting also sits until the end of the day. The fish bite occurs throughout the day with varying success, a school approaches, begins to take, and after the bite there follows a certain lull. You only need to weigh anchor and go searching further if nothing has bitten for a couple of hours. At the same time, it’s worth looking at other fishermen - if they are biting, but here everything is gone, you should go in their direction. Even if they catch perch with spinners, they can just as well catch it with a float with a butterfly, no worse than with a spinner.
Pulling out fish from great depths is done using a “mill” - the fishing line is selected by winding it around your arms spread out to the sides. You should not throw the filly aside at the end - snow sticks to the reel, which makes it difficult to use; quite rarely, it can break through the crust and get stuck; it is better to place it near the hole on a smooth surface. A thicker fishing line for a float tangles much less than an ultra-thin jig. When actively biting with three fishing rods, it is important to quickly be able to pull out, remove, replant and release the fishing line into the hole, then pull out the next one. Often the fish won’t even let you put out the second fishing rod.
Playing along is another element that allows you to catch more. The rod is taken in the hand, then one or two swings are made with a large amplitude - from 30 cm to a meter. At the same time, the nozzle smoothly lowers down, attracting fish. You should not use this technique too often - perhaps the fish has already approached and is sniffing, and then the bait flies up from under its nose when the fisherman decided to play along with it a little more. Everything has its time, you need to have patience when fishing like this.
Homemade winter float
HomeArticlesAll articlesArticle
Starnak
The other day I was attacked by a whim. I haven’t made floats for more than ten years, my hands were really itching. And, if for summer fishing you make your own float that is competitive with purchased ones, you have to try very hard, but in winter everything is much simpler. I’ll say right away that I’m not completely out of my mind, I know that purchased winter floats cost from 10 to 50 rubles, but catching fish with tackle lovingly made with your own hands is always an order of magnitude more pleasant than using a store-bought one. In addition, as usual, when making it ourselves, we have the greatest freedom both in choosing the material and in giving the desired shape, right down to coloring. So, for those who like to do handicrafts - step-by-step instructions as a guide to action!
We take a piece of hard foam and use a hacksaw to cut out blanks for future floats. The size of the workpiece is generous, approximately a square with sides of 1.5 cm in profile. The length of the workpiece is about 7-10cm. It all depends on what capacity the float is needed. In our case, I wanted to get floats with a carrying capacity of 2-3g, hence the dimensions.
It is very easy to process hard foam with a sharply sharpened knife. Our task is to give the workpiece a shape that roughly resembles the final appearance of the product. We begin processing by cutting off corners, without fanaticism, removing little by little until we “feel” the material how it is processed.
The result should be a workpiece turned to a cylinder. In profile, the closer to the circle, the better.
After the approximate cylinder has come out, on one side we reduce it to a cone, this will be the lower part of the float. It’s okay if at this stage the workpiece looks scary, we are not finished yet, in the future we will eliminate all these roughnesses with the help of a file.
Using a file, again for metal, we bring the shape of the float to close to ideal. The left hand holds the workpiece as shown in the photo, turns it towards itself with the thumb, while with the right hand we move the file forward and slightly to the right. With the help of such movements we give the desired shape and eliminate the flaws of the initial processing with a knife. If you need a completely ideal shape, you can take a smaller file and also refine the workpiece with fine sandpaper.
We cut off the excess part of the workpiece. If you are not sure exactly how much to cut to get the required load capacity, then first install the mount (see below), then load the float and, cutting off a little at a time, achieve the load capacity numbers you need. The cut location must also be finalized with a file, chamfered and the end sanded.
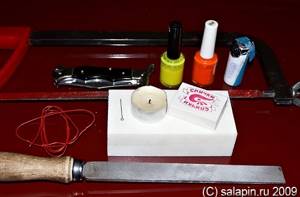
Take a pin (see first photo), bite it off in the middle, and use the half with the eye. We clamp it in pliers and heat it on a candle flame. It’s better not to heat it red-hot, as you might melt the excess. If it overheats, let it cool slightly.
Having centered the heated pin with the workpiece, melt a hole for the fastener. The operation requires cold hands and iron endurance. The heating of the needle should be such that it enters the float with slight pressure, but without difficulty. Practice on scraps, it will become clear the second time.
Now comes the fun part - the mounting. I make it from telephone wire in a special way. We cut off a piece of wire as in the photo, and remove the insulation from half. The fold can be done, if desired, either on the half with or without insulation. We bend it so that we get an ear and twist it with a regular twist.
Half of the wire is stripped of insulation to obtain the desired thickness of the product. If you peel all the wire, it will be too thin; if you don’t peel it at all, it will be too thick. And so - just right.
We take the fastener with pliers and insert it into the pre-melted hole. There is a little trick here: you need to rotate the fastener in the direction in which the wire will not unwind; if you look at the photo, then counterclockwise. In principle, this fastener holds very well in the float on its own. But if you want your grandchildren to fish with this float, add a drop of any glue that does not corrode the foam.
The result should be something like this mount. It must have a free connection so that the float can take a vertical position in the hole.
In principle, our float is ready for use. All that remains is to equip it with a suitable cambric and now use a fishing rod. The white foam is clearly visible in the dark hole. But you can put in a little effort and paint the float. This is done very simply, but we must not forget one very important point.
Before painting, the float must be primed. Soil does two important things. Firstly, it prevents the paint from corroding the float. Many paints are guilty of this, again I recommend trying it on sections. Secondly, the paint on the primer looks much brighter than without it. Apply a thin layer of primer with a brush, which will also fill all the pores and give the float a smoother appearance.
To dry the floats, you can use improvised objects, for example, a summer float. We press it with the same knife onto the edge of the window sill and, above the battery, onto the protruding keel, we put our products on the fasteners for drying. The primer dries very quickly, after ten minutes the floats are ready for painting.
Turn on your imagination! The coloring of the float is a matter of taste, who likes what. Just don’t make the top dark, otherwise the float will be very difficult to distinguish in the hole. To be completely sure that the color will be preserved, as well as to give the body of the float additional streamlining, you can coat it with varnish.
Now you can go fishing and get twice as much pleasure from fishing, because the float you made with your own hands will float up the next time a bream bites!
Question. Is it possible to do the same thing, but easier? Answer. Yes, you can. Forget everything that is discussed in the first half of the article. Go wild, buy a ready-made float from craftsmen for summer fishing, which will look something like this one, only twice the size. Since this monster is completely unsuitable for summer fishing, it will make a couple of excellent floats for winter fishing. It is enough to cut it in half and adjust it to the required load capacity. Most likely, even the color will be preserved. The fastening unit may require modification or rework, and you will certainly have to re-do it in one of the halves. But curling a wire and sharpening a workpiece are two very different things, right?
Tags: winter fishing homemade float
31

Register or log in to comment.
enjoy
-> Article
Homemade winter float
05.10.2014 14:13:38
Tell me what exactly is the best primer so that the varnish does not eat up the float?? Of course, I’ll try it myself, but maybe if it doesn’t make it difficult, you’ll immediately push me in the right direction))) Thank you!
enjoy
-> Article
Homemade winter float
28.01.2015 08:50:31
In short, I bought a special varnish from TriKita, an excellent product. Apparently this varnish has a different base, not nitro. Very bright colors are obtained when dry. The only negative is the smell - very specific, which, as I understand, does not disappear when it dries. but it does not corrode the foam and performs its function 100%.
Trophies
For some reason, a float rod is considered most suitable for bream. However, other types of fish are also willing to take it. Let's start in order with the most common types.
Roach
This fish lives in almost all ponds, lakes and rivers. You can catch it both with animal baits such as bloodworms and maggots, and with plant baits such as semolina and bread. The porridge is not very convenient; you should put it into a syringe for fishing only if this syringe is in a warm pocket and does not freeze. On the contrary, the bread is not afraid of frost and you can fish with it. Bloodworm is a good bait. Maggot is a little worse. Roaches do not bite on worms as readily as on summer days. It is found both at the bottom and in the water column, but it is still more reliable to fish from the bottom. In this case, the hook is placed almost at the bottom, but it should not lie on it - this is important when selecting the weight of the float.
Perch
Yes, yes, perch can be successfully caught using float tackle. Especially in the dead of winter - many fishermen know that playing with a jig at this time is useless, it only scares off the striper, and it is easier to fish with standing tackle. But the float initially involves fishing with a standing bait with virtually no play. An important detail: when fishing for perch, the nozzle is positioned as when fishing for roach near the bottom.
Bloodworms, maggots and worms are used - the last two types only because they are the easiest to store for a long time. In some places they catch it with burdock moth, mormysh crustacean and other aquatic organisms. Well, if it bites, then why not? It is useless to use vegetable baits for perch. Sometimes fry are used as a good bait - in this case you can catch a fairly decent trophy of a kilogram or more.
The problem is that it can be difficult to catch these fry in winter. This is usually how village fishermen catch fish, who catch fry in large ice holes where they rinse clothes or for water with buckets - he comes there to “breathe” and can be caught with a net, colander or even a fishing scoop.
Ruff
Traditionally in Russia this fish was caught only with a float. Sabaneev describes a tackle with two hooks located on a wire crossbar specifically for catching ruff. Now there is not too much of this fish and there are also fewer people who like to catch it specifically. However, sometimes you want ruffs for fish soup, and you can catch them on a float. If you need live bait to catch burbot, you can’t find a better fish than a ruff.
Read: Fishing in winter. Beyond the river
This fish stays on a relatively hard bottom, where there is no silt; it cannot tolerate it. Usually it is pebbles or sand, but sometimes it is found on clay soil. Loves depths of 3 meters and above. On rivers it prefers places with current. It swallows the hook deeply, so it is important not to be late with hooking. Often found as extraneous prey when fishing for bream. Almost never bites in the water column - only from the bottom. In this case, the hook is positioned as when fishing for roach, or a jig is used - it should slightly overload the float, the bite will be visible on the rise.
Rotan
Recently, rotan has become a common catch for fishermen. It is tasty, found in places where other fish simply cannot survive. So you can catch it even in the evening in the city pond near your house. The best bait for rotan is another rotan. He reacts sharply to the smell of his relatives; it is in his nature, apparently, to eat up the leftovers and eat damaged fish of his tribe.
It willingly eats its own fry - they look like tadpoles, only much larger. You can use a worm as bait - it is quite attractive and stores well. If not available, take bloodworms, maggots, or any animal bait that will move on the hook. A rotan will not take on a worm or maggot hanging motionless.
After catching the first one, you should cut it with a knife and use its insides as a bait. This is the best bait, rotan smells it from afar and will willingly come to feast on its fellow fish. Sometimes you should play along with the nozzle so that the smell in the water spreads further. Rotan bites not on the game, but on the smell - this should be remembered. Therefore, it is more correct to catch it with a float than with a spoon or jig with a game. Instead of a hook, use a large jig, described earlier. The hook itself should be large. The nozzle is placed in the water column near the bottom; usually it is located in the thickness of the bottom hornwort not at the bottom, but above it.
The layer of hornwort also has its own specifics - in the upper part there are long vertical stems, and at the bottom a continuous matted carpet is formed. You should try to fish 20-30 cm above its border. You can easily determine it using an empty feeder. Usually, when lowered onto the carpet, this is felt; the feeder smoothly stops its movement. In this case, the depth gauge will simply penetrate it to the bottom.
Bream
Most anglers prefer to catch it with a float. Indeed, most of the bream caught from the hole in winter went to floaters. A bream is more likely to take a stationary bait than a jig during a game - it often scares it away rather than attracting it. It is caught at great depths from the bottom, sometimes it bites in the water column, but less often. It prefers the so-called bream pits, where it accumulates in large quantities in winter. In former times, it was a massive prey there for baggage poachers, but now this method of fishing is prohibited.
The bait is used both animal and vegetable. It is difficult to guess its preferences in advance, so they are caught with several fishing rods using different baits. Somewhere it bites on pasta, somewhere on maggots and bloodworms, somewhere it grabs pearl barley. The bait is of great importance. If you feed bream in a deep-sea place for a long time, it will constantly stay there in large quantities. Some fishermen make holes for themselves and work on them in shifts, constantly feeding the fish and replacing each other in the tent, if possible. It prefers fairly hard clay soil, rarely stands on silt or in grass and is only passing through. The equipment is used with a small pad, which slightly overloads the float. In this case, the hook itself with the nozzle lies on the bottom, the bait too, and the sinkers are located in the water column. The bite is visible on the rise.
crucian carp
In some reservoirs it is readily caught from the ice. They say that in Siberia there are entire lakes inhabited only by crucian carp, where they catch more of them from the ice than in the summer. And in the summer he is inactive there. However, in the European part of Russia this does not always happen - there are places where he refuses to take under the ice and only bites when it disappears. One of the few fish that, even in winter, prefers to stay on muddy ground, among reeds and other similar places - the rest leave there, since there is little oxygen there, which is wasted by rotting plants. This doesn’t bother Kara at all.
Quite picky. Can be caught on different baits. You need to have several of them, and if it stops pecking in some place, the first thing you need to do is change the nozzle. Subject to attachment - often stays at feeding places for several years and takes only there, even if the supply of porridge and food has long ceased. In winter it bites from the bottom; it is extremely rarely caught in the water column. A fishing rod is equipped as for catching bream or, if the bottom is overgrown, as when fishing for roach, with a hook “hanging” in the thickness of the algae. It requires a large hook to cut through a thick lip. A crucian carp on a hook behaves very smartly and you need to make a lot of effort to get it - it’s nice. It has a sharp, large spike in its caudal fin, which can cause injury when removing the fish from the hook.
Subscribe to
our channel in Yandex Zen
How to make a float from foam plastic
Foam floats are characterized by a high level of sensitivity. The most common are homemade spherical models, drop-shaped or olive-shaped floats.
To begin with, small square or rectangular blanks are cut out of a piece of foam plastic. Next, using a sharp utility knife, the float is given the desired shape and cleaned with sandpaper. Instead of a knife, you can use a drill with an appropriate attachment.
After cleaning the float from dust, we paint its body in the desired color or combination of colors. When the paint has dried, coat the foam float with varnish and again give the workpiece time to dry. Next, drill a small longitudinal hole in the center of the workpiece and insert a core (feather or wood) into it. The length of the core can reach 6-7 cm, the thickness on average is 1-1.5 mm. You can also slightly change the design by gluing a thin feather element only into the upper part, and in the lower part making a small loop for fishing line from thin wire.
Instead of wire, you can use an eye from a hook. Most often, a single sinker is used in the tackle, when using it, only part of the float rod is visible to the fisherman. Foam floats are quite sensitive, so they will notify the fisherman even of weak bites. For effective operation of the float, a fishing line with a thickness of up to 0.16 mm is required.
Options for making a sensitive float with your own hands
Despite the abundance of floats in fishing stores, amateur fishing masters continue to make homemade models. They differ in appearance, material and load capacity. Making a sensitive float with your own hands is not difficult. It is enough to decide on the type of product, select suitable materials and consistently perform all operations.
A DIY float can be used in different fishing conditions. Depending on the scope of use, appropriate materials should be selected.
- You can fish in the coastal zone with the lightest models weighing 0.2-0.8 g. Thanks to the low weight, it is possible to hunt for such types of fish as roach, rudd and crucian carp.
- For fishing in the current, a medium-weight float (0.8-2.5 g) is required. Equipment with such a signaling device can easily be cast to 20-30 m, where large fish such as bream, ide, and chub live.
- A heavy float weighing from 3 to 10 g allows you to perform ultra-long casting. Such models have a voluminous body, and flight characteristics reach 50 m. The antenna will be clearly visible from afar due to its large size. Large representatives of the ichthyofauna such as carp and silver carp will be interested in the bait.
If earlier fishermen were limited in materials, today the choice is quite large. Some of the materials are suitable for making a body, while others are better used as an antenna.
- You can create a floating body using:
- polystyrene foam;
- wine or cognac corks;
- medical syringe;
- balsa;
- wood.
- The following may be suitable for the role of an antenna:
- waterfowl feather (from geese or ducks);
- cane;
- plastic tube.
To create a bite alarm, you may need various household materials:
- waterproof glue will help hold the individual elements together;
- wire 0.5-1.0 mm thick is needed for making rings and loops;
- acrylic paints will give the float individuality and good visibility;
- toothpicks will help process the body of the float.
For comfortable and fast work, you should have some tools on hand.
- The easiest way to make precise and even holes is with an electric drill and a drill set. In some cases it is more convenient to work with an awl.
- A chisel and a sharp knife will allow you to remove excess pieces of material when creating a fishing masterpiece.
- Using a file or sandpaper, you can give the float precise shapes and perfect smoothness.
- The easiest way to hold the material or tool being processed is in a vice.
- A ruler or caliper will help control the accuracy of production.
Technology for making a float from wine cork or polystyrene foam
To make a float with increased load capacity, it is necessary to form the body. It can be shaped like a ball, an olive, or a drop.
Minimal modification is needed when making a wine cork float. It has a cylindrical body, which remains to be slightly modified and polished.
- But when using popular polystyrene foam, you need to cut a suitable shape from a square or rectangular blank. At the initial stage, it is better to use a sharp utility knife to give the future float a body as close to the ideal shape as possible. The length of the workpiece can be 50-70 mm long and 10-20 mm thick.
Photo 1. Foam body, antenna and pen rod.
Photo 2. Glue the antenna and rod into the body.
- A carabiner with a swivel or a wire loop is attached to the bottom of the antenna. All that remains is to decorate the body and antenna with paint or nail polish.
Photo 3. Cut off the rod tube. it turned out to be a sliding float.
Photo 4. Color the product.
Every fishing enthusiast has several goose floats in his box. They often help out when fish bites are cautious and unnoticeable. Before making a float from a goose feather, you should properly prepare the material.
- To collect feathers, it is better to go to a pond that is favored by geese or ducks. You can take 5-10 feathers with you, different in color and length. You should not start any processing on the shore. It's better to do everything at home.
- Using a stationery knife, cut off the fluff on both sides.
- The remaining fluff can be removed using fire. To do this, it’s easier to use a lighter and walk the flame along the body several times. Fire will also help straighten a crooked feather.
- Next, you need to coat the attachment points of the fibers with colorless varnish to seal microscopic holes and cracks.
- The upper part of the feather is painted red or orange.
- Knowing how to make a feather float, it is important to securely attach it to the fishing line. To do this, two cambrics from a tube from a dropper are placed on the feather. Alternatively, a thin wire loop can be made at the bottom end of the float.
- Increasing the weight and carrying capacity of a goose float is quite simple. It is necessary to make a body from foam, balsa or cork. Then measure the thickness of the feather with a caliper and make a through hole using a drill. Its diameter should be 0.1-1.0 mm thinner than the thickness of the pen. The antenna is inserted inside and fixed with glue.
For ultra-long casting of equipment, you can create a float with a weight.
- You can make an antenna from two plastic tubes. A tube 1.5 mm thick should be installed on top; a plastic product with a diameter of 3 mm is suitable for the lower part. Alternatively, bamboo or reed can be used.
- The body is made of polystyrene foam. Body height is 40-70 mm, diameter at the top is 15 mm, at the bottom it narrows to 10 mm.
- A hole 4-6 mm deep and 2.5 mm thick is made in the lower part of the body. A lead load is mounted in the hole, which is fixed with glue. It can be cast to the appropriate thickness by first installing a wire loop.
- A wire ring for fishing line is attached to the upper part of the body.
- The antenna is assembled with the body using waterproof glue. The final step will be to paint the float.
A fan of float fishing should have a rich set of bite alarms. Some floats are convenient to use when fishing short in calm weather. Other models will help deliver bait over long distances, allowing you to catch trophy fish.
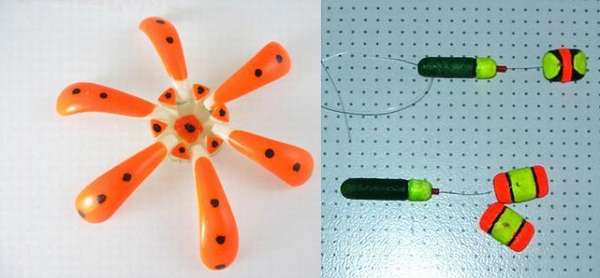
Features of floats with petals
Petal floats are not often found on sale. Their cost, as a rule, exceeds the price of ordinary winter floats by tens of times. They have, as already mentioned, an aesthetic function rather than a practical one. Such devices have only one advantage - they are more noticeable when biting. Against this background, there are two important disadvantages:
- The design is complex, which entails a high risk of breakage if handled carelessly.
- During active biting in cold weather, when taking the fishing line out onto the ice, such a complex float freezes and clings to uneven surfaces with its petals, which leads to additional difficulties in handling the tackle.
Working part equipment options
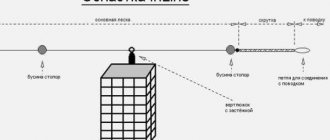
Any installation of a winter fishing rod is assembled according to the principles described above. Any float system is adjusted to generally have a slight negative buoyancy. This is the only way the equipment will be sensitive when working with cautious fish. Main equipment options:
- One jig at the end,
- Hook and sinker
- With auxiliary and main load,
- A variety of equipment with an additional hook or jig,
- Installations with a blind weight at the end and a flow outlet.
Any created float equipment is checked and adjusted at home in advance in a container of water. You need to arrive at a pond with a set of prepared fishing rods, especially if it is not known in advance in what conditions the fishing will be done. Read more about the options for various installations of winter fishing rod equipment.
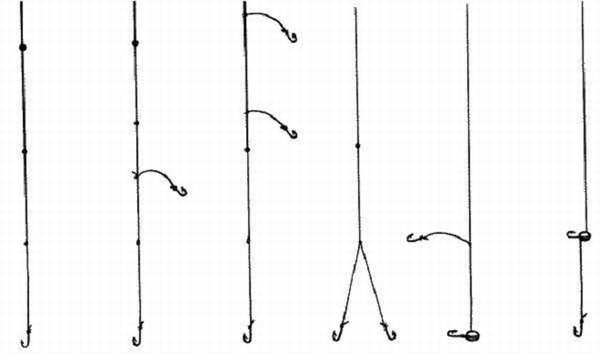
For winter roach fishing with fishing rods, a float rig with two hooks works effectively. Equipping a winter fishing rod with two hooks is available in various options:
- A heavy and light jig is taller than a locomotive,
- Hook over the jig (on a leash or locomotive),
- A leash from the fore-end of a heavy jig with a hook or phosphorus blende.
You can also use your own variations. All winter fishing is a constant experiment in the selection of working equipment. A winter float rod with two hooks – even more so. An additional provocateur is placed higher, lower, on a long or short leash. Sliding options are more versatile, when the distance between the main bait and the suspension can be changed without re-tying the gear. Any winter rig of two leashes is knitted so that the hooks do not get tangled or tangled. This is a double-edged sword - it’s better to use one hook than to constantly untangle knotted leashes. The binding knots are standard, as in summer rigs.
fishing line
The diameter of the fishing line for ice float fishing rods is usually 0.1-0.14 mm. Ultra-thin monofilaments, as for active play with a jig, are not needed - this will weaken the fishing rod as a whole. The standard option, suitable for most cases, is 0.12 mm. It is better to use special winter monofilament or fluorocarbon. An important characteristic of fishing line is the lack of memory. When creating complex sensitive installations, it is important that the fishing line stretches evenly to the sinkers, and does not go in rings, repeating the contours of the reel. Otherwise, all the benefits of compensating for the weight of the bait will not work. Read more in the article about fishing line for winter fishing rods.