DIY mini snowmobile
Dear visitors to the “ Samodelkin Friend ” website, from the material presented you will learn how to independently assemble a snowmobile with an engine from a walk-behind tractor.
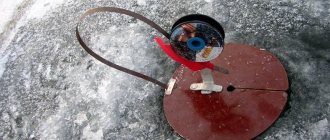
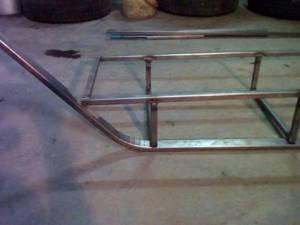
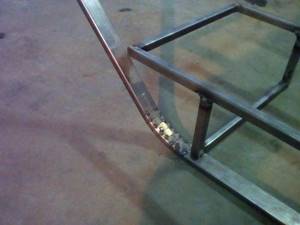
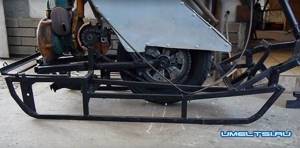
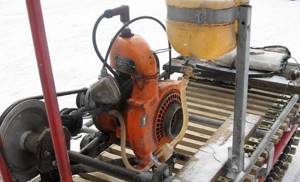
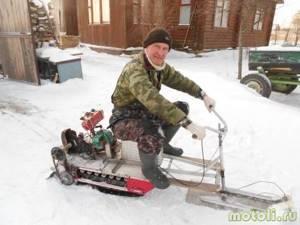
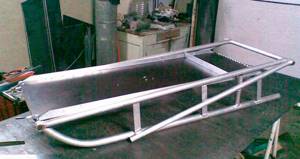
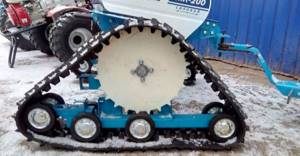
Step-by-step assembly photos and a video of the mini-snowmobile running in are provided. Every avid fisherman and hunter knows perfectly well that in winter it is not very convenient to travel on loose snow on skis, and when it is necessary to cover a distance of several tens of kilometers to a farmstead, winter hut, hunting hut, or to a reservoir, then there is generally a “pipe)) For To cover long distances you need a snowmobile, but the prices of factory-made cars are beyond the means of the common man; again, repairs and spare parts will cost a pretty penny. So we do it ourselves, with our own hands)) To build the snowmobile, the author used an engine from a Lifan walk-behind tractor with a power of 9 l/s, this type of engine is very popular today among home-made people, wherever they are installed) tractors, all-terrain vehicles, boats, etc. The internal combustion engine is located in the rear of the car directly above the track; by the way, it is made from half of the BURAN caterpillar cut in half.
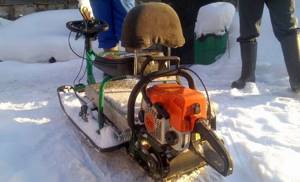
The snowmobile runs quickly through the loose snow, carrying two people and runners with luggage, which once again proves that Kulibin’s business is alive and growing)
Materials
- ICE “Lifan” 9 l/s
- professional pipe "square"
- caterpillar "Buran"
- chain
- star
- bolts, nuts, etc.
Tools
- welding inverter
- angle grinder
- drill
- set of wrenches
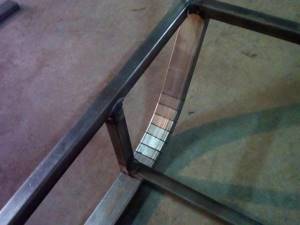
Assembling a snowmobile with your own hands.
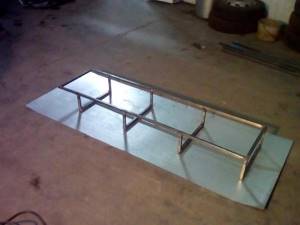
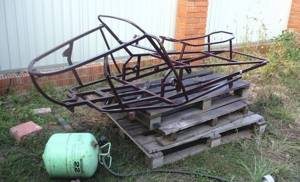
This snowmobile is very compact and at the same time quickly assembles and disassembles, literally in 5 minutes. It also easily fits disassembled into the luggage compartment of a car.
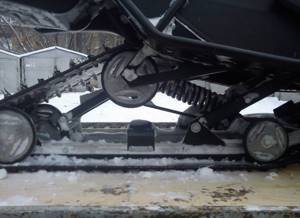
The caterpillar is made from BURANovskaya caterpillar cut in half; aluminum tracks made from profiles are additionally installed.
Here's a snowmobile)
Do-it-yourself sled-drag for a motorized towing vehicle
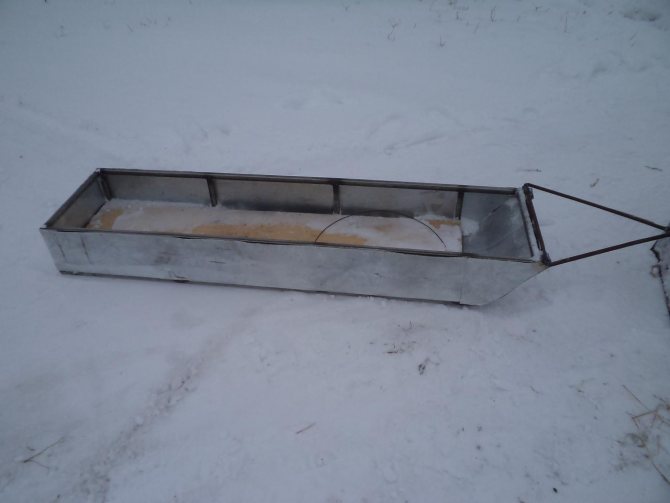
Greetings! In continuation of the previous article about a motorized towing vehicle on wooden slides, we will consider creating a homemade drag sled for it. Initially, it was planned to simply buy ready-made plastic drags, but later, after purchasing a sheet of galvanized iron, it turned out that it was just enough for both a motorized towing vehicle and drags. Therefore, it was decided to buy some additional steel profile and spend several hours building the sled. Now first things first...
Material
The sled-drags are made of steel profile 20×20 mm and 20×40 mm and galvanized sheet measuring 2×1.25 m. I.e. made of the same materials as the motorized towing vehicle itself.
Profile, galvanized and plywood
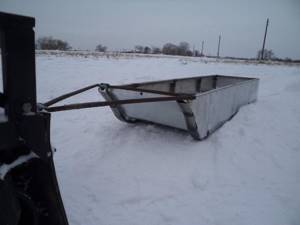
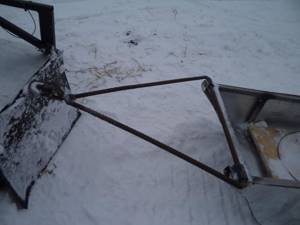
The towing device is homemade, welded from reinforcement in the form of a triangle, on the top of which a hook is welded.
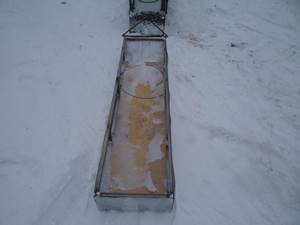
A sheet of plywood was laid on the bottom and secured with self-tapping screws.
Shape and dimensions
The drags have a standard rectangular shape with a bend in the front. The length is about 170 cm, width - 40 cm. It turns out that the size of the drag sled is slightly larger than a motorized dog. The width was selected so that the sled could easily travel along the track of a motorized towing vehicle and at the same time would not be too narrow.
Construction process
The two of us spent about 6 hours creating the drags. As in the case of the motorized dog, there were no drawings; all dimensions were calculated “on the spot”. This is still easier than welding a frame for a towing vehicle.
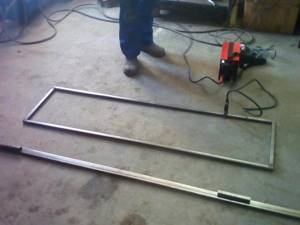
First of all, a rectangular frame was welded, which will be the upper part of the frame.
The basis of the drag sleigh
Next, racks were welded to it, which are connected by cross members. These crossbars will be located at the bottom of the sled and after complete assembly, plywood will be screwed to them with self-tapping screws.

After this, runners were made from a 20x40 mm profile. They will be attached to the edges of the skids and will act as skis, and will also add additional rigidity to the entire structure.
If you don’t have a pipe bender, you can bend the profile using a grinder and welding. We make several cuts to half the thickness of the profile, bend it and fix it by welding.
This way you can set any bend angle.
After this, all that remains is to assemble the structure. We cut off the required amount from the stainless steel sheet, mark it, cut out all the excess at the bends.
Next, we drill holes of sufficiently large diameter in the places of the frame struts in order to weld these struts to the runners. This can be done conveniently using a step drill. Those. We will have a stainless steel sheet, as it were, sandwiched between the runners and the drag frame.
Next, use rivets to attach the sheet to the runners, place the frame on top and weld it to the runners through the holes.

Then we bend the sides and also attach them to the frame with rivets. Almost ready, all that remains is to thoroughly weld and rivet all areas, clean sharp corners with a grinder, make a tow hitch and secure the plywood.
Towbar drag
By the way, the hook as in the photo pulls out because its spring-loaded closing part is too flimsy and it simply breaks out. Therefore, it is better to install something more reliable.
Conclusion
Do-it-yourself drags have a number of advantages. First of all, a reliable metal structure. Of course, factory plastic drag sleds are also strong, but still there is more trust in metal than in plastic. Plus, you can make drags of any shape and size. And finally, the cost of their production in terms of materials costs does not exceed 1,500 rubles, which is much cheaper than buying ready-made drags.
Continuation…
Do-it-yourself motor sleigh for winter fishing

As soon as winter comes with snowfalls, movement on the roads becomes difficult. In order to be able to move freely in snowy areas, it is absolutely possible to assemble a full-fledged snowmobile from improvised means.
At the same time, you don’t need to spend a lot on a new vehicle. The benefit of this is especially visible when a car does not allow you to move in snowy winter conditions, and even when the roads are not cleared. In this case, the benefits of a snowmobile in a snowy winter are, as they say, obvious.
Any design should begin to be assembled by first developing drawings. All the necessary parts and components are indicated on them, after which the stage of practical implementation of the idea begins. In our case, first of all, we need to determine the brand of chainsaw that will be used in the construction of the snowmobile.
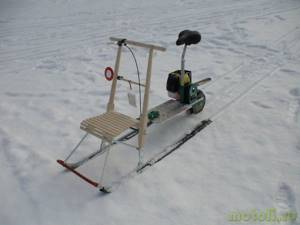
The design of our homemade vehicle is simple and practical. On a small sled made from pipes and angles, the engine and gearbox of the Druzhba chainsaw are installed. In order for the engine to operate stably, a carburetor taken from a Chinese moped was installed.
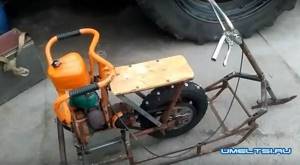
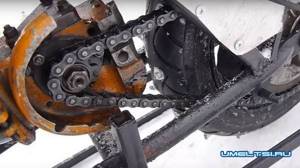
The chain drive runs in the direction “drive sprocket” – “driven sprocket (from a motorcycle)” of the wheel. The wheel before this was on a scooter; the tire was covered with spikes and hooks, for a confident ride on an icy surface. The wheel is mounted on levers - when the driver gets on the snowmobile, the wheel is pressed against the ice by levers. As a result, the wheel is pressed tightly against the ice surface.
The steering wheel was installed as usual, like on a bicycle. Only here it is not a wheel installed, but a guide (skates have a similar design).
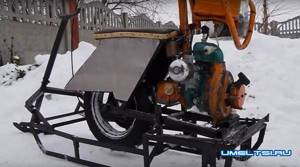
The snowmobile is designed with a protective cover over the wheel, and with a lever brake made by the author of the homemade product.
The result is a very convenient vehicle that moves quickly on the ice - with it you will quickly find a fishing spot with a good bite.
How to make a snowmobile from a chainsaw
The snowmobile is manufactured according to one of 2 schemes:
- single-track (2 skis in front, 1 track in back);
- two-track (1 ski in front, 2 tracks in back).
Any snowmobile device has the following design:
- Engine.
- Supply system.
- Oil injection system.
- Transmission.
- Chassis.
- Steering.
- Frame.
- Electrical equipment.
Before you begin making a homemade snowmobile from a chainsaw and its further assembly, you need to design drawings of all working components and the general appearance of the vehicle. It is better to draw each assembly unit separately and take out the dimensions.
During the development process, the brand of gasoline tool is taken into account.
Models such as Druzhba, Ural and Shtil are well suited.
The Druzhba chain saw has a simple design. The disadvantage is the low motor power (1 kW) with a large mass of the tool (12 kg).
Read also: Steady rest for lathe 16k20
The Ural has a weight of 11.7 kg and an engine power of 3.68 kW.
- ability to work at low temperatures;
- high environmental friendliness.
When making a snowmobile from a chainsaw with your own hands, you can choose the Shtil brand. It is characterized by noiselessness during operation, a power of 1.5 kW, and has a nominal weight of only 3.9 kg.
Racks
The initial stage is the manufacture of the base of the frame structure from welded spars. For the middle part, corners 50x63 mm made of hardened steel are used, the front and rear are made of S2 steel with a flange at an angle of 90°. All elements must have holes of the same diameter for mounting with the track wheel and drive shaft. Brackets for road wheels are welded to the bottom of the frame.
The racks are made from 30x30 mm corners and connected by metal crossbars. The result should be a structure in the form of a small portal. A platform is required for the mounting location of the chain saw gearbox and the chain drive shaft. Sheet steel of the required size is selected, usually 2-3 mm thick, and welded to the center of the right side of the module and the portal.
At the back of the portal and at the same time in the middle of the module, a place is formed for the seat, which is subsequently made from boards and fabric or removed ready-made from old equipment, for example, a moped.
The front spar and the drive axle traverse are installed to the beam, which is a standard water pipe with a radius of 0.75 mm. Steering ski bushings are welded at both ends, and a stand for the engine subframe is welded in the center. The mounting points for the supports are reinforced with 2-mm metal gussets for strength and stability of the structure.
Caterpillar
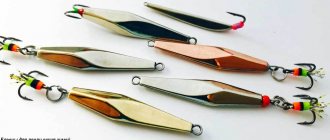
The mechanism from the Buran unit is used as a caterpillar, the belt is shortened by 0.75-1 m. The gears of the gear drive are planted on the transverse shafts, then the web is laid. The caterpillar gear is made from a nylon sheet measuring 15 mm.
Drive shaft
To make the drive shaft, a metal pipe with a diameter of 14 mm is taken, and flanges are installed on top to fix the wheel teeth. At the ends of the mechanism, pin tips are pressed in and welded with space provided for bearings.
Engine
The snowmobile engine is the most important component that affects the operation of all self-propelled equipment. Therefore, experts recommend using a power plant from a Shtil chainsaw with an engine power of 1.5-3 kW. The motor is mounted on a stable support of the cross beam. The gearbox is rotated 180°, fixed on the platform, and the intermediate shaft of the 2-speed transmission is also mounted. The fuel tank is installed on top.
Asterisks
The drive sprocket with an internal key made of St20 is attached to the shaft with an M12 nut and a spring washer. For precise fixation, a thread of the required parameter is cut on the tip. It is taken into account that the 1st transmission stage corresponds to a large sprocket with the maximum gear ratio (on the Ural engine there are 38 teeth), the 2nd stage corresponds to a small drive sprocket with 10 teeth.
The chains are of a standard type, with a pitch of about 16 mm.
Brake system
If the snowmobile is designed to travel at low speeds of up to 30 km/h, then the braking system may not be provided. Vehicles are stopped by friction in the chassis and transmission systems.
Steering
Control - steering on support-steering skis. The support arms are rigidly connected to the steering shaft bipod. The steering wheel is two-handed, with a gas handle mounted on the right side.
Do-it-yourself motor sleigh
Many people living in cities and villages, where there is more snow than asphalt, are concerned about the question of what to get around on. The ideal option is a snowmobile. But not everyone can afford such a purchase. At such a moment, it is worth remembering what our fathers did in such a situation. And they made motor sleighs. Yes, you can buy them ready-made. But the problem is that not all cities have them on sale, since this is a new product on the market, and besides, homemade ones are always better. Therefore, if you have certain skills and experience, you should decide: “We make our own motor sleighs.”
Motor sleigh - what and with what
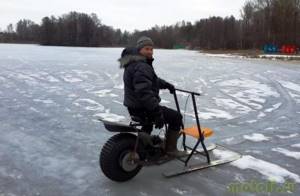
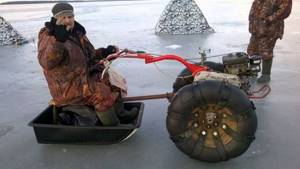
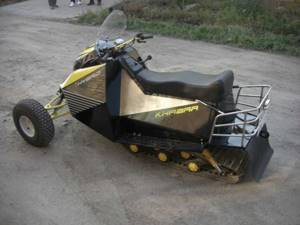
But first, it’s worth understanding what a motor sleigh is and what they are needed for. Motor sleighs are a means of transportation and cargo transportation in snowy conditions. They are basically a very small snowmobile with a wheel. The motor is used either from a scooter or a snowmobile.
For control, there is a handle on which the brake system and fuel supply lever are installed. The seat is small, designed for one person. It is driven by a small wheel with very spiky rubber or a small track. For comfortable movement on snow, skis are installed.
In general, making a snowmobile yourself is not as complicated a process as it might seem at first. Homemade products only seem complicated at first. It is enough to have basic knowledge of how motors work and learn (or ask someone) welding.
What you need to know about the design
- A motor sleigh consists of a running gear - a motor, a gas tank, wheels, skis, a fuel supply and ignition system. Control - steering wheel, much like a bicycle. There is also a frame and a seat. Let's take a closer look at each element of the chassis.
- Engine – for making a snowmobile with your own hands, a small engine from a scooter or moped is ideal. It is important that it withstands cold weather well and has the ability to be wound by lever or cable. It was also possible to use the oil-fuel mixture as fuel.
- Gas tank - any container that can withstand the presence of fuel inside will do. Therefore, plastic bottles are canceled - they can melt through. An excellent option would be to use a ready-made gas tank. But if you are itching to make a sled with your own hands inside and out, then you can make the tank yourself. This will be discussed later.
- Almost any wheel will do, but it is best to use a car wheel, as it is easier to find studded tires for it. An excellent option would be a wheel from an enduro motorcycle; even a porcupine might envy its needles.
- Skis – it’s better not to skimp here and use alpine skis. They are stronger and more flexible, so they can bear weight more easily. If they don't fit in length, we make them shorter.
- Fuel supply and ignition - everything will be together with the assembled engine, so there is no need to invent anything here.
Well, as for the rest of the elements, it’s already clear; we come up with everything ourselves and make it for ourselves.
It is also worth paying attention to motor sleighs with caterpillar tracks. Yes, this look is more difficult to do yourself. But at the same time, the motor sleigh will feel much better on ice and crust.
What is better: homemade or purchased sleds
In order to make a Finnish sled with your own hands, you need to have the necessary skills, materials and tools. Among the positive aspects of independent work, one can note not only the money saved, but also the design, limited only by the imagination of the home craftsman.
The purchased sled will be stronger and more durable: factory technological processes are used to process metal and wood. A wide range will allow you to choose a model with the desired functions and related accessories. Whatever the choice, Finnish sleds will be both fun winter entertainment for children and adults, and a faithful assistant in winter fishing.
What can you take ready-made?
To make something like a motorbike, you don’t need to do everything from scratch. You can take some element, design, sold in the store. In order not to buy a new scooter, you can take it from your own hands, it will be even cheaper. An even cheaper option is to look at the disassembly markets, where there is a lot of this extra stuff. You can use a snow scooter for the base of a motorized sled, but you need to choose a completely metal one and additionally change the design with your own hands, otherwise this subtype of sled simply will not withstand the loads.
We assemble the sleigh with our own hands
First, you need to decide on the design; to do this, look for photos or videos of motor sleighs and copy them. If you intend to make motorfins yourself, then you should arm yourself with a pencil. First, sketch out on paper what you want to see. After this, begin to sweep aside those parts without which the unit will not lose its qualities. Add stiffeners and fastenings as necessary. Once you finally understand what you want, move on to the drawings. At this stage, it will become clear which bolts and nuts are best to use, which elements will be homemade, as well as the main welding points.
Look for scooters at scrap yards or markets. Any will do, the main thing is that their engine volume is no more than 50 cubic centimeters (otherwise the sled will fall under the A1 license category). Also take into account such a nuance as a stable injection and ignition system. Remaking it yourself and bringing it to mind is for those who want to do absolutely everything with their own hands. A gas tank would be a good idea. But at the same time, you can use a can of gasoline, or make it yourself.
Important: do not solder the tank under any circumstances. Only welding. Otherwise, you can witness the “tin plague” - a process when tin becomes brittle in severe frost and breaks out of the seams.
Start assembling the frame following the drawings. At this stage, the ability to do your own welding will come in handy. Use pipes for the frame. They are easier to bend than rolled profiles. They can also be connected at sharp angles without loss of stability. This will make your sled more aesthetically pleasing. Don't forget to also make a bushing for the snowmobile's steering wheel. Simply weld a piece of pipe larger than the handlebar post at a 90-degree angle to the frame.
Start putting all the parts together, from the engine and cables to the pipes. It is worth considering that skis are best secured on a low-moving basis. After you have installed everything yourself on the future motor sled, do not be lazy and test them. As soon as the shortcomings are corrected, install the seat.
How to make a fishing sled with your own hands
Sled for fishing
Anyone can assemble such a structure. The main thing is to decide what kind of sled you need and with what functionality. If you need a sled to deliver fishing equipment to a fishing spot, then it can be made from wood, plastic, aluminum or iron. It all depends on the capabilities of the fisherman and the purpose of the sled.
Metal fishing sled
Metal sleds can be made either collapsible or non-collapsible. More recently, other designs simply did not exist. The metal structure is a rigid and durable base, on top of which there is a platform made of wooden boards or plywood. This is the so-called cargo area, which is used for transporting cargo. Their only drawback is the difficulty of operating in snowy areas. Due to the fact that the runners are narrow, they sink in the snow and a person needs to expend a lot of effort to move them, and even when loaded.
Plastic fishing sled

Similar plastic sleds are made in the form of a trough. They have good performance characteristics. They move without problems both on ice and snow. In this case, you should pay attention to the dimensions of the structure and workmanship. Although many argue that such a design is not difficult to make on your own.
Wooden sled
Wooden sleds are very popular. This is the most affordable and easily processed material, and structures made from it will last for many years. The main thing is to have the following tools and materials on hand:
- pine boards;
- wood glue;
- sandpaper;
- jigsaw;
- electric drill, etc.
Manufacturing technology
- You need to take two boards from which two runners will be made. The appropriate shape should be drawn on them and cut out with a jigsaw.
- The runners need to be fastened together. For this, cross bars of the appropriate size are used. The connection may consist of glue and round tenons.
- To strengthen the structure, additional transverse strips are attached to the front and back of the runners, mounted with glue and spikes.
- For a more aesthetic appearance, all excess is cut off and cleaned well.
- The board, which will serve as a cargo platform in the future, is prepared for subsequent fastening by cutting out all the necessary grooves and drilling the corresponding holes.
- An additional bar for fastening is attached to the back of the 2 runners.
- The places where the runners are rounded are reinforced with strips of aluminum or iron. This is necessary so that various obstacles do not damage the runners of the sled.
- Before final assembly, it is better to check all parts for proper dimensions. At the same time, you need to make sure that all elements are sanded and coated with waterproof varnish.
After the sled is assembled, it should be tested for strength by placing on it all the equipment that is used in winter fishing. Only after this does it make sense to take them with you.
How to choose an engine
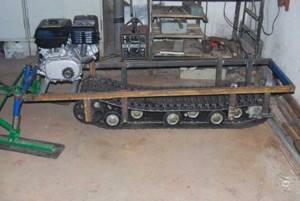
In order to create a snowmobile, it is necessary to take into account the most important and central part of the entire mechanism - the motor. The motor must have decent traction in order to move the entire mechanism in difficult snowy weather conditions. For everything to work out as it should, a powerful motor from the Neva walk-behind tractor will do.
If such an engine is available, one or two people will be able to move on a homemade snowmobile from a walk-behind tractor with their own hands. The engine power is 6-7 horsepower, which is quite enough to move on snow cover.
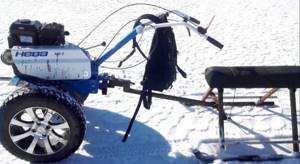
If you add a snowmobile stand to the walk-behind tractor, the lifting force will increase and you can easily load your walk-behind tractor for snow trips.

What is good about this engine, many ask. In fact, there are many more advantages than you might think:
- First of all, it is an affordable price.
- Also good quality is proven by Japanese production.
- The motor has an additional air cooling system.
Also note that gasoline can be used as fuel.
Features of the design plan
The simplest version of a snowmobile consists of a part that drives and one that is driven first. The second part consists of a seat, shock absorbers, a steering part and runners, thanks to which this part moves. The second part is much more complicated, since it contains all the elements that set the snowmobile in motion.
First of all, in the second part it is necessary to correctly provide the power unit, that is, the motor itself. The frame on which everything will be arranged and the drive are also important.
Do-it-yourself diagrams and drawings of a snowmobile from a walk-behind tractor must be made in advance, and you can find the required option on the Internet or in various types of literature.
First, before drawing up the drawing, determine the purposes for which the snowmobile will be used. After the drawings, you will need to select the parts, and, if possible, make some with your own hands.
DIY chainsaw snowmobile manufacturing diagram (drawings)
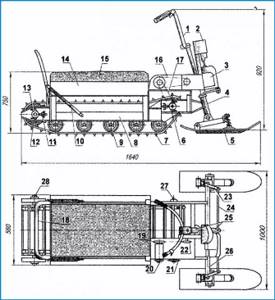
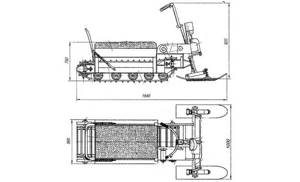
Light snowmobile made from a Ural chainsaw : 1 — steering wheel; 2 — fuel tank (from the Druzhba chainsaw); 3—power unit (from the Ural chainsaw); 4—steering ski post bushing (pipe 030, 2 pcs.); 5—steering ski (2 pcs.); 6—caterpillar drive gear (nylon, sheet s1 5, 2 pcs.); 7—caterpillar (from the Buran snowmobile, shortened); 8—frame; 9—support roller (from potato sorting, 18 pcs.); 10—backrest-limiter strut (pipe 1/2); 11—track tensioner (2 pcs.); 12 — caterpillar tension gear (nylon, sl5 sheet, 2 pcs.); 13—bearing No. 80204 in the housing (4 pcs.); 14—trunk box (bottom—plywood s4, sides—board s20);
15—seat (cover—s4 plywood, foam rubber, leatherette); 16 — 1st stage of chain transmission; 17 — 2nd stage of chain transmission; 18—backrest-seat limiter (pipe 1/2″) 19—driven sprocket of the 1st chain drive (large sprocket of the speed reducer—intermediate shaft), z = 38; 20—drive sprocket of the 2nd stage of the chain drive (small speed reducer sprocket), z = 10; 21 — driven sprocket of the 2nd stage of the chain drive (drive sprocket of the track drive shaft), z = 18; 22—drive sprocket of the 1st stage of the chain drive (gearbox output shaft sprocket), z = 12; 23 — steering knuckle lever; 24—steering rod (2 pcs.); 25—steering shaft with bipod; 26—front axle beam (pipe 030); 27—track drive shaft; 28 — tension axis of the caterpillar.
First you need to create diagrams and drawings to create a snowmobile in order to connect the following components:
- engine;
- transmission;
- skis or caterpillar.
Moreover, you don’t have to design the caterpillar yourself; you can take an existing mechanism from the old Buran. And if you need to make children's transport, then skis will be good.
Read also: What are hall sensors?
Racks
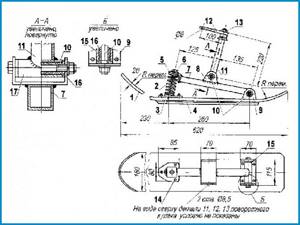
Steering ski: 1 — runner (nylon, sheet s20, from a children's snow scooter); 2—spring (normally stretched, from the rear shock absorber of the moped); 3—spring support; 4 — undercut (duralumin corner 20×20); 5 — — spring cover (angle 35×35); 6— fastening the spring to the cover (M8 bolt with washer); 7 — support lever (pipe 30×30); 8 — eye for attaching the fork stand to the ski lever (steel, sheet s2); 9— eye for attaching the support lever to the ski (steel, sheet s2); 10 — axles (M8 bolt, 2 pcs.);
Having caught 237 kg of fish, the poachers were not punished!
During interrogation, the detained fishermen revealed the name of the secret bait.
11—steering knuckle stand (bicycle steering stand with crown and part of the fork); 12—steering bipod (steel, sheet s4); 13— fastening of the steering bipod (teak M16); 14 — fastening the spring bearing and the lever eye to the ski (M5 bolt with a countersunk head, 7 pcs.); 15 — lever bushing (steel pipe with a diameter of 30); 16— plain bearing (nylon bushing, 2 pcs.); 17 — strut bushing (steel pipe with a diameter of 30) In the top view, parts 11, 12, 13 of the steering knuckle are not shown.
As racks for making a snowmobile, you can use steel corners measuring 3 x 3 cm. They are connected by steel crossbars. The result is a not very large portal. To create a platform, it is recommended to connect a sheet of steel 2 mm thick using spot welding to the front part and the middle of the right side of the vehicle structure. This is where the gearbox of our chainsaw and the chain drive shaft will be placed in the future.
It is recommended to mount a small module on a fragment of the arch of the rear portal and the middle of the car, which will become a good support for the seat.
The connection between the front frame and the front axle cross member is ensured using a beam. The connecting element in this case is a standard water pipe with a radius of at least 1.5 cm.
At the end of this pipe, the steering ski bushings are welded, and a stand is mounted in the middle of it. The latter will act as an engine subframe.
Caterpillar
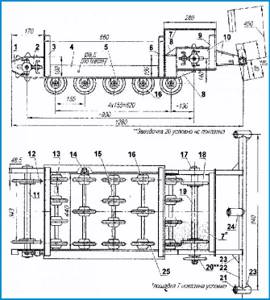
Snowmobile frame with tracked block: 1 — — rear part of the spar (steel sheet s2, with flanges, 2 pcs.); 2 — tension device (4 pcs.); 3 — rear portal (corner 30×30); 4—middle part of the spar (angle 50×63, 2 pcs.); 5—bracket-fork for installing the axis of the road wheels (steel sheet s2, 10 pcs.); 6—middle portal (angle 30×30): 7—platform for mounting the power unit gearbox and the intermediate creeper shaft (steel sheet s2); 8 — scarves (steel sheet s2.4 pcs.);
9— front portal (corner 30×30); 10—front component of the spar (steel sheet s2 with flanges); 11 — axis of tension gears; 12—track tension gear (2 pcs.); 13—axle of road wheels (steel, circle 10, 5 pcs.); 14—axle fastening (M10 nut and spring washer, 20 sets); 15—distance sleeve (duralumin pipe); 16 — roller (18 pcs.); 17—bearing unit (4 pcs.); 18—track drive gear (2 pcs.);
19—track drive shaft; 20 — drive sprocket of the drive shaft (driven sprocket of the 2nd stage of the chain drive), z = 18; 21 — bushing of the steering knuckle (pipe with a diameter of 30, 2 pcs.); 22 — front axle beam (pipe with a diameter of 30); 23 — scarves (4 pcs.); 24 — engine stand (pipe with a diameter of 30); 25—roller tire (rubber ring, 18 pcs.)
If you decide to make a mini-version of a snowmobile with your own hands, then you can use tracks from the old Buran as tracks. But this spare part needs to be slightly modified, shortening the workpiece by at least half a meter and connecting it with transport tape. Gears can be made from a sheet of nylon 1.5 cm thick.
Drive shaft
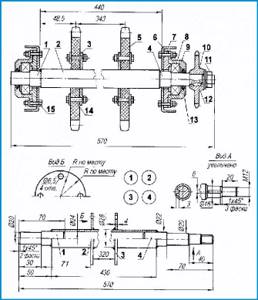
Caterpillar drive shaft (tension shaft is the same, only item 4 is replaced by item 1): 1—left (along the way) tip (steel, circle 22); 2 — shaft (steel, pipe 028×2); 3 — flange for fastening the gear to the shaft (steel sheet s4, 2 pcs.); 4—right (along the way) shaft tip (steel, circle 29); 5—toothed track drive wheel (2 pcs.); 6—frame spar (2 pcs.); 7 — bearing housing cover (steel, 2 pcs.);
8 — bearing 80204 (2 pcs.); 9— bearing housing (steel, 2 pcs); 10 — drive shaft sprocket; 11—fastening the sprocket on the shaft (M12 nut with widened and spring washers; 12—key (steel 20); 13—seal (felt, 2 pcs.); 14—fastening the gear to the shaft flange (M8 bolt with widened and spring washer , 8 sets); 15—fastening the bearing housing to the spar (M6 bolt with spring washer, 4 sets)
The drive shaft acts as a tubular element with a radius of 1.4 cm. A flange with special holes for fixing the gears is placed on top of it. At the end of the drive shaft, pin tips are pressed in and welded using the contact welding method. In addition, they must be grooved for bearings.
Read also: Chameleon mask for welding rating reviews 2017
About the engine
The most important part of this mechanism is the engine. Other spare parts, for example, a chain and a tire, are not so important in the process of designing the type of transport in question. In this case, the most important thing is to monitor the correct operation of the motor in a timely manner. If the latter is in good condition, the snowmobile will work for a very long time and without any complaints.
Asterisks
Please note that in this case the tip on the right is created slightly longer than the one on the left. A keyway is made on the extension to fix the chain drive star. It is this element that is called the track shaft sprocket, which is securely secured with a nut. Although initially it is necessary to create the desired thread on the product.
It is recommended that the dimensions of the tension shaft tips be identical. Moreover, the fastening is done similarly to the design of the drive mechanism.
Steering
You can use the handlebars of a scooter or even a regular bicycle as a steering wheel. Here it is important to subsequently output manual control to the element. It is recommended to make the set so that the central axis instantly adjusts the traction for further control of the skis and comfortable movement.
Brake system
This vehicle does not have a braking system at all, but it can be made if desired. But there is no particular point in this, since the car does not develop high speeds. Although everything is done solely at your discretion.