Depending on the season and, accordingly, fishing conditions, a distinction is made between summer ones, intended for use in open water, and winter ones, used from ice. Their equipment differs little and consists of one and a half ten meters of fishing line, a sinker, and a leash with a hook. The fundamental difference can be traced only in the design of the base.
After freezing, the girder is perhaps the only tackle that gives at least some guarantee of catching pike. As a result, there is a huge variety of winter gear of this kind. There are a huge variety of ice fishing supplies on the market, but real fishermen prefer to make them themselves.
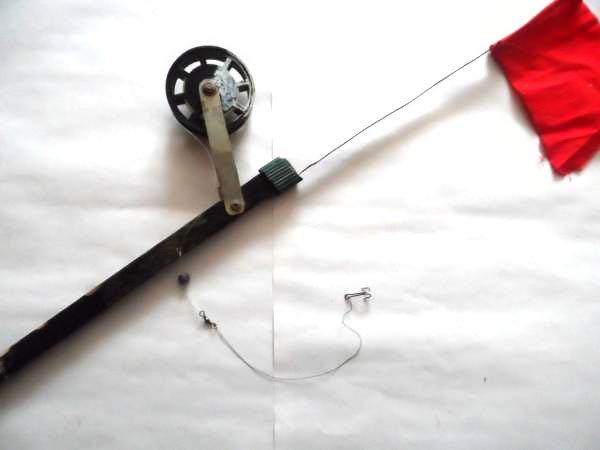
Do-it-yourself classic winter vent
Components:
- signaling device;
- reel bracket;
- the coil itself;
- rack stand;
- equipment;
Manufacturing.
- The stand is made independently from a tube or metal corners.
- the coil bracket from the spokes of a bicycle wheel. All corners of the structure must be straight.
- The coil is made of polystyrene foam (the wooden version absorbs moisture and swells). To be able to quickly detect its rotation and react in a timely manner to a bite, one half is painted in a bright color.
- The signaling device is made from a piece of steel wire. One end is attached to the stand, the other, free, is equipped with a bright flag. Being folded into a kind of loop, the guard will stop the reel.
- described above is attached to the reel
When the pike takes the bait, the alarm will be released and the flag will shoot up. You must respond to a bite immediately. Otherwise, the fish may drag the tackle under the ice, and then it will be left with the trophy, not you.
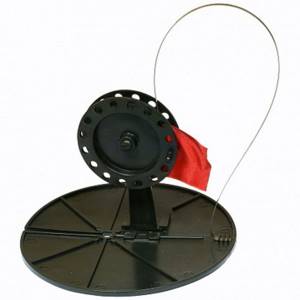
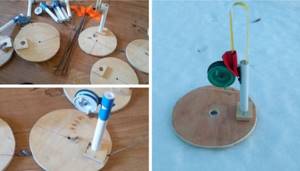
Modernized classic version of the zherlitsa
Components:
- base with a slot for fishing line;
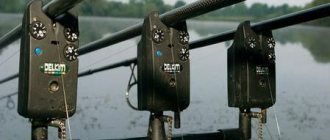
- signaling device;
- coil bracket;
- coil;
- equipment;
Manufacturing:
- The round base is made of solid types of foam, less often plywood. Its diameter should correspond to the diameter of the hole (or ice drill, which is actually the same thing).
- The reel is made as in the case of a classic girder. It is customary to attach it to the bracket using threaded connections.
- The signaling device is made similarly , but is screwed to the base with a self-tapping screw.
- A slot is made in the base to allow the equipment to pass through.
- The equipment described above is attached to the reel.
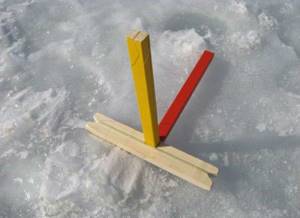
Reel "spatula"
Popular zherlitsa, consisting of:
- round polystyrene stand with a slot for equipment;
- racks;
- At the end of the stand, a signaling device with a reel is mounted on a hinge;
The signaling device has an external resemblance to a spatula equipped with a wooden handle. When prepared, it is secured with an elastic band. The “handle” is painted orange. When a pike takes it, the alarm is installed vertically, and the unfixed fishing line begins to unwind.
Equipment
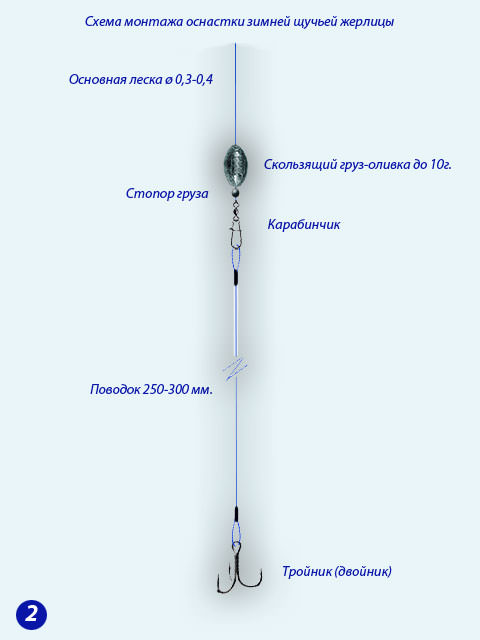
As a rule, regardless of the type of structure, vents are equipped with a minimum of elements:
- 12- or 15-meter fishing line;
- leash;
- hook: it can be a tee, a double, or even a single hook - it all depends on the fishing conditions and the taste of the fisherman;
- a stop pellet located in front of the start of the leash;
- sliding sinker;
Let's look at them in more detail:
- The fishing line should be chosen from among strong monofilaments designed to catch the trophy for which you are going to the pond. An important property is the absence of a memory effect. When using coils, this is of decisive importance. A diameter of 30-40 mm is quite suitable for most anglers. However, it makes sense to use a thicker line if you are confident of catching something more serious. Under no circumstances should you equip your lanyards with braided wire - when fishing, the cord can cause serious damage.
- Choosing a leash is a separate issue. The material for it can be:
- braided fishing line;
- fluorocarbon;
- strings;
- steel;
- tungsten;
- driving material;
- titanium;
- Kevlar;
- etc. Each angler chooses what he finds worthy of his attention, keeping in mind that metal leashes can scare off cautious pike, and fluorocarbon ones cannot survive an encounter with its teeth.
- The main requirement for a hook is that it be sharp. The size depends only on the mass and dimensions of the live bait. In places where snags are possible, it makes sense to give preference to single ones.
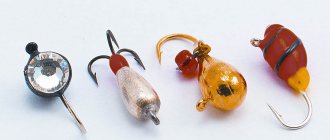
- The stop pellet allows you to adjust the position of the sinker, thereby controlling the freedom of the live bait.
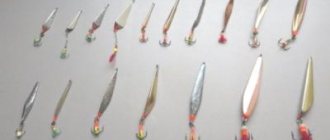
- as a sinker . Its weight in most cases falls within the range from 5 to 15 grams. It is determined primarily by the size of the bait and its mobility, as well as depth and current. It is intended to keep live bait in the area of expected bite and prevent its attempts to move into cluttered areas and tangle the tackle. Refrain from over-loading. This will not only quickly exhaust the baitfish, but can also scare away the predator that has pecked and suddenly experienced excessive weight.
Types of winter girders
Winter gear has 2 main types:
- Under-ice supplies, checked periodically:
- Saves the fisherman's time and effort.
- They are best suited to be left overnight. To avoid the line breaking when the ice covering the hole is broken, the section of the equipment located in the place of expected freezing is made of a metal leash or wire.
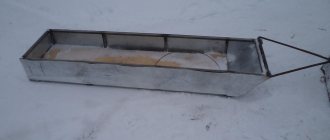
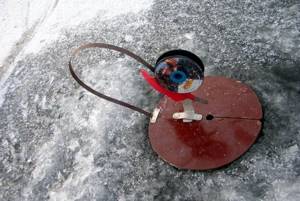
- Trays that place ice directly on the surface , equipped with a signaling flag. Use during daylight hours. This variation prevents the hole from freezing.
Classic summer vest
To make a simple but effective summer zherlitsa you will need:
- slingshot;
- fishing line;
- the sinker, as a rule, is sliding;
- triple/double hook and leash for it;
- devices for securing gear on the shore;
The fishing line is tied to the slingshot and wound crosswise. It contains a sinker, a leash with a hook and, in some cases, a float. Live bait is attached to the hook. After this, the tackle is attached on the shore to the branches of trees or bushes hanging over the pond, and to a special pole. If desired, the pole can be placed in the water.
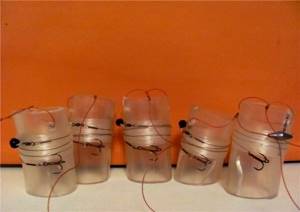
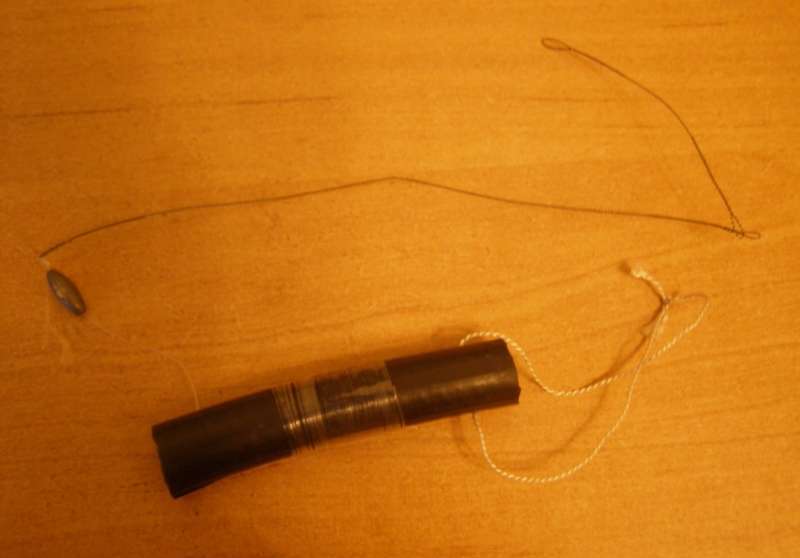
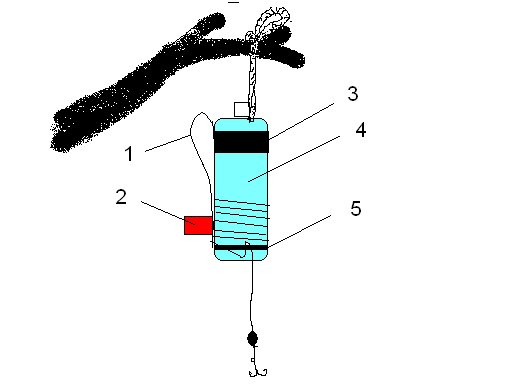
Jerky from a bottle
Even if you are not properly prepared for catching pike, there is an opportunity to make up for lost time on the pond. A half-liter bottle is best suited for making a zherlitsa.
Manufacturing:
- Several meters of nylon thread are attached to the bottle and wound.
- The thread is secured with an elastic band.
- and a leash with a hook are placed on the thread
- To improve visibility, it is useful to paint the bottle in a bright color.
Such girders are installed and checked using a boat.
Good to remember
When creating a rig, it’s a good idea to imagine the sequence of a pike’s attack on live bait.
It happens in 2 stages:
- The predator grabs its prey across , while rushing several meters forward.
- Having extinguished the movement by inertia , the pike stops, turns around the prey and swallows it from the head.
The bite will be interrupted and completed at the first stage if the pike:
- I felt resistance to the gear caused by an excessively large load or a small supply of fishing line.
- I was pricked by the free hook of a tee inserted into the back of the bait while throwing.
Thus, the reserve length of the tackle and the correct selection of lead olive, as well as the correct placement of the stop pellet, can be of decisive importance. These details cannot be taken lightly and require detailed elaboration.
It would be optimal to retract the gill cover, bring the leash out through the mouth and only then attach the hook to it. In this case, its tip will be directed towards the tail of the fish and will not interfere with the pike swallowing the bait.
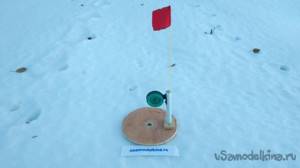
Now it's winter fishing season. And for those who like to catch predatory fish, today I will show you my idea of how to make a winter girder for catching pike. As you know, the zherlitsa is the most productive method of fishing in early winter and including deep winter. Such a girder will cost you pennies, and its qualities will not be inferior to a store-bought one.
Necessary materials:
— Plywood 5 mm. — Polypropylene pipe — Fishing reel — Tape measure — Red fabric — Self-tapping screws — Block
Step 1: First of all, we need to cut out (with an electric jigsaw) a circle of plywood with a diameter of 200 mm. Then we drill a hole in it exactly in the center, with a diameter of 20 mm. When we have done everything, we need to thoroughly clean the workpiece with sandpaper so that the fishing line is not damaged during fishing.
We equip our girders, and you can get ready to go fishing! To all fishermen - NO TAIL, NO SCALES.
Fishing piers are divided into summer and winter periods. Their difference is in the correct construction of the structure, each of which has its own characteristics. The object of fishing with such gear is pike, less often burbot, pike perch and perch. Due to the fact that fishing stores do not offer a wide selection of girders for different times of the year, professionals and beginners prefer to prepare them themselves at home.
Zherlitsy on racks
This is the simplest design of all presented.
All components of this device are located on a single stand, which is used as a support and fastening by freezing into a layer of ice or by installing it in a snowdrift. The design of this type of girder allows the flag to be secured high enough so that the fisherman can see the installed equipment at a great distance. It is also possible to attach the fishing line high to the reel, which allows the fishing line to move smoothly and ensures a mandatory hook when the fish bites.
Pros:
- Good visibility of equipment;
- Compactness;
- Easy adjustment for easy fishing.
Minuses:
- It is problematic to pull the vent from the fixed surface;
- One leg does not provide high strength of this device.
Do-it-yourself winter girders
There are the following types of homemade girders:
- Changeling. Consists of a plastic tube, thick wire and electrical tape. A hook with bait is attached to the wire and placed above the hole. The end of the tube with bright electrical tape shows whether there is a bite or not.
- On a leg. To use such a girder, you will need more materials. Here you need to have:
- plastic tube;
- bright flag;
- fishing line reel;
- nuts and washers;
- base;
- hose bushing.
It works this way: the leg is placed on the snow and frozen. A fishing line with a hook and bait passed through a reel will signal a bite.
- On the platform. The design is considered the most complex, as it requires drawing and fitting of all elements. They are mounted on one platform, which is often cut out of wood or plastic. To prepare it take:
- coil;
- checkbox;
- plywood;
- staples;
- fishing line;
- hook.
When there is a bite, the line comes out from under the clamp brackets, the flag rises up and signals the appearance of fish.
- From a bottle. The easiest way to make winter lanterns, as a regular plastic bottle will do. For large fish, you should take not a half-liter bottle, but at least a three-liter one. The only thing that will depend on the fisherman is whether the fish will fall on this girder. The main thing is to be careful.

- Under the ice. They leave the fisherman more free time. It is better to leave such supplies overnight. If you place the structure on ice, you need to place a signaling device there. This option does not contribute to freezing of the hole.
There is a great deal of information about various girders in the specialized literature, but they have one thing in common - you can actually catch fish on them.
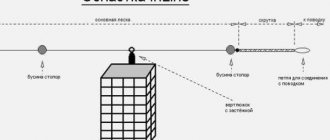
The ice fishing rig consists of the following components:
- signaling device;
- bracket together with the coil;
- rack;
- equipment
When assembling the winter girder, you need to perform the following steps:
- Fix the wire on the stand at one end and attach the other with a flag.
- attach the equipment to the reel.
Recommendations for improving the girder
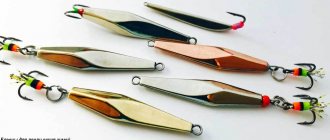
- Using the example of an American jig with a rubber shock absorber, we recommend that you also use this feature so that the pike does not break the tackle and when fishing, the rubber smoothes out sharp jerks of the fish.
- A great way to mount racks is to use a tripod. Unlike the platform version, this one will be securely fixed in the ice and dusted with snow, which guarantees its immobility.
- Closer to the bait, use fluorocarbon up to 0.4 mm so that the pike does not notice the fishing line. However, you will still have to use a metal leash.
- The wooden structure of the vent can be replaced with propylene (PVC) tubes.
- A flagless vent is another option for improving your design. Use an electronic bite alarm, or even better, a pager to transmit a bite signal at a distance.
Classic version (for pike and others)
This design consists of several elements:
- signaling device;
- bracket with coil;
- rack;
- equipment
It's not difficult to make.
- Take a metal tube that will serve as a stand.
- The bracket can be made of metal knitting needles.
- The coil is made of polystyrene foam.
- The signaling device is made from a piece of wire.
- Attach equipment to the reel.
- At the moment when the fish swallows the bait, a bright flag rises up.
Modernized classic version
This design includes the following components:
- base;
- signaling device;
- bracket with coil;
- equipment
Cooking process:
- The base is prepared from hard foam or plywood with such a diameter that it matches the hole;
- The coil is made of polystyrene foam and is mounted on a bracket;
- The alarm is screwed to the base;
- A fishing line is threaded into the base and secured to the reel;
- During fishing, the signaling device goes behind the reel, and at the moment of a bite, it begins to rotate, causing the flag to rise up.
Reel "Spatel"
Comprises:
Since the alarm is similar to a spatula, it is equipped with a wooden handle and then secured with an elastic band. The handle itself should be painted or covered with electrical tape so that it remains bright and noticeable. When a pike bites, the alarm stands straight and the line begins to unwind.
Wood frame construction
The simplest model:
- Find a wooden flyer from a branched knot (preferably an elastic one).
- Cut a fork with a handle 15 centimeters long and 10 millimeters thick.
- At the end of the flyer, make a rim to secure the loop.
- It is better to have a fishing line with a reserve of up to 7 meters and a diameter of 0.6 mm.
- Attach a metal leash to the free end of the fishing line.
- Attach a treble hook size No. 4-5 through the ring from the leash.
- Place a sinker on the fishing line (several of them can be installed).
- Secure the sinker at the bottom with a swivel.
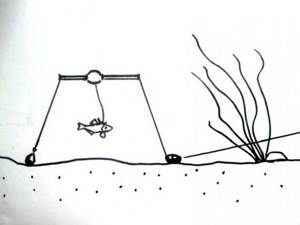
Subglacial vent
Such girders are simple to manufacture and are suitable for various objects that will correspond to the hole made. To prepare an ice trap you will need:
- object corresponding to the hole;
- a plastic tube approximately 40-50 cm, which is attached to any selected item;
- the fishing line is inserted into the sawn hole of the plastic tube.
Another way to make a structure for fishing from under the ice can be made from a duralumin strip using metal wire. The method of self-cooking consists of the following points:
- A strip of duralumin 1x50x200 millimeters or more with curved ends in one direction (this is also the base);
- Drill a small hole in the center of the plate where the coil will be placed;
- Make another hole near the reel for the fishing line.
- Attach a signaling device wrapped or painted with bright colors to the spring;
- Attach the spring to the end of the base and secure with a pin.
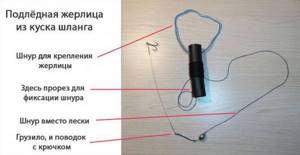
Another option for fishing from under the ice. To make it you will need:
- a couple of pieces of hose about 10 centimeters;
- make a hole on one piece of hose to attach a loop;
- on another section, cut a hole where the rope will be attached;
- instead of a reel, they use a plastic tube into which 10 meters of cord are wound;
- secure the first end of the cord with a loop, and insert the second into the slot at the end of the hose;
- Attach a sinker and a leash made of fishing line about 40 cm to the free end of the rope;
- connect the leash with another metal leash and hook.
Hose rigs
How to assemble a winter self-cutting girder
A zherlitsa is a fairly simple piece of equipment that you can assemble with your own hands. But experienced fishermen go further. When making tackle themselves or modifying an existing one, they install a self-cutting hook on it. This automatic device makes it possible to make a sharp jerk when biting in order to hook the fish. Installing a self-hooking device is especially important in the case when a fisherman needs to monitor several lines at once and there is no way to independently hook the fish at the right time.
Did you know? Pike lives only in cold fresh water, but sometimes it can also be found in coastal marine areas with desalinated water.
Classical
The production of a classic girder is carried out as follows:
- From a wooden board you need to make a rectangular base measuring 30x10 cm (the thickness can be arbitrary).
- In the center of the wooden base you need to make a hole with a diameter of about 1 cm.
- Drill 2 holes in the coil and use self-tapping screws to screw it closer to one of the ends of the base.
- Install a flag mount on the opposite side. As such, you can use plastic clamps with a nail for electrical wiring. Attach a flag with a spring.
- Wind the fishing line onto the reel with all the necessary accessories (lock, weight, leash with hook).
Improved classic model
An improved version of the classic zherlitsa can be made from wood or foam. You need to cut a circle out of the material. Its diameter will depend on the size of the hole. You can add another 1–2 cm to the diameter of the ice ax so that the base tightly covers the hole and does not fall through.
Here you can read about making a winter fishing rod with your own hands.
A reel with fishing line, a leash and a hook is screwed to a bracket made of a metal or plastic tube using electrical tape. The flag is screwed onto the base using self-tapping screws. It needs to be placed under the handle of the reel - during a bite, the flag will jump up, indicating to the fisherman that it is time to catch fish. A hole is drilled in the center of the base through which the fishing line is passed.
From a plastic bottle
To make a girder from a plastic bottle, you need to prepare adhesive tape, electrical tape, scissors, an elastic band, a thin spring with a flag, fishing line, a hook and other accessories. Of course, you will also need a 1.5 liter bottle itself. It must be cleared of the colored label, if any.
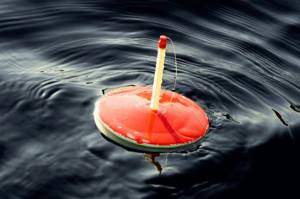
Pay attention to the information about floats for ice fishing.
Now you can start making:
- Tie the end of the fishing line without a hook to the neck, and wind the rest around the central part of the bottle. It is advisable to put a rubber ring a little below the lid to hold the line in place.
- Attach a spring with a flag to the wall of the bottle with tape.
- Bend the flag to the bottle and secure it with a roll of fishing line.
- Form a loop from the fishing line remaining to the leash and pass it through the elastic band placed below the neck.
- Bait the fry and start fishing.
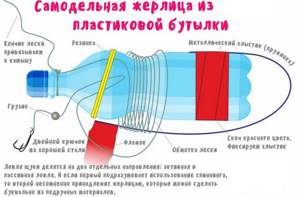
The principle of operation of such a trap is simple - when a predator grabs a live bait, the fishing line on the bottle unwinds and releases the spring with the flag. The fisherman just has to get the catch and change the bait.
From the hose
In this case, to make a simple tackle, you will need a piece of rubber hose, a knife, an awl, a reliable wooden stick and, in fact, a fishing line with all the accessories. On one side of the cut piece of hose, towards the end, punctures are made with an awl to create two holes opposite each other. Closer to the other end, you need to make an incision that will serve as a line clamp.
The area in front of the leash must be fixed in the cut made at the other end of the hose. Immediately before fishing, the hose is put on a wooden stick, and live bait is threaded onto the hook.
You need to make a loop from a small bush of fishing line - to do this, thread it through the holes and tie it. Using a loop, the hose will be attached to a wooden stick during fishing. The main line is also threaded through the same holes. One end of it is tied here, and the rest of the tackle is wound around the center of the hose section.
Equipment
All important elements:
- Fishing line. Because it is less exploited, the company should not worry. Its diameter will depend on the size of the fish. Usually take up to 0.6 mm.
- Coil. 20 meters of fishing line are wound on it - maybe a little more.
- Leash. Metal so that predatory fish cannot bite it.
- Sinker. Its weight should have a ratio to fish of 1:2. On the river, the load is chosen depending on the speed of the current (it is important that the live bait is kept in one place).
- Signaling device.
- Bright flag.
How to increase your fish catch?
Over 7 years of active fishing, I have found dozens of ways to improve the bite. Here are the most effective ones:
- Bite activator . This pheromone additive attracts fish most strongly in cold and warm water. Discussion of the bite activator “Dry Blooder”.
- Increased gear sensitivity. Read the appropriate manuals for your specific type of gear.
- Pheromone -based lures .
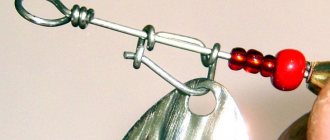
Check box
Making your own flag is a reliable option, especially if it consists of different colors. A small red flag is barely visible in the reeds, and at a long distance it turns into black. Orange is clearly visible in the bushes, but is invisible at a fair distance.
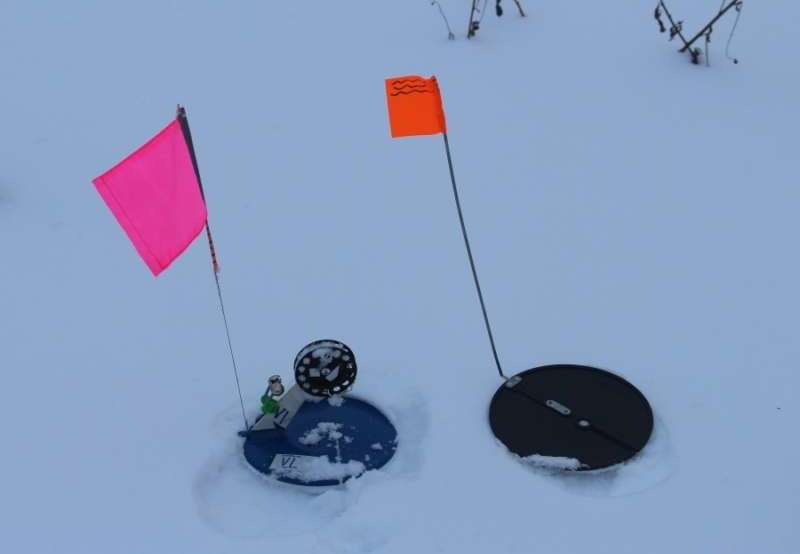
A multi-colored flag will allow the angler to immediately see the bite. It is also recommended to stick stripes of reflective material on the flag (at night, under the light of a flashlight, they will be clearly visible).
Manufacturing is not difficult:
- take a rail 50x50 mm and 40 centimeters long;
- check the box on the elastic material;
- secure the flag rod at the end of the workpiece using electrical tape;
- attach an inertial reel, which is present on the float rod, to the rail; it is attached in such a way that during scrolling the rod with the flag straightens;
- wind up to 20 meters of fishing line on the reel;
- attach a sinker to the fishing line ring;
- attach a swivel to the fishing line;
- attach a metal leash with a hook to the swivel;
- secure the vent to the shore with a peg.
But everything is in order
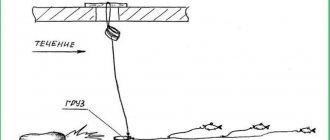
We once had a family vacation on a beautiful forest lake, which, it would seem, quite recently was truly a forest lake, rich in fish and relatively deserted. But very quickly a highway was laid to the lake instead of a forest, sandy dirt road, and the first buildings of sanatoriums and children's camps were quickly built. And the lake became a cultivated reservoir. And this is understandable. From the city of Yoshkar-Ola it is only 20 kilometers along the Kokshaysky tract. And from the turn to the lake there are only 2-3 km of excellent asphalt road. The water in the lake is clear and even blue, and there is a clean pine forest around. Why not a resort?
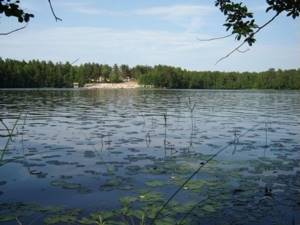
To be precise, the children and I were relaxing on the lake, and my wife continued her work as an organizer and musician of additional education, only this time in nature. We did not live like other employees who were given plank houses. Our dwelling was a strong house, obviously built a long time ago, a hut, essentially, made of pine logs. My wife left for work in the morning, and we “fooled around” on the lake and in the forest, picking mushrooms. Soon I was overcome by the longing for fishing. I brought a fishing rod, spinning rod, and jigs to Lake Shap. I didn’t take the fish on a spinning rod. Either she didn’t know what artificial baits were, or I didn’t find the key to pike and perch. But quite good pike began to be desperately caught on the girders. True, there was a problem. If I went to the house by boat, leaving the poles unattended, then vacationers would always approach them on a boat or catamaran-bicycle and fiddle with the tackle, pull out the poles of the poles, and often remove the tackle, sometimes with fish. This was clear from stories and rumors. Something had to be done about this robbery. You can’t keep watch around the girders for days. In addition, at times I had to leave for the city.
And so I came up with a cunning donka-zherlitsa, as stated above, not very perfect, but nevertheless it began to catch pike for me, so much so that I soon built a smokehouse next to the house and garden and began to supply my wife’s employees with smoked fish , starting with the camp director. Corruption, one might say. At times the intoxicating smell of fresh smoked fish hung over the camp.
The process of making summer vents
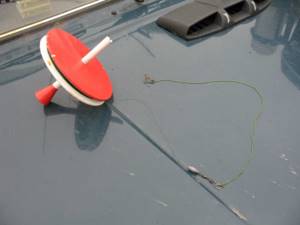
For catching pike, perch, pike perch and other predatory fish in the summer, a girder that will float on the surface of the water is perfect. This type of tackle is called a circle.
To make a summer girder (mug) you will need:
- slingshot;
- fishing line;
- sinker;
- triple hook (single hook is also possible);
- wooden stake to secure it to the shore.
Instructions:
- tie the fishing line to the slingshot and wrap it around;
- the sinker, leash and float are assembled;
- put live bait on the hook;
- Attach the tackle on the shore to the branches of bushes that are located next to the reservoir.
Classic version
With the onset of the summer season, many reservoirs are overgrown with vegetation, and in order to build a good trap for pike, you need to take into account the hard-to-reach places where this fish lives. For example, someone who is used to catching pike in winter can easily convert a winter fishing rod into a summer one.
The main thing is to find the necessary elements to make a fishing line on which you can wind the fishing line. Mainly used:
- plastic circle;
- plastic bottle;
- piece of wood
There are also girders that can be installed on the water, but they require constant supervision so that it does not get sucked into snags.
To arrange a summer barn you need:
- choose the place where it will be attached;
- find a wooden flyer and attach a fishing line to it (the fishing line should be 0.5 mm thick and about 7 meters long);
- a sliding weight with a swivel to connect a 30-centimeter leash (necessary for currents);
- retaining rings;
- hooks (if the fisherman wishes, double and triple hooks can be used).
- After installation, tie the girder to a tree or branch hanging over the pond.
We do not recommend equipping the girder with a piece of fishing line that is too long and installing it on the girder, because the pike can take the tackle into the snag.
Use a boat to install the vent in the right place, because from the shore you will have to enter the thickets and water.
Jerky from a bottle
One of the simplest ways to make a zherlitsa is to use a bottle.
- a nylon thread is attached to the bottle, which is secured with an elastic band;
- the sinker is placed on the thread and a leash and hook are put on;
- the bottle is painted in a bright color;
- bait is baited, and the bottle is tied with a thread to a tree branch hanging over the pond.
The fisherman will only have to carefully monitor the fish to see if it has caught the bait.

Those who prefer to fish from a boat can also make a girder, only in this case they will need a large bottle, for example, a three-liter bottle.
Instructions:
- fasten the fishing line under the neck of the bottle, and wind a loop across it, which is held under the ring;
- You should pour some water into the bottle;
- make a small hole in the lid and neck of the bottle where you can tie a fishing line;
- then take the cord and fishing line, thread the fishing line through the bottom of the bottle and make a knot;
- pass the fishing line through the lid;
- Attach a sinker and several hooks with live bait to the fishing line.
When the pike grabs the bait, the lower part of the rod will rise, and the upper part will go deeper. Then you can fish the pike ashore.
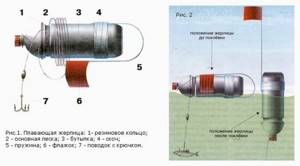
Winter on a tripod
The last type of girder that is most often used by fishermen is a tripod structure.
This girder is installed above the hole and has a structure that consists of a flag, a folding tripod for support and a fishing line with equipment. These rigs are used mainly in the first weeks of winter, when there is not yet so much snow, which makes fishing with this gear difficult. There is one caveat that it is quite problematic to keep the tripod on the surface, especially in strong winds. Therefore, to secure the gear, it is necessary to have a small amount of snow to strengthen the legs of the girder.
Pros:
- The easiest vent to install;
- The flag is visible at long distances;
- You don’t need to worry too much about disassembling and assembling the vent – just fold the tripod.
Flaws:
- Unstable design;
- Takes up a lot of space;
- It has a higher price than the types presented above.
What to look for when buying a winter girdle, video:
Important Tips
Let us remind you that not only pike bite on girders, but also burbot, pike perch, perch, and rotan. Nevertheless, pike is the most popular fishing object. Finally, we will give 8 important recommendations.
- If fishing allows you to use several leashes, you can attach different live baits.
- The bite will depend on the gear. If it is thin, then the bite will be bad.
- If there is a strong current, then it is better to take a heavier sinker.
- Mask the supplies at night. The hole can be filled with snow.
- Do not stand over the tackle or run from one to the other. Choose a place to wait and watch the warning lights carefully.
- Observe the correct installation of the girder.
- The bite will depend on the fishing location.
- It would be useful to prepare for knowledge in the field of fish behavior in the dead of winter.