There are a number of devices in fishing tackle and equipment that help improve the comfort and reliability of fishing. These innovative and largely uncomplicated parts were invented and subsequently introduced into fishing processes as a result of long practical experiments that proved their viability and real benefits of use. One such effective element in the equipment is the anti-twist for the feeder. The device is used in feeder rigs as an integral element of installation, the main task of which is to prevent tangling of the main cords with the feeders, sinker and leash.
Overlapping in feeder fishing is a frequently occurring problem, which can be overcome by using a well-developed casting technique, which is typical for experienced fishermen, or by assembling a feeder mount with an anti-twist, which is recommended for novice fishermen. The equipment itself in various lengths and diameters can be purchased at every fishing store, where its cost is relatively low. Well, if you want and have a little free time, try to make it yourself.
Ultimately, getting an effective product is a completely realistic idea if you know the principle of operation of the device and the features of its design, which this informative article presented below will help the reader understand.
Why do you need a feeder anti-twist?
The set of feeder installations includes a feeder and leashes, which are assembled on fishing lines and connected to each other into equipment using various methods. The rigs are fed into the fishing zone with a special rod, where the cord is manipulated through an inertia-free reel through rotational movements of the mechanism handle. During the process of winding the cord, these actions cause twisting of the soft lines of the leash and the feeder attached to the cord, which leads to tangling of the elements.
In addition, at the casting stage, the heavier feeder, by inertial force, pulls the rest of the installation, including the cord itself, along with it. The leash with the nozzle lags behind the load in speed, and therefore there is a possibility that this element will overlap both the cord and the landing feeder. As a result of an unsuccessful cast, the leash with a hook and bait takes a position in close proximity to the feeder, or even falls under it, which, of course, negatively affects the progress of fishing. The anti-twist for the feeder, in the situations presented above, separates the leash from the rest of the equipment and this happens due to the rigid frame of the device and the correctly selected length of the leashes.
Important! The part does not guarantee 100% elimination of overlap, but if a number of requirements for the casting technique and installation assembly are met, it significantly reduces the likelihood of tangling of the equipment.
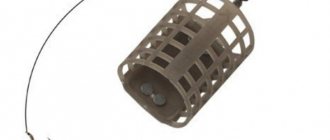
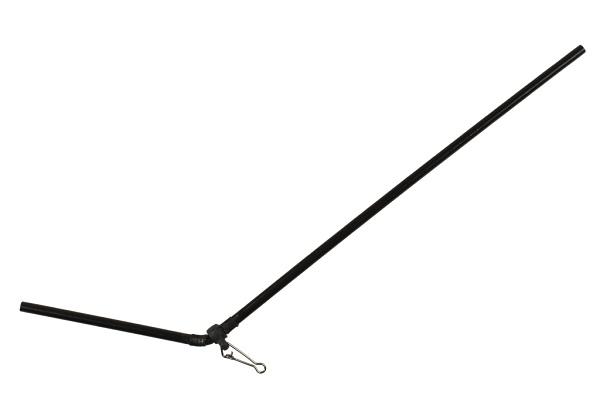
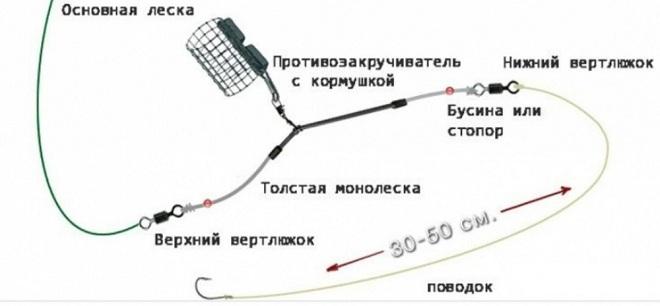
In appearance, this is a rather simple product, made of a plastic tube and bent at a certain angle, resulting in the so-called rocker arms of different lengths. At the bend point there is a fastening ring, around which the main cord is tied or the feeder is attached to it. By threading the main cord through the cavity, a leash or feeder is attached to the ends of the tube, swapping the elements based on the type used when fishing for rigs.
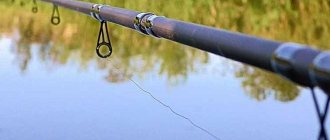
Simple rigging of a feeder rod
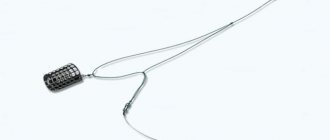
Equipment for feeder with anti-twist.
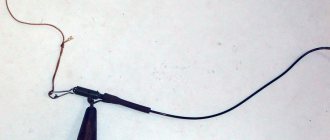
This is the simplest and fastest feeder rig. An anti-twist is put on the main line, then a bead or silicone stopper is put on, its task is to prevent the knot connecting the main line and the swivel from being destroyed (here I often use an improved clinch). A leash with a hook is attached to the swivel using the loop-to-loop method. There is a more complicated option:
Leash for feeder fishing.
Swivels and bead.
What can we say here? Don't save money! Branded and high-quality swivels do not lose so much in price to Chinese handicrafts that one should give preference to the latter. The size and weight of the swivel should be as light as possible, but when using an anti-twist, the diameter of the tube must be taken into account so that it does not slip through it. Since the tackle uses a sliding sinker and is often quite heavy, it can destroy the knot and to protect it, put on a bead of beads or a silicone stopper for the float, usually used in a match fishing rod, which protects the joint very well.
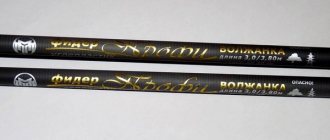
Main line.
Here the choice is obvious to me; it should be a braid for the feeder and the thinnest possible in terms of tensile strength. Fishing often takes place over long distances, and the range and accuracy of casting using a spinning reel strongly depends on the thickness of the fishing line. And when fishing in a current, a thin line creates less resistance to the flow of water and thereby makes the bite easier to “see.” Using monofilament as the main line will not be an ideal solution due to the fact that it tends to stretch. At long distances and careful bites, you can easily miss the fish.
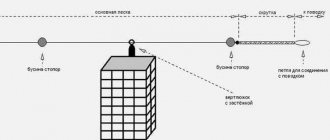
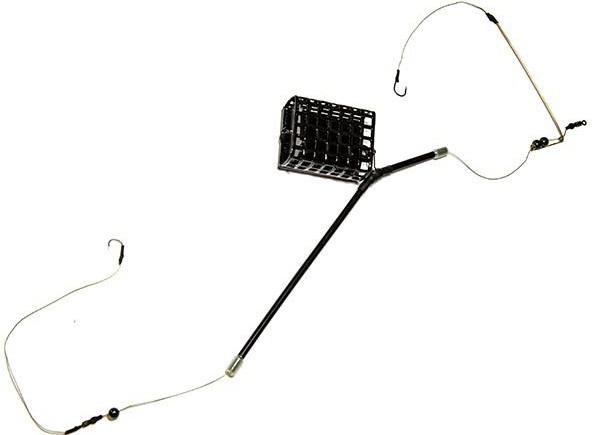
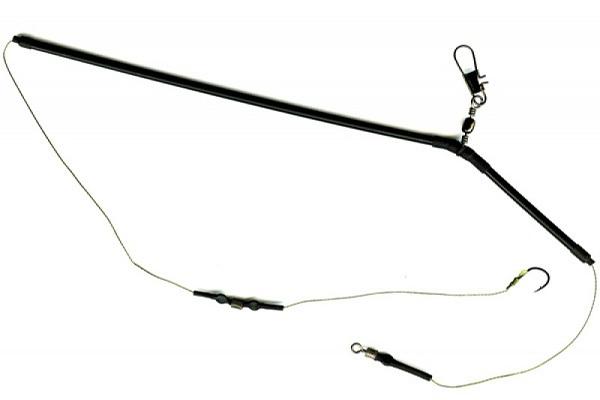
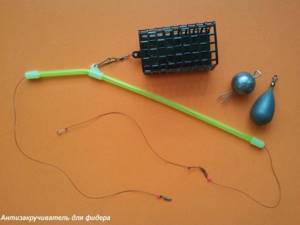
Differences in equipment and types of anti-twist devices.
The above figures show two versions of the same gear for bottom fishing , but in the second case a rigid monofilament line insert is used. I use this option when catching large fish or on a “heavy feeder”. This option allows you to save time on the pond when assembling gear, reduces the vibrations of the bait in the current and performs the additional function of a shock leader. But it also has a negative side, it reduces the sensitivity of the feeder gear. This equipment is highly sensitive only if the fish pulls the bait along the line line. To eliminate this drawback, there are different types of anti-twist agents.
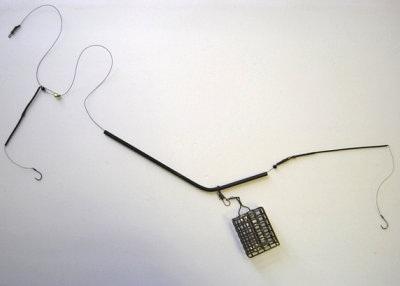
Option for a short anti-twist for the feeder. It has two advantages and one disadvantage; it is usually sold in sets of several pieces (photo on the right).
It is necessary to pay attention that the long end of the anti-twist should be facing towards the hook; this arrangement reduces the likelihood of the hook getting tangled on the feeder, but sometimes this still happens. In order to reduce such cases, it is necessary to practice smooth casting of the bait without any hard jerks, as many are accustomed to doing with spinning rods. But I’ll talk about the topic of casting techniques and feeder fishing tactics another time.
It is necessary to pay attention that the long end of the anti-twist should be facing towards the hook , this arrangement reduces the likelihood of the hook getting tangled on the feeder, but sometimes this still happens. In order to reduce the number of such cases, it is necessary to practice smooth casting of the bait without any hard jerks, as many are accustomed to doing with a spinning rod. But I’ll talk about the topic of casting techniques and feeder fishing tactics another time. There are other rigs for feeder fishing. Read more about the simplest rig and catching bream on a feeder and how to tie a paternoster rig.
What are the advantages and disadvantages of an anti-twist
Feeder tackle with an anti-twist has a certain number of advantages over other installation options and the main thing, as we have already mentioned, is the low probability of overlaps.
Tooling is considered a fairly simple way to quickly assemble a feeder. When placing the yoke, small fish will not be able to twist the leash around the main cord, which will be effectively prevented by the rigid tube. In addition, when an anti-twist is included in the circuit, it balances the equipment, distributing the load that occurs during the throwing process in the place where the feeder is attached over its entire length, which increases the reliability of the entire equipment, counteracting the shooting of the load when feeding heavy equipment. For the sake of objectivity, it is worth noting a number of disadvantages of using this element, and above all, this is a decrease in the sensitivity of the gear. Installing an anti-twist on the feeder makes the tackle rougher and less informative.
The windage of the equipment increases, so the most suitable reservoirs for fishing with such equipment are standing and weakly flowing water areas. When splashing down, installations with anti-twisting devices, due to their increased volumes, emit more noise. When catching cautious fish, an additional element that is unnatural to the bottom topography makes the potential trophy wary, often underestimating the number of possible bites.
Varieties and analogues
Sometimes amendments are made to the design to meet the requirements of real fishing conditions. Thus, the feeder is attached to the anti-twist through a paternoster. This method seems to be the best when fishing in fast water, since only the sinker - the feeder - remains in danger of being lost, the rest of the rig will survive. However, feeders are already considered consumables for feeder fishing.
Types of anti-twist
It cannot be said that the types of anti-twist are characterized by a wide degree of diversity. In principle, this is a primitive element in structure, usually consisting of one solid part or a set of similar auxiliary and fastening fishing accessories, and in some cases, made directly from monofilament fishing lines with their unique twist.
A separate example in this list is an anti-twist for a feeder line with a rubber shock absorber. In its classic form, an anti-twist is a curved plastic tube with a diameter of over 1 mm. Most often, this type is offered in fishing retail chains with the only difference being the length of the arms of a kind of rocker. In addition to tubes, there are options for L-shaped bends, which are made from elastic steel wire, at the ends of which and at the bending point, fastening loops are installed for connection with the components of the rest of the equipment.
The anti-twist is also designed by including a triple swivel or single swivels in the product, alternating and fixing their spacing with stoppers. In compact and soft loop feeder installations, bends are made from fishing line, making relatively rigid twists using certain methods. Although such a fuse does not prevent the line from rotating around its axis, it does a good job of keeping the feeder and leash apart, preventing them from getting tangled.
How to fish with this rig
The retractable leash is a jig rig, which means that fishing will be done at the bottom and you will have to use the most popular jig wiring - stepped.
In the guide to spinning for beginners, we already told you how to make the correct spinning casts and mentioned step retrieving. Your task is to cast to promising places, wait until the sinker hits the bottom, make a small jerk and start reeling in the line. The wiring should be intermittent according to the pattern of 2 turns with the handle, then wait until the sinker falls to the bottom again, then again two turns. The number of revolutions and waiting time between reelings is purely individual and depends on the fishing activity of the fish and your baits. Try changing the speed, number of turns and time between reels to find the ideal activity of your lure at that moment.
Here are some popular step wiring diagrams:
- 2 very fast revolutions, wait until the sinker hits the bottom, then 2 fast revolutions again
- half a turn, wait, half a turn, wait and so on
- 4 turns of medium speed, waiting to fall to the bottom, again 4 turns of medium speed and so on
As you can see, there are a lot of stepped wiring schemes, experiment. Different schemes will work each time.
Types of installation with anti-twist
Installing a feeder with an anti-twist is not difficult to assemble, and it is with this that novice feeders are advised to begin gaining experience and developing feeder fishing technologies.
The first and most common installation method begins with passing the main line of the tackle through the cavity of the tube. The end of the cord is inserted through the short arm of the device, leaving 5–7 cm of thread free. Next, put a damper bead on the cord and tie a small swivel. The damper will serve as a bumper and protect the unit when making casts, during which the equipment, moving along the cord, will create pressure on the swivel. A leash required for fishing conditions is mounted to the swivel, and a feeder selected for fishing is attached to the carabiner located at the bend of the anti-twist.
The second equipment option with a safety rocker is assembled according to the following algorithm. A piece of monofilament fishing line with a diameter of 0.3-0.4 mm is pulled through the cavity of the tube, so that 7-10 cm pieces of material remain free at both ends. Damper beads are put on both ends and swivels are knitted. A feeder is mounted on the short arm, and a leash is installed on the long arm of the rocker. The structure itself is attached to the main cord of the tackle by means of a connection through a carabiner mounted on the bend.
Important! This type with the use of an anti-twist is characterized by quick change and the ability to self-hook fish.
Sometimes, instead of fishing line, fishermen use a feeder, model or hat elastic, which allows the use of thinner leashes in rigs. The sensitivity of the installation becomes worse, but larger, more cautious fish are caught.
How to make feeder equipment with an anti-twist
To make feeder equipment with an anti-twist you will need:
- a piece of monofilament or fluorocarbon fishing line with a diameter of 0.25−0.28 mm, a length of 50 cm;
- 2 swivels number 7;
- anti-twist for feeder;
- feeder feeder;
- 2 stop beads;
- monofilament leash equipped with a hook.
To install feeder equipment with an anti-twist device, you must:
- thread the fishing line into the body of the anti-twist;
- from the side of the long section, put a stop bead on the fishing line;
- tie the swivel after the bead;
- Place a stop bead on the top of the thread;
- tie a swivel above the beads;
- attach a hook to the lower swivel;
- Tie the main line to the upper swivel.
In feeder fishing, shooting a feeder is a common occurrence, because the gear is delicate and the lines are thin. Thanks to the anti-twist, it is possible to prevent the feeders from shooting off and quickly change them. If an angler changes the fishing distance, the weight of the feeders used also changes.
Do-it-yourself anti-twist for feeder
The easiest way to make an anti-twist for a feeder with your own hands is from materials such as a plastic cocktail tube or a used ballpoint pen that has become empty. In addition to a workpiece suitable for the job, you will need to have a swivel, the diameter of the ring of which must match the diameter of the tube selected for the product, and a fastening carabiner. The tandem of these auxiliary accessories will serve to create reliable and effective fasteners. The equipment and tools required include scissors or a hacksaw blade for metal. To connect the parts, purchase quick-drying glue.
Do-it-yourself anti-twist for a feeder begins by heating a plastic tube over low heat to bend it, as a result of which the workpiece takes on the appearance of a rocker arm with asynchronous arms.
Important! As a rule, to make the device, the tube is bent at an angle of 135 degrees, trying not to narrow the diameter at the bend and to prevent corrugation of the surface of the material being processed.
After the workpiece has cooled, put a swivel on the rocker arm, fixing it with glue on the formed outlet angle. After the glue has dried, a quick-release carabiner is inserted into the swivel. Now all that remains is to check the edges of the tube for the absence of burrs that can deform the fishing line and you can assemble the feeder installation, which is no different if you include a purchased product in the package.
Device analogues
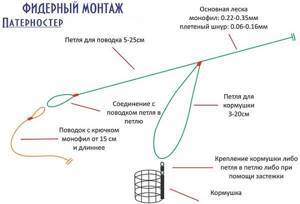
In the variety of feeder equipment there are installations that can help the fisherman achieve almost similar results when using a rigid anti-twist. These types include paternoster knitting techniques, asymmetrical and symmetrical loops and helicopter installation. In the paternoster method, the role of an anti-twist is played by a branch twisted from a fishing line or a formed loop to which the feeder is attached. In loop types, the feeder is mounted on a swivel and moves freely along one side of the connected loop.
The technique for mounting a helicopter feeder is the reverse of installing a paternoster. Here it is not the feeder that is attached to the outlet, but the leash itself. All these types of feeder equipment, with the correct casting technique and high-quality knitting of equipment elements according to certain sizes and ratios, also prevent overlaps and tangling of installation parts during reeling in the cord and landing the caught fish.
Feeder accessories
Standard installation of feeder equipment consists of the following elements:
- the main line is monofilament or braided, depending on the fishing conditions;
- shock leader - monofilament with a 0.3 mm larger diameter and a length of up to 10 meters (required to prevent breaks when casting and playing large fish near the shore);
- swivel;
- feeder attachment unit;
- the feeder itself, moving freely along a piece of fishing line in a loop or between stoppers;
- swivel;
- leash with hook.
Variations are possible only in terms of attaching the bait container. The leash can only change in length - the stronger the current, the longer it is.