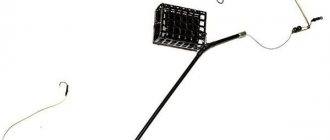
- Tackle for fishing
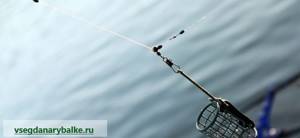
- Feeder
13950
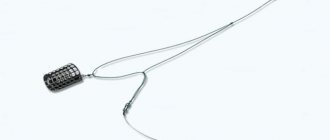
Fans of feeder fishing use a variety of equipment options, but the most popular is the simplest and very effective design called a paternoster or Gardner loop. It has some disadvantages, but the advantages more than cover them. Such equipment, for example, is very easy to manufacture; it does not require many years of experience. If a professional knits an asymmetrical loop in 5-6 minutes, then even a beginner can make a Gardner loop in just a couple of minutes. Another positive quality of this equipment is that it practically does not sink in the bottom silt. This, in turn, makes it universal; you can fish anywhere, regardless of the type of bottom surface.
The big advantage of this feeder equipment is that the leash overlaps quite rarely, which cannot be said about the same asymmetrical loop.
In addition, there is no need to use several swivels; one on the feeder is enough. This element would not be needed at all if it were not for the turbulence created during winding by water resistance. It is for this reason that any feeder should be equipped with a swivel.
Unfortunately, it does not solve the main problem of the paternoster - the constant twisting of the main line. With braid it is not yet as pronounced as with monofilament. When using a monofilament, after just a few casts there is a visible twist, which can only be untwisted in one way - pull out the equipment, lift the rod and wait a second or two for it to unwind on its own.
Separately, it is worth mentioning sensitivity. The paternoster is less sensitive compared to many other feeder installations. This drawback is especially evident in cases where the fish that has taken the bait rushes towards the shore. To better see the bite, you have to select feeders of minimal weight, which is not always justified when fishing in a strong current.
The appearance of the paternoster did not cause much delight among feederists. At first, they treated the new product with great distrust. Some were alarmed by the simplicity; the equipment seemed too primitive. For some reason, it is generally accepted that the more sophisticated the design, the easier it is to deceive a cunning and cautious fish, although in fact this is only true in theory, and in practice it often happens the other way around. Others were accustomed to different montages and did not want to change anything. But gradually the invention of the famous angler Steve Gardner won over many fans of the English donkey and became the main tool in their arsenals.
Features of the Gardner loop for the feeder
It is worth noting that today the Gardner paternoster for the feeder is the most common and popular bottom equipment. Its use is not limited to the feeder, and it successfully complements the installation of conventional donuts, where it replaces wire bends and anti-twist tubes. In addition, instead of feeders, ordinary weights are often used, which allows you to catch active fish at high speed.
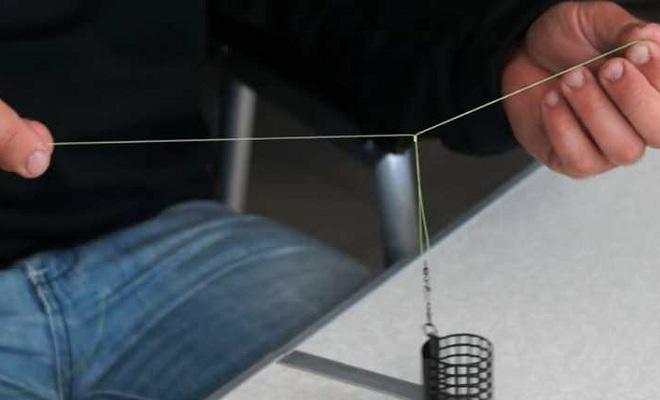
An important feature of installation is the high probability of self-hatching of fish trying the bait. This is facilitated by the mass of the feeder or load, which, due to the specifics of mating, have a small stroke, spontaneously hooking the leading bait onto the hook, even a short distance, regulated by the length of the leash, the fish. The fisherman can only record the fact of the bite by making a control hook and engage in fishing for the caught trophy. But the principle arising from the installation technique only works for active fish. If the bite is depressed as a result of the passivity of the fishing objects, then the fisherman will see only idle bites, without noticing the fish. Feeling even slight resistance from the load, the trophy will immediately spit out the food it is trying. In such a course of the fishing process, switching to other types of rigs can save you.
Manufacturing of feeder equipment “Asymmetrical loop”
An asymmetrical feeder loop is a variation of the symmetrical model. The difference between them is the length of the fields. In the asymmetrical one they are different in length. To make the design you will need:
- a piece of rigid monofilament thread 1 m long, 0.2−0.4 mm thick or fluorocarbon;
- 2 swivels;
- feeder load;
- main line;
- hook.
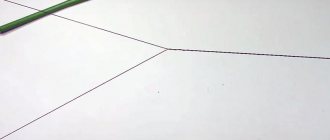
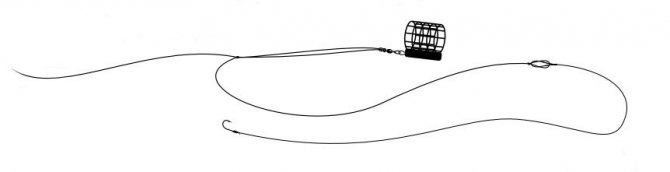
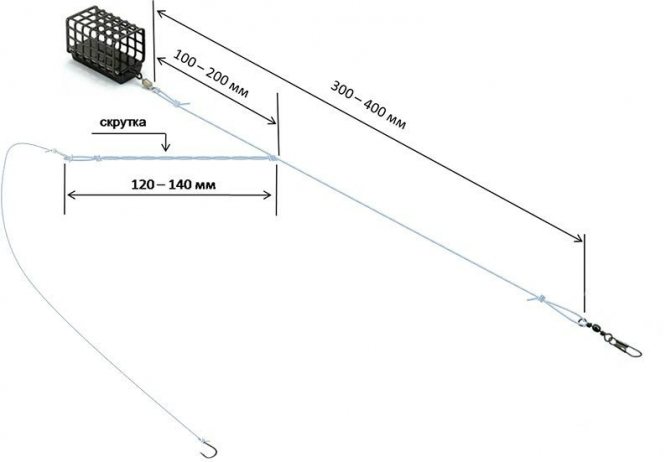
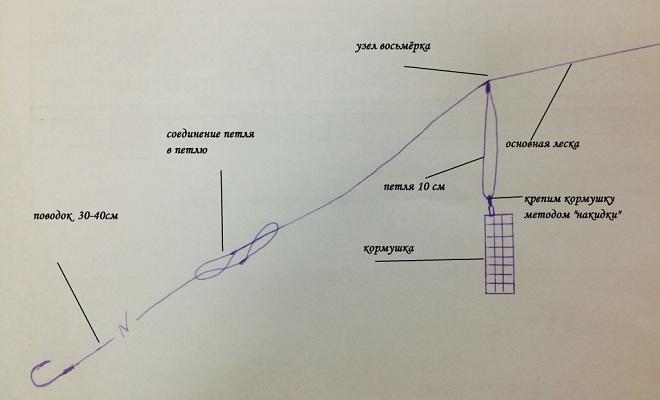
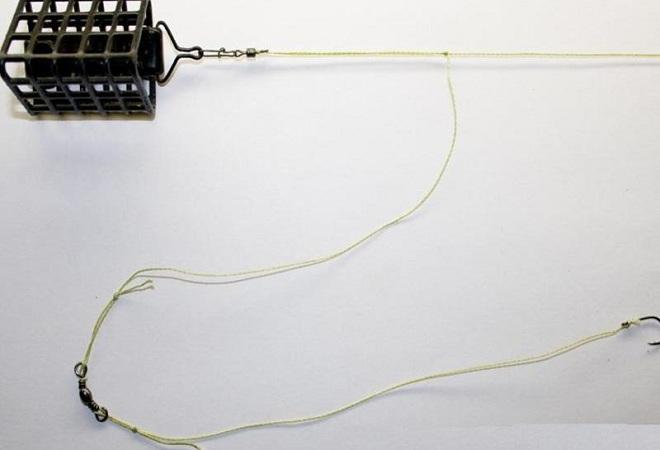
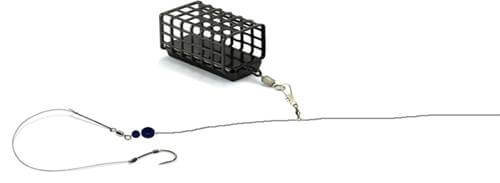
The monofilament or cord is folded in half, as for a symmetrical device. To obtain asymmetry, the loop for the feeder is formed at a distance of 8–15 cm from the bend. It is secured with a double or triple knot. A 10-15 cm long twist is made from the two ends of the fishing line. It is secured with a double knot. A swivel with a clasp is attached to the long part of the future asymmetrical structure, attaching the feeder. The length of the main loop is measured and fixed with a double knot. To attach to the main thread, a swivel is put on the end of the loop, which is secured with a double knot.
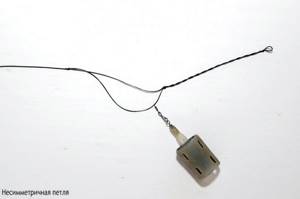
The remaining ends of the fishing line are cut off so that the gear does not get tangled when casting. A leash is connected to a small loop. The feeder moves freely along the long side of the bend. An asymmetrical loop for the feeder allows you to get rid of the problem of tangling the tackle due to the occurrence of overlap of the leash and the main thread.
Advantages of an asymmetrical loop
The asymmetrical model is made in different lengths (30−70 cm). When biting actively, a loop of shorter length is used, when biting passively, a longer one is used. The asymmetrical loop design enhances the sensitivity of the gear. This equipment is effective for catching carp, crucian carp, bream, and roach.
Controversies and myths about the asymmetrical loop
Among anglers, debates constantly arise about the effectiveness of asymmetrical loop gear. Some of them claim that this is a myth and a figment of the imagination of its creators and users, but in reality it is an unjustifiably complicated version of the ordinary Gardner paternoster.
Their opponents provide the following evidence in defense of the equipment:
- when tensioned from a slightly bent tip, the thread looks like it is broken, but the feeder slides freely along it;
- during casting, the leash with the hook does not touch the feeder due to the presence of a twist that moves it to the side;
- If the rig sinks into the silt, then in the paternoster version you need to apply force to pull it out, but in the asymmetrical rig the feeder easily slides along the monofilament.
Advantages and disadvantages
Both beginners and experienced fishermen use the paternoster on the feeder. When starting a fishing session, it is this equipment that can indicate the further development of a fishing strategy based on the conclusions made by the angler after the first casts based on the activity of the fish. In addition to the reconnaissance function, the knitting pattern is distinguished by its simplicity and speed of production. After all, the installation, already at the initial stage of gaining experience, can be assembled in less than a minute right on the shore of the fished reservoir. The paternoster works both in currents and in still water, which is a universal quality of equipment. Installation does not require additional fastening and fixing elements, and can be made using either monofilament or braided cords. The Gardner loop has a low degree of overlap and tangling.
The disadvantages of the technique include low sensitivity when biting inactive and cautious fish, and therefore, a high number of false bite signals requires a radical change in installation with a transition to a different type of feeder equipment. Also a negative factor is the twisting of the loop when winding the cord, which is especially clearly manifested when using monofilament fishing lines in assembly schemes.
Selection of feeder equipment for fishing conditions
Anglers on forums often argue about which is better - an inline or a paternoster, a loop or a helicopter. There is no answer to this question. Feeder equipment must be selected on the spot, especially on an unfamiliar body of water with no experience of fishing in it. At the initial stage of fishing, we check whether the equipment is sensitive or not. In the case of the paternoster, we play with the length of the outlet to the feeder and the leash. The more aggressively the fish bites, the shorter the arm of the feeder should be. You need to choose the right cutting moment. If it doesn’t work, we experiment with the length of the leash.
Paternoster fishes well when the fish bites on the spot, without trying to quickly grab the bait with the tips of its lips and swim away without swallowing. Therefore, such a feeder installation is good for tench, crucian carp and any other fish that calmly tries the bait. If the fish slightly grabs the bait and swims away, trying to swallow it along the way, inline will work better, since the feeder will not interfere with the fish running away to the side. There is no best feeder installation, one doesn’t work - we try another until we find a working option in these specific conditions.
Subscribe to the channel:
YouTube channel RYBAFAN
We are VKontakte
History of the appearance of equipment
The Gardner loop rig began its history in the forties of the last century in the British capital, when the then famous English sports fisherman Steve Gardner improved the installation of the “ ledger rig ”. These actions were facilitated by the athlete’s wife’s passion for bottom fishing, where she was not entirely successful in tying the usual equipment at that time.
Gardner simplified the tying task for his wife by making a loop lead directly on the cord itself, which made it possible to quickly and quite simply attach leashes to the lead using the loop-to-loop joining technique. The very abbreviation “Gardner loop” was introduced into a wide range of use in feeder fishing by Russian fishermen. In the original, the improvement is called “ Looop ”, which translates as a loop.
But the Russian name for montage has gained worldwide recognition and has firmly established itself not only in fishing slang, but has become regularly used in information sources covering feeder fishing and has rightfully become a legitimate term.
Types of paternoster installation for feeder
Having mastered the simplest method, preferably using it in practice, and not sitting in the garage, if it gives at least some result, you can experiment with other types. From the outside it may seem that they are not much different from each other, but this is not so. Although the types of installation of a paternoster for a feeder have much in common, this is only visual, and in reality, both the catch itself and the conditions created for this depend on how the paternoster for the feeder is tied.
Classic paternoster
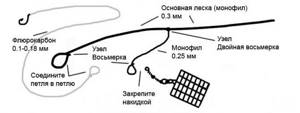
The classic paternoster is designed for bottom fishing in hard-to-reach places, and is used in cases where the bottom topography is complex: littered with branches or snags. It also performs well when fishing from the shore at a short distance, or from a boat. For this purpose, the leash should be attached to the continuation of the main (thick) fishing line, and the outlet for the feeder should be knitted from a thinner one. The process uses two types of fishing line; if the main one has a thickness of up to 0.3 mm, then for retraction it is better to use a fishing line with a thickness of no more than 0.2 mm; a triple surgical knot or a figure eight knot is more suitable. The advantage of this technique is that if there is a snag, only the sinker will come off, and not the leash with the catch.
Amateur paternoster
In this case, fishermen can experiment a lot, and the absence of certain rules is the main advantage of this type. The Amateur Paternoster is crocheted in almost the same way as the simplest one, that is, for the feeder and hook bends, a single rigid fishing line is used, most 0.3 mm thick, with different lengths of bends. But this is where the similarity ends, this type is more complex in that the equipment is attached to the main fishing line according to the loop-to-loop principle, or in an even more intricate way, through a swivel with a carabiner, which is much more reliable. It is noteworthy that fishermen often attach an additional outlet for another hook, although this does not fit well with the design of the feeder itself and complicates fishing.
Gardner's loop
To many novice fishermen, just mastering the feeder paternoster, the Gardner loop seems extremely complicated, but in reality, it is one of the simplest, especially compared to the previous one, with which there is a lot of confusion. There is a legend among fishermen that a certain Englishman named Gardner invented this noose for his wife, seeing that she could not tie it in the classical way. Here, in fact, there is nothing at all complicated; it is enough to make an ordinary loop without any markings or trimmings, leaving it as is. The remaining free end of the fishing line serves as a branch, and the feeder is hung in a loop - nothing simpler has yet been invented.
{banner_vnutri-kontenta-3}
Paternoster with twist
There are also no special surprises in a twisted paternoster, and it’s not even a matter of how it is knitted, but what equipment is used for this. Often, instead of the main fishing line, a braided nylon cord is used - its softness is considered an advantage. But in reality, this is not entirely true; the only thing that guarantees this technique is constant overlap at the time of casting, and frequent twisting around the feeder. To avoid these troubles, you should put a thick twisted line on the shoulder of the leash. Its very rigid structure does not allow it to wrap around the feeder, moving the leash a little to the side. But using twisted fishing line is also problematic and inconvenient - this option is clearly not for beginners.
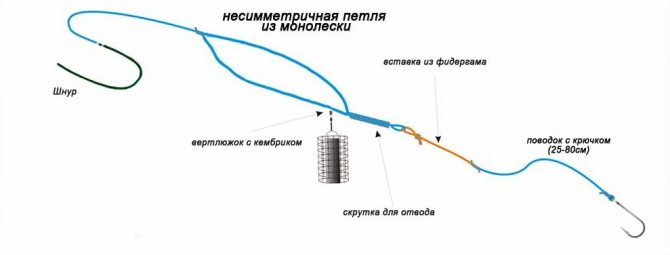
With fidergam insert
A paternoster with a feedergam insert is relevant only in certain conditions, in particular if the reservoir is not replete with large representatives of ichthyofauna, and a thin fishing line is used to catch them. In this case, an insert made of feedergam is used - a type of feeder rubber that makes the leash more durable. By the way, it also has its advantages: with the insert, catches are lost much less often if fishing is carried out from behind a fairly steep edge, which is important in the process. Such a paternoster for a feeder is knitted in the usual way, with the only difference being that the feeder is first inserted into the outlet loop, and then the leash itself, according to the loop-to-loop principle. It's extremely simple and reliable.
One-piece bend
The one-piece bend is vaguely reminiscent of the previous one; it also uses feeder rubber, but not in the form of an insert, but in the form of a solid bend on the leash. But this is done not to strengthen the fishing line, but to get rid of joints on the leash, that is, multiple loops and individual inserts. This technique allows you to use the maximum length of the elastic; you just need to carefully calculate the length of the leash and the arm with the feeder - the latter should be longer to avoid frequent overlaps. In the process of knitting a paternoster, there are no particular difficulties; you just need to attach the feeder to the main fishing line, tie the elastic band to it with a simple double knot, and make an additional knot at the attachment point.
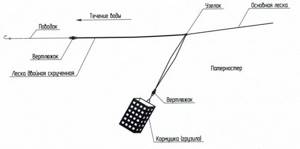
Sliding paternoster
A sliding paternoster is relevant in places with strong currents; for calm, standing water, its use does not matter. In difficult conditions, even despite the sensitivity of the feeder, fishermen notice the fish leaving too late, and the sliding paternoster allows them to gain precious seconds. It is not difficult to knit; it almost completely repeats the usual installation of a paternoster, with the only difference that it is not a “blind” fastening of the outlet to the feeder, but one that allows it to slide freely. This effect is achieved by using symmetrical and asymmetrical loops for the feeder. By and large, there is no noticeable difference in this; the overall result does not change.
Knitting instructions, subtypes
At this time, in modern feeder fishing there are a number of modifications of loop tying, which do not differ significantly from the original, classical method invented by the author. The differences lie in the installation package with additional fastening accessories and elements that prevent tangling. Before knitting a Gardner paternoster for a feeder, an angler will need a certain composition of materials, the list of which can be unified taking into account all possible knitting options.
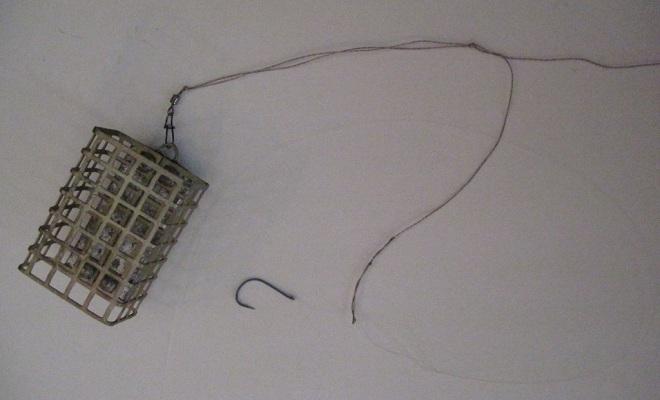
To assemble the installation, the fisherman will need to prepare:
- The main line - on which the installation will be based.
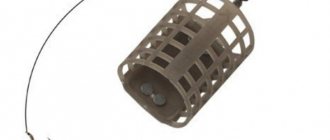
- Feeder - simultaneously acting as a sinker.
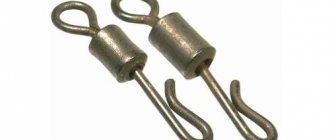
- A swivel in tandem with a carabiner is used to secure the feeder.
- Stopper – to limit the movement of the feeders.
- Fluorocarbon or nylon fishing line - used as a leash in equipment.
- Hook – the size of which is selected based on the bait used and the size of the trophy planned for the catch.
To design the equipment, main fishing lines made of various materials and different thicknesses are suitable, capable of withstanding the weight of the filled feeder and the resistance of the fish being caught. After checking the presence of the required elements, it is enough to familiarize yourself with the instructions below for forming variations of the loop and begin to develop assembly skills.
Classical
The easiest and fastest way to tie a Gardner loop is in the classic way. The knitting technique in the action algorithm is as follows:
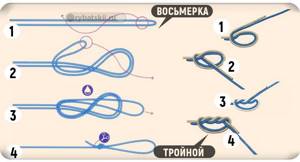
- Two cords, the main one and the one intended for outlet, it is usually thinner, folded in half.
- A double figure eight knot is knitted from the folded cords. The difference from the ordinary figure eight will be that the fishing line is pulled into the loop not once, but twice.
- After tightening the knot, we cut off the tails of the fishing line, leaving them at a length of about 25 cm from the knot.
- On the main cord of the left tail we knit a regular loop into which the leash will be attached.
- We cut the tail of a thin fishing line to 10 cm and also knit a regular loop for attaching the feeder.
- We connect the leash and the feeder into loops, completing the installation with these steps.
With twist
Twisting in installation is an improvement that reduces the likelihood of overlaps. It is used not only in the formation of a Gardner loop, but is also inherent in other types of feeder equipment, improving the comfort of fishing. The step-by-step method is as follows:
- We fold two fishing lines in half, the main cord and the thread intended for retraction.
- We form a connection between the folded ends of the fishing line using a double figure eight.
- Pressing the cords connected by a figure eight to the table with a weight, we twist the double-folded main line into a braid, fixing the twist at a distance of 25 cm with a loop intended for fastening the leash.
- On the side branch, only at a length of 10 cm, we perform exactly the same operation with the formation of the final loop for mounting the feeder.
- At the end of the installation, we supplement the loops with a leash and a feeder.
With continuous loop
The difference between this modification is the formation of a large outlet loop to which the feeder clings. Assembly instructions are performed in the following order:
- On the main piece of fishing line half a meter long from the end, a large loop is knitted.
- The loop is folded in half and a figure eight knot is made so that the side branch, and it will be in the form of a loop, is no longer than 10–12 cm, and the main cord is 25 cm.
- At the end of the main thread we tie a loop to attach the leash.
- Using a carabiner, we attach the feeder to the side solid loop, and also connect the leash to the main fishing line, thus completing the installation.
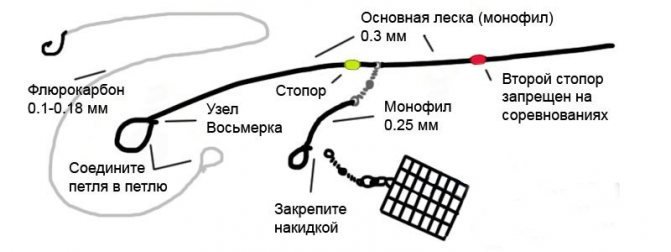
Sport
This interesting variation of the paternoster is intended for sports feeder fishing, but is no less popular among amateurs due to the speed of formation and catchability. Assembly of the “sport” modification is carried out according to the following principle:
- A swivel with a clasp and a stopper is put on the main thread, stretching up the cord. A figure eight knot is made at the tip of the warp, creating a loop for attaching the leash.
- We tie a piece of fishing line to the swivel, intended for attaching the feeder, arranging a fastening element at the end, which is most easily accomplished using the surgical loop technique.
- Finally, we equip the mating with a leash and a feeder.
- The stopper regulates the movement of the feeder along the main thread.
Two hooks
Fishermen increased the likelihood of bites by modifying the paternoster with the option of installing two hooks in the equipment. The technique for forming the equipment itself is completely identical to the classic or other version. The only peculiarity is the installation of additional leashes or hooks. In a loop connected for the feeder with a surgical knot at the end of the base, you can mount two leashes of different lengths, or you can install two hooks on one leash, maintaining a certain distance between them. An installation option is practiced where an additional leash should be on the base in front of the feeder.
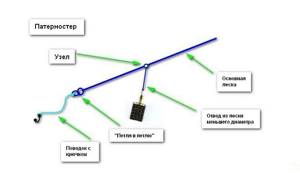
Varieties of Paternoster Gardner
Fishermen are smart and very inventive people. That is why the classic Gardner paternoster has several analogues, adjusted to certain fishing conditions. To make it clearer why they are needed, let’s display them in a table.
| Variety | Design features | Recommendations for use |
| Classic version (paternoster) | The feeder is connected to the main line through a thinner line. Thanks to this, the fisherman has the opportunity to pull the trophy out of the snag by tearing off the feeder. | For fishing in heavily snag areas where snags often occur. |
| Gardner's loop | Here everything is the other way around. The feeder is mounted on a loop; the rigid double line reduces the likelihood of breakage. With this installation, sensitivity increases and the number of fish notches decreases. | More suitable for muddy bottoms. |
| Twisted installation | The lead to the leash is a twist of two fishing lines, which significantly reduces the number of overlaps, due to which you can wait a long time and to no avail for a bite. | This type of equipment should be used by those fishermen who are constantly confused by other paternoster options. |
| Sliding installation | The outlet is fixed on the main line using a swivel, its movement along it is limited by a small stopper. | It is considered a sporting equipment with which the fisherman has to hook the prey on his own. No self-notches! It is allowed to be used in all feeder fishing competitions. |
As you can see, the paternoster equipment is multifaceted. This term “hides” several very effective designs for catching fish, but only if they are used correctly. Let's take a closer look at the manufacture of each of them.
Is the equipment sensitive to bites?
Feeder gear equipped with a paternoster cannot be classified as high-sensitivity equipment. Many other techniques convey the weak contact of the fish with the bait much more subtly.
Important! The paternoster is recommended as a feeder rig for catching active fish.
From the point of view of the development of events when biting, it is worth focusing on such moments as the movement of the fish. If the fish that took the bait continues to move away from the shore, then the tension of the line will ideally transfer the bite to the quivertip tackle, but additional notching from the angler will be required. When the trophy moves to the shore, a situation is often created that the fish is completely self-hatching, but with indistinct work of the quivertype, expressed only in light but prolonged twitching.
How to tie a knot for attaching to a leash rig
The loop for the leash should be as elegant as possible, miniature in size. You should use a figure eight or triple knot (simple double). You need to cut off the excess part under the knot itself, eliminating its protrusion to the side. Otherwise, when casting the paternoster gear, the tail will touch the leash and all kinds of debris at the bottom of the reservoir, which will not allow you to react in a timely manner when the fish bites.
A similar version of the loop is performed on a leash. When fishing with a feeder, it is good to prepare leashes of different lengths and diameters. Then the replacement process will not take much time.
If the hunt is for bream, then the optimal leash length is 30 cm. Here the chances of self-hooking the prey are extremely high. Such a short length of the equipment practically eliminates tangling during transportation. Leashes up to 70 cm long work better for passive fish. They are effective even for cautious underwater inhabitants. By increasing the length of the leash, the angler increases the chances of attracting fish that live at the bottom of the reservoir.
About color schemes and accessories
In the success of the installation of feeder equipment, an important role is played by the camouflage of the mating located at the bottom. Attention is paid, giving priority to the selection of fishing lines similar to the color of the water in the reservoir and its soil. The massiveness of the feeders, the color of the accessory that does not correspond to the natural color of the fishing area, as well as the incorrectly selected mesh cell of the feeding device, which contributes to heavy dusting or, on the contrary, a small and insufficient supply of food to the fishing area, become the causes of no bite.
Bulky fasteners and anti-twisters also alert the fish, reducing the chances of success. The invisibility of the leash and an optimally thin but reliable hook, on the contrary, improve the results, smoothing out the negative effects of a weak bite.
Pros and cons of equipment
The main advantages of this installation include:
- High sensitivity, high (although not one hundred percent) possibility of self-notching;
- When the feeder gets into the silt, the leash remains above the bottom surface;
- Lightweight and easy to manufacture.
However, there are also disadvantages, for example:
- Twisting the fishing line (especially when attaching the feeder without using a swivel);
- During the course, weakening of sensitivity;
- The possibility of chafing the cord at the junction with the feeder.
Along with the classic version, modifications of this installation are also used:
Is it possible to bet directly on the shock leader?
Using feeder tackle with a shock leader, there are absolutely no restrictions on the use of the paternoster. The equipment is tied with a knot directly on the cord material or attached to its end, as in the classic applications of a shock leader. When installing the shock leader on the cord itself, it is preferable that it be made of braided fishing line, since it is more convenient to install on thin and soft threads, and its reliability will be higher than when performing work on a thick monofilament fishing line.
Installation instructions for removable gear
Now we will still focus on the installation of removable feeder gear paternoster
. Since you often have to change them right while fishing, and the knitting process can be interfered with by natural factors (rain, wind, night). So it's better to prepare in advance.
Take a small piece of fishing line and fold it in half, then twist it into a regular braid.
. Many people think that twisting a pigtail is very difficult, although in reality everything is much simpler. There are two main ways to do this:
- we clamp the loop with our teeth and twist the line using the index fingers of both hands;
- Take both ends of the fishing line with your hands and simply twist them in one direction.
Make sure the braid is approximately 20 cm long. Then you need to tie a figure eight knot so that the braid does not unwind or move. To put it simply, fix the twist
so that the tackle does not fall apart.
Now you need to take another piece of fishing line, about 10 centimeters long, and make a second pigtail out of it
. It is done in one of two ways, which are described above (there is a video below, everything is also described and explained in detail there).
Now you need to secure both twists
using an additional knot, simply by attaching them to each other. Try to make the pigtail stick up or to the side, but never down. This is done to achieve the main purpose of twisting - to move the leash away from the feeder, to avoid overlaps.
Now that all the loops of the paternoster are twisted and connected to each other, you can safely attach the feeder
and go fishing.
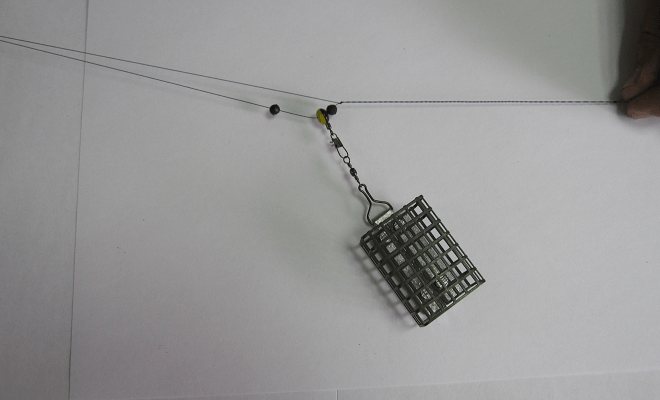
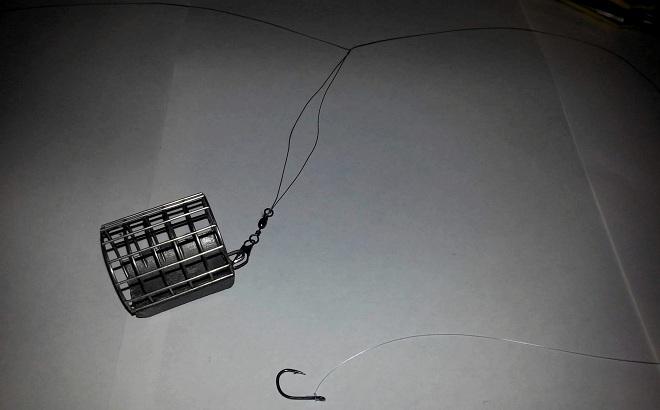
About installing the feeder
: simply insert the feeder into the loop ring and pull it through it (fishermen call this method a “cape”). Tighten the line and be sure that the feeder will not go anywhere.
Last but not least, a leash with a hook is attached
. Everything here is extremely simple, it is attached using the “loop-to-loop” method, which is known to everyone since childhood, and I think you shouldn’t pay special attention to it.
Some fishermen improve the paternoster by increasing the length of the second twist to 35 centimeters. This is done for fishing in the current. With such a length of the pigtail, the leash will definitely never reach the feeder and will not get caught on it.