Advantages
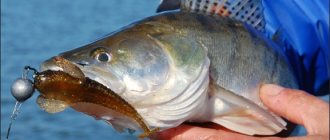
There are a number of positive aspects in installing silicone baits on Cheburashkas that give them advantages over jig heads.
- Firstly, this design has greater mobility, which increases the amplitude and realism of the play of silicone baits, and, accordingly, the efficiency of catching passive fish.
- Secondly, such an installation allows you to quickly change the weight of the bait without removing it from the hook, which becomes especially important if the catchable bait is the last one left in the angler’s arsenal, and others show worse results.
- Thirdly, the use of Cheburashkas allows you to make “locomotives” out of sinkers - hook them one after another to reduce the thickness of the load, while increasing its length. This method is rarely used, but it can be quite effective, especially when fishing for various kinds of silicone worms, which should not have a large head.
- Equipping baits with Cheburashkas allows you to use any hooks. It is often difficult to find a small jig head with a large hook, or, for example, molded on a hook of a certain shape. In addition, it is convenient to attach double or even triple hooks to eared sinkers, if the angler so desires, but finding such a jig head will not be easy.
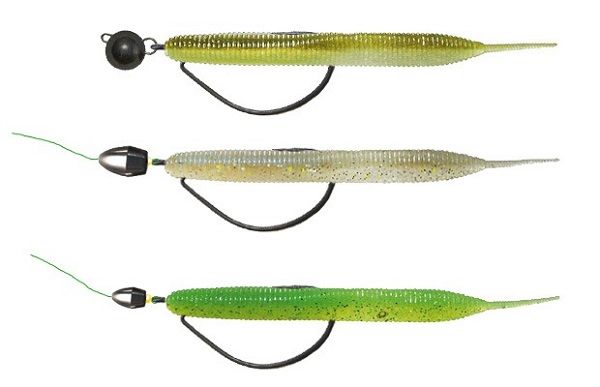
The use of an offset hook with a Cheburashka allows you to make more effective non-snaking hooks than from simple jig heads, due to the free movement of the hook and the absence of a lever with a sinker
Fisherman's blog
Do-it-yourself collapsible cargo "Cheburashka".
Hi colleague!
Do-it-yourself collapsible cargo "Cheburashka"
One day in the store I bought collapsible tungsten weights “Cheburashka”. The advantages of such a weight made me part with a decent amount of money, but they were worth it.
With a very small volume, the weights were very heavy, due to the flexible fastening of the hook, the bait behaved very naturally, while they could easily and quickly change the hook to a larger hook or with a longer shank.
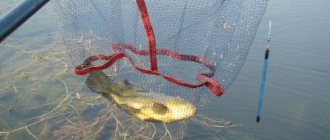
On my first fishing trip, I decided to try out new weights. The installation and attachment of the bait completely confirmed my opinion about the merits of these weights, but the very first cast of the bait greatly upset me.
The bait flew very far and quickly sank to the bottom, BUT after two lifts from the bottom with a stepwise retrieve, the load settled dead in the rocky bottom and it turned out to be impossible to remove it from there.
I lost 1 of the 4 weights I purchased!
From my first experience with tungsten collapsible Cheburashkas, I gained useful experience, drew the appropriate conclusions and decided that I needed to make such weights myself! At the same time, I will under no circumstances make them spherical! The ball, of course, is the minimum volume, but in our case, the cylindrical shape of the load will be much more useful than the ball.
Cylindrical weights fly no worse than a ball, and when guiding, they pass all sorts of obstacles much better. Lead could also be used as a material for a collapsible Cheburashka, but I really liked the weight advantages of tungsten collapsible Cheburashkas. After some searching, I purchased 4 tungsten electrodes for argon welding.
The cost of one electrode, from which 4-5 weights are obtained, is 2 times cheaper than the cost of 1 store-bought weight of Cheburashka! Tungsten is very difficult to process, but it breaks easily. Therefore, to make a collapsible weight, I decided to use a heat-shrinkable tube - thermofit, sold in car dealerships.
I left the principle of the fastener unchanged, slightly changing the shape of the fastener itself. You can watch the entire process of making a collapsible Cheburashka cargo with your own hands in this video.
It took me no more than 5 minutes to make such a collapsible Cheburashka weight! And on the water, such weights showed their best side! I use them when fishing with micro jigs and I can say with confidence that while maintaining their “flight” characteristics in comparison with purchased ones, they pass underwater obstacles much better.
Varieties
There are many types of Cheburashkas that can be found in fishing stores today. There are several main characteristics that distinguish them from each other.
Form
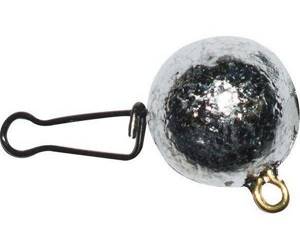
Despite the name, there are not only spherical Cheburashkas. The ball is considered the best shape for a sinker due to the fact that it can have maximum weight with a minimum diameter. In addition, this shape promotes long casting, increases snag resistance and is the easiest to manufacture.
However, in addition to the classic round ones, there are Cheburashkas, the shape of which is called field. These are elongated sinkers designed for fishing in snags and uneven bottom terrain. The third type of eared weights is the “fish head”, beloved by many anglers, the name of which speaks for itself. But the latter type of sinker, as a rule, costs a little more, without demonstrating any special advantages, which is why it is used infrequently. Due to the lower aerodynamic qualities of the field, the most popular today are the spherical sinkers familiar to most anglers.
Material
How to catch pike with a jig
The classic option on the market is lead Cheburashkas. This metal is heavy, inexpensive, and very easy to work with, which makes it an undisputed leader for fishermen. At the same time, it is a proven fact that it is harmful to the environment, and remembering how many dangling sinkers rest on the bottom of reservoirs, the scale of the problem becomes obvious.
A more expensive, but also more environmentally friendly option is to use tungsten Cheburashkas. Of course, they are cast not from pure tungsten, but from alloys, but they nevertheless have better strength indicators, which is why they can last longer than lead ones. However, given that in 99% of cases the service life of a sinker is measured by the time it takes before it breaks, and not before it deforms, this advantage is not considered important among anglers.
Also, tungsten Cheburashkas are heavier than their lead counterparts, which is why, with the same mass, they have a smaller size, which reduces air resistance and facilitates longer casting. In addition, it is believed that tungsten weights create an additional noise effect when hitting stones during wiring, which cannot be said about soft lead.
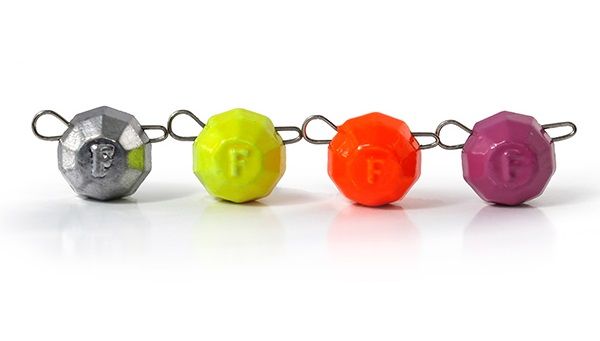
Relatively recently, Cheburashkas painted in different colors began to appear in stores. However, so far fishermen have not noticed any special differences and the demand for them is not too great
Rings
There are several options for placing the rings on the body of the sinker. The first, which was the most popular earlier, gave the popular name to such loads. In this arrangement, two rings are located on both sides of the sinker and oriented in one direction, which makes them similar to the ears of a famous cartoon character on a large head. This arrangement option is not very convenient when fastening through one winding ring or clasp, since the ears of most hooks are directed with the hole towards the tip, which is why with this method of installation the hook is directed with its tip not upward, but to the side. This increases the likelihood of a hook and somewhat worsens the animation of the bait.
The ears of the second type of Cheburashka are in the same places, but are directed at an angle of 90 degrees to each other, which, when attached through one winding ring, contributes to the correct positioning of the hook.
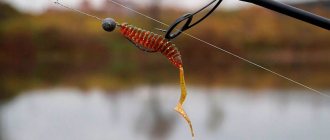
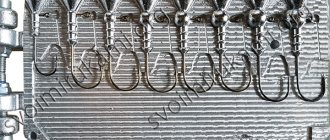
The third, most popular type at the moment, are collapsible Cheburashkas. In such rings, the rings are not soldered, but inserted inside the lead body and represent a single wire structure of a special shape, vaguely reminiscent of a paper clip. Such products allow you to remove the rings from the sinker and thread them into the eye of the hook, thus increasing the reliability of the structure and eliminating an unnecessary element from it.
There are also Cheburashkas with soldered fasteners, but in terms of reliability they are much inferior to collapsible ones, which have approximately the same functionality, which is why they are not in great demand
Self-production
Currently, a fairly large number of spinning anglers cast sinkers for fishing themselves, receiving impressive savings. Today, making dismountable Cheburashkas with your own hands is at the peak of popularity. Such weights are a little more difficult to cast, but they are much more practical than conventional non-dismountable ones.
The Cheburashka sinker can be made in two ways, and, as always, one of them is simpler, and the second is cheaper. If you plan to cast a lot of weights, it makes sense to purchase a special casting mold for this - this will make the process much faster. To save money, it is quite possible to make the mold yourself. For this you need:
- Two matchboxes.
- A sinker whose size needs to be repeated.
- Thin metal plate.
- Vegetable oil.
- Gypsum.
- Water.
- Empty jar.
- Drill.
- Wire.
- Wire cutters.
To create a mold for making sinkers you need:
- Remove the ear from the finished Cheburashka.
- Cut a piece of the plate the width of the hole and 5-6 centimeters long and insert it into the sinker instead of the eye.
- Dilute plaster of Paris with water in a 1:1 ratio.
- Stir until the consistency of sour cream.
- Wait for it to thicken and place the plaster in a matchbox, filling it to the brim.
- Tap the box on the table to avoid the formation of bubbles and voids.
- Lubricate the sinker with oil.
- Holding the plate, place the weight on the plaster so that it disappears into it exactly to the middle.
- Make 4 holes with a drill approximately 5 millimeters from the corners.
- Mark a cone-shaped hole for the sprue on the wide side of the box.
- Leave the half to dry for a day.
- Repeat steps 3-6 in the same way with the second box.
- Make holes in the second box similar to the first one and mark the sprue.
- Grease the dried first half of the mold with the weight inserted into it with oil.
- Carefully place the first half on the second half and squeeze them slightly.
- Let the form dry.
- Separate the halves, remove the sinker and use a knife to cut through the sprue and thin air ducts on the sides of the Cheburashka imprint.
- Insert pieces of wire, nails or pins into the drilled holes so that the halves of the form fit exactly against each other.
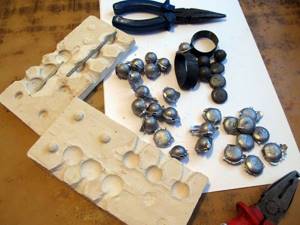
By and large, there is no difference whether the fisherman has a metal mold or a homemade plaster mold; the principle of making sinkers is approximately the same:
- Grease the halves of the mold with oil or a piece of lard to easily remove the cast Cheburashka.
- Insert the oiled plate across the mold into the specially made recess.
- Connect the halves using pins and squeeze if they are not held tightly enough. It is not recommended to hold the mold in your hands during casting; it is better to hold it in a vice; in extreme cases, you can use thick fireproof gloves.
- Melt lead in a prepared container. It is advisable that the container have a spout so that the hot metal can be poured out conveniently.
- Pour lead into the sprue in a thin stream.
- Wait until it cools down.
- In parallel with cooling, bend the ears from the steel wire, using as an example the eye of the factory Cheburashka from which the mold was cast.
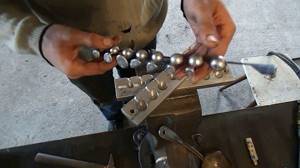
- Separate the halves of the mold and remove the resulting load.
- Remove the plate and remove excess lead using wire cutters.
- Insert eyelet.
If excess lead appears on the joint line between the halves of the mold, it can be cut off quite easily with a sharp knife
At this point, the production of a collapsible Cheburashka can be considered complete.
Felt fabric toy Cheburashka

You will learn how to make a felt fabric toy, Cheburashka, in my master class. Good cartoon character. Children love these toys very much. You can quickly make a simple toy with your own hands that will be an excellent gift for your kids.
To work you need 2 felt sheets of brown and orange, brown sewing threads, a needle, two black buttons, white fabric for the eyes, padding polyester, scissors, super-moment glue, text proofreader - Stroke.
Sequence of work
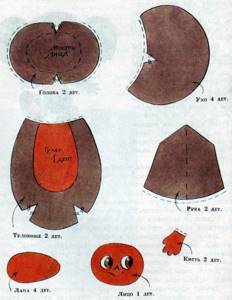
Open it up. If you want to fit on one felt napkin, then lay out the paper templates and carefully cut them out, without throwing out even small pieces, as they will be useful for the bangs, nose and eyebrows of the toy.
We cut: 2 parts for the head, 2 each for the body, for the ears, arms and 1 each for the legs.
Pattern sizes including seams:
Head diameter 8 cm.
Ears 5.5 cm by 6 cm.
The body is 10 cm in height and 9 cm in the wide lower part.
The length of the upper legs is 5 cm and 2 cm wide. We sew the legs on the wrong side only up to half, so that it is convenient to turn them inside out and fill them with padding polyester. Then we sew the rest of the part right over the edge. We sew the lower legs from a circle with a diameter of 2.5 cm, folding it in half, and sew it over the edge with small stitches
From orange fabric we make a circle 1 cm smaller. for the muzzle.
An oval pattern for the breast and two semicircles for the ears.
We sew the cut details along the wrong side at a distance of no more than 5 millimeters. Leave holes for filling with padding polyester.
Glue the orange parts according to their intended purpose.
We connect the parts of the toy.
Let's start finishing the muzzle. Sew over the edge of the orange overlay. Glue white circles in place of the eyes. We sew the buttons on top, piercing the needle from the back of the head.
We tint the highlight on the eyes with a white touch - corrector.
Cut out the bangs and glue them with glue.
Cut out a triangle for the nose and glue it too. We sew the mouth with a thick thread and adjust it with a thin thread to highlight the corners of the mouth and create a smile.
Next, we sew the edges of the linings on the ears and chest.
That's it, our little Cheburashka toy is ready! The finished product was 16 centimeters. It is soft and pleasant to the hands!
You can sew a string and hang the toy in the interior of the room.
In the next master classes I plan to continue the theme of cartoon characters and I invite you to follow new publications on my website.
Adviсe
There are several life hacks about casting sinkers, discovered by experienced spinning anglers. These include the following tips:
- To produce different weights of Cheburashkas, it is necessary to purchase or produce a large number of casting molds. However, this problem can be solved by adding tin to lead - they will mix easily, but due to its lower density, tin will make the sinker lighter. By experimenting with ratios, you can cast a fairly large number of weights of different weights in one mold.
- To compress the mold in the absence of a vice, you can use an ordinary office clip.
- A container for melting lead can be made from an ordinary tin can by bending its edge with pliers so as to form a spout for casting.
- The simpler the mold is to manufacture, the faster it fails. Therefore, if you plan to cast hundreds of Cheburashkas, it makes sense to purchase or make a good metal mold, since plaster molds will have to be made again quite often.
A good shape is distinguished not only by a long service life, but also by performance. There are models with up to 10 casting cells