For making your own, two designs of homemade fishing bags or, as many old fishermen say, pouches are offered. The first bag is suitable for storing fish for summer and winter fishing.
It is advisable to use the second waterproof bag only in the cold season or for short fishing for two to three hours on a summer morning or evening.
The first bag was sewn with my own hands on a sewing machine from a dense material that does not allow fish mucus to pass through, but is highly breathable, making the catch less likely to spoil when fishing, even in warm weather. Especially if the carcasses are topped with fresh nettles or sedges.
The second waterproof pouch is also sewn with paraffin threads with your own hands in the full sense of this expression, that is, by hand. This soft container is waterproof, more versatile and is intended not only for storing fish for winter fishing.
One or two side compartments are sewn into the design of a homemade bag made of rubberized fabric for carrying a fishing rod and a hook from a tube or other structure separately from the fish. That is, everything is provided so that during winter fishing, without a box or backpack, we can walk along the old holes.
You can get acquainted with the appearance of a homemade bag by watching a video called Homemade fishing pouch made of rubberized fabric.
To make a waterproof rubberized bag with your own hands, the topic contains patterns for a soft container.
How to sew a fishing bag
You can sew a canvas bag for storing and carrying your fish catch while fishing.
A bag hung over the shoulder during summer fishing allows the fisherman to leave the backpack in the trunk of the car and go along the pond to try his luck on a spinning hunt.
A bag for fishing, or rather, for storing and transporting a fish catch, is made of thick tarpaulin that allows air to pass through freely, which protects the fish from quick spoilage when fishing in open water.
After fishing, fish packed with sedge and nettles in a homemade canvas bag can be taken home, if not alive, then fresh, even if the journey from the shore to the kitchen table lasts 3-4 hours. When storing fish in a hand-sewn bag for several hours, you don’t need to salt it.
At the same time, a fairly thick tarpaulin, from which the bag is sewn with your own hands, prevents mucus from leaking from the fish carcass, which means that your clothes will not be damaged by it while fishing.
Everything you need to sew a bag for summer fishing is presented in the photo. The dimensions of the homemade product are arbitrary. The dimensions of my bag are quite large (35x30x10 cm). For fishing, folded into a half ring, it can accommodate a pike weighing up to 4-5 kilograms or pieces of 5-6 kilogram pinches.
You can sew a fishing bag with your own hands from scraps of tarpaulin. From relatively small pieces of material, a front side, two sides, a bottom and a back wall, ending with a cap and a buttonhole, were cut out for it.
If you have a large piece of tarpaulin, then it is easier to sew a fishing bag if the front side, bottom and back wall of a homemade fabric pouch are cut out in the form of one strip of tarpaulin, to which two sides should be sewn.
All seams of a homemade fishing bag with a single fold of material are sewn on a sewing machine. It is advisable to overcast the cut elements with thread before sewing them along the edge of the material.
We create a stylish bag “The Sea is Calling” with our own hands
I hear that whisper of the surf again. Who am I, where is my heart? Only water knows. What should I do? I don’t understand what’s wrong with me. But the sea is calling me again. It's like I'm his wave...
If the sea is also calling you or you like to create original things with your own hands, I bring to your attention my first master class dedicated to sewing a textile beach bag “The Sea is Calling”. I tried to present all the stages in detail so that everyone could sew a beach bag for themselves according to their own design.
I wish you pleasant viewing! Let's begin.
To sew this bag (40 cm wide and 35 cm high) you will need:
- 2 pieces made of denim (No. 1 and No. 2), size 42cm x 28 cm and 42cm x 21 cm respectively;
- denim pocket, 4 denim belt loops;
- 4 pieces of white fabric (linen, cotton), the following sizes:
- 42 cm x 28 cm - external part of the bag (No. 3);
- 42 cm x 21 cm - external part of the bag (No. 4);
— 42 cm x 72 cm — inner part of the bag (lining No. 5);
— 25 cm x 20 cm — internal part of the bag (internal pocket No. 6);
- 2 pieces of checkered fabric, size 146 cm x 8 cm (bag handles No. 7 and No. 8);
- white and orange threads;
- acrylic paints (or markers) on fabric;
- tools: sewing machine, scissors, pencil, ruler, iron, file (or plastic folder);
- the desire to make an exclusive thing with your own hands!
Note.
All parts already include seam allowances (1 cm on each side of the part).
Step 1. Sew handles for the beach bag.
Since the handles in this model go through the entire bag and are sewn into the bottom seam of the bag, we will need two strips of fabric 146 cm long. You can make the handles shorter by securing them at the top of the bag, and sew denim belt loops over the place where the handles are attached as decorative elements . The length of the handles in this case will be 65 cm. The width of the finished handles of this bag is 3 cm.
- iron the fabric on each edge so as to bend the allowances (1 cm each);
- fold the strip of fabric in half lengthwise and iron it again;
- we sew a line along the strip of fabric along the edge, sewing both halves together. The handles are ready.
Step 2. Sew the outer part of the beach bag. We sew a large piece (No. 3) of white fabric with a smaller piece of denim fabric (No. 2) as shown in photo 1. On the front side of the fabric, we lay a second line at the junction of the denim and white fragments (along the white part).
Sew a smaller piece (No. 4) made of white fabric with a larger piece made of denim (No. 1). Along the front side of the canvas we sew a line in the same way. We sew a denim pocket onto the denim part of the fabric. IMPORTANT: stitch twice, securing the upper corners of the pocket. This is what we should get:
On both received fabrics we sew two denim belt loops (through which the handles will pass), having previously determined the location of the handles on the bag. In this case, the distance from the top edge of the fabric to the belt loops is 8 cm, the distance between the belt loops is 15 cm. We pass the handles through the belt loops. We arrange them in such a way that the handles meet each other in the bottom seam of the bag. Pin or baste.
We baste both fabrics along the bottom edge (the bottom edge of the denim parts), having first folded both fabrics facing each other and inserting the ends of the bag handles into the seam.
We sew on the handles, laying lines up to the belt loops. We fold the fabric face to face and sew down the sides of the bag.
We form the bottom of the bag: fold the resulting blank so that the side seams coincide with each other and coincide with the bottom seam of the bottom of the bag (photo 6).
We measure 5 cm from the corner upward and lay a horizontal line so that its length is 10 cm (photo 7). This is the width of our bag. We repeat a similar operation on the other side. We cut off the stitched corners, departing 1 cm from the line (photos 8 and 9).
Step 3. Sew the inside of the bag (lining).
We sew a pocket on one side of the inside of the bag made of white cotton fabric. IMPORTANT: we secure the upper corners of the pocket with an additional stitch as shown in photo 11.
Fold the fabric in half (pocket inside) and stitch on both sides (side seams).
We form the bottom in the same way as the outer part of the bag: we fold the workpiece so that the side seams and the fold of the bottom coincide. We measure up from the corner 5 cm, lay a horizontal line 10 cm long, cut off the corners.
Step 4. Connect the outer part of the bag with the lining.
- turn the outer part of the bag right side out (seams inward), turn the lining inside out (seams outward, pocket inward);
- insert the bag into the lining, matching the side seams. We pin or sweep away;
- We place the workpiece under the machine foot so that there is a layer of bag at the top, and a layer of lining towards the conveyor.
- we sew both parts (external and internal), without finishing 6-8 cm to the end of the seam. We will need this hole to turn the bag inside out;
- turn the bag inside out through the hole left, sew up the hole;
- insert and straighten the lining inside the bag;
- iron the top of the bag (the fold line and the seam between the bag and the lining). You can additionally stitch along the top edge of the bag.
Step 5. Decorate the bag.
Select a drawing. On the back side of the canvas (inside the bag) we attach a file (or any flat plastic object - a folder, a plastic napkin for hot food, etc. I use a sheet of transparent plexiglass - it is thin, but at the same time hard).
Using acrylic paints (or markers) on the fabric, we make a drawing. IMPORTANT: take a small amount of paint onto the brush and do not dilute the paint on the fabric with water! Fabric tends to absorb moisture, so paints diluted with water will simply “float” along the threads of the fabric in different directions and the design will be smeared. Let the paint dry completely (from 8 to 24 hours) and use an iron to fix the paint by ironing the design through the fabric for 4-5 minutes. Select the temperature setting of the iron in accordance with the material from which the bag is made. In this case, the beach bag is made of natural materials (linen, 100% cotton), and therefore the temperature regime is maximum. We perform thermal fixing of the pattern without the use of steam!
Note. It is more convenient to make the drawing at the stage of manufacturing the outer part of the bag, before sewing the side seams (after placing a file under the fabric). Thermal fixing of the pattern can be done after sewing the bag.
As a result, we get such a stylish beach bag!
If you are more comfortable holding a needle in your hands than a tassel, you can decorate your beach bag with embroidery, beads or buttons. You can glue shells, transfer a thermal transfer image to a bag, or hang such funny fish on the handles 
Thank you for your attention, I wish you all a great holiday with your new beach bag!
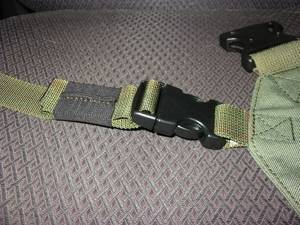
Fish storage bag strap and buckle
The belt and buckle to the side wedges of the bag, as far as I remember, were sewn from an old gas mask case. And the homemade canvas bag itself for storing and carrying fish while fishing is very similar in appearance to a different case, only larger in size.
Instead of a branded belt, you can sew a wide braid to the side walls of a homemade bag. To adjust the length of the belt while fishing, sew a buckle into the braid. Both are sold in stores. For a waterproof pouch made of rubberized fabric, the buckle is made by hand - cut out of duralumin 2 mm thick.
It is better to sew the buckle that regulates the length of the bag belt on the side rather than on the top. Then the metal will not rub off the impregnation of the jacket on your shoulder, both during fishing and when moving with a catch of fish along the pond.
If some of the fishermen don’t really like carrying boxes with spoons and other small fishing gear in their jacket pockets while fishing, then you can sew an outer pocket on the front side of the canvas bag, and sew a zipper on top of it.
You can sew such a homemade container with your own hands and without a sewing machine using the same technology that a bag for storing fish in the winter is sewn. It is shown in the photograph in the following article.
Under the pocket of a waterproof bag made of rubberized fabric, the picture shows a very convenient detacher for spinners and jigs.
If you seriously think that sewing a homemade pouch from rubberized fabric will take too much time, then it means that you have never had the opportunity to sew with your own hands (by hand) with many pockets of a canvas backpack.
Useful tips
Recommendations from professionals are always useful:
- You can cut the fabric with a special soldering iron, in which case the edges will melt and will not fray;
- to get a backpack with a volume of 75 liters, reduce the main part on all sides and the height of the back by 10 cm, and the length of the tube part by 20 cm;
- shoulder straps are placed at a distance of 50 cm from the bottom for height 170 - 180 cm, for greater height - 55 cm and for shorter height - 45 cm;
- It is better to sew with strong nylon threads;
- To make the seams stronger, it is better to sew with a zigzag or double seam.
Patterns can be improved individually.
For example, increase or decrease the size and number of pockets. A backpack sewn by yourself will become an indispensable companion on any hike. Subscribe to our Social networks
How to darn woolen socks by hand?
Sleeveless vest made of thick yarn knitted for women
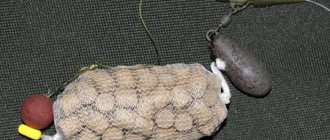
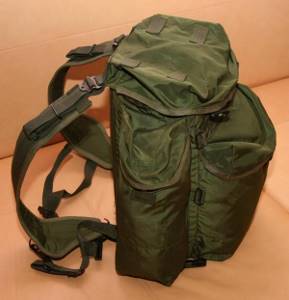
Waterproof DIY Fish Bag
A waterproof homemade bag for storing and carrying fish while fishing, hand-sewn from rubberized fabric.
It takes 3-4 hours to sew a soft container from a waterproof material and install a pair of locking buttons.
If you have a little free time, you simply need to sew a similar waterproof bag for winter fishing for your own convenience.
The details of the hand-sewn pouch can be seen when watching the video on my YouTube channel. The link is located at the bottom of each page of the site.
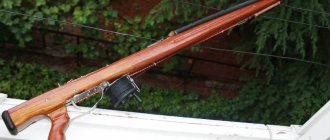
Personally, I constantly use the homemade pouch shown in the photo on every winter fishing trip, when I leave the drill, backpack and plastic trough alone to get bored while I go around the old holes. Then all the last fish caught is stored in a waterproof bag thrown over the shoulder.
At the same time, both hands remain free and my jacket does not get dirty. And the weight of a small catch of freshly caught fish practically does not wear through the material on the shoulder of a jacket that is still waterproof and not old.
You will laugh now, but for my birthday my relatives once gave me a rather expensive fishing winter suit. So, in order for the waterproof properties of the material to last longer on the shoulders of the new jacket, I specially sewed a fishing bag with a soft wide braid, which I advertise in this topic.
Waterproof fish catch bag
If you use the pattern sizes suggested below, then your waterproof container made of rubberized fabric will contain about 3 kilograms of medium-sized, unfrozen fish. A larger catch of small fish can fit in a homemade fishing bag, since the carcasses fit more tightly.
In frosty weather, thanks to a waterproof bag made of rubberized fabric, more fish will fit into your fishing box, since they will get there in an extended state, first freezing in the limited space of the fishing bag.
Plus, you don't have to collect fish from the snow from each hole. You will immediately send it from the hook of a spinner or jig straight into the cavity of a homemade fishing bag. And this is a direct saving of time during a short winter day.
A homemade waterproof bag won’t hurt when fishing on the first ice, when you have to move over shallows. Then you can approach the fishing spot on pre-drilled holes absolutely silently without a rattling winter fishing box or trough.
On the side wall of the cavity of my waterproof bag, made of rubberized fabric, there is a pocket sewn into it, into which a winter fishing rod with an unhooking fit is placed.
Homemade fish bag
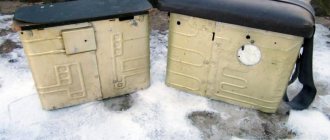
A homemade waterproof bag for storing and carrying fish when fishing is shown in the photos.
You can estimate the dimensions of the soft container “live” against the background of an ice fishing box, which, by the way, is also homemade.
Below are the dimensions of the segments of the homemade waterproof bag patterns, which can be changed by you.
I just want to warn you: the article presents a sketch, and not a drawing of a homemade bag for carrying fish while fishing.
Therefore, when cutting the elements of a waterproof fishing bag, you should refer to the dimensions indicated in centimeters, which are given taking into account the width of the seams.
My handmade waterproof bag has a pocket sewn on it for carrying a fishing rod for winter fishing. On yours there may be two compartments or none at all.
Necessary materials
Fabrics
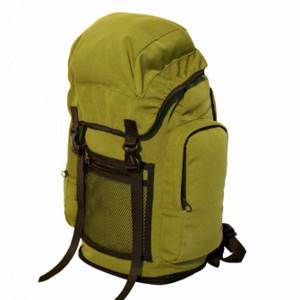
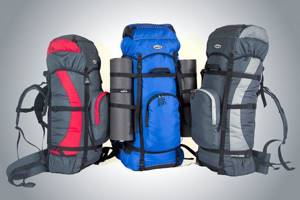
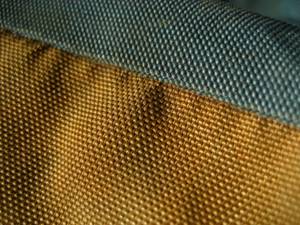
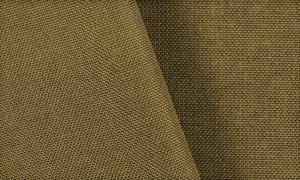
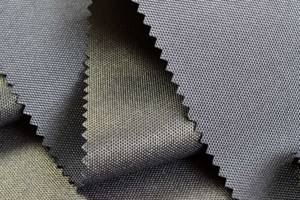
It is important that the hiking backpack is durable and waterproof. Therefore, the choice of fabric is approached with special attention. The following materials are suitable for its manufacture:
- avisent - was developed for the army and has the appropriate characteristics: durable, lightweight, inexpensive, withstands low temperatures, allows water to pass through, frays when cut;
- cordura - also invented for the army: available in different densities, water-repellent, does not crumble, expensive, heavy, does not tolerate low temperatures;
- oxford - a fabric with a matting weave and nylon content: light, inexpensive, heat-resistant (does not lose properties from -50 to +110 degrees C), waterproof, fades when exposed to direct sunlight;
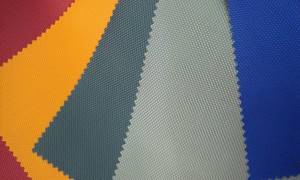
- polyester - for greater strength and moisture resistance, it is treated with polyvinyl chloride: cheap, lightweight, does not change properties in frost and sun, does not deform, does not crumble, does not withstand heavy loads, does not protect from moisture.
Advice! When choosing a material, you should take into account the planned loads and conditions of use.
Accessories and additional materials
For practicality, you will additionally need:
- thin nylon (with a width of 150 cm) - 70 cm;
- Isolon (foam) 10 mm thick - 1 sq. m.;
- sling 25 mm - 7 m;
- sling 45 mm - 2 m;
- fastex 25 mm - 2 pcs.;
- fastex 45 mm - 1 pc.;
- tightening buckle - 14 pcs.;
- stop clamp - 1 pc.;
- zipper 30 cm - 1 pc.;
- zippers 20 cm - according to the number of pockets;
- aluminum tubes for frame D4, length 70 cm - 2 pcs.;
- cord D3 - 1.3 m;13. tape for finishing seams - 2 m.
Pouch for winter fishing - patterns
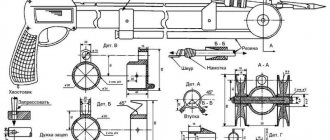
Patterns of a homemade pouch for winter fishing, sewn from rubberized waterproof fabric, are presented in the sketch drawing.
In the simplest version, three patterns are enough for sewing a pouch: the middle part-A and two side walls-B.
If you want to carry fishing rods separately from the mucus-covered fish you catch during winter fishing, then when sewing a pouch you will need one or two more patterns-B.
Sewn to the sides of a waterproof pouch, they are pockets designed to carry a cutter, a pair of fishing rods and a small box of jigs or lures.
First, let's look at all the pattern elements of a homemade pouch for winter fishing indicated in the drawing. And then we’ll figure out how you can sew a soft container used for fishing with your own hands.
A vertically elongated large rectangle “A” with an orange perimeter outline belongs to the pattern of the front side, bottom and back wall of the future homemade waterproof pouch.
These three components of an ice fishing bag are cut into one strip of waterproof rubberized fabric. Although you can sew them with your own hands from three composite strips. Just like the canvas pouch shown at the beginning of the page is sewn.
The pattern under the letter “B” with dimensions 8x12x24 centimeters belongs to one of the sides of the fishing pouch. You should have one or two such patterns (according to the number of pockets). At the bottom, the corners of the pattern are slightly rounded, which is not at all necessary.
Pockets of a waterproof homemade pouch
Superimposed on the pattern for the side of a homemade pouch is a sketch of a pocket pattern (a dark burgundy outline), which has the same length as the side wall, but the width should be greater by the height of the two sides of the pocket.
The sides of the pockets on my waterproof pouch are approximately two centimeters, which is indicated in the sketch. But in the finished (sewn) form, with the same length of the patterns of the side walls and pockets - the latter on the sewn pouch will be a little shorter.
This will happen because part of the length of the pockets intended for carrying gear during winter fishing will be spent on forming (bending) the bottom planes. So you have several options here.
Or initially decide: let the pocket on the bag be a couple of centimeters shorter than the side wall of the waterproof pouch. In this case, the cavity of the cut pocket is sewn two centimeters above the bottom of the homemade pouch, as I did.
Personally, this height is enough for me to carry the necessary gear and small fish for winter fishing. To catch pike and pike perch while fishing in winter, I take a waterproof pouch (also hand-sewn) made of larger rubberized fabric when fishing, or I do without it altogether, putting the large fish I catch in a backpack.
If you are fishing for a perch on winter fishing with tackle with a removable reel, which takes up a relatively large amount of space, then lengthen the size of the pockets to the bottom of the pouch, and raise the sides to 3 centimeters.
Rectangular homemade fish tank
Rectangular homemade products are very popular, and they are not at all difficult to assemble with your own hands. To do this you will need the following materials and tools:
- Metal wire in an aluminum sheath that prevents the development of rust.
- Garden mesh - you can use an option that is used to protect bushes with fruits from birds or rodents. This mesh has small cells and is also very durable, making it great for homemade cages. The size of the mesh is determined by the size of the cage, but in the best case they should be 3 by 3 meters.
- Additional tools include scissors, pliers, matches or a lighter, nylon thread and a marker.
To make a rectangular cage, you must follow the following step-by-step instructions:
- The homemade product will be 3 meters long with a distance of 50 centimeters between the rings.
- The created rings must be threaded through the mesh cells so that the ends of the wire are inside, and tightly wrapped or soldered
- A mesh is used to wrap the bottom ring. Make a drawstring from the mesh, securing the last piece of wire in it with nylon thread. Then you should turn the fish tank inside out and stitch the bottom ring again.
- You can use any available materials as fastening; even an unused fishing rod elbow will do. In this case, it is enough to insert the fastener into the pre-bent excess section on the upper ring. That's all, the homemade fishing accessory can be considered ready.
How to sew a pouch for fishing
The process of sewing a waterproof pouch for fishing is generally discussed below, but if your homemade product will have pockets, you should first form a configuration of pockets for carrying gear for winter fishing and sew them into the side cavities of the pouch.
The width of the bottom edge of the pocket (at the base of the trapezoid) should be equal to the width of the side of the fishing pouch, to which should be added twice the height of the sides of the pocket. Total: 2x2+12=16 centimeters.
We place the pocket pattern on the table WRONG UP, fold the fabric at the bottom by 2 centimeters along the entire length of the border strip. See the sketch of the side wall of a homemade fishing pouch in position “B1”.
Next, the folded corners of the pocket on both sides are sewn by hand diagonally. So, as shown in sketch “B1” with two thick dotted lines. As a result, we get a hem at the bottom of the pocket of a waterproof pouch, shown in the drawing as a thin horizontal line.
The angle between the stitching and the base of the trapezoid (bottom of the pattern) of the side of the fishing pouch should be 45-60 degrees. On my pouch, which I constantly take for winter fishing, the seam is sewn at an angle closer to 60 degrees.
By the way, what is striking in the drawing is that the width of the bottom of the pockets is greater than that of the side walls. Here 1 centimeter of rubberized fabric is left for the inner hem.
Before you start sewing the elements of the waterproof pouch, be sure to make this hem of the rubberized fabric and secure it with several large stitches. On a fully sewn pouch, the threads can be pulled out.
To sew together individual patterns of a fishing bag made of rubberized fabric, I used a large needle and thick paraffin threads. After regularly using the hand-sewn pouch for winter fishing for more than two decades, not a single seam has come apart.
If you don’t have paraffin threads to sew a fishing pouch, make them yourself. To do this, melt a piece of candle in a canned food jar and dip a coil of raw cotton thread into the melted stearin. Then remove them from the jar, cool, knead and thread a needle with a large eye.
Fabric calculation
The simplest and most accurate method for calculating fabric is to lay out the layout on graph paper using a scale (cutting) ruler. This way you can calculate the required amount of material as accurately as possible.
In this case, you will need 2 m of fabric with a width of 150 cm.
Important! Sewing such a product will require at least 3 square meters. m. of base material.
Sewing fishing pouch patterns
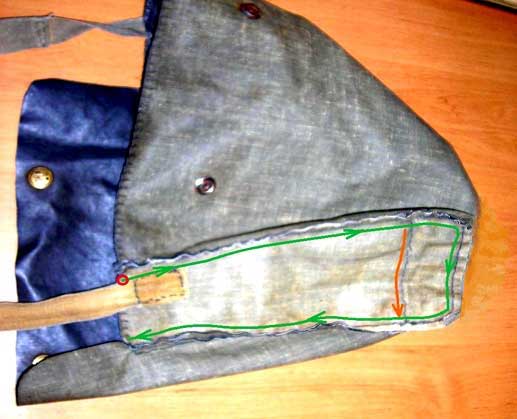
The technique for sewing a pocket pattern and a side wall to the edge of the cavity of a fishing waterproof pouch with your own hands is shown in the photograph.
First, we sew together the above-mentioned pattern elements along one side wall of a homemade fishing pouch. then on the other. In the photo, the seam is shown with a green line. The red dot indicates the beginning of the seam. Although it will not be possible to sew the patterns differently without distorting the finished pouch. And don’t forget about hemming the pocket bottom patterns.
Finally, we sew the folded bottoms of the pockets on both sides of the homemade fishing pouch to the side walls. On one side, this seam is shown in the photograph with an orange line.
Our waterproof fishing pouch, sewn from patterns, is almost ready for use on winter fishing, but for those fishermen who are doing sewing for the first time, I will describe some of the nuances of sewing the segments of the pouch in detail.
Sewing a bag from rubberized fabric
It is better (stronger) to sew all the seams of a bag made of rubberized fabric using two lines.
First, run a row of stitches along the length of the stitched surface of the pouch, say, with stitches 5 mm long. The distance between stitches should also be 5 mm.
Then sew another line of thread through the rubberized waterproof fabric, the stitches of which should lie in the gaps between the stitches of the first line already sewn.
As a result of such sewing, you will get a seam similar to the one that is sewn into the fabric by a sewing machine, which with a large margin will withstand the weight of the fish catch in your rubberized bag while fishing.
Choose the location for the buttons on the valve and on the front wall of your fishing bag yourself. Instructions for their installation, as well as auxiliary devices for flaring buttons, are included in the kit packages.
For strength, I recommend sewing a homemade fishing bag along the top edge with an overcast stitch, which will increase the strength of the rubberized fabric along the edges of the rubberized fabric patterns.
You have already read the recommendations for choosing a belt or braid and buckle for a hand-sewn fishing bag from rubberized or canvas fabric at the beginning of the page.