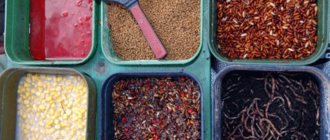
Features of salting and drying fish using a dryer
When preparing the resulting catch, you must remember the recommendations that allow you to properly dry and salt the fish:
- For a piquant taste, it is better to add several dozen black peppercorns and crushed bay leaves to the salt;
- To enhance the taste, some salt is mixed with sugar, the ratio should be 3:1;
- To prevent the fish from spoiling, it is better to gut it before salting or drying;
- Dried fish is very attractive to flies; to prevent their appearance, it is necessary to make special insect traps.
Let's celebrate! By following all the recommendations for drying and salting, you can end up with a delicious fish that you won’t be able to tear yourself away from.
Features of drying devices
To ensure the above conditions and the desired result, a homemade drying unit must meet certain technical requirements:
- the temperature inside it should be maintained at no more than 70°C, this will ensure maximum dehydration, but will not allow overdrying;
- The volume of the chamber should be calculated not only from the number of products intended for preparation, it is necessary to take into account part of the space for free air circulation <;
- the design of the device should allow you to adjust the drying time; if you assemble it yourself, this can be achieved by simply moving the baking sheets closer to the source of heat or air flow.
If necessary and if possible, the device can be equipped with heaters and thermostats, electric fans, and other equipment that will make its use more efficient and comfortable.
Types of dryers
Of course, the most inexpensive option for a dehydrator is an ordinary clothesline on which fish is strung and placed somewhere under a roof or on a balcony. Despite its simplicity, this option does not exclude infection of the fish during the drying process by the larvae of various insects, as well as from lingering flies.
Therefore, the most practical and reliable food dryers are always designed with walls that protect food from flies, other insects and pollution from the street, but somehow promote free air circulation. Dryers for fish or meat come in different designs:
- Hanging
- Collapsible
- Stationary
- With fan
Hanging dryers differ from stationary ones in that, in accordance with their name, they are suspended from the wall, thanks to which their height and position can be adjusted, which is convenient when choosing the most favorable location based on the amount of sun or wind. Collapsible dryers are very convenient because they can be disassembled for compact storage when not in use. In addition, they are mobile, and during a long fishing trip the catch can be immediately placed in a dryer right on the shore of the reservoir.
All of these dryers are designed to dry fish outdoors. What to do if this is not possible, or if the fish needs to be dehydrated in winter? In this case, a meat and fish dryer with a fan will help, which is quite easy to do with your own hands.
Convective
In this option, drying occurs with a directed flow of heated air. The design provides a shadow that can be located above, below or in a horizontal plane.
The easiest way to make such a device is to assemble a chamber, install a heater and a fan heater in it. However, the quality of processing becomes a victim of design simplicity. The fruits are dried from the outside, retaining moisture in the core.
They are not suitable for long-term storage because they quickly become moldy and pose a risk of botulism infection.
This disadvantage can be minimized by longer drying times, but this leads to the loss of a significant part of the beneficial properties and increases energy consumption.
Infrared
These devices use infrared radiation, the effect of which is as close as possible to that of the sun. The effect occurs more evenly, vitamins and microelements are better preserved. Drying results are better suited for long shelf life.
It is more difficult to assemble such a device; you will have to select a suitable infrared emitter and choose a scheme for its correct placement.
Dehydrator
Translated into human language, installations of this type are called a dehydrator. The design of these devices is designed for maximum moisture removal. Despite the fact that the same term is often used to refer to conventional dryers, the difference between them lies in the presence of a thermostat that controls the temperature.
Thanks to such design improvements, drying occurs under optimal conditions in a tolerably short time. This device is better than others for drying beef, pork or fish .
Result: maximum free from moisture, evenly dried, able to retain consumer properties until the next harvest and longer.
But to assemble a dehydrator with your own hands, you cannot do it with improvised means; you will need additional equipment.
Electric
To assemble the electric version, you do not have to assemble the cabinet from scratch. An old cabinet or small cabinet of sufficient size will do just fine. Some craftsmen adapt old refrigerators for these purposes. Let's consider the option from a cabinet, as the simplest in terms of labor costs.
- Depending on the location of the fan, the upper or lower plane of the bedside table must be equipped with holes; the more such holes, the better the circulation of air flows. If its fixation is provided on the back side, ventilation holes are made in the door.
- In the next step, we line the walls with material that will maintain the temperature regime.
- Then, on the inside, we attach the guides on which the trays will be located. We assemble the latter from slats and sew them up with mosquito netting.
- On the back side we cut out a hole with a diameter for a fan heater or a couple of holes for incandescent lamps. If an infrared heat source is expected, we cover the back wall with a film prepared in advance. We bring the cord for power supply outside.
- To turn a regular dryer into a dehydrator, add a thermostat to the circuit and take the control elements outside.
- You can close the improvised dryer with an old door; if it doesn’t exist or it doesn’t fit, we assemble a simple frame and cover it with plywood with a large number of holes. Don't forget to install a latch or hook to prevent the door from opening during operation.
- After this, all that remains is to place the assembled trays inside the chamber and the apparatus can be considered ready for testing.
As you can see, in order to build a dryer with your own hands you don’t need to make any special efforts, and there are many benefits from this device. You can make a dryer yourself from scrap materials without spending a lot of money. Use our tips and instructions and enjoy your vitamins at any time of the year.
Dry salting of small fish
For dry salting of small fish at home, spread a clean cloth on the table, place the fish on it in rows, head to tail, so that the back of one fish rests on the belly of the neighboring one.
As objects for dry salting, select from your fresh catch the smallest fish with a flat carcass structure - bream, silver bream, white-eye, roach, rudd - weighing up to 200-250 grams.
The best sea fish for dry salting are thawed herring, flounder, halibut, and tilapia. Here are the names of the fish that I had to dry-salt myself. True, the salting of carcasses may not necessarily be dry.
During the laying process for home salting, sprinkle each layer of small fish with salt. When you have finished salting all the cooked fish, fold the edges of the cloth. Press the board on top of the carcass and press down with heavy pressure. But keep in mind that the juice released during dry salting of fish, seeping through the fabric of the linen, will flow out.
A sign that dry-salted small fish is ready is the cessation of juice (tissue fluid) secretion, a hard back of the carcass and a pale eye color.
Salted small fish, after rinsing or soaking in water and then drying, is ready to be served or stored at home in the refrigerator.
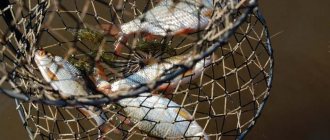
Where to buy a fish dryer and at what price?
A fish dryer is an essential device for a fisherman. It can be purchased:
- in a specialized fishing store;
- hardware store;
- in online stores;
- in sporting goods stores in the fishing department.
The device protects fish from insects thanks to a special mesh that can be fastened with a sewn-in zipper. The dryer is made from durable, high quality materials.
There are several types of industrial dryers:
- On stretch marks;
- On the frame;
- Rectangular;
- Single-tier;
- Multi-tiered.
The cost of fish dryers varies, it all depends on what material it is made of:
- 300-600 rubles (the basis of such devices is a dense mosquito net, which is stretched over a frame made of light metals, quite convenient to use, you can easily take it with you fishing);
- 700-1500 rubles (the device has several tiers and chains, holds a large amount of catch);
- From 1500 and above (the dryer frame is made of durable heavy metals, steel is mainly used, it is not mobile).
When choosing a dryer in a store, you need to weigh all the advantages of each model, and then choose the device for yourself.
Storing dry salted fish
For long-term storage at home, rinse dry-salted small fish in clean brine and place in the barrel (box) in which you intend to store it. The container must be clean and durable.
When laying the salted fish, press it with your hands or a heavy object, such as a weight, placing a wooden circle under the weight so as not to damage the surface of the carcasses.
Dry salted fish will not emit a specific odor if, when stored in a barrel or wooden box, the rows of fish are covered with nettles.
Seal dry-salted small fish tightly packed in a barrel with a lid (second bottom) and place in a cool or very cold place for storage. Any home-salted fish can be stored this way for several months.
Deciding on the sizes
To load and unload your catch with maximum comfort, you should correctly determine the dimensions of the dryer. The best options would be the following dimensions:
- height indicator - about 120 cm;
- length – 100 cm;
- width – 75 cm.
In this case, the dryer will be spacious and will have at least three levels. Each level should be equipped with three metal rods, which will allow the catch to be suspended. A drying chamber with the indicated dimensions allows you to dry 80-100 crucian carp (weighing about 300-400 grams each) at a time.
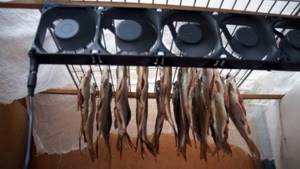
DIY fish dryer with fan
Why do you need a fan in a dryer? I repeat for readers who started reviewing the article from this point. If you do not have the conditions for normal ventilation in the dryer or you dry fish or meat on the balcony in winter, then a fan is simply necessary. A small fan greatly increases the process of product dehydration by constantly recirculating air in the dryer. Let's not pull the cat by the tail, and we'll tell you how to install a fan in a fish and meat dryer.
STEP 1: select a fan . Through many different tests, we found that the most optimal would be to use a cooling fan from a personal computer. Such fans consume very little electricity and have high efficiency. Although the fan is small in size, it will provide sufficient airflow to dehydrate fish and meat.
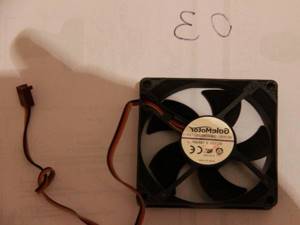
STEP 2: site preparation . To install an electric fan in your dryer, you do not need to cut any holes in the mesh. If this is done, insects may enter through the fan and ruin all the products. We install the fan inside the fish dryer on wooden slats. To do this, you can use hot glue or secure it in some other way.
STEP 3: installation and connection of the fan . We install an electric fan in the upper corner of the dryer so that the air flow is directed towards the area where the products will be located. We apply hot glue to both sides of the fan and lean it against the wooden planks. You need to hold it until the glue hardens (1-2 minutes). To fix the fan more securely, you can attach 1 more wooden strip to the bottom of the fan. Connecting such a fan is very simple. You just need to connect it through a special 12 V voltage converter. This is the operating voltage of this type of fan.
In this simple way we figured out how to make a dryer with a fan. If you already have a conventional dryer, then converting it will not cause any difficulty and will not take much time. A dehydrator of this kind will never be superfluous in the household of a real hunter and fisherman. But, if you don’t want to bother too much, you can make a very ordinary fish dryer in 10 minutes. Interested!? Then we will now tell you how to do it.
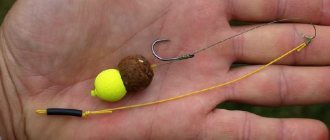
Pressure for dry salting of fish
In the initial stage of dry salting, moisture begins to be abundantly released from the fish, squeezed out by heavy oppression (weight), which, together with salt, forms a concentrated salt solution.
More precisely, the brine during dry salting should be obtained by extracting moisture from the fish with salt while squeezing the latter out under pressure. For this reason, very stringent requirements are imposed on the quality of salt used in dry salting of fish.
The salt should only be coarsely ground with the lowest moisture content, which, before using for dry salting, it is advisable to first dry it on a baking sheet in the oven.
The weight of the oppression is selected in such a way that the load can push through the entire mass of the fish and squeeze out air from it, which promotes the development of putrefactive bacteria in the fish.
In order for the dry salting process to proceed faster, it is advisable to use a pressure heavier than the weight of the entire mass of fish under the load.
Only flat forms (surfaces) made of wood, stainless steel, and porcelain are used as covers for pressure during any, including dry salting of fish.
Wooden lids made of linden or aspen, which do not emit resinous or tannin substances and are less deformed under the weight of oppression, are best suited for these purposes.
When dry and quickly salting fish, you should not use lids made of plywood, since when it delaminates, it releases toxic substances along with the glue.
The home pickling process itself is very simple. Part of the dry coarse salt is generously sprinkled on the bottom of the container and then each layer of fish is sprinkled equally generously with salt.
And you should pay attention to the evenness of the carcasses in the box, which for dry salting are usually laid using the “head of one fish to the tail of another” method. A wooden plank is placed on top, which is pressed down with a load of oppression.
When fishing, a wooden box and a board are brought with you in the trunk of the car. Several stones (cobblestones) or a bag filled with wet sand are used as oppression.
And the most important thing. When dry salting fish, the brine should flow out of the container used for salting. As a rule, for these purposes, quite a lot of small diameter holes are drilled in the bottom of the box. Some of the moisture will seep through the side slots of the box.
The picture below the title of the article shows a large fish salted by dry salting in a wooden box in its entirety, which can be brought to a salted condition in another home-made way.
Modification with fan and thermostat
To make a solar dryer with a fan and thermostat, you should prepare the following materials:
- glass or plastic;
- plywood;
- corners, bars, slats;
- wheels with a diameter of 40-80 mm (for ease of moving the unit);
- aluminum sheet;
- small fan (diameter 120 mm, 12 V);
- thermostat;
- voltage stabilizer with KR142EN8B microcircuit;
- 12 V solar battery;
- mosquito net.
For ease of assembly, you should be guided by the drawing indicating the dimensions of the product parts, which is presented below.
The first step is to assemble the body of the product from beams and plywood and seal it. Then, wheels are mounted on the bottom of the dryer. With their help, the product will easily turn towards the sun. The back door of the dryer is made of transparent material (glass or plastic).
If you follow the dimensions suggested in the drawing, then 7 pallets can be installed in this dryer at a distance of 7 cm from each other. For this purpose, wooden slats are mounted in the body. It is appropriate to make pallets for such a design from mesh material and support slats.
A black painted aluminum sheet is installed on the manifold. A fan is mounted in the upper part of the box and, in accordance with the diagram, an electrical circuit is assembled from a fan, a solar battery, a voltage stabilizer and a thermostat.
When connecting the elements of the electrical circuit, you should be guided by the diagram below.
To increase the performance of the assembled solar-powered dehydrator, it must be placed so that the collector and battery are facing the sun's rays.
Balykov dry salted fish
Balykov dry salting is used for salting fish weighing over a kilogram: catfish, large perch, ide and others, including red sea fish.
For balyk salting, wash and gut the fish. Cut off the head and tail.
Using scissors, cut off the belly part a couple of centimeters below the side line of the fish. (see photo). Dry the carcass with a towel.
For balyk dry salting of asp and bream, you can leave the head on the fish, but be sure to cut out the gills.
If the prepared fish carcass weighs more than 2 kg, then cut it along the spine from the inside, without cutting the skin on the back.
Prepare balykov dry salting mixture: mix 10 tablespoons of salt with 4 tablespoons of sugar. Add a pinch of ground cinnamon, coriander, pepper (to taste).
Rub the mixture into the scales, sprinkle it generously on the inside of the belly, and if the fish is layered, then between the layers.
Wrap each balyk carcass in canvas and tie it tightly along its entire length with twine. Place the fish in the refrigerator for 7-10 days to salt.
Drain the brine as it appears. After balyk salting, remove the fish from the cloth, rinse with cold water, and wipe dry.
Dry salted balyk fish can be stored in the refrigerator for a long time if it is periodically rubbed with vegetable oil.
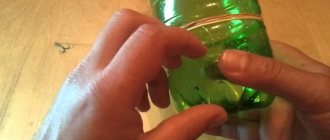
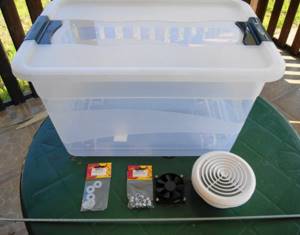
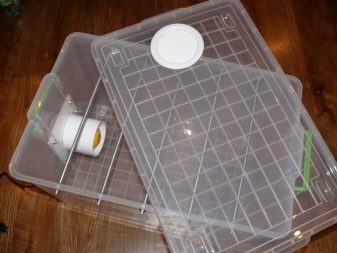
Dryer made from plastic boxes
We select plastic boxes of any size and shape. Considering the poor air flow capacity of plastic, care must be taken to provide the chamber with an exhaust hood.
During production you cannot do without the following materials and tools:
- plastic corners (duralumin type);
- adhesive base (liquid nails);
- fasteners (bolts);
- screwdriver and jigsaw.
The main advantage of the plastic design is ease of assembly and operation. In addition, the structure can be disassembled, so keeping it clean will not be difficult.
Considering the poor air flow capacity of plastic, care must be taken to provide the chamber with an exhaust hood
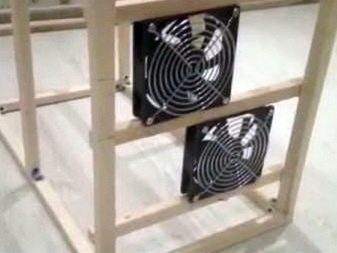
Fish dryer (collapsible)
Materials:
- grilles for floor fans – 3 pieces;
- wire;
- computer fan (cooler) – 2 pieces;
- power supply from the computer - one piece.
Making a homemade fish dryer with a fan
Our dryer will be almost no different from a simple collapsible dryer. You can start making a regular dryer from wooden slats, and then integrate a fan into it, which will help the fish or meat dry out faster. You are very lucky if you have an old dryer that is missing this very fan. You can fix this situation in 5 minutes, but we will tell you how to make a fish dryer with your own hands.
STEP 1: preparing materials . The simplest dryer design will be a rectangular cabinet with dimensions of 1500 x 500 mm and a height of 500 mm. To make it, we will need small wooden planks and a special fine mesh, which will protect the fish from attacks by insects and animals. The design will be quite small, so all connections will be permanent. We fasten all the planks using ordinary wood screws and mounting angles.
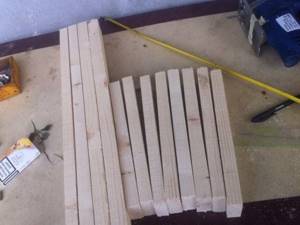
STEP 2: make the frame . To make the frame of a fish dryer with a fan, you need to prepare wooden planks. We will need:
- 4 strips 1500 mm.
- 10 strips 500 mm.
- Self-tapping screws.
- Metal corners.
- Screwdriver.
As mentioned earlier, the dimensions of the frame are 1500 x 500 x 500 mm. We assemble a frame from wooden planks. First we make the main skeleton, and then we attach additional strips to increase the rigidity of the structure of the fish dryer with our own hands. The top of the dryer must open and close to allow access to the fish. Therefore, we attach it to the simplest curtains. To close the gap between the cover and the frame, you need to stick a seal around the entire perimeter. To prevent the top cover from opening on its own, two hooks must be installed on the sides of the structure.
Dryer frame Finished dryer frame Attaching the lid
Locks on the lid
STEP 4: frame processing . To give a beautiful appearance and protect the wooden frame of the dryer from external factors. We treat the frame with stain. After the first layer has dried, you can process the frame with a sander to remove various surface roughness and unevenness. Next, apply one more, final layer. We got a cherry-colored frame.
First layer of stain Second layer of stain
STEP 4: Grid . At this stage of creating the dryer, you need to select and cut suitable pieces of mesh. When choosing a mesh for the dryer, it is worth considering the diameter of the hole. It is advisable to take the smallest one. If you need to make a dryer quickly, then ordinary gauze will do, but it is worth considering that the performance characteristics of gauze are very poor compared to mesh. And so, we should get two pieces of mesh measuring 500 x 500 mm, and four pieces measuring 1500 x 500 mm. We also cover the lower part of the dryer for meat and fish with a fine mesh.
STEP 5: Attaching the mesh . Now we need to secure the mesh to the frame of the dryer as well as possible to avoid the possible penetration of insects inside. To do this without any problems, we used wooden window beads. We cut it to size and secured the mesh around the perimeter. To do this you need to use a 25 mm nail. But, you can make it easier and secure the mesh to the frame using a stapler.
Frame with mesh
At this stage of our step-by-step instructions on how to make a fish dryer, we have an ordinary portable design. You need to make small hooks inside so that there is somewhere to attach the wire with the fish. Next, we have to introduce a small but very efficient fan into this design to improve dehydration in the product. Don't worry, you won't need to redo anything, you just need to make some modifications.
Fan dryer
Some of the dryer models made by Russian craftsmen have fans in their own structure. Air heat exchange in such dehydrators makes it possible to speed up the drying process. Such devices are created from a variety of plastic containers or something like closed cabinets through which an air flow is forced. Let's look at the production process of a simple device with a fan. For this purpose we will need:
- large-volume plastic tank - from 20 liters or more;
- vent exhaust fan;
- ventilation grille;
- steel rods with threads and corresponding nuts;
- fasteners for grille and fan.
We work in the following order:
- We make a hole in the tank lid for the ventilation grill and fix it;
- we attach the fan in a similar way to any of the side ends of the plastic box;
- in the upper segment of the tank we create holes for the rods and insert them, securing them with nuts (we will hang fish and meat in this place).
If you need to increase the ambient temperature in such a dryer, you can use electric rugs. Such products are sold in pet stores for breeding reptiles.
Dry salting of large fish
To dry salt large sea or river fish, cut the carcasses lengthwise from the back side (the head too).
To do this, first cut the rib bones on one side of the ridge and remove the entrails from the belly of the fish. Then spread the fish into two parts.
It is better to cut out the backbone of the fish, and it is also better to cut off the heads and tails if the fish is large enough for home dry salting, especially if it is not flat in shape.
When removing the abdominal contents of large fish, be careful not to damage the gallbladder. Before dry salting at home, wipe the carcass with a dry canvas cloth.
Such preparation of fish for dry salting will help save a certain amount of coarse salt, which is scarce for some. For complete happiness, the rib bones from the fish can also be removed (see photo).
As a result, we should have two large layers of fillet prepared for dry salting, suitable in the future for preparing a host of delicious fish dishes. The fish salads and appetizers alone are worth it!
Next, rub the salt under the scales of the fish. Sprinkle the inner surface of the large fish fillet generously with salt and place it, abdominal cavity up, in one row in a wooden box.
If large fish, spread out like an open book, are salted with heads and rib bones, then the carcasses are laid out in opposite directions. That is, the heads of the bottom layer of fish should be under the tails of the top row, and not head to head. With this arrangement, during dry salting, the pressure will apply equal force to the entire batch of large carcasses.
When dry salting, as with any other home salting, the largest fish is placed on the bottom. Sprinkle the top of each row generously with salt. A wooden lid with heavy pressure is placed on top of the salted fish.
Place a box with large, dry-salted rudd, roach or other river or sea fish in a hole dug in a cool place, cover the container with polyethylene on top. The juice secreted by the fish will flow out of the box through the cracks. This is the meaning of dry salting of large fish.
When dry salted, fish weighing up to half a kilogram is usually salted in 3 days, and fish weighing up to a kilogram is salted for 5 days. Larger fish will be salted for at least 10 days. As you can see, the method of dry salting fish is not the fastest.
The simplest dryer for fish and meat
If you are lazy and do not want your dryer to have a beautiful attractive appearance, but only to fulfill its purpose, then this design is just for you. To make it, you will need a perforated sheet of galvanized iron, several boards, nails and some kind of wire. Don't know how to make a dryer yourself? Well, let's start making!?
STEP 1: make a cylinder . We need to make a cylinder from our perforated galvanized sheet. We secure this cylinder with rivets. This cylinder will serve as protection against insects and animals.
STEP 2: spacers . Inside the cylinder you need to make spacers from wooden planks. They will act as a hanger on which fish or meat will hang and dry. We secure the spacers of the fish dryer with nails as shown in the photo.
STEP 3: fish hanger . And we will hang the fish on a regular wire. After the fish is placed on the wire, we hang it on spacers and fix it on nails, as shown in the photo. You need to lay a fine mesh on top and secure it with wire to the cylinder. We cover the whole thing with a lid and wait for the result.

This design can be assembled in 5 minutes, if you have all the necessary materials. This homemade dryer is designed for dehydrating products in an open space. But in winter you will not be able to use it. Therefore, building a dryer with a fan is more appropriate.
Dry salting of fish
Using dry salting at home is better (more convenient and faster) for salting fish weighing up to a kilogram or larger. For example, the bream shown in the picture.
But here there may be an asp or a large bluefish caught during summer fishing.
Total salt consumption for dry salting: from 200 to 300 grams per kilogram of fish weight.
The mechanics of dry salting, like the recipe, are simple to the point of primitiveness. True, special requirements are placed on the quality of salt, which I have recently had problems with.
Previously, high-quality coarse salt for dry salting of fish was obtained in exchange for vodka at the nearest coal boiler house. This shop is currently closed.
Therefore, instead of using dry salting when fishing in hot weather, I sprinkle the fish with not so coarsely ground salt directly in the canna with periodic draining of the “fish juice”. It turns out something like wet salting of fish. Then I transfer the catch into a wooden box and continue to add salt using the homemade dry method.
First, a few words about the very essence and mechanics of home dry salting of fish.
Blitz tips
- When drying fish, experts recommend blowing it with a fan for the first 24 hours , which will speed up the drying process and prevent the appearance of an unpleasant aroma.
- If you have large fish, it is recommended to pre-cut it so that the product does not spoil. The insides of large fish are full of greenery that rots from exposure to high temperatures.
- The drying chamber is usually installed away from sunlight (preferably under a canopy).
Sources
- https://bagorik.ru/gotovim/zakuski/sushilka-dlya-ryby-i-osobennosti-sushki.html
- https://remkasam.ru/kak-sdelat-syshilky-dlia-fryktov-ovoshei-gribov-miasa-i-ryby-svoimi-rykami.html
- https://zen.yandex.ru/media/id/5b569b6b050fd400a929561e/5bbcbe6fed70c900aa98ae91
- https://lakeking.ru/snasti/spinning/sushilka-dlya-ryby.html
- https://rabotai-sam.ru/sushilka-s-ventilyatorom/
- https://stroy-podskazka.ru/koptilnya/sushilka-dlya-ryby/
Recipe for dry salting fish
In principle, almost every river and sea fish can be salted with homemade dry salting. True, for the smallest fish the size of capelin, it is still better to choose a wet marinade recipe.
Oval-shaped fish weighing up to half a kilogram is salted at home without gutting; the entrails of larger fish are removed.
Before dry salting, large fish should be rinsed in water, the abdominal cavity should be cut from the side of the ridge from head to tail, and the entrails should be removed.
According to this recipe for dry home salting, 150-200 grams of salt are required per kilogram of fish.
Rub the carcasses with salt outside and inside - from the side of the scales and in the abdominal cavity, stuff the salt into the gills.
Place the prepared fish in rows in a barrel, belly up, sprinkle each row with salt. The liquid released from dry-salted fish should flow out through the bottom of the container.
The duration of dry home salting of large fish in a refrigerated room is from 10 to 15 days.