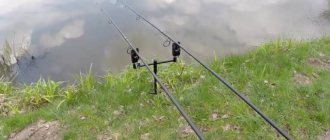
In this article (for beginning carp anglers) we will talk about such an indispensable element in a carp angler’s equipment as a fishing marker.
Most likely, many new anglers have faced this (often very nervous) question: where and at what distance should you catch carp? And in general, what is under the surface of the water surface, in the area we have chosen? Because, having arrived at a reservoir (especially an unfamiliar one), we do not know either the depth or the features of the bottom at a promising fishing point. But excellent knowledge of the fishing sector is the most important guarantee of successful carp fishing. Especially if it is also a hunt for a trophy specimen. This is where our entire strategy for the future session is based.

This mysterious underwater world...
Why do we need a marker for carp fishing?
Carps are incredibly smart and cunning fish with associative memory. They like to stay in certain places, where sometimes even the best food cannot lure them out. But they all have a small weakness, which helps to catch them - natural curiosity. Carps, due to the physiological characteristics of the digestive system (they do not have a stomach), must constantly move around the reservoir in search of food.
Therefore, our primary task is to discover its feeding areas and the “paths” along which it moves to the “dining areas”. In order to achieve success, it is necessary to study in detail the place of future fishing, and accurately scout all its “tables” (i.e., feeding places). Where, then you will need to throw bait, and you can fish longer. To achieve this goal, it is important to find literally EVERYTHING at the bottom that, at least a little, stands out from the general background. Such zones are promising in terms of carp fishing. It can be:
- areas of hard bottom against a background of silt or detritus;
- depth changes (even minor)
- boundaries of aquatic vegetation;
- stuck areas of a lake or pond;
- as well as areas of the bottom covered with colonies of shells, etc.
These are the places you need to pay attention to – first of all! Of course, you can study the bottom of a reservoir from a boat, using classic surveys that sailors used in ancient times (mainly to measure the depth in front of the keel of a ship). Or a more advanced device - an echo sounder. But, if due to circumstances it is not possible to use the float. funds, but an echo sounder is not yet affordable; or at sporting competitions, where the rules strictly prohibit the use of echo sounders and boats, what to do in such force majeure cases? Here a tackle with a special sinker and a float marker will help you and me.
Marker float
What is it and most importantly - how should it be used? A “marker” is a fairly large / brightly colored float that is clearly visible even at a distance of more than 100 meters. Marker floats come in different shapes and displacements. The most popular models have a thin/long shape, somewhat reminiscent of a cigar. It must have a brightly colored top, on which stabilizers are located that do not allow the float marker to lose its trajectory during flight. Although, despite the fact that these products “fly” well, they still float up poorly (due to their small displacement). Therefore, strictly for certain situations, modern manufacturers also produce short/thick floats. Of course, they don’t fly quite perfectly, but they float up very well (thanks to their large displacement).
However, to work with a marker float you also need to have a special fishing rod. Why do we need it?
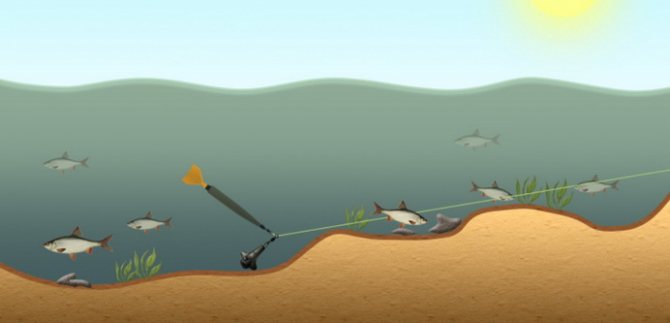
Using a marker float on current
On the one hand, the operation of this simple device looks very primitive and simple, but there are still some rules, without which fishing will be impossible.
Before you start fishing, you need to attach a tackle with a float to the rod. The fishing rod consists of a sinker, fishing line, float and sliding joint. Sequence of actions with a marker float:
- Throw the finished tackle into the chosen location of the reservoir.
- Wait 15-20 seconds until the weight is at the bottom.
- Wind the line so that the float rests against the eye of the weight.
- Mark the line level at the reel.
- Slowly lower the line so that the marker float gradually floats up.
- Place a second mark.
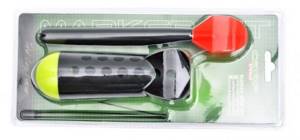
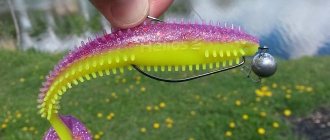
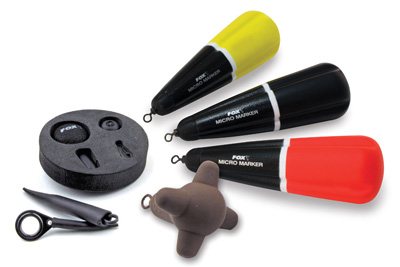
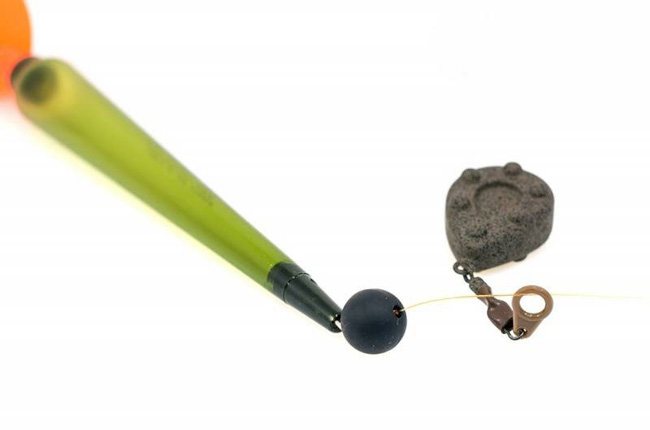
Photo 1. Branded marker set.
When you have done all this, you need to make sure that there are no bends on the fishing line and unwind it. Then you need to measure the distance between the marks and subtract those centimeters between the weight and the ring. This is how you can measure the depth of a reservoir using marker gear.
Advice! In order to fish in reservoirs with algae or snags, you must use a short float without protruding parts. For long-distance fishing, it is better to use elongated floats equipped with stabilizers.
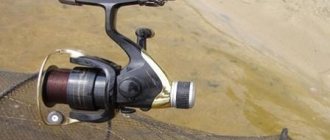
A reel for a marker rod must have certain characteristics:
- Very light.
- Wind thin braids evenly.
- Have a powerful and reliable design.
In order to conveniently, simply and easily explore the bottom, an inertial reel with a baitrunner is used. It is this structure that helps the angler instantly switch between levels of spool rotation. To prevent the fishing line from getting tangled, large-diameter spools with a front vertical edge are inserted into the reel. In order to make the bobbin request fixed, a clip is used.
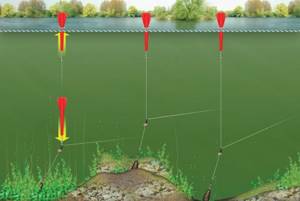
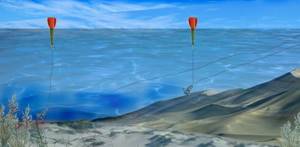
In still water, the float floats parallel to the weight and there can be no errors. In addition, there are no bends left on the fishing line, which makes it easy and convenient to measure the depth of the reservoir. This is ideal weather for fishing.
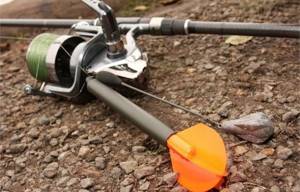
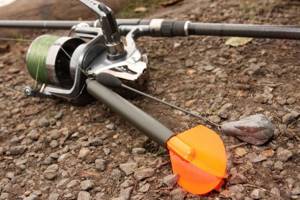
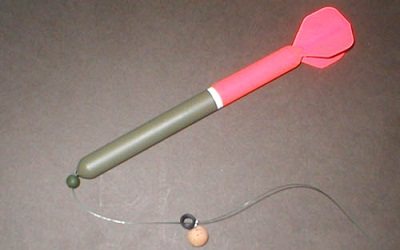
Photo 2. The system includes a marker rod, float and sinker.
In reservoirs with a muddy bottom, it is more difficult to use a marker float than in flowing or standing water, but it is also possible to solve the problem. There are 2 solutions:
- You can make the so-called “Umbrella” with your own hands. A small plastic bottle will help with this. First, cut it off at the neck. Now we put the resulting part (looks like a skirt) on the sinker. When the umbrella falls to the bottom, it will land on the bottom and the weight will not sink.
- Select a spherical sinker. It will create minimal pressure on the ground, and will not get bogged down in muddy soil.
When the current is strong, it is quite difficult to measure the depth of the reservoir. The flow of water simply blows the float away and it floats up not above the weight, but a little to the side, which significantly complicates the measurement process. In this case, the fishing line becomes curved, which interferes with accuracy. In order to solve the problem you need to:
- Using heavy weights. Thanks to this, the marker equipment sinks to the bottom at a precisely selected point.
- Using floats that are flat in shape so that they float up as quickly as possible.
In the current, a float called “dart format” is mainly used.
Advice! Feeding fish on the current is not always effective, as any angler knows. But when fishing with a marker rod, you can calculate the place where to throw the bait, and then throw the equipment into the water. So the fish, seeing the bait and not noticing any dangerous objects around, will immediately swim towards it.
Absolutely any material that can float can be used as a float. For example:
- Planed wood (it should be small but noticeable, so it is better to paint it with nail polish).
- Bottle of cosmetic or pharmaceutical products.
- Part of a syringe.
- Plastic jar.
- Medicine bottle.
Making a marker float with your own hands from a syringe is a very simple, interesting activity that does not take much time and effort.
We will need matches, a 20-cc syringe, an awl, wire cutters, tweezers, a swivel, a knife, scissors, glue, bright nail polish and pliers. After all items are prepared, perform the following steps:
- We cut off the place where the needle is put on the syringe and do the same on the opposite side. We get a cylinder.
- Align the edges with a lighter (bring it to the edge and melt it a little).
- Using an awl, we make 2 holes in the syringe for the loop.
- We put a swivel on the bracket (which was previously rolled out of wire). We insert these elements into the holes and bend the wire in opposite directions so that it is well fixed.
- You need to pour glue into the syringe. We do this so that a layer of 5 millimeters forms at the bottom, and leave it to dry (about 16-20 hours).
- To prevent the glue from leaking out, it is necessary to glue tape to the hole in the cylinder.
- We cut the syringe plunger in half and paint it completely with varnish.
- We insert the dried parts into each other (piston into cylinder).
- We paint the cylinder halfway with varnish so that it can be seen as far as possible.
- Pour a little glue over the piston so that the float is fixed and sealed.
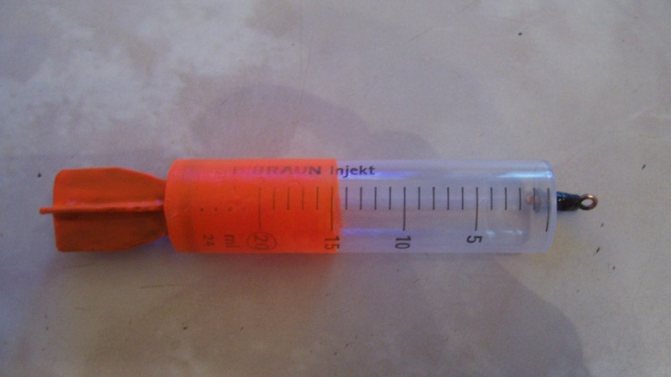
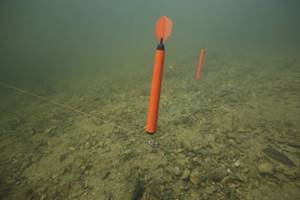
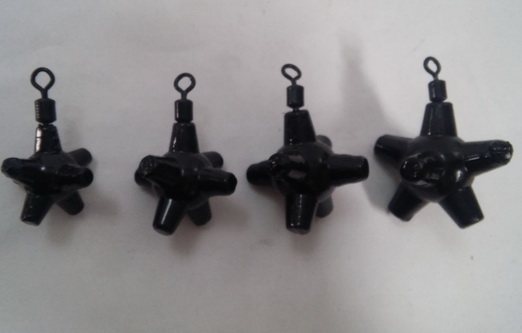
Photo 3. Homemade marker.
So, the installation of the marker rod is complete. Simple and very easy. There are a lot of unnecessary things that you can use to make a float. They lie in every apartment, in every garage and do not bring any benefit. Maybe we should get rid of unnecessary junk and create the necessary thing for fishing?
We suggest you read: Fishing for pike with live bait using a fishing rod with and without a float
Fishing is only fun when you are truly happy with your equipment. Only by improving your fishing skills can you truly become an experienced fisherman who enjoys every moment of connection with nature.
The equipment is thrown into the place where you are going to determine the depth and the line is wound as much as possible so that the float reaches the very bottom to the sinker (the sinker should not scrape along the bottom, so choose a heavier sinker).
After you feel that the float has reached the sinker itself and further winding will pull the sinker along the bottom - make a note on the line near your reel, or at the first ring, and then begin to slowly release the line from the reel so that the float slowly floats up.
As soon as the float appears on the surface, stop lowering the line. The distance from the first ring to the point that you marked on the fishing line is the depth of this place.
When using equipment with a marker float, which is shown in the first picture, you need to take into account the distance from the sinker to the ring through which the fishing line is threaded. It needs to be subtracted from the depth that you got. In any case, it is insignificant, because the length of such a piece of fishing line is from 5 to 15 cm.
The problem with ponds and lakes is that the sinker can bury itself deep in the muddy soil and then it will not be possible to determine the real depth from the surface of the water to the surface of the bottom.
Use some kind of area increaser for your sinker, anything, for example, you can make a kind of umbrella (or skirt, if you want) for your sinker using a plastic bottle, cutting out a surface that suits you.
When measuring depth with such a float in a current, there are several problems:
- The float does not float above the sinker, but diagonally along the current, thereby making it impossible to determine the exact depth.
- When the float floats up, part of the fishing line (from the end of the rod to the sinker) simply floats downstream, forming a bend, thereby preventing the depth from being accurately measured.
Both of these problems are partially solved by increasing the volume of the float and sinker, as well as by giving the float a flat shape, which would allow only a small area of the float to resist the flow.
We suggest you read: Zhor in pike: what is it and at what time does it begin
The ball float also performed very well, but has a wide resistance surface to the flow.
When measuring depth in a current, try to use a large marker float and a heavy weight. Do not release the float all the way to the surface, but leave it a little under water, so the error will be much smaller. The float can be modified by making a long bright tip (while the float is under water, the tip will appear above the water.
- The main line is passed through the ring of a short leash with a weight, and always a special marker one - a special shape, heavy (40-150 g) and with hooks. The weight should be greater the stronger the current.
- Attach a marker float to the missing end of the fishing line. The latter will float up after casting.
- Throw the assembled equipment at the depth measurement point.
- Wait for the weight to fall to the bottom.
- Reel in the line until the end of the marker float rests against the eye of the weight.
- Make a line level mark at the reel.
- Lower the line a little at a time so that the marker float floats up evenly.
- Stop bleeding when the float comes out of the water.
- Make a second mark.
After all this, carefully unwind the fishing line so that there is no bending. And then you measure the distance from the second to the first mark and subtract from it those centimeters that were between the weight and its ring. This will help compensate for the uneven “travel” of the fishing line. The resulting value will be the depth of the reservoir at the selected point.
This is the most convenient and easiest option to use, because in this case the depth is easiest to determine. There is no current, so the float floats exactly above the weight and there is either no error in the measurement results at all or it is minimal. By the way, there are no bends in the line either, which, again, is to our advantage.
In still water, a float-marker of a standard “darts” shape performs best. It floats up the fastest, and the depth can be determined in a matter of minutes.
A muddy pond or lake bottom is a problem because the sinker can easily become embedded in the sticky soil, making measurements difficult. Although this inconvenience is also not too difficult to get rid of.
The problem of silty soil can be solved in one of two ways:
- You can use a sinker with an increased area, for example, choose a pyramidal or similar shape instead of a spherical one. In this case, it will create less pressure on the ground and, accordingly, will not get bogged down and buried as much.
- You can make an “umbrella” for the sinker from a regular plastic bottle. Cut it off under the neck and put on the resulting “skirt” with the thick part down in front of the weight. When falling to the bottom, the “umbrella” will stand on the viscous soil and prevent the weight from burying.
Marker rod
Many fishermen (especially beginners or NOT fans of carp fishing) make a big mistake: when buying a new rod for carp fishing, they put a marker (float) on the old one. Then they try to work with them and for a long time cannot understand: why is it not working out for them? Yes, everything is actually very simple! Firstly, other carp rods (i.e. working or spod rods) are made using completely different technologies than marker ones. Accordingly, the structure of these fishing rods was developed for completely different types of tasks. For example, the main purpose of a working carp rod is to provide us with the opportunity for long-distance, accurate/power casting, as well as dampening (absorbing) jerks during the moments of retrieving our catches.
To work with a marker rod, you don’t need such extremes! Because here it is extremely important to have a high level of sensitivity when transmitting signals from the sinker to the tip of the rod, and then to our hand. Therefore, in the manufacture of “markers” a completely different technology is used. As a rule, they have a hard action, but a very soft tip that reacts to literally everything that happens to the sinker on the bottom. Marker rods also have small inserts in the rings (on working forms they are needed to reduce friction of the fishing line on the rings), and a cross-sectional shape close to a square - for more effective friction of the fishing line on the rings. Which, in turn, increases the sensitivity of the entire equipment and contributes to a clearer transmission of signals to the rod blank and, accordingly, to your palm.
It is also important that marker rods have special markings on the form, located just above the reel/holder for the most accurate depth measurement.
Manufacturers produce marker rods (popularly known as “markers”) in 3 main directions:
- lightweight (allowing you to work with weights weighing from 85 to 90 grams);
- medium (designed to work with loads from 110 to 120 grams);
- and heavy (weighing up to 140 grams, which affects casting distances).
Marker equipment
The marker rod is equipped with a spinning reel (with a large line capacity) filled with braided cord. With the exception of the last 10-15 meters of mono line (used as a shock leader). Why is the reel spool filled with braided cord? Unlike monofilament fishing line, braided cord does not stretch, and therefore better transmits the vibrations created by the sinker when it is “dragged” along the bottom.
But there is one problem: since the wicker material is very soft, when casting it can simply “twist” and then prevent the float from floating up. That is, you will find a promising fishing point, but the float will not float up. Thus, you will not be able to confirm for yourself its “prospects,” which you will agree is very annoying. To solve this problem, use a shock leader with a mono line (large diameter) or ready-made cone shock leaders. They never get tangled while casting!
We will also need special weights for marker equipment, on the surface of which there are large spikes. Although, any flat sinker or “flu” will do, the main thing is that they all have a swivel in their design.
When you bring your rod and reel into “combat readiness”, pass the free end of the shock leader into the eye of the sinker (only we MUST select it according to the TEST of the rod). Then put on a stop bead (to securely secure the knot on the float) and tie the float. That's all the wisdom! Now your marker equipment is assembled and ready to go!
Equipment elements
Coil
As a rule, in combination with marker rods it is recommended to use fairly large reels with a baitrunner system.
The use of reels with a baitrunner is quite justified, since they allow you to save time on the procedure of releasing and clamping the main clutch and quickly release the line from the reel during frequent depth measurements.
Thus, compiling a map of the bottom area is much easier and faster.
Reel spools for marker gear are produced either with a front edge (vertical, and its inner edge has no slope) or with a reverse cone.
In this regard, our rod is very similar to a spod rod, since it also uses braided fishing lines. Due to the lack of inclination of the inner edge, the front turns of the “braid” are wound with the required density. If the density turns out to be insufficient, then when casting there is a high risk of overlap, which is what distinguishes spools with an inclined edge.
In order to fix the fishing distance, clips are used; there may be one or two of them on the spool of a reel for a marker rod. If the marker is reeled out at night, then it is enough to place the fishing line in such a clip so that in the morning, having outlined the necessary guidelines for the casting direction, you can hit the float exactly at a certain point and set it to where the fishing was done the day before.
fishing line
For this type of gear, braided wire (0.15–0.25 mm) is usually used. The casting distance is inversely proportional to the thickness of the fishing line. At the same time, thin “braids” also have disadvantages: their service life is shorter than that of thicker lines, and the risk of overlap and tangling is higher.
The shock leader, which is used in conjunction with braid and a rod, is usually made of monofilament and has a conical shape. Due to the variable diameter, the conical shock leader allows for long casts, but at the same time does not weigh down the marker buoy, because provides less resistance than a thick braided leader.
The thin side of the “leader” is attached to the fishing line, and the thick side to the float. Conical shock leaders differ in the magnitude of the breaking load at the thick end of the monofilament. For sinkers weighing up to 3.5 ounces, leaders with a load of 35Lb are used; for larger weight sinkers (4-5 ounces), this value should be higher - up to 45Lb.
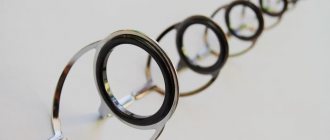
Float (buoy)
There are not many requirements here:
- high floatability and good aerodynamic properties (for casting).
- secondary is bright color and visibility.
Modern elements of the gear are made of durable lightweight plastic and have a hollow structure.
You can buy a marker float either in a specialized online store or in any fishing store. True, even despite the low price, beautiful bright plumage and good floatability, it is not necessary to buy this element, since you can make it yourself. I will talk about this in the following articles.
Sinker
Some models of sinkers have special spikes that cling to the unevenness of the bottom and thus determine its relief, transmitting vibrations to the tip of the rod.
In general, marker sinkers are produced for different conditions: for example, for fishing on currents and slopes, heavy flat sinkers (up to 5 ounces) are used.
There are also sinkers with a wire extension, which allows you to raise the line above the bottom, ensuring its passage through the ring and excellent floating of the float itself.
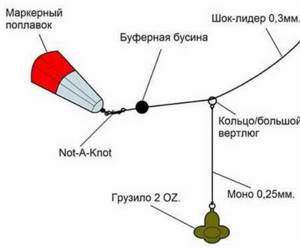
Installation
There is nothing complicated about marker installation itself.
A weight swivel is put on the cord, then a buffer bead is placed.
A float is attached to the end of the fishing line.
This assembly, in which the fishing line with a float at the end passes into the hole of the weight swivel, is called sliding.
How to use a marker to measure depth?
Which depth measurement procedure will be the simplest and most understandable for a beginner? Let's give simple examples. So, we send our sinker to the farthest distance possible. And we wait until it falls to the bottom. Next, we control the tension of the fishing line when the float rests against the eye of the sinker. Then, having released the clutch, or turned off the baitrunner, we begin to release the fishing line (according to the marks on the rod. Until your marker float appears on the surface. The length of the released cord (we are guided by the marks and the number of releases) is the depth in this area reservoir
Then we rewind the cord again, having first turned on the baitrunner or tightened the clutch until the float rests against the sinker. We place the rod horizontally in the direction of the descent of our fishing line, and its tip should look exactly at the casting point. And smoothly (without haste) we move the marker rod to the side. Moving its tip approximately 80-85 degrees, stretch the sinker along the bottom in your direction for 3-3.5 meters. Next, we repeat this depth measurement operation several times.
Thus, you can quickly and, most importantly, accurately measure all the depths in the area you like. Depth measurements must be carried out according to a “fan” pattern, relying on any landmarks located on the opposite bank (of course, if there is such a possibility). Experienced carp anglers (while working with a marker) make notes on a piece of notebook, where a plan of the fishing area is drawn in advance (with all the landmarks, fishing distances and bottom characteristics). As a result, they receive the most detailed picture of their area (sort of like a map), and then make a decision: where exactly and what exactly they will use to catch their trophies.
Marker and its work
11/21/2013 The most important thing is to find the point. For the last seven years this has been my motto in sport fishing. Success in fishing does not depend on the quality and quantity of gear, not on bait, no matter how good it may be, but on the correctly chosen fishing point. Each of my fishing trips begins with measuring the depth and determining the structure of the bottom - knowing these characteristics, I am never left without a catch. The question is how to do this quickly and efficiently.
MARKER RODS AND ITS EQUIPMENT
At competitions, I don’t choose the fishing sector for myself, I get it by lot. And this lot does not always suit me. To show maximum results, I must study my fishing area thoroughly. A special marker rod equipped with a special sinker and float helps me with this.
A marker rod with a length of 360 cm is always two-part. This is a specialized rod, so it is always marked “Marker”. He has his own, special system. The first two thirds of the blank have a fast action, the last third, the tip itself, is parabolic. It is thanks to the softness of the tip that information about the structure of the bottom is transmitted to us through the form. Large diameter guides, designed to work with large reels, for unhindered power casting to maximum distance.
There are two marks on the form, which determine the depth at the fishing site. The first mark is 15 cm from the reel, the second is 30 cm (I made an additional third mark of 50 cm on my marker).
The marker rod is equipped with a large reel with a baitrunner system. A baitrunner makes it easier to release line when working with a float to determine depth. A braided line with a diameter of at least 0.22 mm is wound onto the reel. I always use weights of 100 g or more, and throwing such weight over a distance of 60 meters or more on thin braid is not at all easy. The cargo is also not quite ordinary. It is pear-shaped and has massive spines. There may be four or more thorns. When dragging a load along the bottom, it seems to bite into the ground, due to which more complete information about the nature of the bottom is transmitted along the cord to the tip of the rod.
To measure depth we will definitely need a marker float. It is better to take floats with maximum lifting force. They float up easier and faster, thereby transmitting information more accurately. Some models are equipped with removable tips of different colors for better visibility of the float in different lighting conditions.
A rubber bead should be installed between the float and the weight. This is a buffer that softens the impact of the marker sinker on the float during casting.
HOW IT WORKS
We assemble and equip the fishing rod. First of all, we put a marker weight swivel on the cord, then a buffer bead, and tie a marker float to the end of the line. The result is a sliding installation when a fishing line with a marker float tied at the end passes through the hole in the marker weight swivel. As you can see, there is nothing tricky in this installation.
We make the first cast at the maximum distance - that's what a strong braided line is for. We need to know the structure and topography of the bottom in our fishing sector, even if we do not fish in the place where we are casting. The load sinks to the bottom, followed by the float. We take out the slack in the fishing line until the float touches the load. We turn on the baitrunner on the reel and begin to drop the line, marking the length according to the marks on the rod blank. The float begins to float. Let's say that by the time the float floated to the surface, we had 12 discharges of 50 cm each. We multiply and get a depth of 600 cm in this particular place. We remember this value, reel in the fishing line, and pull the float back to the load.
The next step is to drag the load along the bottom. Slowly, using only the rod, we drag it along the bottom. A heavy load with spikes clings to the bottom and quite accurately provides us with information about its structure. Whether it is silt or sand, stones or zebra mussel shells - we will understand all this by the tactile sensations coming from the blank. The distance over which we drag the load is no more than three meters. Then we begin to release the line again and count the segments until the float appears on the surface. This time we got 15 drops, which corresponds to a depth of 750 cm. Again we pull the float to the load and again drag the load along the bottom.
Thus, we go through the entire fishing sector from the farthest point and almost to the very shore. Having discovered something interesting at the bottom (a colony of zebra mussels, a hole and a way out of it, a table near this very hole, or something else that is strikingly different from everything else in the area), by repeated casting we again find these promising places and, with the float raised, fix the line in the clip reels. We unwind the tackle and, already knowing both the depth and casting distance, prepare the bait and choose the feeder that most closely suits our conditions (if you only have one, it doesn’t matter - there are fewer problems with the choice).
It should be taken into account that studying the depth using a float is only possible on reservoirs without a current and on slowly flowing canals and rivers. In a strong current, the float will drift too far from the original measuring point. In such conditions, the depth is determined by the time the load falls to the bottom: by counting from the moment the load touches the surface of the water until it touches the bottom. Focusing on the bottom anomalies, we select a fishing point, add the approximate depth at this point and also clip the fishing line. By repeated casts, we determine the accuracy of hitting the place we have chosen, and adjust the casting distance, increasing or decreasing the distance using a clip.
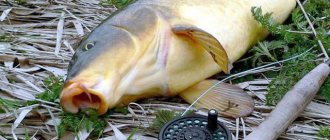
The best places to fish are:
the lower and upper sections of the dump with the same depth of at least a couple of meters;
shell rock - this is where both large and small fish feed;
flat areas - irrigation in front of river beds;
a harder clayey area among marshy silt.
If there is nothing similar in the sector, you can tie to a single stone on the bottom or to a section of underwater vegetation. With the help of a marker rod and with sufficient experience in using it, it is quite easy to find such places.
After the fishing point is selected, we need to transfer the fishing distance from the marker rod to the feeder rod. There are two ways to do this.
The first one is the simplest. We place the marker rod and feeder side by side on the ground or on the stands, loosen the clutch or turn on the baitrunner, pick up the marker weight and feeder and begin to move away from the rods. The lines run off the reels until the line on the marker rod reaches the clip. We put the weight and feeder on the ground, return to the rods and clip the line onto the feeder reel. It is clear that this method requires a free and flat section of the coast.
For the second method, only a few meters of free space is enough. We take two posts and tie them with a rope of a certain length (usually three meters). We stick the posts into the ground at a slight angle to each other at a distance of the length of the rope. Place the marker weight behind the post and begin winding the fishing line around the posts, counting how many turns it takes to reach the clip. We remember the number of revolutions and mark the place where the tip of the marker was at the end of the winding, after which we do the same procedure with the feeder. If the line breaks during fishing, we can easily restore the original length of the line by using the stands again.
Studying the bottom and depth in the fishing area is not only useful, but also very educational. Having completed this not-so-complicated procedure, we no longer catch blindly, throwing it anyhow and hoping for chance, but consciously. A marker rod is the same echo sounder with the difference that in this case we don’t need a boat.
We are on Google+ Fisherman-Fisherman
| Author | Andrey Dumchev, Moscow |
| Issue number | 47/2013 |
| Read the article | 17987 |
Rating: 3.41
Studying the bottom topography using a marker
Using the method described above, you can measure depths at fairly large distances from the shore. However, you and I are interested not only in this, but also in the condition and structure of the bottom (relief) in the selected area of the reservoir. So, this can be determined by how our sinker moves along the bottom.
1) Muddy bottom
The most common example is the presence of silt at the bottom - this is where the sinker will get stuck. And how “strongly” it sticks indicates not only the thickness of the silt layer, but also its consistency. When dragging a marker sinker stuck in silt, the following happens: at first, it goes hard and very slowly, and then it becomes easier and faster. But if you pause, the sinker will get stuck again, and to move it from its place, you will again need to apply force.
2) Underwater vegetation
In the presence of underwater vegetation, the marker weight will initially move normally, but then become thoroughly stuck and, accordingly, stop. In the process of dragging the sinker through aquatic plants, you can even hear the stems tearing under the water.
3) Is the bottom sandy or gravel?
On a sandy bottom, your sinker will move easily and evenly, and the rod tip will always be slightly curved. On the bottom covered with gravel or colonies of shells, the load will also move normally, but with slight jerks, and the tip of the rod will tremble slightly. It is worth noting that experienced carp fishermen can even by ear detect the dragging of a marker sinker through algae, gravel or shells.
All movements of the load are controlled by the tip of the fishing rod, and by the way it “gives” to our hand.
4) The most trump spots for carp fishing
And finally, the most important question: how to learn to identify areas with more/less hard soil in large silted areas of the bottom? Here it is important to “calculate” the moment when the sinker stuck in the silt is released, and the tip of the rod straightens and begins to tremble slightly. This is a sign that a very promising carp fishing spot has been found. Measure the depth in this place, visually remember the landmarks and range. And after that, make several fan-shaped casts to the left and right to determine the size of this area. After all these procedures, place a stationary marker there as a guide for casting gear and bait. Well, then start carp fishing.
Homemade marker gear
Any fishing begins with choosing a fishing spot. In order not to make a mistake in this, you need to know the bottom of the reservoir. Nowadays, the bottom is most often explored using marker gear. But a real branded marker is quite expensive. Is it possible to replace this fishing device with something homemade made from cheap components? Let's consider this possibility in more detail.
How to examine the bottom with a marker
The idea of marker research is simple. At the end of the fishing line, a float is tied, and a sliding, heavy and horned sinker is installed on the fishing line. This equipment is thrown into the reservoir with a special powerful and long rod equipped with a reel.
The process of exploring the bottom with a marker
- After casting, the sinker falls to the bottom, and the float floats up, pulling the line from the reel.
- When the fishing line is pulled up by the rod, the float sinks and rests against the sinker at the bottom.
- Then the line is released until the float floats up, counting the number of turns that come off the reel. The number of turns (the float's ascent distance) determines the depth at the location of the sinker.
- Then the line is again reeled in until the float stops against the sinker (the float is drowned) and the sinker is slowly pulled along the bottom to a distance of 4 - 5 meters.
- Pulling up the sinker is done with a rod without the participation of a reel. To perform the reeling process, the rod is simply raised from a horizontal position to a vertical position. And the tip of the rod covers a distance of these same 4 - 5 meters.
What is being investigated, what is the result?
During the pull-up, the sinker, clinging and resting against the unevenness of the bottom, conveys the character of the bottom through the fishing line to the rod, and the fisherman can easily distinguish by its vibrations whether there is clay on the bottom or silt, shell rock or stone.
Thus, in one measurement cycle, the fisherman receives at least 4 approximate characteristics of the bottom patch under study:
- direction relative to your location;
- distance from the shore;
- depth at a point;
- characteristics of the bottom (subjective);
Then pulling up and measuring the depth and nature of the bottom is repeated along one line - from the casting point to the angler.
What is included in the marker equipment?
Such branded equipment comes with a hefty price tag. The set of marker gear for bottom research should include:
- special fishing rod 5 meters long or more,
- powerful reel, always with a bayrunner,
- network,
- special sinker
- specialist. float,
- as well as small installations.
But by installing the equipment, you can get an excellent marker fishing rod for carp fishing, allowing you to explore the bottom from the shore at a distance of 100 meters or more.
What can be used cheaply?
Now let's start simulating marker fishing equipment with cheap surrogates. We apply:
- “from an unknown manufacturer” the spinning rod is as powerful as possible with a dough of at least 150 g. 3 meters long
- simple inertial coil of the “Nevskaya” type,
- domestic monofilament fishing line, diameter 0.6 mm,
- foam float with an approximate load capacity of 20 g.
- installations, in particular a persistent buffer under the float, so that the line is not cut off by the sinker.
How to make a sinker for a marker
There's a problem with the sinker. It must be covered in pimples and horned. Just a round piece or plate will not work, since it will not have the desired effect when it is dragged along the bottom. You either need to buy a special sinker, or you can try to make it yourself.
You can use a grinder (hammer and chisel) to cut pieces of wire rod with a diameter of 6 mm or take long bolts. Then tie them with wire so that they form a hedgehog. For reliability, fill it with epoxy and wrap it with fishing line. The result should be something similar to an underwater mine weighing 100 - 150 grams.
The float is tied at the end of the fishing line, and a shock-absorbing limiter is put on between the float and the sinker. The sinker is installed on a 10-20 cm leash made of the same thick fishing line, at the end of the leash there is a swivel - which will slide along the main fishing line.
When making a homemade design, the important thing is that you can completely simplify and make a lightweight marker with a regular commercial sinker and a light spinning rod - such a marker can be assembled while fishing in a matter of minutes...
How to do bottom research in theory
The resulting gear can be used to cast 50 meters, and the thick fishing line does not scare you with a beard on an inertia-free reel. In addition, it is convenient to reel in the fishing line and calculate the depth when lifting the float on this reel without any baitrunner.
Now all fishing can turn into exploring a reservoir, since this activity is quite exciting and learning new things is always interesting.
Typically, research must be done from the fishing location in several directions. When dragging the marker, all measurement results are recorded on paper. By dragging the marker along several lines spaced 5 - 10 meters from each other, we will get 30 - 40 meters of the explored width, and a map of the bottom of this area will be drawn on paper.
Information about the bottom of a reservoir in practice
But the theory can be simplified. If you find a promising place, an edge, a boundary between clay and stone, a depression, then you can leave a marker at this place, tighten its line so that the float sinks exactly above the sinker, and cast with gear aiming at the marker float. Limit the distance on the tackle reel with a clip. You don’t have to remove the marker from the water at all, and bait and fish at a certain distance from the marker in one direction or the other.
The result of all efforts is new information about the reservoir. And information is the most valuable thing. In any case, such a homemade device will significantly enrich you with information and increase your chances of successful fishing.
Let's summarize
Despite its apparent simplicity, working with a marker still requires certain skills and constant training for the purpose of self-improvement. And since this method is quite noisy, it is better to practice not while fishing for carp, so as not to scare away all the fish in the area and not interfere with the fishing of other carp anglers. Therefore, in order to hone the skills of using marker gear, as well as develop a “sense of the bottom”, it is recommended for beginners to study strictly (!) in shallow water. Where you can relatively easily check the sensations transmitted by the sinker and line to your hand. Here, in principle, are all the initial recommendations for mastering the use of a marker. We wish you successful training!
Related materials:
- How can a beginner choose a carp rod (working, marker and spod)?
- Bottom exploration with a marker (by carp fishing legend Ian Jameson)
Publication author
offline for 3 months
Casting technique
Sadness! But this happens too
Accurate determination of the future fishing location is very important for a fisherman, especially for a carp angler. Therefore, for effective fishing, so as not to rely on chance, it is better not to spare money and buy a marker rod along with a spod in a specialized online carp fishing store.
Good tackle, together with the knowledge, dexterity and quick reaction of the fisherman, are the key to successful fishing. At the end of the article, I recommend watching a Video review of the Marker Rod with an authoritative Russian carp angler, leading expert of the Carp Time company, Alexander N. And I wish you, as always, Happy Fishing!
0
Author of the publication
offline 6 years