Purpose
When fishing in reservoirs whose depth is greater than or equal to the length of the rod, a sliding float is used for long casting. This reduces line droop and allows for long casts. If the fishing spot is 4 m deep and is located far from the shore, for a blind rig you need to make an overhang of 4.5 m. This is only possible if the length of the rod is 6 m. But it will not be possible to make a good cast. There is no point in using long fishing rods, and with a sharp, strong swing, it can break.
When casting, the float is located next to the weights, which allows you to leave a small amount of fishing line and make a good swing with the rod. The weight of the total load will be concentrated closer to the end of the tackle, this increases its flight range.
When catching predatory fish with live bait, such equipment is often used. The predator, having taken the bait, does not feel the resistance of the fishing line for some time and boldly swallows the bait.
Installation of a sliding float
Fishing tackle with a sliding float is mounted in the following order:
- a reel with fishing line is installed on the rod, and then the fishing line is passed inside the rings;
- install the top stopper. Usually a locking knot is used;
- A carabiner for the float is put on the fishing line. It is necessary to preserve the float before fishing. Only on a pond is the float fastened to a carabiner;
- a lower stopper is installed on the fishing line;
- install sinkers matched to the float;
- tie a swivel;
- At the final stage of installation, hooks with a leash are attached.
Important!
If there is no carabiner, then tie a knot and then attach the float.
Types of tackle
Depending on the conditions of use, sliding fishing equipment comes in several types.
Zhivtsovaya
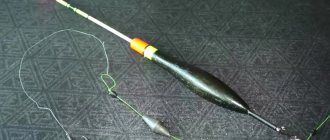
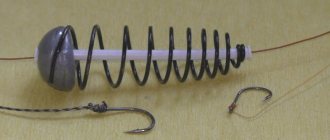
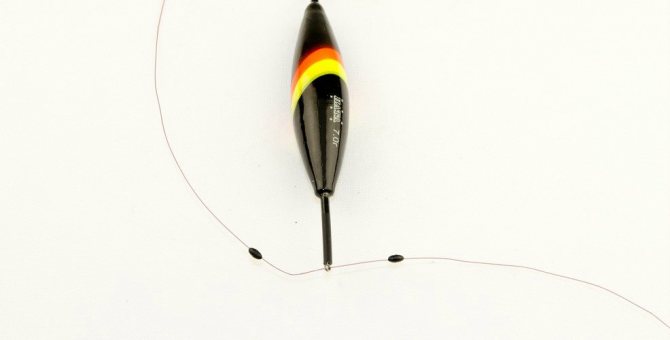
A sliding float is used, equipped with two attachment points. It is capable of keeping live bait afloat. The load is two sliding olives that protect the leash attachment point and the float itself from impacts. Two stoppers are used as travel limiters.
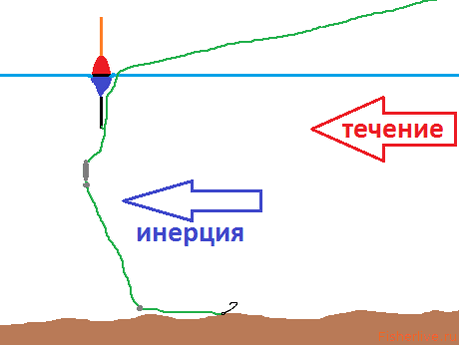
For fishing in the current
When fishing in current conditions, the problem of keeping the bait at a specific point in the reservoir arises. If a non-self-submersible float is used, its weight must match the total weight of the load.
When you need to anchor a sliding float for long-distance casting in a certain place, an olive moving freely between the locking weights is used. After casting, it lies on the bottom, and the line moves through it without resistance, which allows you to transfer the bite directly to the float itself.
If you decide to fish with a wire, two portions of pellets are used as a load. The first is attached to the fishing line closer to the bottom, and the second - at half-water. This will allow the float to calmly drag the bait along the bottom in the direction of the current. An additional load for the leash is the under-hook.
For standing water
In still water, a fishing rod with hooks and a sliding float is usually used. To increase sensitivity, the loads are distributed evenly over the entire height. With one load the tackle is rough and heavy.
A good option when catching crucian carp in still water is to use a self-submersible float, which allows you to adjust the load by replacing the washers included in the kit.
Stopping units for sliding floats
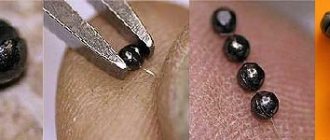
A sliding float requires a stopper. When rigging the tackle, locking knots are tied. Fishermen use two types of stop knots. They are knitted from a fragment of fishing line up to 300 mm long and with a diameter the same or slightly larger than the main fishing line.
Single knot:
- bend a piece of fishing line to create ends of different lengths;
- a short end is placed on the main fishing line, and the long end of the fragment is made 5 turns around two fishing lines, then it is returned to the loop;
- tighten the knot;
- cut off the ends.

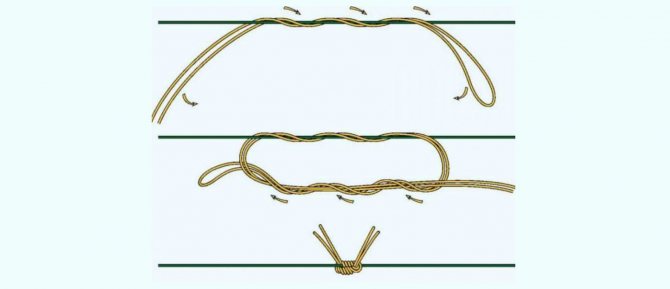
Double knot (Kremkus):
- form a loop from a fragment of fishing line, and then press it with your finger to the main fishing line;
- use either end of a piece of fishing line to wrap the bottom of the loop and the main fishing line 5 times;
- tighten the knot;
- cut off the ends.
Experienced fishermen prepare such knots at home using the tip of a ballpoint pen, and when fishing they are moved to the fishing line.
Important!
Before tightening, the knot is wetted so that the line does not become brittle. The ends of locking knots are not cut very short, since the ends of medium length do not cling to the guide rings. Leave 20 mm ends to tighten the loose knot.
How to assemble the equipment
There are difficulties when using gear with a sliding float:
- entanglement of equipment;
- a sudden change in weather, forcing you to change floats to heavier or lighter ones;
- shooting of the float, its cracking.
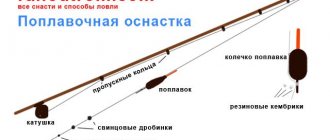
Equipping a fishing rod with a sliding float allows you to achieve results if the tackle is correctly and correctly configured. To assemble such equipment yourself, you need to have a rod, fishing line, reel, float itself, weights and hooks on hand. Comprises:
- float;
- evenly distributed weights;
- stopper assembly;
- shepherds;
- hook.
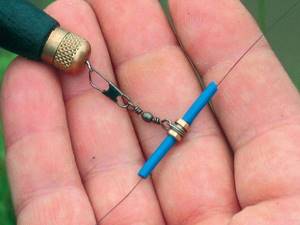
The locking unit is an important element of the equipment. To make it, take a piece of fishing line 15 cm long. Sometimes the substrate is a piece of wire insulation. When tying a knot, be careful not to damage the main line, as this will significantly reduce its strength. To do this, you need to moisten the knot with water and then tighten it smoothly, leaving the ends about 3 cm long.
Special swivels will allow the float to slide smoothly along the line and will not allow it to pass through the stopper. The weights used are ordinary lead shot of various sizes and weights, as well as sliding balls and olives.
Step-by-step collection of gear:
- the float is put on the rod cord, then there is a bead, a sliding sinker, a bead;
- At the end of the fishing line a knot is tied to which the leash is attached. Its thickness should be 0.1 mm less than the base, and its length should be up to 20 cm;
- To prevent the float from moving freely along the entire length of the fishing line, install a silicone stopper or tie a stopper knot.
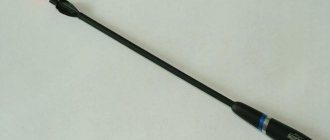
Rods
Even the most ordinary spinning rod is suitable for long-distance casting, but a plug rod with a classic length of about 4 m still has an advantage. It will allow you to cast bait at a distance of up to 50 m.
The rod has 9-12 rings and consists of 3-4 legs. To eliminate “beards” on the fishing line, choose options with a large diameter of rings. The stopper will fly through them freely.
A long float rod does not always allow for a good cast. The range is affected by all components of the equipment and the height of the fisherman himself.
Fishing lines
Casting distance and type of fish are factors that influence line selection. For long-distance casting, you need to take a heavy float with increased carrying capacity.
Before attaching a sliding float to the fishing line, remember that in strong currents it is better to use the option with an internal channel rather than side rings. A stiffer main line will reduce the risk of beard formation. A good option is a base with a diameter of 0.18-0.20 mm for match fishing. The main line should have as small a diameter as possible, since in calm weather it is noticeable in clear water.
The sensitivity of the rig decreases with increasing leash length. For fishing in calm water, use a leash less than 20 cm long. The sub-lead can be attached directly to the main line. If there is a current and the tackle is crawling along an uneven bottom, you can increase control with a leash with a small load and a slightly underloaded float. The shepherd may even lie on the bottom in this case. This will affect the bite - it can be felt with a slight delay.
As soon as you find even minor damage to the leash, it should be replaced immediately. The appearance of knots is unacceptable, as this weakens the tackle several times.
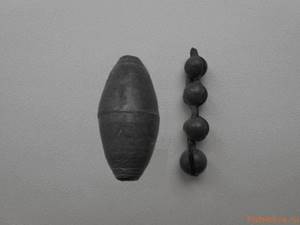
Sinkers
Sliding weights are suitable for use on a float rod when fishing for live bait. They allow the predator to swallow the bait without fear. The line passes through them without resistance. This loading with olives is most effective.
For fishing in bodies of water with a current, several weights are used, attached to reduce weight. The heaviest sinker acts as a lower stopper for the sliding float. It is attached as securely as possible at the very top. A silicone or rubber shock-absorbing tube is installed on top of it.
Swivels
Swivels prevent the line from twisting. Otherwise, its strength when wound into a reel can be reduced to 70%. A sliding mount on the float base without swivels will also lead to tangling of the leash. They are selected to be small in size to increase the effectiveness of the bait.

Factory swivels are numbered by size according to the international classification of fish hooks. They are painted in various colors: from golden to black, and even red. They differ in design: “barrels”, wire, framed.
Frame swivels have good reliability, and any damage is visible to the naked eye. Barrel defects may be hidden within the housing, causing tooling to be lost.
Homemade options are also used. A simple swivel is inexpensive, but it is not designed for high loads. And the quality of a swivel you make yourself can be controlled.
To make it possible to quickly change the bait, carabiners equipped with special fasteners are additionally attached.
Stopper
The stopper can be a special knot, which is knitted from the same fishing line as the base, or factory-made silicone options. The latter have different sizes and colors and are suitable for fishing with live bait. The float stopper should fit freely through the rod rings.
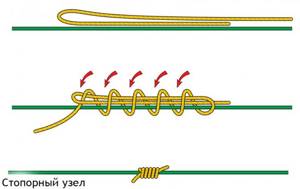
If the factory stopper does not fit and slides off the line without effort, you can make your own version:
- a piece of fishing line 15 cm long is folded in half;
- the resulting loop is placed near the working cord of the tackle;
- Hold the loop with one hand and wrap the free end around it with the other;
- after 7-8 turns, the end returns to the held loop, and the knot is smoothly tightened (it is necessary to moisten it with water so as not to damage the main line);
- Finally tighten the knot after the fishing point has been selected.
Hooks
Fishing hooks are matched to the equipment, for example, the fishing line number. The type of fish and its weight are taken into account. Numbers 6, 7 and 8 are suitable for catching fish weighing up to 1 kg on the river. For catching predators, the Kirby and Abserdin types (with a straight forearm) are suitable, and for carp, crucian carp, carp and other white fish - crystal and limerick (with a rounded forearm).
The color of the hook affects the bite activity only in completely transparent water. When searching for food in turbid water, fish are more guided by their sense of smell and lateral line.
What is a sliding float
The floats have different designs, but the principle of operation is the same. The sliding float moves freely along the line until it reaches a special stopper. If you change the position of the stopper, the immersion depth of the tackle will change.
Any sliding float has the following elements:
- antenna - this element makes the float visible in any situation that arises while fishing: wind, rain, waves. It is subject to requirements for good sensitivity and low windage;
- body - the effectiveness of the equipment is related to this element. In any conditions, the fish must control the bait, and the fisherman must see the bite. To do this, select the shape of the body and its color. The most versatile teardrop shape;
- The keel is the lower, invisible part of the float. It comes in different sizes. With a short keel, the float quickly restores its position on the water. When the keel is long, the float is more stable at great depths and in strong currents.
Float selection
There are several types of sliding:
- with one eye for fastening. Suitable for long casting when fishing in still water. Easy to replace using a special adapter;
- with two ears for fastening. These are suitable for long-distance casting in a body of water with a strong current. The poor quality of the lugs leads to their frequent falling out of the case. They become deformed when hooking fish;
- with a hole along the central center line. Installation is performed by passing the fishing line through this hole. It performs well during long casts and is easy to install.
According to form they are divided into:
- elongated. Designed for long-distance casting in strong winds;
- oval. For casting bait over a medium distance in light winds;
- round float. Used for fishing at short distances in calm weather.
A lightweight one is not suitable for long casts, since its small mass must be compensated by the weight of the sinker. When the bait drops into the water, the line will slide freely through its eye. To ensure good traction, weights up to 5 grams and thin and smooth monofilament fishing line are used.
For fishing in deep water, use a suitable floating float. Its load capacity is in the range of 8−12 g. It allows the bait to quickly sink to the bottom, and the moment the stopper touches will be clearly visible. Its sensitivity depends entirely on the thickness and length of the antenna. For synchronized flight, together with the load, there must be a sufficient amount of its own load at the base of the float.
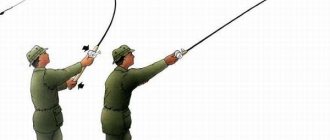
Casting technique
The technology of fishing with a fishing rod for long casting is similar to using a spinning rod. For a successful throw without overlapping tackle, the weight of the sinkers should be 25%, and the rest of the weight should be on the float.
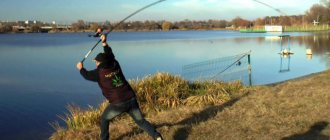
Before casting, the float should be at a distance of 1-1.5 m from the top of the fishing rod. There should be no objects around that interfere with the swing and flight of the tackle. Before the hook with a load falls into the water, the fishing line is slowed down with your fingers, and the equipment rushes forward.
After the float touches the water, the bow on the spool closes and the line is submerged by the end of the rod. Then the bow can be opened again and the line released. The float element rests against the stopper after standing on the water.
After casting, the rod is placed on a stand with the top as close as possible to the water. The tension of the fishing line will provide high sensitivity when biting.
Casting technique is perfected over time. For successful fishing, it is important to properly prepare your gear. You can build a sliding float with your own hands; you don’t have to spend a lot of money on expensive equipment.
Casting Features
The first rule when fishing long distances is that you don’t need to fuss for successful fishing. This can lead to tangling of the entire gear. It is important to cast correctly. The line is given uniform acceleration without jerking or movement. If everything is done correctly, the rig will fly taut behind the float.
To make an easy long cast, you need to control the movement of the line. Before the bait falls into the water, you need to touch the rim of the spool with your index finger, preventing unnecessary bleeding of the cord. The end of the rod is lowered into the water. This will prevent the line from being blown away by gusts of wind. It is recommended to make the swing wide, from behind the back.
How to make a floating float?
How wonderful it is to be in nature after a week of work, near a pond. When there is silence around, only the singing of birds, crystal clear air. And there is an opportunity to relax, and even do what you love – go fishing. They say that one hour of fishing adds five minutes to your life. If you catch a fish, your mood doubles.
DIY float
To create, you will need a minimum set of materials. Before you make your own sliding float, you need to choose whether to remake the blind version or make it from scratch.
For manufacturing, you can take any floating materials that are easy to process. This includes a wine cork, a waterfowl feather, wood, and foam. The material affects the sensitivity of the equipment.
The scheme with internal scaffolding is simple, anyone can repeat it.
Materials and tools
To make a sliding float from available materials, you will need:
- thin tube (copper or plastic);
- a small piece of wood (poplar is suitable), foam plastic (finely porous) or tree bark will act as a load;
- valve rubber (1 cm);
- goose feather (you can use any waterfowl, the main thing is the right size);
- stationery knife or any sharp knife;
- nitro glue (any waterproof analogue);
- fine-grained sandpaper.
A piece of the required size and shape is cut out of a piece of material for the load using a stationery knife. It can be a cylinder or a rectangle. The blank should be slightly larger than the future finished product. A hole equal to the outer diameter of the tube is drilled along the center. After this, the shape of the workpiece can be adjusted to the required sandpaper and knife.
Nitro glue is applied to the surface of the tube and it is inserted into the workpiece. The glue will take several hours to dry. Then the product is coated with waterproof varnish. The tube should protrude 3 mm.
The goose feather is cleared of fluff with a lighter or knife, cut to form a hollow tube about 6-7 cm long. It is put on the top of the workpiece. The same glue is used. Here the feather acts as a protective covering.
A piece of valve rubber is put on top. During fishing, it moves to the encircling line. The stopper will be a knot or small pellets.
A thick white thread will make the antenna visible even in the dark.
You can make a float with an external line pass. In this case, copper rings connected like links in a chain will serve as fasteners. One of them will move freely between the stoppers. To make such a mount you will need a rubber cambric. Its size depends on the size of the float. In order for it to fit tightly, its diameter should be slightly smaller than the body of the float. The cambric heats up and is quickly pressed onto the workpiece, and the second part is put on the ring. It should hold securely and not fall out.
You can make the fastening in another way: take a copper or brass wire of small diameter, from which a pin with a ring is twisted. Coat it well with nitro glue and insert it into the rubber tube.
For these homemade floats, use a knot as a stopper. This will prevent snagging on the rod rings and keep the craft vertical on the water.
If you cover the product with three layers of colorless varnish, you can protect it from moisture and direct sunlight. The loading is done so that only a high antenna, painted in a bright color, protrudes from the water. Bites will be visible in both good and windy weather. Small metal parts or pellets will add weight to the homemade product.
Conversion of a blind float
If you replace the antenna with a tube, you can make a sliding float from a blank one with your own hands. Another way is to drill a new hole in the center along the body.
If you want external fastening, then you need to install a small ring into the donor’s body. This is done like this:
- the ring is twisted from a small piece of wire, a twist tail of at least 5 mm should remain;
- a hole of appropriate length is drilled in the donor's body. Its diameter should be slightly smaller than the diameter of the twist tail;
- the twist is lubricated with waterproof glue and screwed into the donor hole;
- to reliably seal the junction of the wire and the donor, an additional small drop of glue is applied;
- Once the glue has dried, you can coat the product with varnish.
If the load on the body turns out to be insufficient, you can additionally drill small holes in it and then glue in pellets.
Loading the float
For different fishing conditions, different loading options are used. In most cases, the sliding float is equipped with an olive sinker together with a backing of pellets, but sometimes it is necessary to use only pellets.
The use of pellets makes the rig less noticeable to the fish. Since the pellets distribute the weight of the load along the line, the fish practically does not feel the sinker, but when casting, such a load can become overwhelmed. When using an olive, the likelihood of overlap is less, and such equipment flies further, but its visibility increases.
It’s up to you to decide which weight to choose, but you should remember one thing: the fewer sets of weights you have on your line, the less likely it is to get tangled. For example, we put three pellets at the top, three in the middle, and two at the bottom, resulting in three sets of sinkers.
It is more correct to make two sets, the main load and the sub-load, so the likelihood of overflowing drops several times. Also, such a distribution of weights allows you not to notice small snags, since the inertia of the upper weight pulls the leash and pod with force.
Features of a fishing rod for long casting
Anglers who are just learning about long-casting rods thread the line directly through the eye of the float. It is not right. You need to use special connectors with carabiners. They are sold in fishing stores.
Connectors are available in metal and plastic. The edges of the barrel should be smooth. With them, the equipment running along the fishing line will not experience additional resistance and will not damage the fishing line.
The movement of the connectors is limited by stoppers. Silicone options can be purchased at fishing stores or use homemade stop knots.
You need to have a rod for long casting 3.6-4.5 m. It should be light, but at the same time have decent rigidity. An option with a so-called fast action (the rod bends only closer to the top) and a good handle will allow you to increase your casting distance. It is made of cork wood or special soft rubber.
If you plan to go fishing in a small car, the 4-leg options will be just right.
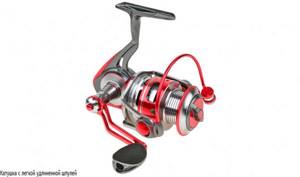
Reels are another element of equipment, the choice of which must be approached responsibly. Options with a light, elongated spool and a small drum work well. This will allow you to comfortably use thin fishing line. The weight of the reel is also important. It directly depends on the material and number of bearings: the more there are, the more reliable. But if there are a lot of bearings, your hands will get tired.
When assembling a rig with two hooks, the first is attached as standard, and the second is tied between two weights on a short leash. The distance between the first hook and the attachment point of the second should not exceed 7 cm. Otherwise, the sensitivity of the tackle will decrease, and the leashes may become tangled with each other.
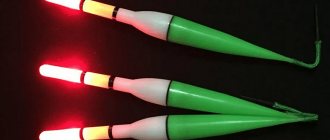
The antennas are painted in a single color. For greater visibility in the dark, they need to be coated with horizontal stripes with a special waterproof varnish. If you plan to fish at night, it is better to use options with a removable antenna. They will allow you to install the firefly without any problems.
Italian equipment
This equipment involves the use of a heavier float with a smaller weight of weights (only 1/3 of the total weight of the load). For long-distance casting, use thin and sensitive tackle.
Mostly carp are caught using this type of equipment, when fishing for which the bait descends to the bottom naturally.
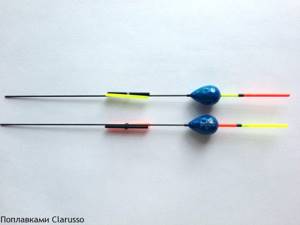
Features of installation of Italian equipment:
- the first bead is put on, acting as a stopper;
- followed by a float and two full rubber stoppers;
- the main shipment (several pellets) is placed on the Clarusso cambric;
- the tackle is blocked by a swivel;
- a 0.35 cord 25 cm long is knitted in front of the leash;
- a 1.5-meter leash is attached, on which pellets No. 5 are placed, and then one pellet No. 7.
On a long leash, you can place a load of shot at any distance.
Belgian tackle:
- A tube measuring 12-15 cm is put on the fishing line, on which a sinker is placed. It prevents the line from tangling and serves as a kind of limiter between the lower part of the tackle and the float itself;
- to ensure high-quality centering of the tube, a small piece of wire is wound onto it;
- we first remove the cambric, now the weights are easily mounted on the Clarusso cambric;
- For the best effect, an English Wagler float is used.
Hungarian
Hungary is famous for its Clarusso and Perfect floats. The latter company released models for English fishing for the first time. But Clarusso developed the Zero equipment, which is radically different from all others.
For Hungarian tackle, a float with a built-in weight is used. This allows it to adhere to the main load, which greatly increases the accuracy and casting distance. Using models without built-in loading, such an effect could not be achieved. But the Clarusso company found a way out by coming up with a special base with the scaffolding passing through it. It made it possible to securely fix the float on the cord during long casts. At the same time, it moves freely in the water.
Zero equipment
To install it you will need to follow two simple steps:
- the scaffolding is passed from bottom to top through the base;
- The gear is loaded as in the Belgian version.
The float is secured with a small retaining ring. Unlike “Wagler” fasteners, the reliable base is highly durable. The Zero rig almost never misfires: the float is securely fixed to the line in flight, and glides easily in the water.
There are other disadvantages of this equipment:
- Since there is no weight of its own, the float behaves unpredictably when the water is rough. Its stability is disrupted;
- Zero's transparent antenna is difficult to see on the water, especially in the dark. Therefore, the bite on the rise is difficult to notice;
- The material for the Zero equipment is plastic, and it is not popular among peacock feather lovers.
Rod and reel
There are no special restrictions on the choice of fishing rod. You can use the most ordinary spinning rod that you are used to. But the most convenient for long-distance casting is a plug rod, the classic length of which is about 4 meters. This fishing rod will provide a cast of up to 50 meters.
The rod usually consists of three to four legs and has about 9-12 rings.
Try to choose a rod with large guides, because the float stopper should fly through them without the slightest resistance. Otherwise, the long-distance request will not work or a “beard” of fishing line will form.
It is believed that the longer the rod, the further the cast will be. But this is not entirely true, because the casting distance is affected by the weight of the equipment, the thickness and quality of the fishing line, the height of the fisherman and, most importantly, the reel.
The video talks about installing gear with a sliding float, organizing gear for long casting, components and assembly nuances:
For long-distance casting of light tackle, it is better to use a small spinning reel with a cone-shaped spool and a gear ratio of 4.7:1 or 5:1. The number of bearings is at your discretion, but not less than two. Their number does not affect the range, even if there are none at all, and five are enough to catch fish.
The spool must have a capacity of at least 200 meters of fishing line; it would be nice if it was marked with the “Long Cast” mark (long cast).
It is better not to use closed coils. Not only does the line rub against its body, but it also acts as an additional obstacle for the stopper.
You can read more about organizing the equipment of a fly fishing rod in a special article.
Selection of reels for storage
The purpose of the reels is to store the assembled equipment. They are made from various materials: metal, cork, plastic. The last option is loved by fishermen for its low price.
When installing equipment with a sliding float, you need to think in advance about reels for storing it. This will allow you to use one rod for different purposes. This is especially true for anglers who use spinning rods for long casts.
Good reels have partitions and hooks for easy hooking of equipment. Shifting the partitions to one edge allows you to completely hide the body of the float behind the sides of the device. This prevents mechanical damage. The compact size of the reels allows you to store all the equipment in a small plastic container.
Gear installation process
- The installation process begins with assembling the fishing rod.
- A reel on which the main line is already wound is installed on the reel seat.
- The limiter (frame) is removed from the reel.
- The fishing line is threaded through the passage rings.
- The selected equipment is tied to the main line or mounted using carabiners. In match fishing, it is customary to mount the equipment (stopper, float, sinkers) in advance. The fisherman takes at least a dozen of these ready-made, tested, shipped at home equipment with him.
- The leash is knitted or mounted on carabiners with a swivel.