All experienced fishermen know how difficult it is sometimes to stare at a float for hours, trying not to miss a bite. The glare of the sun and the wind hurt the eyes, the body stiffens from immobility. What about fishing at night, when you can’t really see the float? An excellent solution to all these problems is an electronic bite alarm , which can be assembled at home in a few evenings. There are probably a lot of diagrams, tips and recommendations on the Internet for making such devices, but many of them are quite dubious. We present you the most reliable, time-tested mechanisms.
Preparing for work
Before you start making an electronic bite alarm with your own hands, it is advisable to acquire the necessary tools and materials . The tools you will need are: wire cutters or pliers, soldering iron, multimeter, knife. The choice of materials and parts depends entirely on which of the described types of alarms you will work on, but in any case you will need: solder and flux for soldering, wires with a cross-section of 0.15...0.5 mm, AA batteries, LEDs or light bulbs (they can be obtained from old flashlights or garlands), a button or toggle switch to turn the device on/off, plywood or thick cardboard for making body parts, electrical tape and glue.
Sound alarm
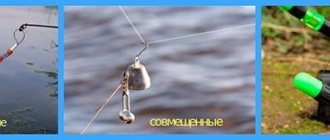
The simplest are a bell or a rattle. The bell is often used at long distances on a spinning fishing rod.
Principle of operation
A set of fasteners in which, for example, a bell is attached to the top of a feeder. If it starts to peck, the top of the feeder, on which the alarm is attached, begins to oscillate and our device produces a sound.
The advantages include low cost, sensitivity to the slightest bites, and the ability to use over long distances.
Step-by-step manufacturing instructions
Would need:
- A flat spring about 20 cm long , you can take it from an old alarm clock or watch. It should be smooth, without errors.
- Aluminum wire 20 cm long.
- Plastic strip 20 cm long.
- Dye.
We make holes with different diameters on the sides of our spring. We fasten the plastic strip on one side with wire so that it holds securely against the passage ring. On the other side we make a hook that holds the spring.
Sound bite alarm
The simplest warning light
To create a warning light, you do not need any special knowledge in the field of electronics or expensive parts. The electrical circuit will consist of only three components - a power source (an ordinary AA battery is quite suitable), an LED or an incandescent lamp from an old 1.5-3 volt flashlight and a sensor of any type. a closing reed switch as a sensor , and at the end of the article you can read about other possible types of sensors. So, a reed switch is a glass bulb, inside of which there are movable and stationary metal contacts. The principle of operation of a reed switch is simple - when a magnet is brought to the body, the contacts close and electric current can pass through the device. It is most logical to solder the circuit using surface mounting, although you can do without soldering altogether. If you are using an LED, pay attention to its polarity. The signaling device is mounted motionlessly in any housing of a suitable size, while the magnet is fixed inside the housing near the reed switch on a flexible spring strip, for example, made of galvanized steel. Additional fishing line is connected to the magnet in such a way that when it is tensioned, the magnet approaches the reed switch and closes it. The second end of the additional fishing line is attached to the main fishing line with a headphone clip or an ordinary clothespin. Now the result of any bite will be a bright glow of our alarm.
Required radio components:
- AA or AAA battery
- Closing reed switch with a resistance of no more than 200 Ohm – 1 pc.
- LED or incandescent lamp with a rated voltage of 1.5-3 V – 1 pc.
Types of bite alarms
So, let's start by figuring out how alarms can notify us about a bite, and they can do this in the following ways:
- Sound signal;
- light signal;
- movement.
Sound alarms include: rattles, bells, electronic sound sensors and other noise elements.
Light sticks include glow sticks that are attached directly to the tip of the fishing rod or to the float. Signal lights are used only at night.
As for motion alarms, these include: soft tips, side nods, or bright rattles that are attached to a sagging fishing line. Side nods can catch the slightest bites and can be used both on a spinning rod and on a donk.
We've sorted out the theory, now let's move on to practice, in which we will try to clearly describe the process of assembling various alarms from improvised means and tools.
Improving the mechanism
A light indicator is an excellent solution for night fishing, but it does not eliminate the need for constant eye contact with the device.
A combination signaling device will help solve this problem - in addition to a light indication, it will emit sound signals. The operating principle of the device and the drive mechanism will remain unchanged, but the circuit will have to be worked on. In parallel with the light source, it is necessary to connect a circuit responsible for generating sounds, for example, a multivibrator that can make the speaker “squeak” at different frequencies. A classic multivibrator circuit based on two bipolar transistors of the same structure is suitable (it is better to use transistors of the npn structure, for example, the KT315, which is well known to all radio amateurs). The capacitors used are electrolytic; when connecting them, do not forget to observe the polarity and make sure that the maximum permissible voltage for the capacitor is not exceeded (capacitors of 16 volts and higher can be safely used). Resistors are suitable for any type, with a power of 0.25 W. The capacitance of the capacitors and the resistance of the base resistors will determine the frequency of the sound; it is better to determine them using the selection method or initially install tuning resistors. We will replace one of the resistors connected to the collectors of the transistors with a speaker with a resistance of 8 Ohms and a power of at least 0.5 W. By combining multivibrators with different parameters, you can achieve various complex sounds. You can even find circuits to imitate the singing of a nightingale or the meowing of a cat. Whatever circuit you choose, you will most likely have to select another current source - perhaps a block of several batteries or an old mobile phone battery.
Necessary radio components (when using a simple multivibrator):
- AA or AAA batteries
- Closing reed switch with a resistance of no more than 200 Ohm – 1 pc.
- LED or incandescent lamp with a rated voltage of 1.5-3 V – 1 pc.
- Resistor with a resistance of 100...500 Ohm (select) – 1 pc.
- Resistor with a resistance of 10...50 kOhm (select) – 2 pcs.
- capacitor with a capacity of at least 10 μF (select) – 2 pcs.
- transistor (we recommend KT315, KT3102 or BC547) – 2 pcs.
- Speaker 8 Ohm - 1 pc.
- Toggle switch or slide switch (switching light/sound modes)–1
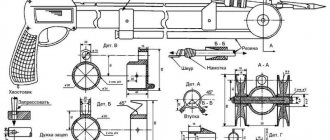
Schemes of 4 electronic bite alarms and 3 mechanical ones - do it yourself
Probably, every avid fisherman, sooner or later, has the thought that it would be nice to have an assistant on his farm, a small one, but an observant one.
This assistant is called a “bite alarm”. But many people not only want to buy it, but to make a signaling device with their own hands.
Today we will talk about what types of alarms there are and how to make some of them.
The simplest bite alarms (principles of operation, manufacturing instructions):
Every fisherman has eyes, ears and hands to determine the bite. The mechanical signaling device is designed, due to its operating principle, to indicate the beginning of a bite through visual, acoustic or tactile contact.
Mechanical visual alarms
Nod. The simplest devices are the familiar float or the tip of a fishing rod (nod). These types of alarms are familiar to everyone. Every fisherman knows how to make a float and nod himself, or which one to buy.
Foil tube. Also, there are slightly different alarms, which are based on the principle of operation on the vibration of the fishing line. The simplest visual one is a foil tube.
- Take aluminum foil and roll it into a tube.
- Then we put the tube on the main fishing line.
- You need to thread the line between the reel and the first ring on the rod - the line will sag in this place.
As the bite begins, the sag of the line decreases, we understand that the fish has begun to grab the bait. Aluminum foil is good because it shimmers in the sun (its movement is clearly visible), and also rustles when bouncing.
Disadvantage - it is useless in windy conditions (reason is the lightness of the material).
Mechanical acoustic alarms
The right bell. Let's talk about a simple acoustic signaling device - these are bells. Our design is much better than store-bought bells, since the bell flies off the tackle during hooking and does not interfere with fishing.
- We buy a bell and remove everything that hangs on it.
- We are looking for a rubber hose about three centimeters in diameter. When searching, pay attention to the fact that its walls are thin.
- On the hose we measure a piece one and a half centimeters in length.
- Cut off the measured ring and see what shape it has. If it’s a circle, then we cut along one side anywhere, but if it’s an oval, then we make a cut on one of the elongated sides.
- Now we need two nuts and a bolt. The size of the bolt is such that it fits into the ear of the bell.
- Now you need to make a hole at one end of the cut rubber ring equal to the diameter of the bolt (it is better to drill at low speeds).
- We thread the bolt through the hole in the rubber ring (with the head inside the ring). You will get a hook made of a rubber ring with a bolt protruding from one side.
- We put a piece of thick fishing line a meter long on the bolt with a tightening loop.
- Tighten the loop.
- Now we put on the bell, press everything together and tighten it with a nut, then screw on the second nut to lock the first.
We have a bell with a rubber hook. We hang it on the fishing line closer to the tip of the rod. When hooking, the bell may fly off - in order not to lose it, we tie the free end of the fishing line on our structure to a peg in the ground.
This design is much better than the cheap bells that are sold in stores. Because the signaling device flies off the rod. You don't irritate yourself or nearby fishermen. And also you don’t scare away the fish.
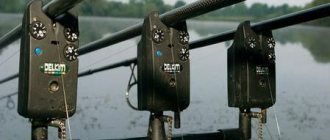
Electronic signaling devices
Having thought about the alarm and appreciating its advantages, I want more from it. A mechanical alarm requires mandatory control by the fisherman over its operation, that is, being near the fishing rods all the time.
What if you want more? To go away for natural needs, cook food, just relax and stretch your legs, here an electronic alarm comes to the rescue, it is also called a swinger for fishing.
It does not require constant presence near the rod and will indicate a bite with a visual (light) or sound signal. There are a sufficient number of types, types and models on sale.
Can be divided into types:
- visual
- sound
- combined
The principle of operation is just as simple - the fishing line passes through the slot, there is a small reel in the slot, and when it moves, a signal is triggered.
So, we described primitive mechanical alarms and briefly talked about factory-made electronic alarms, which are sold in stores. Now we’ll tell you how to make a more or less simple design of a mechanical signaling device, as well as how to assemble an electronic one yourself.
Design and manufacture of a simple side mechanical signaling device
We will need the following components:
- Latch fastener for PVC pipes (used for fastening to a wall, ceiling or floor, the pipe itself is snapped into it).
- Steel (elastic) wire 20 cm long and 0.8 - 1 mm in diameter.
- Nylon thread, waterproof glue, any paint for metal of a “poisonous-bright” color (paint can be bought in cans) or a self-adhesive film of a bright color.
- A rod or tube (guide) 8-10 cm long. The diameter of the tube is such that it fits tightly into the side hole for the PVC pipe holder.
Step-by-step instruction
Let's start assembling our alarm device.
- We make a hole at the end of the tube or rod according to the diameter of the wire.
- We bend the wire in an arc, measure 5 cm from one end and bend it 90 degrees outward from the inner bend of the arc.
- We thread the wire through the hole in the tube or rod. We will have a curved tip parallel to the guide.
- We coat the tip of the wire and the guide with glue and wrap it tightly with thread in several layers.
- We coat each layer with glue.
- Once it dries, you can either paint this place or open it with varnish (for example, for nails), as an option, put a heat-shrinkable tube over the gluing area and use a lighter to encircle it along the diameter.
- At the other end we bend the hook for winding the main fishing line.
- We insert the guide into the pipe holder (it is better to place it on glue).
- We paint with “poisonous” paint or cover with a bright film 5–7 centimeters of the tip of the holder on the side of the fishing line hook.
- We put it on the rod handle after the reel. The arc wire should be on the side.
- We grab the ends of the holder with a thick rubber band (so as not to fly off). We hook the main line after the reel to the hook on the wire arc.
When biting, the line tightens and bends in an arc. Based on the vibrations of the bright tip of the arc, it is easy to determine the moment of the bite.
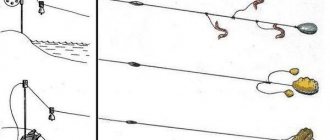
Option 1. Simple circuit of an electronic signaling device
The line tension sensor is made from a contact group from the RPU-2 relay. It is only important to set the relay to open at the slightest movement of the fishing line, but this can be done very easily during assembly.
Option 2. Simple circuit of a waiting sound and light alarm
A very simple scheme. The sensor is based on the same RPU-2 relay or any other analogue. The fishing line is wound behind the sensor and connector SA1 is closed manually.
As soon as the line is tensioned during a bite, it will pass through the sensor and the chain will allow the speaker to signal the bite. You can also install an LED in parallel for light signaling.
Read the article about fireflies for night fishing with a battery.
Option 3. Electronic alarm from a key fob with a melody
A very simple scheme and does not require additional description. The RPU-2 relay or its equivalent is still used.
Option 4. A more complex circuit of a waiting bite alarm
To assemble an electronic signaling device, you need to have at least minimal design skills - what housing to place, what system is best to come up with, mounting method, etc. Each designer determines this for himself. We will tell you about the very principle of operation of the electronic signaling device and its components. For assembly you will need:
- 3 volt battery (or several connected in series).
- Contacts from a broken alarm clock or toy.
- The reed switch is open, without a magnet.
- Magnet (can be used from a furniture latch).
- LED or buzzer (or both for a combination alarm).
Here is the most complete circuit of an electronic sound signaling device.
The principle of operation of such a signaling device is as follows: when a magnet is supplied to the reed switch (during a bite), the circuit closes and transmits electric current to the LED or tweeter (or to both elements). The LED lights up or the beeper buzzes, signaling the start of a bite.
Such a circuit can be used, for example, in the mechanical signaling device described above - improving it into an electronic, combined one.
In this case, we need to bend the arc so that it is closer to the rod with the tip where the hook is located, through which the main line passes.
You need to attach a magnet to this tip of the arc, and attach the batteries, a reed switch and an LED with a buzzer located inside some tube or box to the rod.
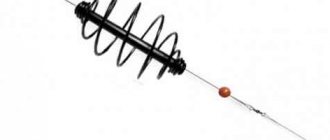
How to make a spring for fishing on a feeder - the technology for creating a pseudo-method feeder.
A detailed carp guide for beginning carp anglers. Construction of basic gear and many other aspects.
Bait for wild carp at this link.
When biting, the fishing line will stretch and bend the wire arc with the magnet, bringing it closer to the reed switch. The reed switch will close the circuit and supply power to the LED and buzzer. You can put a toggle switch in the circuit to turn the tweeter on and off at will, and then it will only work in the on position.
To ensure that the LED always works, install the toggle switch in the circuit after the LED, so that the LED itself is not left without power in the off position. It turns out to be a wonderful signaling device.
Electronic signaling device Megatext and its operating principle
You can read a detailed article about it here. Suitable for ice and summer fishing with bottom gear.
The advantage of this design is that in the open state our alarm does not consume power from the elements at all. It can be used at any time of the day.
If you need to move away, you just need to turn on the buzzer and it will notify you of a bite at a distance from the rod. In case of failure or discharge of the batteries, such a detector will be able to operate in mechanical mode.
It will be enough to remove the magnet and bend the arc to its old position. Successful hooks to you.
Source: https://primanki.com/snasti/fider/signalizator-poklevki-svoimi-rukami.html
Electronic signaling device from an alarm clock
If you have an old broken quartz alarm clock , do not rush to throw it away - the part of its circuit responsible for producing sound may well help you in creating an electronic bite alarm. The principle of operation of such a mechanism is similar to that described in the previous section, with the only caveat that instead of a multivibrator, an alarm clock sound module is included in the circuit. Technical documentation or a multimeter will help you determine the necessary contact points on the board. The reed switch acts as a sensor, as before.
Similar to an alarm clock, you can use a pager, doorbell, children's toys - any simple device that can make sounds. Each of them has its own disadvantages and advantages, but the principle of their use is the same - we find and connect the section of the circuit we need.
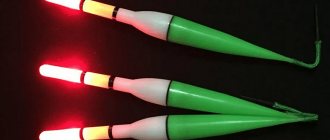
Light
Such indicators will come in handy if you plan to go fishing at night. A simple option is to paint the float with fluorescent paints. And if there is a need to make a signaling device to attach to the tip of a fishing rod or fishing line, you can make an electronic firefly.
| Materials | Tool |
| cocktail straws | scissors |
| battery (button) 3 V | hot glue gun |
| heat shrink tape (thickness should be equal to the diameter of the battery) | lighter |
| LEDs | |
| small crocodile hair clips |
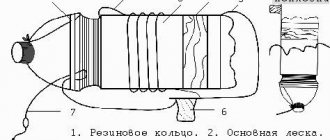
Manufacturing stages:
- Cut a piece from the straw, about 3-5 centimeters long. You can choose the size yourself, depending on what kind of firefly you want to make.
- The piece of straw must be filled with glue from a hot gun. Make sure there are no voids when filling.
- While the glue has not hardened, insert an LED into one side of the piece of tube. It should enter the glue with its head about a centimeter and a half. Leave to cool completely.
- We insert the battery into the shrink tape. The length of the piece of tape should be equal to the diameter of the battery + a centimeter of reserve on one side.
- We take a whole straw and insert it into the shrink tape on the side where we left a free edge. Using a lighter, grab the tape. Be careful, as at this stage you will have to act very quickly. It is important not to let the heat shrink around the tube completely harden. After removing the lighter, quickly remove the straw and insert it back again. Repeat this action several times until the cooling heat shrink takes the shape of a place where the tube will be freely inserted and from where it will be easy to pull out.
- Run the flame from a lighter over the heat shrink on the back side of the battery (opposite from the one you formed in the previous step). Be careful, you do not need to completely solder the battery.
- The last step is to glue a crocodile clip to one of the flat sides of the battery using a hot gun.
Electronic alarm with pager
, musical postcards were very popular . If you still have one, making a bite alarm will be much simpler, because the postcards used a similar operating principle. Having disassembled the postcard, you will find the same reed switch, a board responsible for generating sounds and a piezoelectric element - a simple sound emitter. All that remains is to place the board and magnet in the case. The disadvantage of the design is its low volume, so when fishing you will have to keep the alarm as close to you as possible. Another solution to the problem is to add an audio amplifier . The easiest way would be to assemble a single-stage transistor amplifier using a bipolar transistor, but a more complex design can be created. A good result will be obtained by using an amplifier chip , for example, TDA2003 - its price is less than 30 rubles. An 8 ohm speaker and an additional power source must be connected to the amplifier.
The simplest bite alarms (principles of operation, manufacturing instructions):
Every fisherman has eyes, ears and hands to determine the bite. The mechanical signaling device is designed, due to its operating principle, to indicate the beginning of a bite through visual, acoustic or tactile contact.
Mechanical visual alarms
Nod. The simplest devices are the familiar float or the tip of a fishing rod (nod).
These types of alarms are familiar to everyone. Every fisherman knows how to make a float and nod himself, or which one to buy. Foil tube. Also, there are slightly different alarms, which are based on the principle of operation on the vibration of the fishing line. The simplest visual one is a foil tube.
- Take aluminum foil and roll it into a tube.
- Then we put the tube on the main fishing line.
- You need to thread the line between the reel and the first ring on the rod - the line will sag in this place.
As the bite begins, the sag of the line decreases, we understand that the fish has begun to grab the bait. Aluminum foil is good because it shimmers in the sun (its movement is clearly visible), and also rustles when bouncing.
Disadvantage - it is useless in windy conditions (reason is the lightness of the material).
Sensors
In all of the listed mechanisms, we recommended placing the reed switch on the diagram, and moving the magnet using an auxiliary fishing line. Now let's look at other sensor options for the proposed types of alarms.
- Let's change the location of the control elements - the reed switch can be mounted on a movable plate, and the magnet can be left stationary. Due to the low mass of the reed switch, the sensitivity of the sensor will increase.
- Let's give up the auxiliary fishing line. To do this, we need another type of reed switch - opening . Let's fix the reed switch on the fishing rod, and equip the magnet with a latch that allows you to easily fix it on the fishing line. After you cast the fishing rod, you will need to place the magnet on the section of the fishing line that will be opposite the reed switch. The reed switch contacts will open and remain in the open position until the magnet moves due to a bite.
- We use an optical sensor . An optical sensor will be very convenient when fishing during daylight hours and has three important advantages - high sensitivity, availability of components and ease of manufacture. The main part of the sensor is the photosensitive element. We recommend using a phototransistor , but a photodiode and photoresistor will also work if you make some changes to the circuit. By the way, you can make an excellent phototransistor with your own hands from Soviet germanium transistors of the MP-39, MP-40, MP-41 series - to do this you just need to cut off the upper part of their housing. We attach the purchased or manufactured phototransistor to the edge of the inside of the matchbox, and attach an auxiliary fishing line to the same edge. We will fix the outer part of the box motionless on the signaling device body, and we will place the signaling device itself in the most illuminated place. When biting, the auxiliary fishing line will pull out the lower part of the box, the light will open the phototransistor junction and the circuit will close. Greater sensitivity can be achieved by constructing a box with something like a “shutter” - a moving cardboard strip that opens a window behind which a photocell is located.
- Mechanical sensor . The simplest element consisting of two plates, one of which is spring-loaded and connected to an auxiliary line. When biting, the fishing line pulls the plate, and it mechanically closes to a fixed contact - cheap and cheerful. The main disadvantages of the device: low reliability, low sensitivity and rapid mechanical wear, so we recommend using one of the sensors described above whenever possible.
Visual alarms
The basis of the work is monitoring the progress of the bite. This type of gear makes it more obvious, saves time and bait.
These include:
- nod;
- float;
- foil tube;
- Firefly.
Nod
The nod is an inexpensive device, attached to the tip of the feeder, it happens:
- Lavsan , the same (polyethylene terephthalate) PET, the material of a plastic bottle. A lavsan nod is great for fishing with a jig, especially if with a bloodworm, in which case the jig plays better. The length of the nod should be 10-15 cm. Such a nod can be made at home by cutting it out from the same bottle and making a hole using a heated needle.
- A metal nod made of stainless steel is best suited at depths or currents, which makes it possible to perfectly distinguish between a fish bite and a current jerk, and it can be bent to improve the appearance of the bite. Its length is up to 18 cm. It consists of a metal plate 1.5-3 mm wide, the fastening should be a cone for free adjustment of the plate stroke, and at the end there is a plastic ring for the passage of fishing line. For the entire length of the nod, you need to install 1-2 cambrics to hold the fishing line. You can make it at home using a hard rubber band for a cone, plate, cambric, and ring.
- Spring nod , an excellent bite indicator in the case of heavy baits, especially for predatory fish. Used for fishing methods such as using a spinner or spinners. You can make it at home using a twisted spring 15-18 cm long, 2-3.5 mm in diameter, a rubber or plastic fastener and large beads with a hole for the fishing line to pass through.
- Balanced nod , works thanks to the principle of counterweight. A moving weight is attached to the end of the nod, which balances the mass of the tackle. Equipped with bearing. Perfect for winter fishing in a tent.

The upper nod - the bite alarm is made of dense foam. On the bottom - made of polyethylene foam
Manufacturing procedure:
- You will need a copper wire on which the sliding element will be located and rotate , and its upper part will prevent the nod from rotating around its axis.
- In order for the glide to be perfect and fit the size of the wire , you need to cut off a piece of the ear stick and secure it.
- The working part of the nod itself can be taken from old non-working metal nods.
- The balancing weight - lead or tin , moves along the nod, is fixed with cambrics and is selected according to the weight of the equipment.
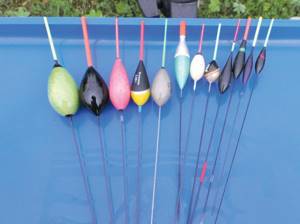
Float
Fishing gear that does not require special financial costs. To make it, you need to take into account the depth of the reservoir, casting distance, and current speed. The choice of material and method of processing the float will depend on this.
When purchasing or making a float, consider the following:
- A heavy float weighing 3-10 grams is designed for casting a fishing rod at least 50 m ; it is designed for larger fish: a nice catfish or carp.
- A medium-heavy float weighing 0.8-2.5 grams will be needed on bodies of water with a current. This tackle is perfect for large crucian carp or silver carp.
- A light float weighing up to 0.8 grams is used for catching fish near the shore. Very sensitive and responds even to a barely noticeable bite. Used for catching roach, rudd, sebel, crucian carp.
Let's consider options for making light floats at home; they will cost pennies, and they can be made in a matter of minutes.
To make it you will need:
- Styrofoam;
- wine stopper;
- goose or duck feather;
- cane.
Additional materials include: colored acrylic paints, waterproof glue, wire, toothpicks of different lengths.
Tools you will need: drill, sandpaper, sharp knife, drill (diameter 2 mm).
Varieties:
- Foam float. A cylindrical piece 5 cm long and 2 cm thick is cut out of dense foam plastic. Next, a long toothpick is inserted into this workpiece, and its other end is inserted into the drill chuck, which is tightly secured in a vice. While the drill rotates the workpiece, you need to sand it using sandpaper and give it the desired shape. Then the toothpick is removed and a new one is inserted, having previously been “planted” on the glue to a depth of 2/3 the size of the float. The polystyrene foam is painted with bright paint; you can use nail polish. To attach the float to the fishing line, a swivel carabiner is attached to its lower part. The process for making a float from a wine cork is identical; moreover, the cork does not need to be sanded, but simply covered with several layers of paint.
- Duck or goose feather float. The feather is first cleaned of fluff using a sharp knife and held over low heat to remove excess fluff. Since the length of the feather can be different, the float will need no more than 15 cm. We paint it in a bright “poisonous” color, attach two rubber rings in the middle and at the bottom of the float and attach it to the fishing line.
- A reed float is made in the same way as a feather float, and besides, you can make it right while fishing, just taking nail polish with you.
Foil tubes
Cheap and easy. It works by oscillating the line. Done in 5 minutes.
How to make at home:
The material used is aluminum foil and rolled into a tube. Slides onto the main line. It is important to thread the line between the first ring on the feeder and the reel to create slack in the line.
The first ring of the feeder should be thicker than the tube itself. When biting, the sag of the fishing line will decrease. Foil “plays” well in the sun and rustles, but due to its lightness it is useless in the wind.
fireflies
Excellent tackle for night fishing. Thanks to the fluorescent glow, it is clearly visible in the dark. Used with spinning rods, fishing rods, and other gear.
How to do it yourself? There are several options worth considering:
- Take white or yellow foil and cut it into strips about 5 mm wide. Apply the finished strips to the float antenna using waterproof glue. To check it in action, you should shine a little light, you can take a flashlight.
- Purchase specialized phosphorus-rich paint that can glow in the dark and apply it to the float.
- To make it you need to take: a stationery clip, a clothespin, a fishing firefly.
A firefly is attached to the clamp and placed on the top of the feeder. It is recommended to put it on before each cast so as not to damage the rod.
The big advantage of all types of visual alarms is their more than reasonable price and ease of use. Well, the downside is that in difficult weather conditions (wind, rain, strong currents) their effectiveness is practically zero.

Fireflies – thanks to the fluorescent glow, they are clearly visible in the dark
Energy of sun
A very rational solution would be to back up the electronic bite alarm from a solar battery located on the body of the device. You can buy a solar battery, or you can, if you wish, make it yourself. High-voltage multi-chip diodes with the casing removed and some types of transistors are well suited for this. But the simplest way is to connect diodes in a transparent case in series to generate the required voltage and in parallel to generate the required current. All these indicators can be easily monitored with an ordinary multimeter, and making such a module will be an excellent practical lesson in soldering. The use of Soviet diodes of the D2 and D9 series is most justified in terms of price, power and ease of manufacture.
We hope our article was useful to you. Collect an electronic bite alarm and go fishing as soon as possible. Good luck with your catch!
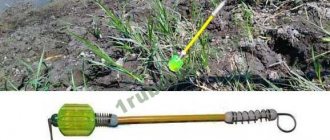
Side warning light
Or, as experts say, lateral quivertype. The device is based on a fastening to the feeder form and a springy part made of plastic or metal. Placed between the coil and the first ring of the feeder.
How does it work
After casting, the line is threaded into the hook, which is located at the end opposite from the feeder. The length of the chassis is about 10-15 cm. We place the side quivertip to the feeder form at an angle of 90 degrees. When the bite starts, the device will become almost parallel to the feeder.
Important advantages are:
- works in any weather conditions;
- Suitable for use on the winding banks of reservoirs, where there are many cliffs and snags.
Since the bulk of quivertypes are made of fiberglass, the big disadvantage is its excessive softness, which means that in the case of a strong current its sensitivity is lost. Also, this material, even under light loads, can begin to delaminate.
How to make a quivertype
To make a quivertype at home you will need:
- 15-20 cm of metal spring wire;
- metal tube with a diameter of 2 mm and a length of 5 cm.
At a distance of 15 cm from the coil, we fix the tube on the feeder form. Next, we make a Z-shaped hook at one end of the wire, and bend the other at a right angle for fastening in the tube. We place the finished product on the feeder and throw it out. We insert the fishing line into the quiver tip hook. For better visibility, attach a bright colored ball to the end of the hook.
Side bite alarm for feeder
How to increase your fish catch?
Over 7 years of active fishing, I have found dozens of ways to improve the bite. Here are the most effective ones:
- Bite activator . This pheromone additive attracts fish most strongly in cold and warm water. Discussion of the bite activator “Hungry Fish”.
- Increased gear sensitivity. Read the appropriate manuals for your specific type of gear.
- Pheromone -based lures .
Mechanical acoustic alarms
The right bell. Let's talk about a simple acoustic signaling device - these are bells. Our design is much better than store-bought bells, since the bell flies off the tackle during hooking and does not interfere with fishing.
- We buy a bell and remove everything that hangs on it.
- We are looking for a rubber hose about three centimeters in diameter. When searching, pay attention to the fact that its walls are thin.
- On the hose we measure a piece one and a half centimeters in length.
- Cut off the measured ring and see what shape it has. If it’s a circle, then we cut along one side anywhere, but if it’s an oval, then we make a cut on one of the elongated sides.
- Now we need two nuts and a bolt. The size of the bolt is such that it fits into the ear of the bell.
- Now you need to make a hole at one end of the cut rubber ring equal to the diameter of the bolt (it is better to drill at low speeds).
- We thread the bolt through the hole in the rubber ring (with the head inside the ring). You will get a hook made of a rubber ring with a bolt protruding from one side.
- We put a piece of thick fishing line a meter long on the bolt with a tightening loop.
- Tighten the loop.
- Now we put on the bell, press everything together and tighten it with a nut, then screw on the second nut to lock the first.
We have a bell with a rubber hook. We hang it on the fishing line closer to the tip of the rod. When hooking, the bell may fly off - in order not to lose it, we tie the free end of the fishing line on our structure to a peg in the ground.
Design and manufacture of a simple side mechanical signaling device
We will need the following components:
- Latch fastener for PVC pipes (used for fastening to a wall, ceiling or floor, the pipe itself is snapped into it).
- Steel (elastic) wire 20 cm long and 0.8 - 1 mm in diameter.
- Nylon thread, waterproof glue, any paint for metal of a “poisonous-bright” color (paint can be bought in cans) or a self-adhesive film of a bright color.
- A rod or tube (guide) 8-10 cm long. The diameter of the tube is such that it fits tightly into the side hole for the PVC pipe holder.
Step-by-step instruction
Let's start assembling our alarm device.
- We make a hole at the end of the tube or rod according to the diameter of the wire.
- We bend the wire in an arc, measure 5 cm from one end and bend it 90 degrees outward from the inner bend of the arc.
- We thread the wire through the hole in the tube or rod. We will have a curved tip parallel to the guide.
- We coat the tip of the wire and the guide with glue and wrap it tightly with thread in several layers.
- We coat each layer with glue.
- Once it dries, you can either paint this place or open it with varnish (for example, for nails), as an option, put a heat-shrinkable tube over the gluing area and use a lighter to encircle it along the diameter.
- At the other end we bend the hook for winding the main fishing line.
- We insert the guide into the pipe holder (it is better to place it on glue).
- We paint with “poisonous” paint or cover with a bright film 5–7 centimeters of the tip of the holder on the side of the fishing line hook.
- We put it on the rod handle after the reel. The arc wire should be on the side.
- We grab the ends of the holder with a thick rubber band (so as not to fly off). We hook the main line after the reel to the hook on the wire arc.
When biting, the line tightens and bends in an arc. Based on the vibrations of the bright tip of the arc, it is easy to determine the moment of the bite.