Molding polymers
The universal material is obtained by dissolving crushed quartz with nitric acid. When mixed with one of the catalysts, it somewhat resembles rubber. The substance is non-toxic, resistant to alkalis and acids. When finished, it is elastic, impact-resistant, water-resistant and has an unlimited service life. Products made from it are very easy to care for and easy to store.
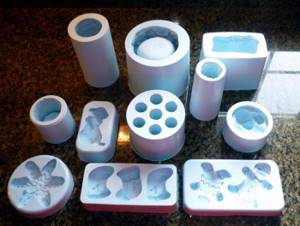
According to their intended purpose, two-component compounds, consisting of a paste and a hardener, are divided into pouring, coating, and silicone for making molds. With your own hands, you can make from these mixtures not only blanks for souvenir soap, but also strong templates for pouring paving slabs, obtaining decorative stones and gypsum stucco.
To give the substance a solid state, before use it is mixed with a tin or platinum catalyst, which is included in the kit. Some qualities of elastic rubber depend on the type of hardener:
- transparency or dullness;
- tear or tear strength;
- dimensional retention and heat resistance;
- hardness;
- final hardening time;
- durability and circulation resistance.
For example, mixtures with tin catalysts are used in industry and construction. To produce artificial stone or strong plastic products, you need the most durable materials. Food grade silicone for making molds into which chocolate and caramel are poured is produced on the basis of platinum hardeners. The softness and elasticity of these compounds is more suitable for “sweet” production and baking.
TYPES OF SILICONE
There are silicone liquids, silicone elastomers and silicone resins. In this case, we are interested in silicone elastomers, these are:
- hot-curing silicone rubbers (high molecular weight);
- hot curing liquid silicone rubber (LSR);
- cold-curing silicone compounds (low molecular weight);
- cold-curing silicone sealants;
- silicone rubbers.
We will focus on cold-curing silicone compounds.
There are a lot of offers on the elastomeric materials market. Let's figure out how to choose silicone.
Silicones:
(ready to use)
(consisting of a base (component A) and a catalyst/hardener (component B)). They are used most often because you can regulate the curing speed, and therefore the lifetime of the silicone
Two-component silicones are divided according to the type of catalyst:
tin based
Tin-based silicone compounds are a good material that meets the price-quality parameter.
They are easy to use, but have a significant drawback - they have low tear resistance, after several years they lose their physical shape - they become brittle, split and tear. Therefore, they are more often used for less critical castings made of polyurethanes, polyester resins, plaster, wax, paraffin, gypsum, concrete, and liquid plastics.
platinum based
These are more expensive silicone compounds that have a long lifespan for use. They are heat resistant. Can be used in cosmetology and food industry*. After curing, platinum-based silicones have the greatest chemical and microbiological resistance. Considered safe.
Disadvantage: Reacts with many naturally occurring compounds, particularly sulfur, tin, amines, and newly manufactured polyester, epoxy, or urethane rubber products. Even after coating the product with acrylic varnish, silicone for molds on platinum will not harden if it interacts with sulfur- and tin-containing surfaces. This makes them incompatible with many natural objects.
*IMPORTANT!
Silicone compounds for use in the food industry must have appropriate food grade certificates!
Advice:
Silicone compounds do not hold alkaline compounds well, so it is not recommended to pour concrete into them - the molds quickly fail.
Where is homemade polymer used?
Despite the variety of compounds on sale, some craftsmen prefer to do everything themselves. This is usually justified by saving money and being creative.
Making silicone for molds with your own hands is possible in several ways. It should be clarified that the resulting substance differs in characteristics from industrial mixtures. And these differences are not always positive. If branded liquid silicone for making molds is used to create large and small products, then homemade rubber is made only for home creativity.
How to make silicone at home
First of all, to make the material, you need to mix ethyl alcohol with liquid glass in equal proportions.
This can be done in any plastic container. During mixing, you need to add dye to the mass according to your own preferences. Both a wooden stick and a regular spoon are suitable for kneading. After kneading, you will get a mass reminiscent of casting, plasticine or rubber. It can be used in several ways in the future. For example, knead with your hands. You can also put the mixture into a regular cooking bag, a gun for construction silicone or a syringe with the necessary attachments and squeeze out the amount that is needed. You can use regular cookie cutters or take some. Or another option is to cast the required shape.
Important! Repeating the shape of an object will only be possible if you apply silicone mass to the outside of the object. To put it another way, apply the mass not into the mold, but from the outside.
Another important point : before applying the rubber mass, the surface should be lubricated with vegetable oil or soapy water.
How to create a matrix for casting: some tips
When starting to make silicone for molds with your own hands, place a container, box or drawer for the main work. It is made from cardboard (if the sample is small), wood or plastic. It can be collapsible or solid. From the first it is easier to release the frozen workpiece. There should be no gaps between the container parts, since all types of elastics have fluidity.
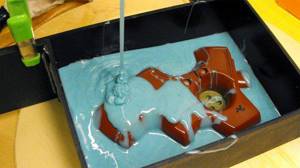
Before putting the “model” into the container, it is covered with a separator. This lubricant should be wax, fat or soap. To get a matrix for a vertical souvenir, it is attached by a stand to the bottom of the container on a piece of plasticine so that it does not float up. Then the pre-mixed compound is poured in a thin stream around the model. Filling the container begins from the corners, completely covering the figure installed inside.
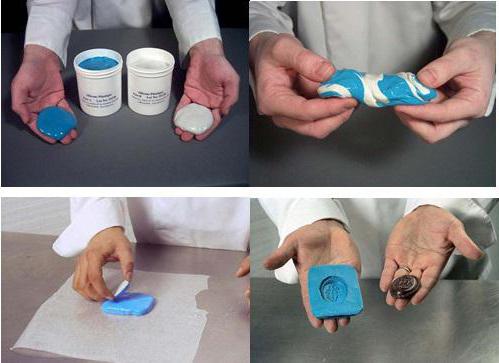
How to make a silicone mold
To do this you will need a special material - compound , which consists of:
- catalyst (hardening agent)
- silicone pastes.
Thanks to these components, any shape can be cast. True, this is not exactly injection-molded silicone (it is more reminiscent of rubber in its properties), nevertheless.
To make an analogue in the form of a silicone mold, you need to do a number of steps:
- Take the container. It must be intact, without cracks.
- Place in the container the object made of plastic or plaster from which the mold will be made.
- Take sand or dry mixture and fill the container with it. This way it will be clear how much silicone is needed for pouring.
- Treat the item with sunflower oil or soapy water.
- Pour in the silicone mixture.
- Close the container tightly.
- Wait 15 minutes.
- Disassemble the container. The silicone should not stick to your fingers at this stage.
- Cut lengthwise using a regular stationery knife.
The required silicone mold is ready!
Recipe No. 1: preliminary preparation
If you need a small amount of elastic rubber for a small product, you can use one of the options below. Making silicone for molds at home begins with preparing a vessel, a spatula for stirring, components, a main container for pouring and a small souvenir, the so-called master figurine, a cast of which is planned to be obtained for “cloning”.
For the first method, take equal amounts of glycerin and gelatin and place them in a small container. The composition is melted in a water bath with constant stirring, avoiding boiling. Heating lasts 10–12 minutes.
Conclusion
Now you know almost everything - how silicone is spelled in shampoo, what its advantages and disadvantages are, who should buy hair cosmetics without additives. Armed with theory, you can safely move on to practice: try, experiment, compare. Remember that the silicone that is added to good shampoos goes through a labor-intensive production process and quality control, which means it is not capable of harming your hair. So you definitely shouldn’t be afraid of this element! That's all, thanks for your attention!
With wishes for the most beautiful and healthy hair, your Vorobyova Nastya.
I like 25
Details of recipe No. 1
The bottom of the prepared cardboard or wood tray is evenly covered with the resulting mixture. Then the souvenir is dipped into homemade silicone and quickly placed in this box. The stuck figure is immediately poured with hot mixture, filling the tray to the brim.
Liquid silicone for making molds, obtained in this simple way, hardens in a few minutes, almost before our eyes. After the mass has completely cooled, the resulting block is removed from the box, a cut is made on the bottom side and the souvenir is carefully removed.
The resulting shaped cavity can only be filled with epoxy resin. Making silicone for molds with your own hands using this recipe has several disadvantages:
- the finished master product absorbs water, so it cannot be used to produce plaster castings;
- the mass melts when you try to fill it with a hot substance, so it is not suitable for creating designer soap.
- After several uses, the inner surface of the mold deteriorates, loses its gloss and quality.
The ability to repeatedly remelt used dies is considered a plus.
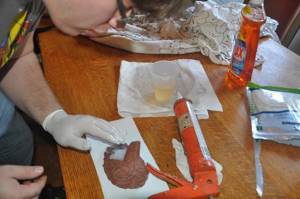
Instructions for making silicone baits with your own hands
To get started, the first thing you need to do is melt the original silicone to make the bait. To do this, you will need to take all the old and worn baits, place them in a bowl or selected container and place them on an open fire to melt (or in a microwave oven).
The open-fire option is most often used when we are talking about large, one might even say industrial, scales, when not one, but several people are involved in the melting, and the melting takes place for a large amount of starting material.
The second option with a microwave oven is more acceptable for home use. It is necessary to place the waste in the syringe, close the spout so that nothing leaks out and place it in the working space of the microwave oven.
The color of the bait being worked on may depend on the personal preferences of the author, and this fact can be attributed to the undeniable advantages of making bait yourself. You can perform an original and extravagant experiment and mix all the old baits, and see what color the result will be - perhaps it will be something innovative and original.

If you use purchased silicone to make homemade baits, you should
use a dye; you can add some sparkles or small balls that will sparkle in the water, attracting the catch.
In order for the “hunt” for fish to be successful, you can add a little flavor enhancer or any flavoring additive , for example, garlic, fish oil or salt, to the mixture when kneading.
But if any attractant is added as a taste enhancer, you need to pay special attention to the fact that after the first fishing the bait will lose this property. In order to make up for the lost quality, after each fishing you can specially lubricate the bait with a flavoring and do this in the correct order.
So, take the bait used for fishing, rinse it with running water and dry it or blot it with a towel (napkin), put all the used bait in one bag and pour in a little flavor, then knead and mix everything in the bag and leave for 2-3 days in a cool and dark place.
In order to correctly fill molds for silicone baits, you need to melt pre-prepared silicone over a fire and pour it into a previously made mold (or purchased one).
If the technology uses a one-sided mold, then after filling it with silicone and within a few minutes you can remove the finished mold from the model.
This is a fairly simple method, unlike pouring a double-sided matrix, which uses two halves that are connected to each other. The previously melted silicone is poured into the groove (the execution of which was described earlier) until the matrix is completely filled to the brim.
When hardening, it is recommended to hold the matrix or place it at a certain angle. After the time during which the silicone hardens in the matrix, you can remove the bait from the mold slowly and carefully so as not to damage small elements.
It is recommended to wait about 3-5 minutes until it hardens, depending on the viscosity of the silicone. After this, the finished bait must be placed in water, and, in order to speed up the cooling process, add some ice cubes to the container.
Then, when the finished bait has completely cooled, you will need to slightly adjust the shape, namely, cut the shape and thereby remove any remaining silicone. Using a sharp, small knife, cut off excess parts of the silicone, trying to make the bait as realistic as possible.
Recipe No. 2: preparation
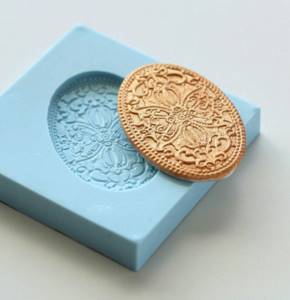
Making silicone for molds with your own hands requires some effort. Craftsmen who work with plastic clay make templates and molds in this way to bring their ideas to life. So, you will need one of the types of high-temperature resistant construction sealant and ordinary food starch or talc. It is advisable to work with rubber gloves. Since the sealant sets within 10 minutes, it is necessary to place in advance next to the object from which the cast will be prepared: a shell, a figurine flat on one side, something else. The mold will be solid, with a concave depression, so it is suitable for the production of only one-sided souvenirs.
Recipe No. 2: details
- Sprinkle a little talcum powder or starch on the surface of the table (to prevent it from sticking).
- A bunch of sealant is squeezed out of the tube into the center of the sprinkle.
- Add starch on top and mix everything.
- The resulting “dough” should contain so much starch that it does not stick to your hands or to the table.
- A thick cake is made from the mass, corresponding to the size of the future souvenir.
- Quickly and carefully, with force, press the selected sample into this workpiece.
- The silicone for making molds is left to dry for a day.
- After removing the figure, the template cavity is lubricated with talcum powder using a brush and tightly filled with plastic clay.
- This base can be placed in the oven to dry along with the filler; it is not afraid of high temperatures.
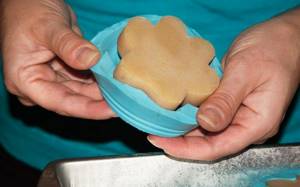
What's good about this method?
The first advantage is the reusability of the resulting template. The material retains all its qualities. You can pour a hot soap base into molds made from starch and construction sealant, after sprinkling them with alcohol from a spray bottle. DIY silicone for making molds can withstand temperature loads on par with industrial compounds.
Among the disadvantages are the sharp vinegar smell of sealants and the rapid hardening of the “dough”. But the master can prepare the amount of substance that is needed at a given moment in time for a specific job.