Wood stove design
Most tourists associate winter and camping with cold feet and the need to stay warm in a tent at night. The stove will always provide the inhabitants of the tent with a flow of warm air. As a result, you will fall asleep peacefully and wake up warm.
If you also need to cook food, sometimes 2 ovens are installed to quickly solve both problems:
- one in a tent for heating;
- the second outside for cooking.
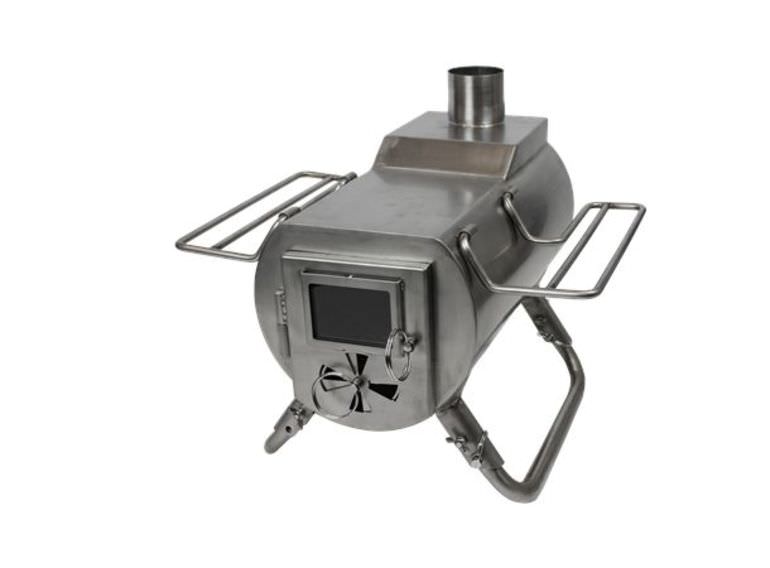
Metal models are usually made of steel. They retain heat longer and provide more uniform heating. The thicker the steel sheet, the better it resists deformation and the longer it takes to cool, which is good at night when the stove is turned off. Sealed steel doors will remain that way throughout the entire period of operation and will not allow smoke and combustion products to enter the tent.
Did you know? The typical weight of a steel stove plus tent is the full load for an ATV or pack horse.
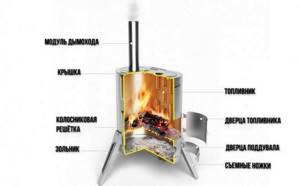
Technically, the furnace itself consists of:
- chamber in which combustion occurs;
- cavities and channels through which air moves;
- chimney through which combustion products are discharged.
The stove is also equipped with a cold air inlet and a damper on the chimney. All this helps control the air flow, increasing or decreasing it. It is desirable that the legs and pipe of the product are detachable. During transportation they are folded inside, and when parked they are mounted in place.
In some store models, the legs are adjustable and this is useful if the tent has to be placed on an uneven area. It is advisable to provide a flat top surface in the design for heating water and cooking food.
Important! Install the stove on a heat-insulating sheet so that if coal from the firebox gets onto the floor, it does not create a fire hazard. It will also be convenient if the oven is equipped with handles for moving.
Types of solid fuel stoves
Among lovers of tourism and travel, various types of tent heating are widely used in winter . The most popular solid fuel models:
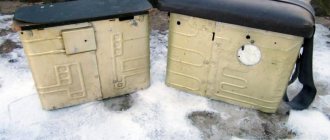
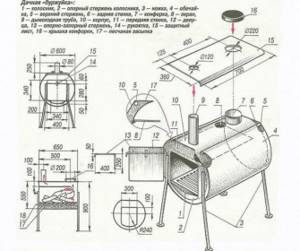
- "Economka" - long-burning tourist stoves for tents. The device allows you to maintain the combustion process on one load of firewood for up to 10 hours. Instead of a door, it has a round hole, which is tightly closed with a plug lid with a handle in the form of a bracket. At the bottom of the plug there is a built-in blower - a small pipe, on the cylindrical surface of which holes are drilled in rows. A cap-cap with a length equal to the pipe is tightly placed on it. When the position is removed, maximum draft is created, the fire becomes more intense, quickly heating up the stove. As the cap covers the rows of holes on the pipe, the traction force is adjusted. If the cap is pushed all the way, all the holes will be closed, the blowing will stop, and the firewood will slowly begin to smolder. Usually, thicker logs are laid at night, after they burn, the vent is closed and the tent space is provided with pleasant warmth all night long. In the morning, it is enough to place a few logs on the unextinguished coals, remove the lid and the fire will flare up again.
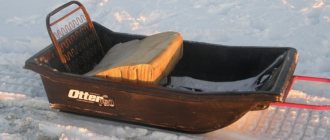
- The Volokusha camping stove for the tent has a streamlined shape, making it suitable for transporting food or small items needed by a tourist, fisherman or hunter.
- The round collapsible and hinged stoves are easy to disassemble and are stored in compact packages that fit in a backpack. They are quickly assembled on site, however, certain skills will be required.
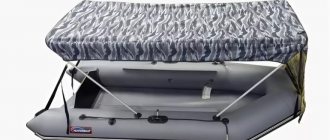
Tourist stoves have several types of installation. For example, in the “Blizzard” and “Domik” tents, heating devices are suspended under the ridge of the tent. Sometimes they are attached to the central post in the tent or simply placed on legs. But such an installation is not particularly convenient. If the stove is placed directly in the snow, it will constantly melt from the heat. Therefore, through the square “window” of the bottom of the tent, you need to dig a recess of the same size and line it with fiberglass or asbestos, and then install the stove.
Spark extinguishing
Any tent has a hole for a hot smoke pipe (chimney). In addition, the area around the stove is always protected with a fireproof mat in case of hot coals flying out. Some tent manufacturers recommend rolling back the tent base and placing the product directly on the ground.
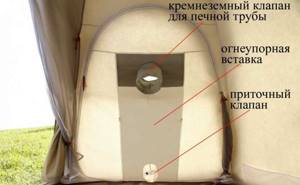
Not only hot carbon dioxide, but also sparks rise from the stove through the chimney pipe. If the pipe is short, they can get onto the roof of the tent and cause a fire. To prevent this from happening, the chimney pipe is made long so that it is at least 2–2.5 m long. While the spark flies along this path, it will have time to go out. Consequently, the chimney acts as a spark arrestor.
Safety precautions also mean that all objects that can catch fire should be kept away from the operating stove. Another danger is carbon monoxide. It must go strictly into the chimney. And the tent itself should be designed so that clean air regularly enters it.
Video: Rules for heating a tent with a stove

Dimensions and characteristics of the tent stove
Ovens come in different sizes and configurations. In order not to make mistakes in calculations, you need to know exactly 3 main factors:
- the size of the tent that needs to be heated;
- total load capacity of the equipment together with the stove;
- duration of the route.
Important! Leaving the stove running overnight when no one is watching the fire is prohibited. If you want to leave it on, then distribute the hours of duty so that someone monitors the flames and the flow of clean air.
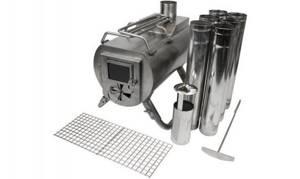
The approximate dimensions of a stove for camping or ice fishing would be as follows:
- pipe diameter - about 86 mm;
- body (firebox) size - 25×25×50 cm;
- firebox volume - 30 l;
- number of chimney pipes - 3;
- pipe length - 50–70 cm;
- pipe with a bend - 1 pc.;
- approximate weight - 5 kg.
Of course, when making a stove with your own hands, your dimensions may be different. The main thing is to worry about the functionality of the structure after assembly.
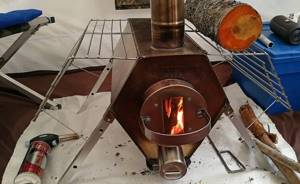
Homemade potbelly stove
At the beginning of the 20th century, a potbelly stove was a wood-burning metal stove that was installed indoors. Combustion products were discharged through the chimney out the window. A camping stove operates on the same principle, but is more compact in size. The fuel in both cases is wood chips, sawdust, and small pieces of wood. The average temperature of the side surface reaches 100-150 degrees, which is something to remember when you cook food.
Important! If you have problems welding galvanized steel sheets, sand the welded areas. Removing the galvanized layer will make it possible to make seams, but will somewhat reduce the useful life of the product, since it will be more susceptible to corrosion.
Instructions for making a stove:
- Think over the model. Draw a drawing or diagram, providing the exact dimensions of the finished product. Mark the metal sheet and pipes with a marker where you want to make metal cuts.
- In the upper part, make a hole with a diameter matching the pipe that will become the chimney.
- Cut the pipe into several pieces so that they can be folded inside the stove during transportation. Make cuts at one of the ends and bend the resulting petals inward. This will allow you to insert one end of the chimney into the other.
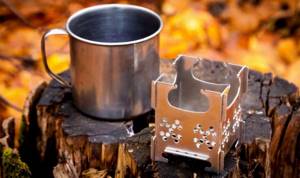
Sliver
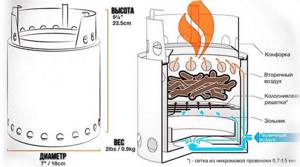
A wood chipper is a small stove that can be taken with you on a summer or autumn hike for 2 people. It is a small cylinder. In its lower part there is a grate, on the side there is a hole for supplying air and maintaining combustion. A grate is installed on top, on which a container with food is placed.
Did you know? It is believed that the heat transfer of a round or oval stove is higher than that of a square one. But tourists will not be able to use the cylindrical model for cooking.
A hole is also made on the side into which fuel will be thrown. Cones, chips, and small branches are used for this purpose. The stove can be equipped with legs that will provide clearance between the bottom grate and the ground. The legs also guarantee stability and allow burnt ash to fall freely.
The wood chipper can be made of rectangular, cylindrical, triangular and any other design. The main thing is to determine whether it is needed on a particular trip, since it is too small to cook food for more than 3 people. And of course, it is not suitable for heating a tent in winter.
Find out also about the features of a gas stove for a tent.
To make a wood chipper you will need a sheet of galvanized aluminum, stainless steel or other metal. It is necessary to mark it, dividing it into 4 walls, a bottom and a lid. Holes are made in the bottom and lid for air movement. In one of the side walls you need to create a door for storing fuel, and in the other - a hole to ensure air movement.
But the simplest version of this design is a tin can. Holes are made along the perimeter in the lower part through which air will move. A couple of holes are punched in the lower part for pouring out the ash. Fuel is placed inside the structure, and a grate is installed on its surface, on which a kettle or pot is placed.

How to make a stove in a tent for winter fishing with your own hands
Making a stove is not a complex process. But you definitely need to calculate the correct dimensions of the product. Otherwise, you may not get high-quality heating of the tent.
To make a homemade stove you will need:
- body or steel sheet from which the body will be welded;
- chimney pipe;
- steel legs;
- fireproof stand.
Tools needed:
- welding machine, if the body needs to be welded from sheet metal;
- saw and metal scissors;
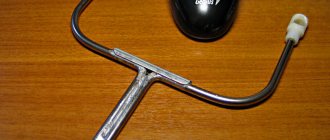
- pipe bender
Pay attention to the features of thermal underwear for winter fishing.
Chimney
The chimney for a camp stove will consist of metal pipes. To accurately calculate the diameter of the pipes, you need to know that it must be 2.7 times the volume in liters of the combustion chamber. In the previous section, a volume of 30 liters was taken for calculation. Then the pipe diameter will be 30 × 2.7 = 81 mm. If you use a smaller pipe, it will not be able to provide the required traction.
The thickness of the chimney pipe will be 0.6–1 mm. The approximate total length is up to 2.5 m. A couple of pieces of pipe will be needed, which are installed one inside the other. In addition to them, you will need a pipe with a bend. To secure the structure, several clamps are needed.
Deflector
Draft is the natural movement of air from the stove into the external environment along with the removal of combustion products. If it is insufficient, the fuel will burn slowly, and if it is too high, it will evaporate from the tent without heating it.
Here you can learn how to choose gloves for winter fishing.
Traction is affected by:
- chimney design;
- humidity;
- Atmosphere pressure;
- air current activity.

The easiest way to strengthen it is to install a deflector on the chimney. This is a sheet of metal rolled into a funnel shape and secured to a pipe. When the air flow flows around the deflector, a zone of rarefied air is formed under it, enhancing the exhaust. And in the absence of wind, such a cap reduces the draft of the chimney. In addition, it covers the channel from random debris getting into it.
Do-it-yourself Robinson oven: drawings for manufacturing
For lovers of country trips, avid fishermen and summer residents, a mobile stove of compact size that easily fits in the trunk of a car will be indispensable. More recently, small collapsible ovens have appeared on the market, with the very eloquent name “Robinson”. It is quite possible to make a Robinson oven with your own hands, especially since in this case it will even cost much less than the ready-made version. The advantage of making this device yourself is the possibility of upgrading, which will expand its capabilities.

DIY Robinson oven
It should be noted that stationary stoves for home and garden can be made on the basis of this simple design, so it can be called universal. If the goal is to independently manufacture a mobile Robinson-type oven, then it is worth considering what configurations it can have, and only after that decide on the choice of model.
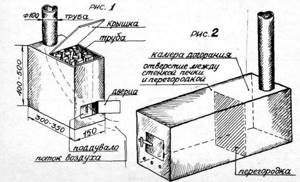
Furnace design and operating principle
The Robinson stove has a so-called rocket design, and on the basis of which many models have been created, significantly different in size and even in functionality.
Conventional rocket stoves consist of a firebox connected to a flue pipe. The fuel bunker can be arranged horizontally, vertically or at an angle, connected directly to the chimney, or have a horizontal section of pipe between these two elements, which lengthens the path of the heated air and creates an additional heated surface.
This diagram shows different options for the location of the firebox of a rocket furnace:
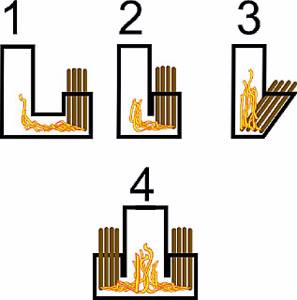
Typical diagrams of rocket stoves
1 – The vertical firebox is connected to the chimney by a piece of pipe, which lengthens the path of hot air from the firebox to the outlet. The connecting section can be used as a hob.
2 – The vertical firebox, located next to the pipe, allows the entire structure to heat up quickly enough.
3 – The firebox, attached to the pipe at an angle, makes loading fuel more convenient.
4 – Two vertical fireboxes located on the sides of a pipe with a larger cross-section. This design will help to heat the container with the contents, placed on top of a special stand, much faster.
All rocket stoves have approximately the same operating principle. It lies in the fact that during the primary combustion of fuel placed in the fuel bunker, the resulting gases, which have significant energy potential, are burned in a vertical section of the pipe. For this purpose, a special secondary air channel is made, which ensures its supply, a kind of “suction”, directly to the base of the vertical pipe. That is, in this regard, a rocket stove in a certain way resembles the operation of a pyrolysis power plant. As a result, at the outlet of the oven, in its upper part, the maximum temperature is reached, which can be used to heat water or cook food.
In the simplest oven configuration, a stationary or removable nozzle is mounted on top of the pipe - for installing a container with water or other utensils.
The big advantage of a rocket stove is its efficiency, since it does not require a large amount of fuel to achieve the desired result. In order for it to function efficiently, a handful of dry wood chips or even dry grass is often enough.
Video: demonstration of the capabilities of the Robinson camping rocket stove
- A rocket stove installed for heating rooms works on the same principle. This design has been known since ancient times, and was traditional in the homes of many eastern peoples.
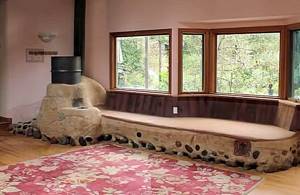
Stationary rocket stove with a heated bed.
With the help of these stoves, they not only heated the room - their warm bed was used as heated sleeping places.
By the way, in our time they are also in no hurry to abandon this design and use it for heating in private houses. In this stove model, the section of the chimney pipe is significantly elongated and passes under the entire stove bench, which transfers the heat of the combustion products. It turns out to be a kind of large heating “battery”, capable of heating a fairly large area.

Scheme of gas movement in a stationary rocket stove with a stove bench
- Another option for a rocket stove could be a small brick structure, built in a country house or in a garden plot. Moreover, if it is laid out in the yard as a temporary option, then the bricks do not even have to be held together with mortar. The main thing is to observe the location of all its elements.
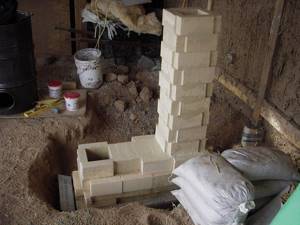
A rocket stove can also be made of brick.
A similar stove model is often offered in presentations of survival communities, which are quite common, for example, in North America. Such a stove can be manufactured in any existing conditions. In extreme cases, ordinary stones found nearby will be suitable for its arrangement, and large gaps between them can be filled with ordinary earth.
- A more complex, but also functional design, based on the same operating principle, is the rocket stove-stove, which will become an indispensable assistant in the country or in a private home in the summer. The large surface of the stove will allow you to simultaneously cook several dishes or heat water, as well as save on electricity or other fuel, since even a large amount of firewood is not required for the stove to serve its purpose.
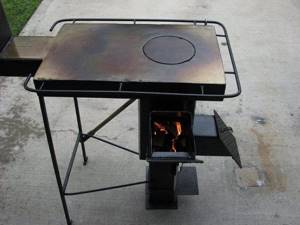
Improved rocket stove with hob
The hollow inside of the stove panel allows hot gases to pass through its entire space, capable of heating it to very high temperatures. Then, combustion products are discharged into a chimney located on the side opposite the combustion bunker.
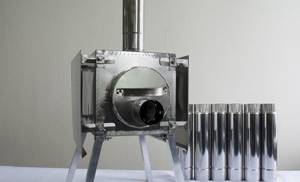
- But this portable version of a camp stove has a very small size, since it is made from an ordinary galvanized bucket, which is usually coated on top with heat-resistant paint.
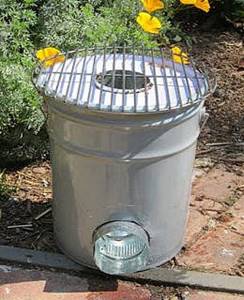
A rocket stove made from a metal bucket.
Inside the bucket, a structure of two pipes is installed, welded together and performing the functions of a firebox and a chimney pipe. The interior of the bucket, between its walls and pipes, is filled with sand (in camping conditions), or fine-grained expanded clay. This kind of “lining” will ensure heating of the vertical pipe so that the pyrolysis gases are actively burned in it. Thanks to this “layer”, significantly less fuel will be required to cook food or heat water.
It is very important to calculate the correct gap that should be formed between the stand for the container (in this case, made in the form of a lattice) and the pipe. Too large or small a gap will either reduce the heat transfer of the stove or interfere with the normal combustion process of gases.
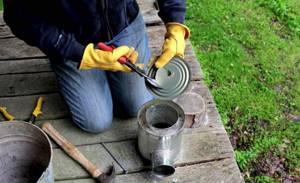
- You can do the same thing in the second case, if you need a device for quickly heating a small amount of water, for example, for brewing tea in extreme or camping conditions. To do this, you can build a small stove from an ordinary metal can. In order to use it to boil water or at least warm up a little, you only need a handful of wood chips or even dried grass.
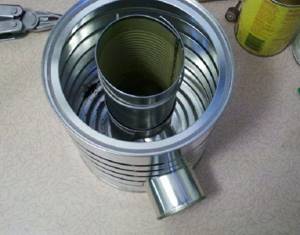
The simplest rocket stove can be made from cans.
The photo presented clearly shows that making such a design is not at all difficult. It is enough to have two large metal cans on hand, one of which will be used to make two tubes - vertical and horizontal, and the second will serve as the outer casing.
This “baby” will allow you to quickly warm water in extreme conditions
A stand for a container with water can easily be made from the bottom or lid of a jar by cutting out the middle of it, then making cuts on the inside of the resulting circle, and bending them down to form legs. This stand fits perfectly on the edges of the jar. The stand can also be made from steel wire by carefully bending several pieces and fastening them together.
Robinson type camping stoves
Today, various compact rocket-type camping stoves are on sale, with different names, including “Robinson”. However, an experienced craftsman, having looked at the structure of such a device, will immediately understand its design and will be able to draw up a drawing according to which it will not be difficult to manufacture it.
It is clear that the manufacture of such stoves will be available only to those home craftsmen who have the skills of plumbing and welding and have the necessary equipment and tools at their disposal.
Every good home owner should be familiar with welding technology!
In the everyday life of a private home, there are very often situations where it is very difficult to do without welding work. It is not enough to have a device - you need to have certain skills. We hope that a special article on our portal dedicated to the basics of working with electric welding will become a good tutorial for beginners.
You need to know that all camp stoves operating according to the principle described above have common parameters that must be taken into account when drawing up a drawing diagram, otherwise malfunctions may occur in the functioning of the structure. These characteristic features include the following:
- The vertical pipe must be at least twice as high as the length of the combustion hopper.
- The height of the fuel hopper, installed vertically, should be approximately equal to the length of the horizontal connecting section of the stove and the width of the combustion opening.
- The best location for the combustion chamber would be to install it at an angle of 45 degrees, since the plenum clearance is optimally located in it, and it is also convenient to place fuel in it.
- It is recommended that the cross-section of the fuel bunker inlet be approximately equal to that of the vertical pipe.
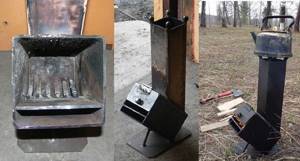
The first version of a camp stove
This model of camping stove is simple in design and manufacture and very compact in size. It does not require a large amount of materials, and it can be made in just a few hours.
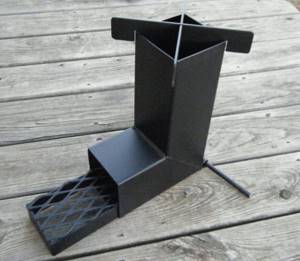
One of the simplest options for self-production
The stove has one important design feature - its lower part, which acts as the bottom of the fuel chamber (grid-iron), is made movable, so it can be pulled out, the required amount of firewood can be placed on it and pushed into the combustion hopper. If the chips are long, then the extended grate can be used as a stand for laying them. In addition, the retractable grill greatly facilitates periodic cleaning of the firebox.
For this model you will need:
| Name of materials | Dimensions | Quantity |
| Square pipe | 150×150×3, 450 mm | 1 PC. |
| 150×150×3, 300 mm | 1 PC. | |
| Steel strip | 300×50×3 mm | 4 things. |
| 140×50×3 mm | 2 pcs. | |
| Metal grate | 300×140 mm | 1 PC. |
| or steel rod for its manufacture | Ø 3÷5 mm | 2.5 m |
The work is carried out in stages and includes the following operations:
- Markings are made on blanks made of square pipes, since one edge must be cut at an angle of 45 degrees. Then the cuts are made using a grinder.
- The next step is to carefully weld the pipes together to form a kind of “boot.”
- In the upper part of the vertical pipe, at its corners or in the middle of each side, you need to make cuts measuring 20 mm in depth and 3.5 mm in width. A stand for containers will be installed in them.
- Next, the stand itself is made. To do this, one of the 300 mm long strips is cut in half. On the second strip you need to mark the middle and weld the prepared sections to it on both sides to form a cross shape.
- From the two remaining strips and short sections 140 mm long, the frame of the retractable device is welded. Here it is necessary to make a fitting and take into account the fact that the long strips should not be welded to the sides of the short strips, but overlap with them.
- On top of the finished frame, a finished grate or steel rods cut along the length of the frame with a distance of 10 mm from each other are tacked by spot welding; they will act as a grate.
- Then, a stand for the container is installed on top of the pipe, and the grate is pushed into the combustion hopper. Now you can test the finished furnace.
- If the test activities were successful, then after the metal has cooled, the furnace can be painted with heat-resistant paint.
- Although it is not provided for in this design, it is still recommended to additionally weld a handle to the retractable frame, which will help to more comfortably adjust its location.
The second option for a camp stove is “Antoshka”
This stove is a little more difficult to manufacture, as it has a larger number of elements. However, the work is still quite doable if you prepare everything necessary for this.
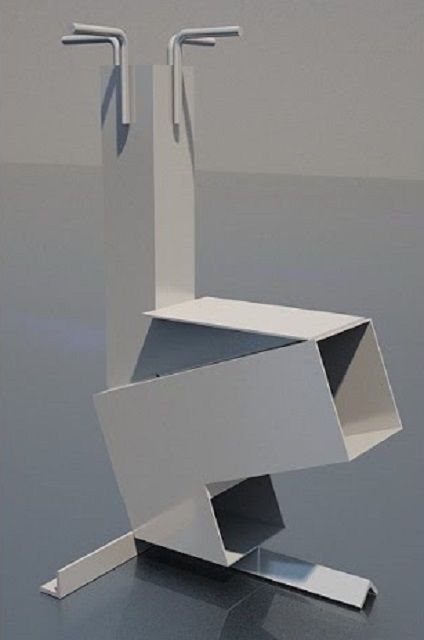
Rocket stove model "Antoshka"
The convenience of this design lies in the fact that it provides an additional heated plane. For example, you can install a container for cooking on a stand located on a vertical pipe, and at the same time use an additional plane fixed above the combustion bunker to heat water.
To make this model you will need the following blanks:
| Name of materials | Dimensions | Quantity |
| Square pipe for making a combustion bunker | 150×150×3 mm, length 450 mm | 1 PC. |
| Square pipe for making a lower ash chamber | 150×150×3 mm, length 180 mm | 1 PC. |
| Square pipe for the vertical section of the furnace | 100×100×3 mm, length 650 mm | 1 PC. |
| Metal plate for the panel above the firebox | 300×150×3 mm | 1 PC. |
| Metal plate to cover the back of the combustion hopper pipe | 150×150×3 mm | 1 PC. |
| Metal corner for stand | 50×50×3, length 300 mm | 1 PC. |
| 50×50×3, length 450 mm | 1 PC. | |
| Fittings or rod for stand-corners | Ø 8 mm, length 300 mm | 4 things. |
| Fittings or rod for the grate | Ø 8 mm, length 170 mm | 8÷9 pcs. |
| Triangular metal gussets for installing the hob | Steel 3 mm. The dimensions are adjusted exactly after assembling the stove. | 2 pcs. |
Next, some elements need a little work.
- The vertical pipe is marked, since its lower part must be cut at an angle of 30 degrees. A cut is made according to the marking.
- Then a pipe intended for the combustion bunker is taken, and a hole measuring 120x100 mm is marked and cut in its upper rear plane. A hole is also cut out from the bottom side of the combustion pipe, but already 150x150 mm in size - to connect this part of the furnace with the ash chamber.
- The next step is to weld the rear part of the combustion bunker with a plate prepared for this, and then pieces of metal rods are welded to the bottom hole from the outside at a distance of 10-12 mm from each other - this will be the firebox grate.
- Next, you need to make a blower chamber. To do this, take a piece of square pipe measuring 180 mm, and mark a cut on it at an angle of 30 degrees so that the size of the blower is 100x180 mm. The part must have a bottom and side walls, and the upper part will be welded under the grate of the combustion bunker on three sides.
- Now, for further work to be carried out comfortably, the stove needs to be placed on stands, which are made from metal corners, welded to the back of the combustion and ash chambers.
- The next step is to move on to working on the upper part of the furnace. A vertical stove pipe is welded to the upper opening of the firebox. After this, the top panel is tried on, and the angles of the triangles - the stands - are determined. Their configuration is drawn on paper, and then transferred to a metal sheet and cut out.
- The triangles are installed on the edge and welded to the vertical pipe and the “roof” of the cooking hopper. The triangular elements, together with the top plate, will create a sealed space above the combustion hopper, thanks to which the metal panel will remain hot for a longer time.
- Then, a plate measuring 300×150×3 mm is fitted and welded to the front upper edge of the combustion hole, the installed triangular supports and the vertical pipe.
- Having finished with this part of the furnace, all that remains is to weld the corners to the top of the vertical pipe, which act as a stand for the containers. Prepared reinforcing bars 300 mm long must be bent at right angles so that they have identical sides. The corners must be welded to the four sides of the pipe, raising them to the same height, so that their upper edge is located above the plane of the mouth of the vertical pipe at a height of approximately 30–50 mm.
- After this, you can test the structure and then paint it with heat-resistant paint.
Robinson oven
Next, two options for the Robinson stove will be considered - factory-made and home-made.
The device purchased in the store does not have a door that allows you to regulate the intensity of the primary combustion in the firebox, and some home craftsmen repeat it.
The Robinson stove can either be copied from the factory model, or some additions can be made
Other craftsmen who make a stove for themselves have tried to improve the design, making it more efficient, so such modernization is worth paying special attention to.
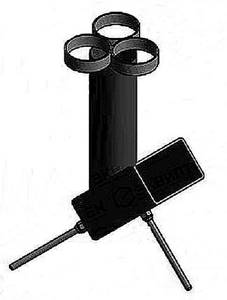
Option copied from an industrial design

Basic dimensional parameters of the Robinson stove
If you choose a factory version of the stove for self-production, you can easily understand its elements according to the drawing, especially since very few parts are required:
— Metal box of the combustion bunker, made of 3 mm steel sheet. The total size of the hopper is 150 × 100 × 300 mm. It is assembled from five plates 2 pcs. 300×150 mm; 2 pcs. 100×300 mm and 1 pc. 100×150 mm.
— Metal plate 150×200×3 mm for separating the blower channel from the combustion chamber.
— Metal pipe with a diameter of 100 mm and a height of 600 mm.
— Pieces of reinforcement with a diameter of 7–8 mm and a length of 120 mm — for the manufacture of a grate.
— Three rings with a height of 25÷30 mm, cut from a pipe of the same diameter as the vertical riser -100 mm, and one ring with a diameter of 110 mm;
— three d13 nuts, which are welded to the bottom of the combustion bunker and are intended for screwing the legs;
- three identical pieces of steel rod with threads cut into them, or ready-made studs (long bolts) with M8 thread.
Here it should be clarified that the upper stand may have a different configuration, since it does not play a special role in the efficiency of the device. The main thing is that this element does not have a continuous upper plane and is not located close to the mouth of the pipe, otherwise there will not be proper draft in the furnace and the fuel will not burn with the required intensity.
The stand for dishes can have a different shape
To make a stand of this exact shape, you need to cut three rings made from a pipe in half, and then weld them to a metal rod.
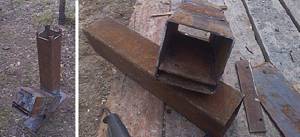
The work on manufacturing such a stove model is a little complicated by the fact that two elements of different shapes are used - a rectangular box and a round pipe. The assembly is performed as follows:
- First you need to prepare a plate separating the firebox from the ash pan. To do this, pieces of reinforcement are welded onto the plate, at a distance of approximately 10 mm from each other - this will create a grate.
- Then the finished plate with the grate needs to be welded to the side and rear walls of the firebox. It is welded at a distance of 30÷35 mm from the bottom edge. The plate must be installed exactly horizontally.
- Next, the corner joints of the rear and side walls of the chamber are welded.
- The next step is to weld the bottom part to the box, and to it three nuts for screwing in the legs.
- Next, the “roof” of the combustion chamber is secured by welding.
- Then, the pipe is marked, as it must be cut at an angle of 30 degrees. After the cut, instead of a circle, the cross-section results in an oval.
- The pipe needs to be placed with this oval to the middle of the surface of the “roof”, the welded box, at its very bottom and circled with a marker. A hole must be cut along this line in the plate, since a vertical pipe must be welded into it. You can also cut this shape using a high-current welding machine or a metal cutting machine.
- Next, a pipe is welded into the hole. A stand is placed on it to place the container. The legs are screwed to the structure, and testing is carried out, and then, if desired, painting.
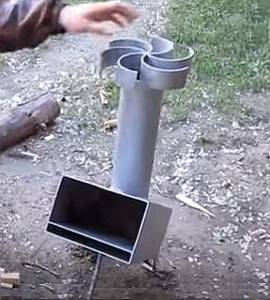
An improved version of the Robinson stove
This version of the stove is similar in design to the previous model, but differs in that the master installed a door on the combustion hole. In this case, the door tilts up. But, it must be said that this method of opening is also not entirely convenient, since with the help of such a valve it is impossible to precisely regulate the draft - it, in principle, has only two positions. The best option would be a damper that moves up and down or left and right, which is installed in corners welded to the walls, measuring 10x10 or 15x15 mm.
Robinson model, supplemented with a fuel chamber cover
In addition to this difference from the previous version of the stove, there are several others:
- For the manufacture of the combustion bunker, steel with a thickness of 5 mm was used.
- For the vertical section, a square pipe was used.
- Corners, decorative metal balls, as in this case, are used as a stand for containers, or you can come up with your own version of this element, which will be the easiest to manufacture.
- The stand for the stove itself also differs from the options presented above. It consists of a steel plate to which a leg made from a piece of reinforcement is welded.
To make this stove model you need to prepare:
— A pipe for the manufacture of a combustion bunker, 400 mm long, with a cross-sectional size of 160×160 mm.
— A chimney pipe 600 mm long and 120x120 mm in size;
— Panel separating the firebox and the ash gap. It is made of 5 mm steel sheet and 7÷8 mm metal rod. Its size is 155x300 mm.
— A plate measuring 180×350 mm – for a stand under the stove;
— Metal panel measuring 160×100 mm.
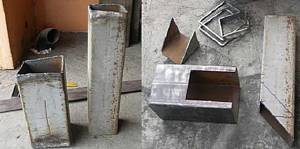
Blanks for the furnace and their cutting
The photographs presented show the material that is suitable for making the stove, as well as the process of cutting it. The cut part from the vertical pipe part can be used instead of a leg on a stand under the stove.
Jumper in the fuel chamber - to create a lower air channel
Further, the work is carried out in the same way as in previous versions of furnace manufacturing:
- A dividing panel with a grate is fixed inside the firebox.
- Then, the rear wall of the combustion bunker is closed and the vertical pipe is welded.
- Next, the entire structure needs to be installed and secured by welding to a metal plate. As a support, a piece of metal rod or a triangular part cut from the chimney is mounted in front.
- On the upper edge of the vertical pipe at the corners, pieces of corners are fixed by spot welding, which will become a stand for the container. They should have a height above the pipe of 40÷50 mm.
- Next, a door is installed on the combustion inlet (on hinges, as in this case, or in the form of a sliding panel in a frame of corners).
- The design is being tested. After this, the welding seams are cleaned and the furnace is coated with heat-resistant metal paint, which will not only make the device more neat, but will also prevent the appearance and spread of corrosion.
For someone who has the skills to work with various plumbing tools and a welding machine, making one of the Robinson-type furnace options is not difficult. The entire process of preparing parts and assembling itself will not take much time, but the stove will last a long time and will become an indispensable assistant in various situations.
Therefore, if it is not possible to install a stationary heating structure in a country house or purchase a ready-made cast iron or steel stove, then Robinson is exactly what you need. Moreover, its production does not require a large amount of materials, and to obtain the desired effect, a very small amount of any available natural fuel is consumed.
Video: homemade rocket-type metal stove
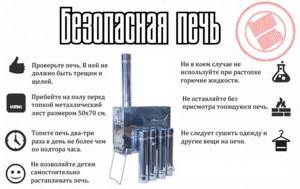
Precautionary measures
Oven operation can be dangerous in two cases:
- fire due to a spark hitting the roof of the tent or coal falling out of the firebox;
- poisoning by combustion products.
Preventing sunburn is simple. It is enough not to place flammable objects near the stove, make sure there is a special stand under it and block sparks due to the length of the chimney. In addition, a burning firebox should not be left unattended overnight.
The time it will take for it to cool down will be enough until the morning. This is 5–8 hours, depending on what metal it is made of. Thus, a sheet of tin will cool the fastest, while steel will cool slowly over many hours.
As for combustion products, oxygen is needed for fuel combustion. If it does not get into the pipe or there is not enough of it, then the combustion will proceed slowly. And then you need to increase traction by creating additional air flow.

It is also important to remember that you cannot cook a barbecue in a tent on a stove, like other food. The resulting smoke and carbon monoxide do not enter the chimney, as they are located inside the tent. And to get them out you need to open doors and windows. If this is not done, you can be poisoned by combustion products.
There are quite a lot of stoves for winter camping and fishing on sale. But if you don’t like the prices or quality of the products offered, then you can always make a stove with your own hands from scrap materials to provide yourself with the much-needed warmth and comfort on a winter night.
Compact gas heater
A gas heater does not have the disadvantages that a wood-burning device has. First of all, the problem of procuring or delivering fuel is solved, and there is also no need for electricity. This design functions thanks to the burner. The gas appliance is equipped with a closed and therefore safe combustion chamber, in the center of which there is a wick that does not require special maintenance.
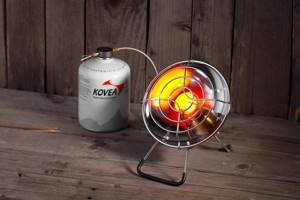
In the event of a sudden extinguishment of the flame, the automatic fuel cut-off shuts off the gas supply and thereby prevents poisoning of those present. The device can be metal or ceramic, it depends on the special attachment. It is equipped with a gas cylinder and a burner, which can be easily transported over long distances. Such heaters belong to the category of the most efficient source of heat and light. The quality and technology of modern gas furnaces provide comfort, safety and ease of use. Positive qualities of the device:
- high degree of mobility;
- good thermal efficiency and at the same time economical;
- safety of use (only when tipped over there is a risk of fire);
- light weight;
- ease of use.
The disadvantages are failure of operation due to severe frosts, the need to replace cylinders and a longer heating time for the tent compared to a wood-burning stove.