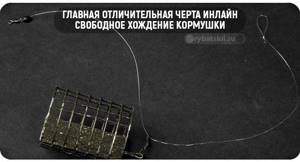
What is inline equipment for feeder
The sports inline style is not very common, unlike the famous Gardner loop, however, fishermen use it successfully in a wide variety of fishing conditions. Beginners should learn how to make such equipment, because it will come in handy when fishing for large trophies.
You can catch the following types of river inhabitants online:
- crucian carp;
- bream;
- carp.
This type of equipment for a bream feeder has quickly spread and become popular because many new modifications are appearing.
The essence of the method is that the heavy feeder is not at all tightly fixed to the cord, nor to its outlet. Limiters are installed on the braid, and the feeder moves between them.
Types of feeder and picker equipment
You can use different rubber as a shock absorber, but feeder rubber is more preferable. It does not stretch as much as a plug-in type and compresses more slowly.
The twist with a lead should be shorter than the twist with a leader, otherwise it will get tangled when casting.
Sliding equipment
They also use foam plastic, from which a reel of the desired shape and size is cut. In addition, you can insert a hook into the foam reel.
The rigs should be stored in a dark and dry place, because ultraviolet rays negatively affect the condition of the fishing line from which the rigs are knitted.
After use, you should thoroughly dry the assembly and then reel it on the reel, otherwise wet hooks will quickly rust.
If it is not possible to use a reel, take small ziplock bags, they are also convenient for these purposes.
Feeder tackle is widely available, and learning how to tie it is not that difficult. By gradually improving your skills in feeder fishing, you can achieve outstanding results.
Not every angler has the opportunity to regularly go on long fishing sessions and spend several days on a reservoir.
Feeder rigs allow you to catch decent trophies even during short fishing trips, and this is their undoubted advantage over other gear.
Inline principle
Fishing rod rigs can be made in a variety of ways. If necessary, the hinged choir is limited by a special stopper. For this reason, technically, inline on the feeder is divided into two types - absolutely free sliding and limited for quick self-notching.
Unlimited sliding
The essence of this sliding is that the caught fish will be able to reel in the main line until it reaches the slack of the clutch. When feeder fishing, the reel is always fixed, so the fish, after reaching the required resistance of the gear, will feel it and release the bait.
In this case, self-hooking rarely occurs, because the fish’s sense of danger increases during the pull due to the excessive flexibility of the rod tip.
This kind of fishing is best done in sports mode, as you need to constantly monitor the equipment and hook the prey in time. Inline is considered safe for fish in terms of the likelihood of a quick break in the braided feeder cord. If this happens, he can easily get rid of the cormak by pulling out a piece of braid and a leash from it.
Restriction by stopper
Beginner fishermen prefer to limit themselves to inline only with the upper stopper, because it is much more convenient. If there is a need to get a little distracted or leave the fishing spot, then when biting the prey will choose the main line right up to the stopper. Then it will hook itself or leave the bait.
This is a kind of safety net against dragging the rod into the river. The mechanics of operation of the equipment depends on the installation distance of the stopper from the feeder.
Such equipment is considered universal:
- if you move the fuse closer to the feeder, as in the running method with a tap, you get a blind paternoster;
- when the stopper is moved up 20 cm, the inline will act as an asymmetrical loop, because the free movement of the monofilament is the required distance.
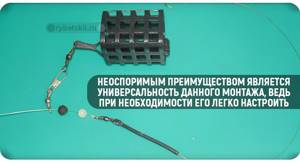
With active biting, self-hooking occurs very often. For this reason, this amateur installation option has many advantages. It is important to know how to tie it: the feeder can be quickly adjusted to certain fishing conditions right on the river, without modification.
Classic feeder
The simplest installation of a feeder with a feeder is a paternoster. Types of feeder equipment and installations - further development and improvement of such a connection. Let us examine in more detail their features and development path, as well as the nuances of operation and application.
Paternoster
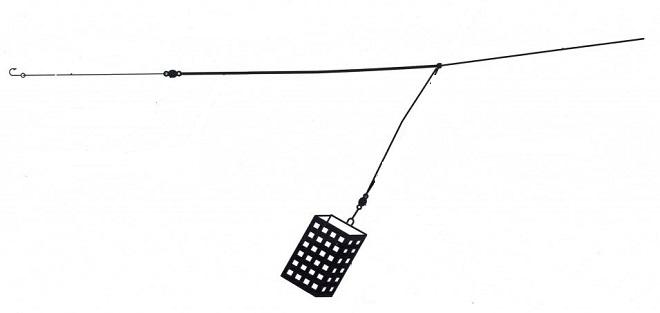
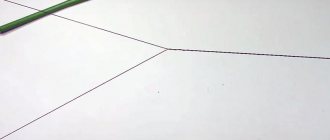
Sometimes there are such schemes
Because of this, novice fishermen have the illusion that the meaning of installation is in a straight line between the hook and the main line, and the sinker (feeder) is on the outlet. In fact, this situation is only in the picture. After casting, a straight line is formed between the rod and the feeder, and the leash is a branch to the side from the main line.
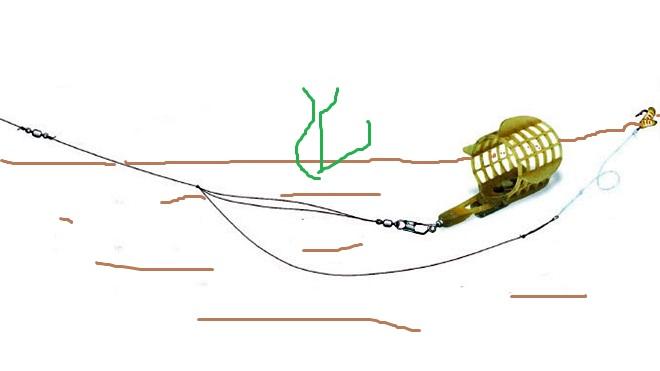
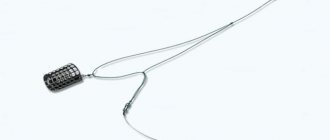
Paternoster (Gardner) in water
Doesn't remind you of anything? That's right, the blind installation we are all familiar with with a sinker at the end and leashes above the usual donkey or hook, only instead of a sinker a feeder is placed. So there is no need to extol the “great fishing discoveries” of the British. This is a classic rig for any bottom tackle. And it is effective to this day.
Athletes also use it in competitions. This type of outlet works great for fairly active fish, which boldly takes the bait into its mouth. This installation is very sensitive - the touch of the fish is directly transmitted to the quivertip. However, the stronger the current, the worse the bite is visible, since due to the inflating of the fishing line loop by the flow, the fish’s leverage is transferred more to the feeder, and not to the quivertip. Therefore, it is better to use the paternoster in places with weak or no current.
This installation does not hook the fish on its own, so when fishing you need to select the right hooking moment. However, a large active fish can jerk so that it lifts the feeder and hooks itself. The disadvantage of the installation is that bites are not visible at all when the fish pulls the leash in the direction from the feeder to the shore, towards the fisherman, as it straightens the leash from the sinker. In this case, the bite will be visible only when the feeder is moved toward the angler - the main line will sag.
Paternoster mating
This simplest option for installing a feeder with your own hands can be knitted on a pond in a couple of minutes. In the purely English version, a thinner fishing line is used to attach the sinker. This is so that in case of a possible snag when fishing with the feeder on algae or snags, the outlet comes off, and not the main line. Usually no one bothers like that - the main fishing line is used both for the feeder and for the lead to the leash.
Another drawback is the possible overlap of the leash on the feeder or main line when casting. That's why beginners sometimes don't like this combination. However, when the feeder is cast correctly (without jerking), overlap does not occur. A simple rule when tying also helps to counter this: the extension of the main line to the leash should be 5-7 cm longer than the branch with the feeder.

Paternoster and Gardner's loop
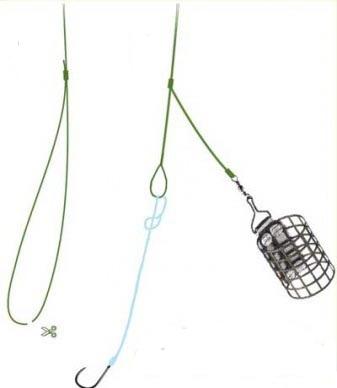
Symmetrical loop
The next installation on the feeder is a natural improvement of the paternoster, solving its main shortcomings, overlaps and lack of bite indication when the fish is pulled towards the angler. This is a symmetrical loop. The feeder is not attached to the outlet, but in a loop. The loop is formed in front of the section of the fishing line that goes to the leash.
Symmetrical loop
When working in the current, the feeder leash is no longer so tightly tied to the lever to the feeder. Therefore, this installation is more preferable for the flow than the paternoster. In addition, it is self-locking. Self-hatching occurs when the fish completely selects the loop to the knot when pulling, which is why the feeder, with its weight, drives the hook into its mouth.
When fishing in still water and using long leashes, especially on soft silt, the sensitivity of such feeder equipment decreases. The leash may lie unevenly in the water - so the first touches of the fish may not reach the quivertip. In addition, the feeder, together with the outlet on the leash, can sink into sediment or mud, which also interferes with the transmission of a bite. The following equipment option solves these problems.
This installation of the feeder equipment is knitted in the same way as the previous one. However, the arm of the loop on which the feeder is attached is made longer by several centimeters. When the main line is tensioned while the asymmetrical loop is in the water, the attachment to the leash moves away from the feeder by the same distance and rises slightly above it (since the working part is located lower than the angler on the shore). Therefore, neither mud and silt, nor small objects on the bottom interfere with the transfer of influence from the leader to the twist and further to the quivertip through the main line.

This again brings this rig closer to the paternoster (according to the position of the leash in the water) and returns sensitivity - the hook and part of the leash lie on the bottom. But it joins the base above the bottom, since the main line gradually rises towards the shore. This option is best used on the bottom with plants or stones in a current that does not allow the feeder paternoster to detect bites. More details - feeder asymmetrical loop.
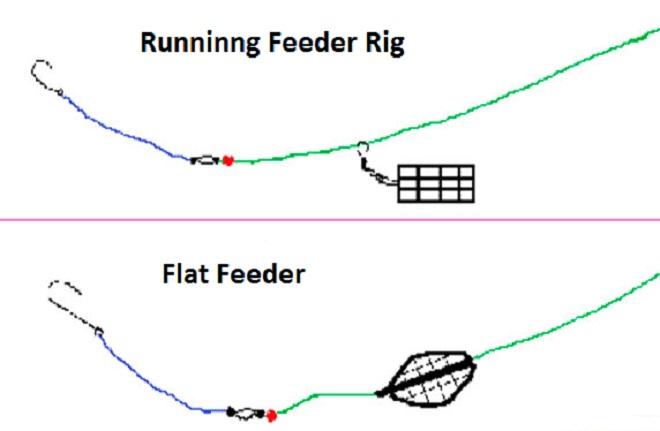
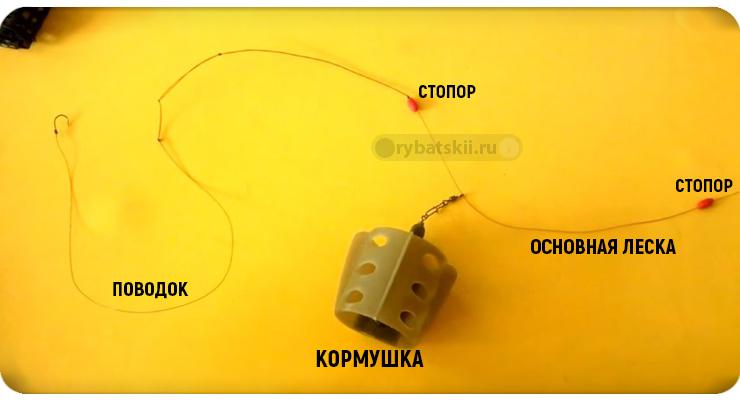
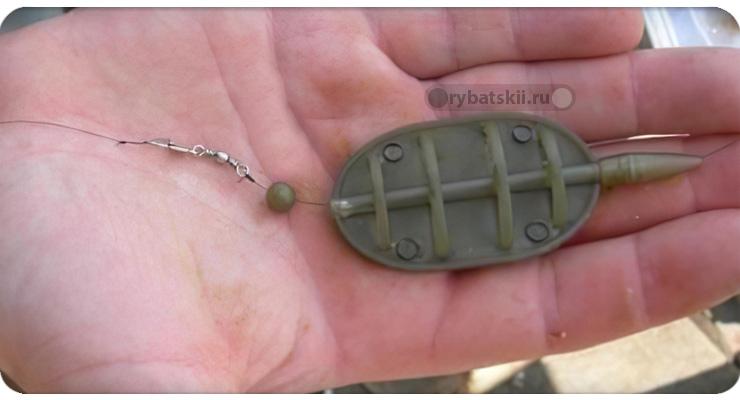
This is not a self-trimming feeder rig. However, it is not for nothing that feederists consider inline installation of a feeder to be catchable (Running Feeder Rig) in any conditions - in still water or on a current. The feeder is attached to the fishing line in a sliding manner - by passing through a swivel and is limited by a stopper. Below the stopper, a twist is made so that there is no overlap when casting, a length slightly larger than the size of the feeder.
In amateur fishing, the free movement of the fishing line can be limited by another stopper on top of the feeder - for self-notching (this is prohibited in sports). Feeder inline is the same as carp Running Rig. Here we mean passing the fishing line through the eyelet of the feeder mount. Feeders with a through hole are also attached using the inline method - feeder method, flat method, springs, but the line passes through the entire structure.
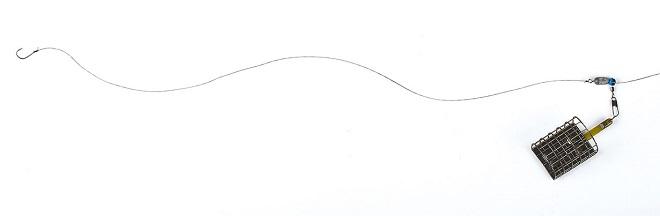
Inline (Running feeder)
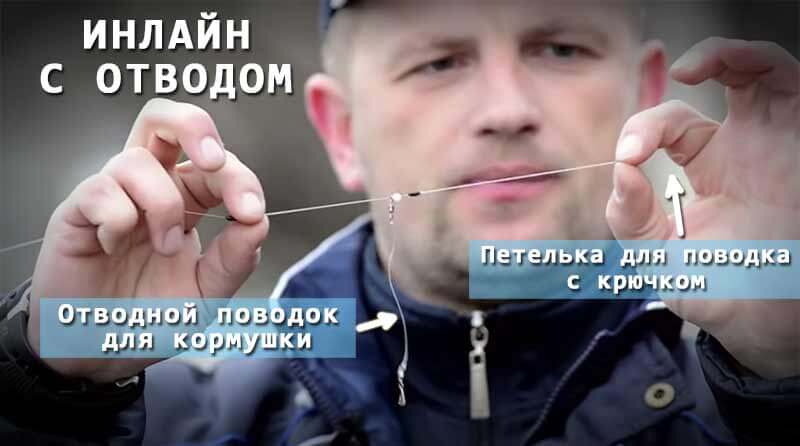
An improved option is inline with a feeder feeder on the outlet. The principle is the same as what distinguishes an asymmetrical loop from a symmetrical one. The goal is to bring the configuration of the rig closer to the paternoster in the water, to raise the junction of the leader and the main line above the bottom, to give this knot more freedom.
However, you should not throw the paternoster and asymmetrical loop out of stock - they will come in handy. Even the running feeder does not always work. The advantage of a running rig is that there is no resistance to the rig when the fish tries the bait. With a sluggish bite, she can simply throw the bait if it does not slip into her mouth with weak suctions. This does not happen with the Running Feeder - nothing prevents the fish from calmly trying the bait. More details – online in the feeder
Running with retraction
Inline principle
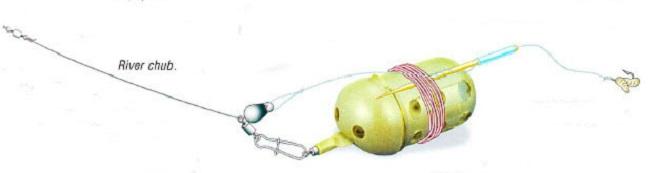
River Chub
An option for using inline for strong currents is River Chub. The current still puts pressure on the main line, forming an arc. And its resistance when pulling can alert the fish. To avoid this, temporarily shorten and fix the leash, for example, with a toothpick. A reserve is created for the first pull.
In this case, the long leash does not float in the stream, but is located next to the feeder. This is necessary so that in the first moments after taking the bait in the mouth, the line of the leash calmly straightens in the first seconds of the bite, and the fish does not feel the main cord, which is under the pressure of the current, when pulling. Here you need to properly mount the feeder feeder.
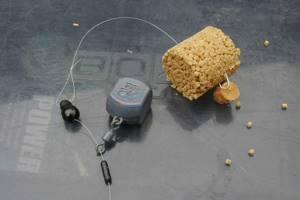
As a temporary solution until you learn how to knit special equipment, for a beginner, mounting it on a feeder tackle with an anti-twist is suitable. The main line is passed through the tube. On the leash there is a long arm of an anti-twist. At the bend of the tube, a feeder is attached via a carabiner. This configuration also prevents the leader from tangling with the main line or feeder when casting. This type of equipment is sensitive and works well on active, unfrightened fish.
Disadvantages - the windage of the tube reduces the casting range, there is a bulky equipment near the feeder on the bottom in the area where the nozzle is located. This option is widely used in regular donka because of its simplicity. However, once you have learned how to knit the correct twists, it also does not cause any difficulties. But the overall accuracy and invisibility of the feeder equipment is an order of magnitude higher. Article about feeder anti-twist devices.
Carp montages
The feeder is close to carp fishing. There is nothing stopping you from using carp rigs in feeder fishing for large crucian carp, carp or carp. Installation of a feeder rod can be done according to the canons of carp fishing - use safe clips, leadcore and other things. However, classic feeder ties for fishing in the current are no worse - you just need more powerful leashes and hooks. For fishing in still water for large carp, it is more advisable to use a flat feeder or inline equipment with a spring (more on this later).
Carp Running Rig
Carp with pellets
Helicopter and two knots
The helicopter feeder rig also came from carp fishing. Functionally, this is the same paternoster, only the leash is hinged on the main line, and its sliding is limited on both sides by two knots, stoppers. If you remove the top stopper, then in essence you get a running rig with a very long outlet (the distance from the place where the leader is attached to the sinker).
Helicopter and two knots
When is it appropriate to use
It is advisable to use the inline method with outlet for fishing in fast currents or in silty lakes. This equipment has proven itself well on lakes with soft soil and dense vegetation. Since the monofilament passes through the bead or swivel on which the outlet with the feed is attached, when immersed in viscous silt the device does not pull the remaining parts of the tackle with it. This is a kind of improved paternoster.
Having some differences in the methods of fastening the cormak, these types of equipment are made according to the inline operating principle. A thin leash with a sharp hook for the feeder is not made as a retractor, but rather forms a straight line along which the feeder can easily slide.
These types of tackle installations are made from simple nylon or fluorocarbon fishing line, as well as from braided cord. Some fishermen use leadcore or similar materials. When fishing with low-stretch braid, a feeder is used to compensate for the sharp jerks of the predator.
Accessories for in line
Nowadays a huge number of different auxiliary devices for fishing are produced. But for proper assembly of the inline installation, certain materials will be required.
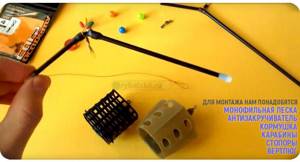
To properly manufacture inline feeder equipment, the following components are required:
- anti-twist;
- carbines;
- feeder;
- monofil;
- swivel;
- stoppers.
This equipment is very easy to assemble and is used mainly for catching large fish. It is often paired with a “Method” type cormak. First, a swivel and a feeder are attached to the fishing line - they should be between the beads. Then a small outlet for a thin leash is tied behind the stopper with a loop. It is necessary to take into account the size of the cormak, because the distance from the main loop to the locking part should be slightly larger.
Correct installation of inline is equipped with leads no longer than 50 cm to prevent overlapping of the equipment. With this fishing method, a special curved tube is used, which is called an anti-twist, which prevents tangling of the bait and the leash.
Online editing
The inline installation method for a feeder is not considered a specific equipment option, but a popular method of attaching a feeder in a sliding design. By this name, many novice fishermen understand the running feeder method, but there are other methods of equipment.
On monofilament line
A similar rigging scheme is performed directly on monofilament wound on a spinning reel. The edge of the monofilament is passed through the thin eye of a carabiner with a secure clasp, onto which the cormac is secured. Next, a bead is put on, the inner diameter of which is slightly larger than the size of the fishing line. This will allow her to move freely. The bead acts as a locking mechanism and prevents the swivel from sliding close to the leash outlet.
Then the withdrawal itself is made. To do this, leave 25 cm from the edge of the monofilament, bend the line in half and leave a small loop using a reliable knot. Next, the monofilament stretches in the air and twists.
The length of the lead should be such that a small loop for a thin leash is 4 cm below the feeder. To prevent the important twist from unwinding, you need to make a double knot at the very end and cut off the excess part.
Inline installation with outlet
With proper installation of the inline with a small outlet under the feeder, the feeder is first lowered to the bottom of the reservoir, and then, with some delay, the bait. For this reason, such equipment should be used when you need to fish on the fall.
The running feeder rig method with a small outlet is optimal for catching the following types of river inhabitants:
- bream;
- roach;
- chub;
- silver bream.
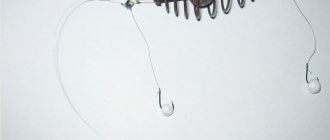
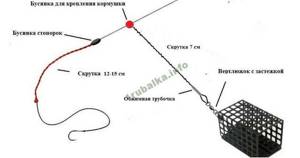
To assemble the gear, you first need to prepare an outlet for the feed:
- Since it must have a length of at least 7 cm, a bead with a large internal diameter is taken so that a double fishing line can fit into it.
- A piece of monofilament with a diameter of 0.33 mm and a length of about 20 cm is inserted into the bead.
- The monofilament is folded in half so that the bead is in the middle.
- Then each edge is securely clamped with your fingers and twisted.
- The twist is 10 cm long. Then a crimp tube is put on the monofilament and brought to a distance of 6 cm from the bead, and then the fishing line is passed through the carabiner.
- The rest of the folded monofilament is threaded into the tube so that a small loop comes out. Next, it is brought as close as possible to the swivel and compressed with pliers.
- The remaining antennae are cut off - and a ready-made outlet for the cormak is obtained.
That's not all. The bead is put on the main fishing line, and it should be followed by a small stopper. Then the feeder inline is made using the previous method, only the branch for the leash is made 10 cm longer - 30 cm are retreated from the edge of the monofilament, folded in half, and a knot is tied. This creates a loop. After this, a twist is made, which is fixed with a reliable knot, and the excess elements are cut off.
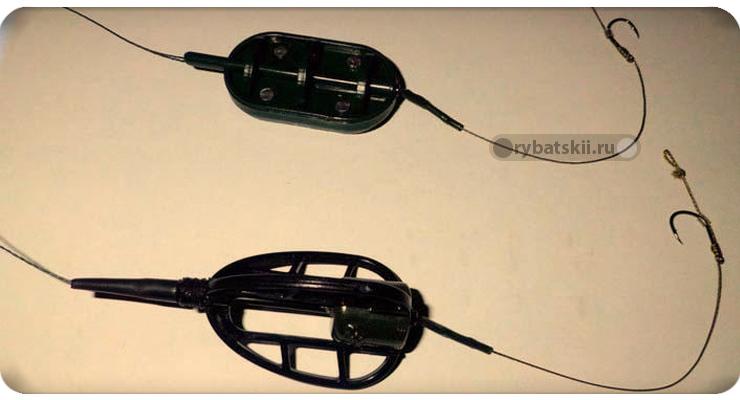
Installation of tackle flat method
A similar installation of feeder equipment is used for fishing both in slow currents and on muddy lakes, because the feeder has a wide and flat bottom. Thanks to this, the device is buried only a few centimeters into the silt, unlike other feeders.
To assemble the tackle, take a piece of monofilament no longer than 50 cm and a maximum diameter of 0.34 mm. One end of the fishing line is tied to a swivel, to which a thin leash for the feeder with a sharp hook will then be attached.
Then a bead is passed through the end of the monofilament and brought to the swivel - the bead itself should be slightly larger than the inner tube of the cormac. The monofilament is passed through the hole in the feeder, 40 cm away from the top edge of which, and a loop is made - the main braid will be attached to it. Many fishermen use a swivel instead of a loop. When installing using the flat method, the length of the leash is about 15 cm.
Carp equipment
To make an inline carp feeder rig, you need to tie a swivel to the monofilament, and then attach a blind rubber stopper, which must remain in one place on the monofilament. It is important to ensure that it does not injure the knot that holds the swivel. Then the monofilament is threaded into the hole of the “Method” cork, 25 cm of monofilament is measured and a loop is formed to attach to the main fishing line.
The leash can be made from monofilament or a special material for cyprinids. It is this element of the tackle that is subject to maximum wear and tear when fishing for prey. Fish can swim away into snags, break the monofilament on shells or sharp stones, so the rig’s leash must withstand heavy loads. The leash is made about 10 cm long. The hook must be selected with a hair coating to securely fix the bait.
How to tie
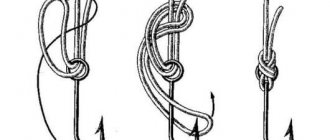
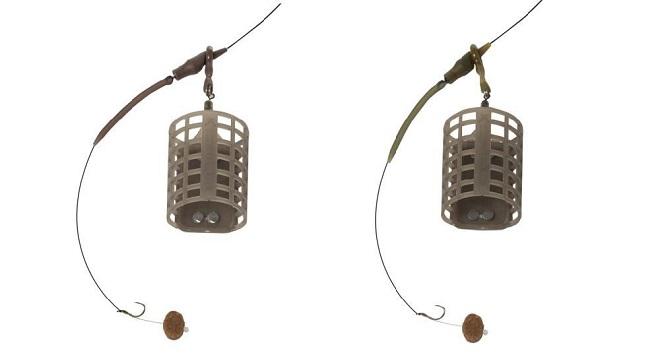
Option 1
- A swivel with a fastener is put on the working end of the fishing line.
- A piece of 15 cm is separated from the end of the fishing line and folded in half.
- A Figure Eight knot is tied.
- A twist is made, it should be rigid and 10 cm long. It is also twisted into a Figure Eight knot.
The equipment is complete, the feeder is attached to the swivel. A leash is attached to the loop. But such equipment does not have self-hatching of fish, so the angler must always be in place.
Option 2
- Beads are placed on a piece of fluorocarbon with a diameter of 0.3 mm;
- we fold this fluorocarbon halfway so that these beads are inside the loop;
- around the bead we twist up to 10 cm;
- put on the tube and pull until the twist begins;
- We thread a swivel with a clasp onto the ends;
- we pull the ends of the fluorocarbon through the tube, then clamp this crimp tube with pliers;
- the outlet is ready.
Now attach this entire structure to the main fishing line through beads. When fishing there is no swivel or carabiner, you can use a ring. The bead is usually placed above the swivel; it will protect this unit from being hit by the feeder.
You should also choose a swivel for the feeder; this is more suitable for homemade feeders. For example, when using a 60 g feeder, use a No. 14 swivel, and when fishing in still water, use No. 12. Use swivels and carabiners only in dark colors; a bright color will scare away the fish.
Sometimes when preparing an inline rig, a problem with the leader material may arise. Monoline is not suitable for the feeder, but braided line is just right. But this cord must be soft. The advantage of the cord compared to monofilament is that it has almost no memory. Almost always, after a few bites, a simple fishing line requires replacement.
Federgam online
If you use braid as the main fishing line, the tackle will turn out to be quite rigid, because the cord practically does not stretch. If an angler uses thin leashes, then there is a high probability of them breaking on large prey. Feeder rubber can solve this problem.
There are the following options for using feedergam in inline snap-ins:
- a small insert between the thin leash and the braid - on an anti-twist;
- a solid piece instead of a homemade twist;
- a rigid feeder along which the feeder moves - as a continuation of the main cord;
- flat-cormacks with a shock absorber inside the device.
The characteristics of the feedergam and the method of its use must be selected depending on certain fishing conditions. It is worth taking several types of rubber with you at once in order to change the fishing rod equipment in time.
What does the installation of feeder gear consist of?
Tackle elements:
- feeder rod with quivertip;
- reel with spool diameter 4000–5000;
- main line (monofilament or braided) with a cross-section of 0.18-0.28;
- shock leader;
- ledcore;
- feeders;
- leash with hook.
We suggest you read: Catching roach in autumn: tackle and bait
Elements of equipment are interchangeable and are selected depending on fishing conditions.
A special high-strength monofilament line or braided cord is used as the main fishing line. The feeder tackle must be sensitive, which is why a low-stretch line is chosen.
If fishing takes place over a long distance, it is important for the fisherman to quickly react to the bite and hook the fish.
Lines with high elongation are rarely used and are used exclusively when hunting for large fish, which actively resist and break off delicate equipment.
Leash
The leash is knitted from:
- monofilament leader material;
- mono fishing line of small diameters;
- fluorocarbon fishing line;
- fluorocarbon leader material;
- soft braided leash material.
The choice of material for the leash depends on the type of feeder equipment.
The length of the leash is selected depending on:
- fishing conditions;
- type of equipment;
- the presence of a current in a body of water.
It varies from 10 cm to 100 cm and more.
Hooks
Hooks for the feeder are selected depending on the size of the nozzle, but it is advisable to use smaller hooks.
Bream and crucian carp are attracted to colored hooks; for catching carp, grass carp and other large fish, hooks are dark-colored, nickel or Teflon-coated. Teflon coating improves camouflage, but such hooks become dull faster.
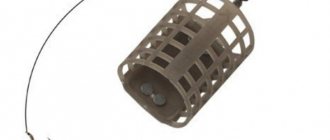
Feeders and sinkers
Feeder installations require a loaded feeder, so additional weights are not needed.
Feeders are made of plastic or metal, surrounded with quadrangular lead plates, or round, oval weights, it all depends on the type of feeder.
For long-distance fishing, heavy feeders weighing 50-120 grams are used, for short-distance fishing, 10-40 grams.
Expert opinion
Evgeny Zhirkov
Feeder fishing expert
Feeders are perhaps the main element of feeder equipment. The success of fishing and, most importantly, the pleasure of feeder fishing depends on the right choice.
On the pages of our website we have paid special attention to covering this topic.
We invite you to familiarize yourself with these materials:
To attach the feeder to the leadcore or main line, swivels with a carabiner are used, allowing it to rotate freely around its axis. This prevents tangling of the equipment and speeds up the process of changing the feeder.
Crimping tubes
If the leash is knitted from fluorocarbon, which does not hold knots well, crimp tubes are used to secure it. They are crimped using pliers, or a tool specially designed for this purpose.
Rubber or plastic stoppers are used to prevent the feeder from moving in sliding feeder rigs and to protect the assemblies from impacts.
Such plastic tubes are used for mounting sliding or blind feeder equipment; they prevent the leash from getting tangled.
The anti-twist is equipped with a carabiner for attaching the feeder and moves along the fishing line within the limits.
Equipment with an anti-twist “forgives” mistakes for beginners and is easy to tie, which is how they begin to get acquainted with feeder fishing.
Leashes for the feeder are knitted from thin fishing lines, but when fishing there is a possibility of biting a large trophy. To prevent possible breakage of the leash, a piece of feeder rubber - feedergum - is attached between it and the equipment.
It absorbs the jerks of the fish and prevents the leader from breaking, even with strong resistance.
Ledcore
Ledcore is a cord made of braided material of a camouflage or dark shade, with a metal core inside. Some types of feeder equipment are mounted on such a cord, such as the method, flat method, or installation with a spring.
Thanks to the heavy core, the equipment is pressed to the bottom, and when fishing, the icecore prevents accidental damage to the fish’s scales.
Shock leader
The shock leader is tied between the main line and the icecore on which the feeder is attached. It is necessary when fishing at long distances and power casts, when a thin feeder line can break.
The shock leader takes all the pressure upon itself and guarantees the strength of the equipment in the most critical place during casting.
If icecore is not used when installing the equipment, the feeder is tied directly to the shock leader. Special shock leaders are sold in stores, but regular braided fishing line with a diameter of 14–18 mm is also used.
Expert opinion
Evgeny Zhirkov
Feeder fishing expert
When fishing with feeder gear with a braided cord, use a shock leader made of durable and thicker monofilament fishing line (0.28–030 mm). It has stretchability and helps out during jerks and when fighting large fish.
Fluorocarbon fishing line (fluorocarbon) with a diameter of no more than 0.31 mm is also used as a shock leader.
Table for selecting feeder equipment according to fishing conditions
| Fish | Reservoir, bottom character | Equipment |
| Carp | lake, silt river, silt river, sandstone | Method Method Inline |
| Carp | river, silt river, sandstone | method , asymmetrical loop |
| crucian carp | lake, silt river, silt river, sandstone | Method, symmetrical loop Parthenoster Asymmetrical loop |
| Bream | lake, silt river, silt river, sandstone | Method Helicopter Asymmetrical loop |
| Roach | lake, silt river, silt river, sandstone | Parthenoster Symmetrical loop Helicopter |
| Chub | lake, silt river, silt river, sandstone | Helicopter |
| Vobla | lake, silt river, silt river, sandstone | Parthenoster Symmetrical loop Helicopter |
Features of using inline in the feeder
When using inline on a river, you need to constantly experiment until you can find a working option under certain fishing conditions. It is recommended to change the size of small hooks, the maximum length and thickness of special leashes, as well as the amount of free play of the feeder. Such actions are part of the correct fishing technique with a feeder rod.
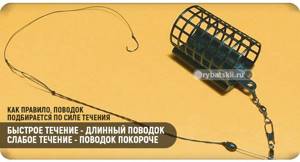
The performance of such gear in a turbulent current and in calm water is absolutely the same. In the first case, it is worth tying long leashes, because they are able to straighten under the influence of the flow to the feeding cloud. For still water, short leashes are suitable, since the hook should be near the feed.
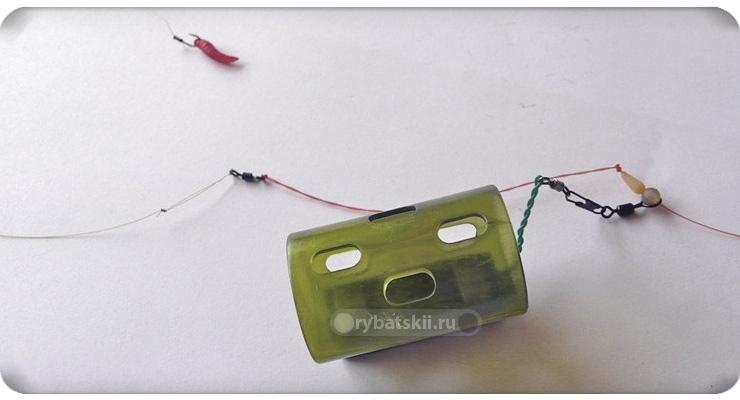
Inline on braided line with feedergam
To secure the elastic band during inline feeder installation, a loop about 15 cm long is made on the braid using a strong knot. A rubber outlet is attached to it through a through hole in the bead. Such a shock absorber allows you to dampen sudden jerks of prey on a braided cord. Then a swivel with a clasp is placed on the braid to secure the feeder or a strong outlet for a heavy feeder.
This work takes only a few minutes, and feedergam blanks and leashes can be made in advance. The stop bead is placed on one of the rubber outlet loops. Its length should be such that the leash loop is 7 cm below the feeder. Experienced fishermen advise knitting all loops with a reliable knot called a figure eight.
Symmetrical loop
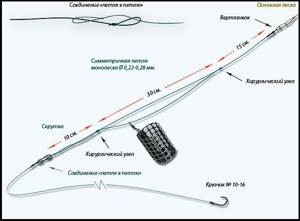
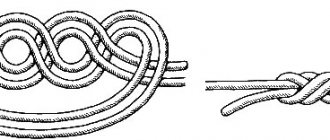
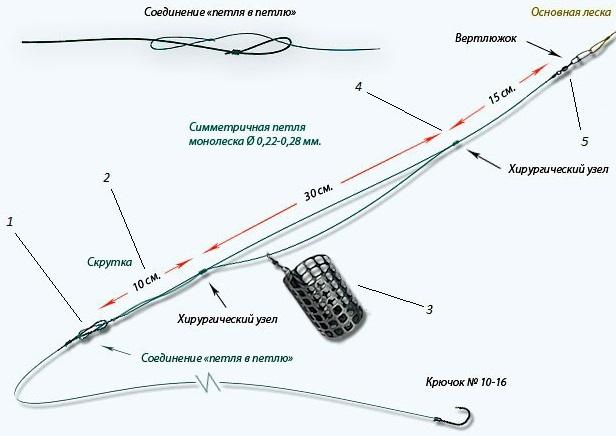
Asymmetric and symmetrical loops are made separately, and then attached to the main fishing line using a swivel. You will need a piece of rigid fishing line 1-1.5 m long and 0.2-0.35 mm thick. We fold this segment in half, and one side should end up being a little longer, about 10 cm.
Using a double or triple knot, we make a loop for attaching the leash. Next, we make a 10 cm long twist on the double fishing line, and at its second end there is another double knot. In addition to a long piece of double fishing line, we attach a swivel.
At the next stage, measure the required length of the asymmetrical loop and tighten the same double knot. As a rule, the length of the longer piece of double fishing line varies around 40-70 cm, the shorter one - 30-60 cm, that is, the difference between them is about 10 cm (in the case of a symmetrical loop, both sides have identical lengths).
At the second end of the asymmetrical loop we knit a knot with a swivel, through which the loop system will be attached to the main fishing line. All excess ends of the fishing line are cut off, the leash and feeder are attached.