Currently, there is a trend towards making your own spinning lures. This is especially true for Russian fishermen.
On the one hand, this reflects their high creative potential and ability to work with their hands, on the other hand, their reluctance to spend money on buying expensive branded baits, especially since homemade baits often turn out to be more catchy than those purchased in a store.
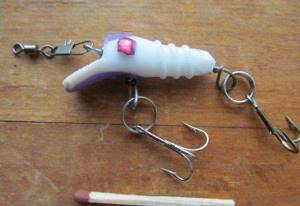
Wobblers, spinners, spinners and some other baits are made at home. A do-it-yourself wobbler made from a toothbrush is a vivid example of how, without spending almost a penny and with a minimum of effort, you can make a completely working bait.
Toothbrush wobblers are small baits used primarily for catching perch.
Manufacturing
There are two ways to make a wobbler from a toothbrush, respectively, and the baits obtained as a result of using different methods have external differences. The first of them is extremely simple, the second involves a slightly larger amount of work.
The material for the manufacture of this wobbler is a used plastic toothbrush .
First way
Tools:
- stationery knife;
- round nose pliers;
- lighter;
- nail.
In addition, in order to make a wobbler, you will need:
- Steel wire. A regular paper clip will do just fine.
- Winding rings.
- Treble hooks. To reduce the load, doubles are sometimes used.
- Super glue.
Manufacturing process
The wobbler manufacturing process includes the following steps:
- Using a hot utility knife, cut a piece of toothbrush to the required length.
- Using a lighter, the edges of the workpiece are scorched, giving it the shape of a future wobbler.
- A wobbler blade is made with a hot knife in the front part of the workpiece.
- Heat the nail and pierce the workpiece through and through in the longitudinal direction.
- Using pliers, they make loops - the front one for attaching the fishing line, the back one for the tee.
- Approximately in the middle of the workpiece, on the ventral side of the wobbler, use the same hot nail to make a hole into which another loop is inserted for attaching the tee.
- Fix the exit points of the loops with superglue.
- The wobbler is equipped with winding rings and tees.
Second way
This method is similar to that for making a wobbler from wood.
Materials:
- Toothbrush;
- steel wire;
- thin sheet of plastic.
Tools:
- hacksaw for metal;
- file;
- sandpaper;
- round nose pliers.
Naturally, you will need winding rings and treble hooks.
Manufacturing process
- Using a hacksaw, cut the workpiece to the required length.
- Using a file, the workpiece is given the shape of a future wobbler.
- The workpiece is processed with sandpaper to give it the necessary smoothness.
- Using a hacksaw, make a longitudinal cut along the ventral side of the wobbler.
- The frame is made. Having cut a piece of wire of the required length, make three loops - at the front and rear ends of the wobbler and in the middle.
- Insert the frame into the longitudinal cut and seal the cut with superglue.
- A hacksaw is used to make a cut in the nose of the wobbler, intended for the wobbler blade.
- A wobbler blade is cut out of thin plastic. This can even be done with scissors.
- Insert the blade into the cut and seal the insertion site with superglue.
- The wobbler is equipped with winding rings and tees.
A wobbler made using the second method has a more attractive appearance, although the process itself is more labor-intensive. In addition, the master has the opportunity to use blades of different sizes and choose the angle of its location relative to the axis of the bait, achieving the required depth of the bait.
Expert opinion
Knipovich Nikolai Mikhailovich
Zoologist, hydrobiologist. I am interested in fishing at a professional level.
Important! Wobblers made from a toothbrush are small in size and are used when fishing with light and ultralight class gear. Therefore, you should be careful when choosing winding rings and tees, namely their size. When casting and retrieving, the front and rear tees should not overlap.
Manufacturing of parts and their assembly
The entire process of producing a homemade wobbler can be divided into stages. This will give a clear algorithm for performing the work, including preparing the workpiece and materials and setting up the already assembled product. The most clear logical production path looks like this:
- production of main parts: body, blade and frame for the workpiece;
- assembly of parts into a product;
- testing and debugging the operating parameters of the homemade product;
- finishing, applying paint and varnish coatings.
We suggest you read: How to properly load a float for current and standing water?
Making homemade wobblers at home begins with measuring a sample. Next, select the appropriate block of material. When drawing the outline of the wobbler, the size is increased by 1 mm to allow processing of the shape.
Use a knife to cut out the required shape. The workpiece is clamped in a vice. A notch is made on the belly of the bait. It is performed by checking the sample. Next, the form is processed so that the notch is in the center. Symmetry is very important here.
Using sandpaper, the workpiece is made very smooth. In its bow, a notch is made at an angle, like the sample. Next, a blade is cut out of plexiglass or other suitable material according to the template. Using a file, the steering wheel is given the correct shape. The blade should fit tightly and symmetrically into the cut. Wire is attached in appropriate places.
At the final stage, all parts are glued together using epoxy resin. It is better to add sawdust to it (this will prevent the mixture from leaking out). When assembling, it is imperative to pay attention to symmetry.
All cracks, pores and irregularities are covered with resin. Hinges and other structural elements are cleaned with a file. Next, the product is primed using varnish with aluminum chips.
After complete drying, apply paint compatible with the varnish. The eyes of the wobbler are drawn. They should be white or yellow with a black pupil. The body of the bait itself can be of any color. Fish in water have difficulty distinguishing color. Therefore, the choice of shade depends only on the preferences of the master.
Some fishermen are interested in how to get rid of the smell of varnish on a homemade wobbler. Firstly, it should be noted that you cannot use cheap, low-quality varnish for such work. It is better to give preference to water-based varieties. They are completely safe for human health and are also durable.
Secondly, if a low-quality varnish was applied to the product, you can correct the situation. After drying, apply another layer on top. But this needs to be done with NC varnish. It dries quickly and eliminates the unpleasant odor of the previous layer.
The better the last layer dries, the stronger and more durable the wobbler will be. Finally, a tee is attached to it. The bait for predatory fish is ready!
Anyone can create homemade wobblers if they wish. It's a fascinating process. You can make a high-quality wobbler after several tests. It will bring a big catch and a sea of positive emotions.
Loading
By themselves, toothbrushes have positive buoyancy , but after they are loaded with winding rings and tees, they become sinking. In order to make them sink strongly, which is sometimes necessary, you can make a small hole in the body of the wobbler into which a lead pellet is inserted, and the insertion site is sealed.
You can also glue a small lead piece to the belly side of the wobbler. Other anglers want their wobbler to float. In this case, cut out a thin strip of polyurethane foam and glue it to the back of the wobbler with the same superglue. After experimenting, you can even make a suspended wobbler.
Adjustment
The final stage of making a wobbler is its adjustment . To do this, tie a wobbler on a fishing line to a whip and begin testing it in a container of water. When tilting the wobbler to one side, use pliers to bend the nose loop in one direction or another until the bait begins to work perfectly.
Expert opinion
Knipovich Nikolai Mikhailovich
Zoologist, hydrobiologist. I am interested in fishing at a professional level.
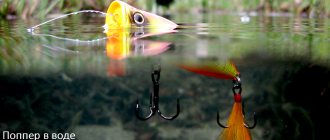
Interesting! Skilled fishermen make not only wobblers, but also poppers and walkers from toothbrushes. Of course, these baits must have positive buoyancy. Their production requires a certain amount of experience from the craftsman.
How to make a wobbler with your own hands
Having become familiar with the main stages of production, the fisherman can only develop an independent plan for making a wobbler or, without bothering with unnecessary thoughts, follow the action plan presented below, which will lead to achieving the desired result.
The manufacture of the case is perhaps the main and rather important point of production. It is in this part of the work that it is worth deciding on the type of wobbler and its main performance characteristics, which will serve as the initial data for choosing the material and a set of tools for carrying out the work.
The final quality of the product depends on the accuracy of the geometry of the shapes and the accuracy of the mounting slots.
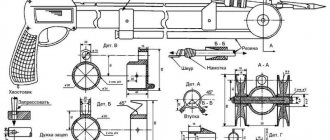
Wobbler drawing
A drawing of a wobbler can be taken from the Internet, or you can use a factory product for these purposes by placing it on paper and tracing the contour of the body with a pencil, then bringing the lines to perfect condition. For drawings and sketches, it is better to use thick, thin cardboard, which is more convenient to work with when transferring the outline of the product directly onto the wooden or plastic blank itself, previously prepared to the size of the future homemade product.
After transferring the outline to the workpiece, we cut out the part along the lines that were outlined around the sketch cut out of cardboard using a fine-toothed saw. Using a penknife, we bring the rough shapes of the cuts to smooth lines, removing as much excess material as possible. From the bottom of the workpiece along the length of the entire body we make a cut for installing the frame, and in the front part at an angle we make a cut for mounting the working blade.
We suggest you read: How to marinate fish for grilling
A drawing of the desired shape is made on the blank for the blade, and using a hacksaw for metal or a jigsaw, a blade or tongue of the bait is cut out of tin or plastic polycarbonate. The edges of the working element are processed with sandpaper or a file until all burrs are removed and the shapes are smoothed. When processing plastic, inspect the cut part for the absence of pores, chips and cracks both from the edges of the element and inside the material. A missed defect affects the reliability of the blade during operation.
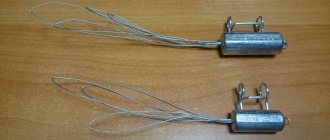
Frame
The frame is made from a piece of steel wire. When choosing a size, take into account the allowances for forming loops on the element. The frame will consist of two loops of ears or rings at their ends and one bend along the length of the part. The end rings are used for fastening the rear tee and the front carabiner, the bend is for mounting the central or lower tee.
Having prepared the components of the homemade product, they begin to assemble the product. The frame is inserted into the lower slot of the body and filled with epoxy resin, after which dries, the sagging is removed with sandpaper. The blade is placed in the slot from the front of the product with glue or secured with a pin, drilling through the body and blade of the wobbler, subsequently connecting them with a pin coated with glue. If necessary, the wobbler is shipped by symmetrically introducing pellets into the body from the sides or mounting lead plates.
Wobbler tests
Having assembled the design of the bait, they begin testing.
A piece of fishing line is tied to the fastening ring and they begin to draw the bait, monitoring the speed of penetration, manner, rhythm and stability of the game. If necessary, the wobbler can be adjusted by additional unloading, bending the fastening loops and changing the angle of the blade. Having achieved the required parameters, you can begin finishing the exclusive wobbler.
Assembling a bait made of soft material is different compared to assembling a wooden wobbler. The body of the bait is made from soft materials from two mirror parts, in which slots are made for the frame and blade. The frame is glued into one part, after which the wobbler is glued into a whole product and after that a spatula is mounted, again using glue. After the glue has dried, the sagging is removed with sandpaper, the wobbler is equipped with tees and adjustments begin.
Finishing
After positive tests, the size and shape remain unchanged, and the product itself is subjected to a thorough visual inspection for the presence of cracks, pores and small chips. The so-called finishing treatment of the bait is carried out. Microdefects are cleaned with sandpaper and filled with drops of epoxy resin, the excess of which, after complete hardening, is removed with zero sandpaper. After this, the product is ready for rough and final painting.
Advantages and disadvantages
The undoubted advantage of wobblers made from a toothbrush is the availability of the material . Another advantage of such baits is the ease of processing the plastic from which toothbrushes are made. Ease of manufacture is also a plus of these wobblers, as well as the low cost of the finished product. The latter characteristic allows you to use toothbrush wobblers in places where there are snags, without fear of leaving a fortune on the snag.
Finally, another advantage of a wobbler made from a toothbrush is that the angler can give it exactly the properties that he wants to get from it, i.e. realize your creative potential. This, by the way, applies to all homemade baits.
The disadvantage of a wobbler made from a toothbrush is that its dimensions are limited by the size of the teeth cleaning tool itself. Unfortunately, a large wobbler cannot be made from such starting material. But lovers of fishing with light and ultralight class lures will appreciate cheap and catchy homemade wobblers.
Materials for the bait body
When wondering how to make a wobbler yourself, first of all they pay attention to the material of the body.
Wood is most often used for these purposes. However, it is better not to use coniferous species to create a wobbler. Oak, birch or beech, which are difficult to process, are also not suitable. Linden is best suited for such bait. Some fishermen began to create wobblers from old balsa floats. Foam plastic, plexiglass or plastic are also quite suitable for these purposes. Even an ordinary household sponge will do for a homemade bait. Many anglers make wobblers for trolling for pike perch, pike or other predatory fish from this material.
It is better not to use polystyrene foam for pike fishing. Otherwise, the wobbler will quickly deteriorate under the teeth of a river predator. It should also be noted that special tools will be needed to process plexiglass and plastic.