The fly fishing rod is a telescopic form without guide rings and a reel. This fishing rod is made of carbon fiber or fiberglass and has a number of features not only in its structure and equipment, but also in additional elements.
This article will discuss in detail such a part of the fly rod as the connector, its pros and cons, selection rules and manufacturing methods.
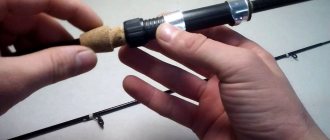
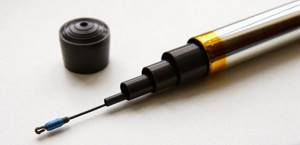
So, the connector is not an integral part of the fly rod equipment. It looks like a small fastener that is used to secure the finished rig to the fishing rod. It is usually attached to the very tip of the rod using super glue.
Today, there are factory-made connectors, which can be bought at fishing markets, and homemade ones, which are made by fishermen on their own.
Factory connectors include plastic or metal fasteners, while homemade connectors include latches made from all kinds of available materials.
On expensive fly rods, as a rule, connectors are already installed, while on cheaper ones, a small rope plays the role of a connector.
How to choose a connector?
In order to choose the right connector, you should use the following recommendations:
- The first thing you should pay attention to when buying a connector is its quality and reliability. It should be smooth without various joints on the alloy, sharp corners and any other defects, since a too rough sharp surface can easily cut a thin line not only when casting, but also when playing.
- The second thing a fisherman must make sure of is the material from which the connector is made. As mentioned above, they can be metal or plastic. It is better to give preference to metal connectors, since they are stronger and can last much longer than plastic fasteners.
- When buying a connector on the market, you should definitely try it on your fly rod. It should be clearly placed on the top of the fishing rod.
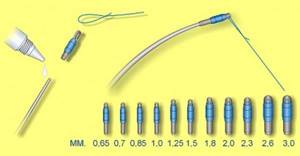
- The diameter of the inner surface of the connectors ranges from 0.66 to 4 mm. This should be taken into account not only when purchasing them, but also when purchasing the fly rod itself.
- Although connectors are not very expensive, it is still better to buy more expensive fasteners, since they are usually made of higher quality material than cheap connectors and have a longer service life.
Advantages and disadvantages
The positive qualities of this fishing rod connector include the following:
- It takes some time to make a knot in the whip. While the connector is distinguished by the speed and ease of replacing fishing line with a hook and other equipment.
- Reliability. The service life of high-quality models is quite long. In addition, when catching large fish, they do not break or become deformed.
Negative sides:
- Poor quality models break down very quickly and become unusable.
- Poor shock absorption properties.
In this case, it’s better not to go cheap. It is more profitable to purchase a product that is a little more expensive, but more reliable and durable.
Advantages of the connector
Using a connector for a fly rod has the following advantages:
- The connector allows the fisherman to very quickly replace one equipment with another without wasting extra time and effort.
- The connector is considered the most popular way to attach equipment due to the fact that it allows you to change equipment depending on the fishing conditions.
- Using the connector is very convenient and practical, since you do not need to tie complex knots or loops to attach it. It is attached only with glue.
- The connector has a low price compared to the elements of the equipment and the equipment itself.
- A high-quality connector can serve for quite a long time without deteriorating or breaking.
- Metal connectors can come in a variety of shapes, sizes and designs.
- Metal connectors can withstand quite a large load and not lose their shape.
- Very convenient as small fasteners, since they do not interfere with the operation of the gear.
Fishing technique and tactics
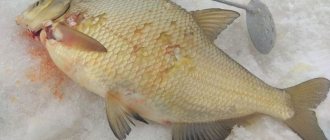
The main target of the floater is considered to be peaceful fish. Fishing with a fly rod involves a large selection of baits, feed mixtures and tactics. In the warm season, underwater inhabitants willingly take plant bait, and in early spring and autumn they prefer live food. Winter fishing is possible only in the absence of ice on the reservoirs.
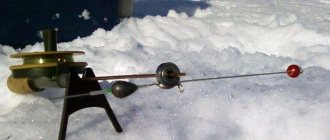
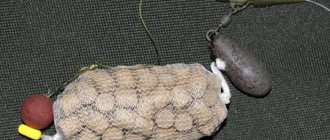
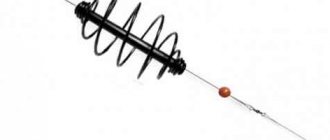
Regardless of the time of year, the chosen location requires careful feeding. To do this, you can use a cup-shaped feeder, which is attached to the connector and pours out at the fishing site. The technique is used at long distances, where it is impossible to throw complementary foods by hand. In some cases, a fishing slingshot is used.
Disadvantages of the connector
- A low-quality connector that has an uneven surface can easily fray the fishing line.
- The connector does not allow the use of very thin lines.
- Plastic connectors are very fragile and can break easily.
- It is highly undesirable to use connectors together with wobblers or any types of spinners, as this may affect the performance of the bait in the water.
- Poor quality connectors can bend and lose shape even under light load, making them impractical.
- The use of connectors if installed incorrectly can significantly affect the overall sensitivity of the gear.
- The connector must be light in weight, otherwise it simply will not be able to withstand the load from the bait used.
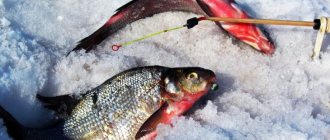
Nods for winter fishing
Today, nods for winter fishing have a huge variety of designs and materials. The assortment of fishing stores includes plastic, metal nods, and nods made of composite materials. In addition, there is a conditional classification of nods by purpose: for trolling, nods for balancers, jig nods for reelless and other types of winter fishing.
Winter nods for a winter fishing rod
In some cases, there is no point in making a nod for winter fishing on your own, as this requires time, skills and materials for manufacturing. Now, for 20 rubles, you can buy a ready-made nod for almost any fishing rod. The problem with ready-made nods from the store is that they are of little use for light jigs, and they still need to be modified.
The point of making a nod with your own hands is when you need a special nod for winter fishing - completely suitable for fishing with a specific bait (jigs, spoons or balancers).
Unlike guards or bite alarms, the main function of the nod is to guide winter bait, be it a jig, a balancer or a spinner. With the help of a nod, the angler monitors the bait's contact with the bottom, gives the bait the desired amplitude and frequency of oscillations, and registers the bite.
What should be the correct nod? It all depends on personal preference and lure playing style. For the same bait, you can use nods of different rigidity - straight and short or long hanging, and the effectiveness will depend only on the nature of the game. The correct nod is the one with which you can catch fish.
Correct nod stiffness
It is generally accepted that shorter and stiffer nods are suitable for catching predators, while long, strongly hanging ones are suitable for peaceful fish. But this is actually not necessary.
Making your own nods
Homemade connector
Factory connectors appeared on the fishing market not so long ago, so they were often made with their own hands.
There are many ways to make connectors for a fly fishing rod, but we will look at the most effective of them:
Fishing line connector
This is done this way:
- wrap the fishing line tightly around the tip of the fishing rod;
- make a small loop at the end;
- wrap this loop with wire or strong nylon thread.
Through-ring connector
It's done this way:
- wind the fishing line around the tip of the fishing rod and make a loop measuring three centimeters;
- insert a pass ring into the loop, which should be made of ceramic;
- leave another half space of fishing line from the ring.
Fine copper wire connector
It must be produced in the following steps:
- fold a small piece of copper wire in half;
- attach the wire with a strong thread to the very tip of the fly rod;
- equip the wire with a small carabiner;
- Lubricate the thread with glue to make it even stronger.
Connector made from regular rubber band
To do this, you just need to wrap it around the tip of the fishing rod. It is also important that the elastic is tight and does not stretch.
Carabiner connector
This is done this way:
- attach a carabiner with a clasp to the tip of the fishing rod with threads;
- also wrap a small piece of fishing line around the fishing rod and make a small loop (it will be a spare one);
- secure everything with glue.
This homemade connector is the most successful, but it also has a significant drawback - it is prone to tangling.
Whether to make a connector with your own hands or buy a ready-made product - this must be decided by the fisherman himself, but at the same time he must remember that such a fastener in any case should be useful and of high quality.
Fishing rod without rings, line fastening
Blind rigging is practiced on an ordinary bamboo fishing rod and on a telescope. It is a mistake to assume that it will be enough to simply tie the fishing line to the top of the bamboo fishing rod or to the thinnest leg of the “telescope”. In order to correctly tie the fishing line, you need to take into account:
- Firstly, the tip itself of telescopic rods is very thin, almost thread-like, and can break;
- Secondly, you need to connect the fishing line so that there is so-called feedback, the sensitivity of the bait.
- Thirdly, it is also necessary to tie it in such a way that, if necessary, you can easily change all the equipment.
In the case of blind equipment, there is no reel, so the fishing line will need to be wound on a reel. The main line should be shorter than the length of the rod and firmly, firmly attached to the tip (hence the name - blind rig). It will be difficult to drag the fish in with a long fishing line.
There are several ways to attach fishing line.
Connector
The simplest, in my opinion, is to use a connector or, more simply, a fastener. They buy it in the store, selecting it for their fishing rod.
Connector models differ in the method of fastening - internal or external. If it is inserted inside the tip, it is internal, if from above, it is external. You will need to select a connector according to the size of the tip. The conclusion suggests itself: it is better to buy a connector together with the rod in order to immediately decide on the model.
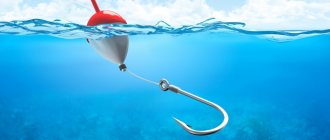
In order to secure the connector, simply glue it. Further, it operates on the principle of a fastener. A loop is made on the main line, which is inserted into the connector lock.
Here's what you need to know: Carp rod test
Another popular way to tie a fishing line. In this case, a loop-to-loop fastening is obtained. You just need to make such a loop for the tip of the rod. It can be made from fishing line or metal wire; a paper clip is often used.
Such a loop is wound to the tip of the fishing rod and secured with nail polish for strength. It is easier to attach the main fishing line to a wire loop than to a loop made of fishing line or nylon cord. This method is not good because at the end of fishing, in order to reel in the equipment on the reel, you will have to cut the loop from the fishing line once.
Kembirk
Instead of a loop, a cambric is put on the tip of the rod. This cambric, or just a piece of PVC tube, must be put on with force. The fishing line is pulled through this cambric, a knot is made and thus secured.
The second way to use cambric. One cambric is put on the tip of the rod, a fishing line is tied to it in a knot and wrapped around several times, a second cambric is put on top. To pull the cambric tightly, it should be heated.
The disadvantage is that the cambrics quickly fray, and at the most crucial moment you can lose all the equipment.
Another drawback is the line twisting or tangling of the tackle when casting, since it is not always possible to secure it perfectly straight. In this case, the cast turns out to be crooked and not clear.
You can avoid overlaps if you remove the loop-to-loop fastening. This can be done this way: do not make a loop at the end of the rod, but attach a piece of nylon cord about 3 mm thick and 10 mm long. Tie a powerful knot at the tip of this cord, and secure the main line with a self-tightening knot. A powerful knot on the nylon cord will serve as a stopper and will not allow the main line to move out.
Depreciation
When catching large fish, it is necessary to somehow dampen jerks.
And here's what you need to know: Feeder for ring fishing, how to make a feeder with your own hands for fishing
If your rod has a thread-shaped tip, a solid one, then the connector in this case will be better suited.
If the tip is hollow or mixed, then a round rubber band measuring 10-15 centimeters in size can serve as a shock absorber. Such an elastic band is attached with the help of a cambric, which is put on the top, an elastic band is wound to the top using a thread, the cambric is pulled tightly and secures the elastic band.
A large knot is tied at the end of the elastic band and a fishing line is attached to it, as in the case of a nylon cord.
If you don’t want to deal with connectors, cambrics, and loops, then buy yourself a fishing rod with rings.
Monofilament fishing line is used for the fly rod. When choosing, the following are taken into account: diameter, i.e. thickness, rigidity, ability to stretch, presence or absence of memory. You will learn about all these parameters by reading the label or asking the seller.
One piece of advice: don’t always trust what manufacturers write on the label; be prepared that the stated parameters will not correspond to the truth. Inexpensive, budget fishing lines always suffer from overestimated parameters.
The choice of fishing line is also influenced by the weight of the equipment. You won't be able to cast a light tackle on a thick line, especially if there is wind.
If you are using a soft line, then after fishing you should not wind the wet line tightly on the reel. It will stretch, and after drying it can break the plastic reel. Therefore, when reeling in, give some slack.
Folk sign: Sultry June - don't give a damn about fishing!
Where to buy a connector for a fly rod?
A connector for a fly fishing rod can be purchased at special fishing markets, where various equipment elements and other additional parts for such fishing rods are sold.
In addition, with the development of Internet communications, you can easily purchase connectors in online stores that professionally sell them.
Here is a link to one of these sites: https://www.superfisher.ru/Konnektory-i-amortizatory.html
As can be seen from everything described above, despite its rather small size, the connector for fly rods is a very important and necessary element, without which almost no professional fishing can do.
Using these recommendations, you can purchase a really high-quality connector that can serve you well for more than one fishing trip in a row.
Making nods and guards for winter fishing rods
Let's move on directly to how you can make various kinds of nods with your own hands.
Making nods
Let's say right away - there is no point in making a nod that can be bought in a store, there is a point in making a nod only if the design of the nod you need is not on sale (Shcherbakov's guard, crossbow guard), or you need to make a nod that is most suitable for the weight of a particular bait, or some kind of special nod. Athletes and fishermen who are seriously interested in winter fishing mainly use homemade nods.
Nevertheless, let's move on to practice. In any case, this can be used to refine store nods.
Almost any nod consists of a form and a holder (clamp, connector). Separately, we will focus on the manufacture of the nod holder, with the help of which it is installed on the whip of a winter fishing rod. It will be below.
Metal nods
Nods made of a metal plate are suitable for fishing rods equipped with a light spoon or balancer, as well as relatively large and medium-weight jigs.
The material can be a clock spring, a metal tape from an old tape measure, or any other available spring plate metal that suits our thickness.
Our task: cut off a strip of the length and width we need under the cone from the metal plate, give the nod a double taper, and fasten the winding ring.
Conical metal nod "swallow wing"
Do-it-yourself metal nod:
- We take a workpiece of the required length (6 – 10 cm);
- Using ordinary scissors or metal scissors, we cut a strip ~ 1-2 mm wide on one side (the working part of the nod) and up to 4 mm on the other - under the cone;
- Using sandpaper, remove sharp edges and burrs;
- Using sandpaper or a power tool, reduce the thickness of the nod plate from the tip side, giving the nod a double-taper;
- We solder or glue a light miniature ring made of thin stainless wire to the tip of the nod;
- Attach the nod to the holder.
The taper of the nod form in terms of thickness is necessary for better performance of the nod when oscillating (the nod bends not at one point, but along the entire length), but this is a rather complex and time-consuming operation, especially if it is done manually. In extreme cases, you can do without double taper.
Installing a final ring and intermediate rings on the nod makes the nod heavier and affects its operation, so you need to try to make these elements as light as possible. The end ring can be soldered or glued with reliable glue. Some people use a plastic ring that is secured through the bend of the tip of the nod and secured with a kebrik. All options have their advantages and disadvantages.
Sometimes, to give additional rigidity at the base, a twisted spring is installed in the holder, through which the nod itself passes.
Mylar nod
A lavsan nod can be used as a jig nod for a reelless jig, any light and ultra-light jigs, light spinners and balancers.
Plastic mylar nods are simpler and cheaper to manufacture. The problem is that commercially available nods are usually too rough for delicate gear. Most sports fishermen and some amateurs make them themselves and this is how they get the right nods.
To make a plastic nod (form), you will need Mylar film. You can “get” it in a fishing store or use plastic from PET containers. You should know that the material properties of different plastic glasses and bottles are very different from each other, so it is better to find high-quality lavsan. High-quality plastic straightens out at any kinks.
A plastic nod made of lavsan can be a simple cone, double-cone, or spring.
A simple nod made of lavsan
- Using scissors or a stationery knife and a ruler, cut a plastic strip 6-10 cm long to a cone from 1.5 mm to 3.5 mm;
- On the thin side of the nod, using a thin needle, carefully punches a hole for the fishing line;
- We fix the nod strip in the holder and install it on the fishing rod.
Despite the fact that we cut the strip according to the cone, the nod may not work exactly as we need. Therefore, we hang the jig on the nod, look, and begin to modify it, giving the blank plate a taper in thickness.
Controlling the tilt of the nod
Plastic is much easier to process than metal. You can grind the thickness of the plate into a cone using sandpaper, a razor blade, a scalpel, or a sharp ice drill knife. The main thing is not to overdo it when checking the deflection of the nod on the jig under which we make it.
You can see the process of making lavsan nods at the bottom of the article.
Spring nod
The spring design of the nod is somewhat more complicated - three plates of different lengths are already used here, one of which (the main one, the nod form) also serves as a tray.
Spring nod
Here's roughly how it's done:
- We cut a strip of the required length along the cone, leaving a reserve at its base for forming a tray;
- Along the width of the main plate, we cut two more strips that will serve as springs;
- We form a tray on the first strip by bending the edges of the plates;
- We install two spring plates in the tray, the length of one of which is 2/3, and the other 1/2 of the main one;
- We fix the structure by securing the plates together with two PVC tubes;
- We place the spring structure into the nod holder.
The complexity of this design lies in the formation of a tray for the spring plates, but you can do without it by fixing the plates together with a large number of PVC tubes. In this case, we can cut triple plastic in one motion, and we will get strips of strictly the same width.