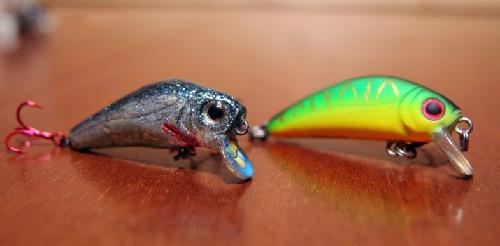
Making wobblers is an interesting and quite accessible activity for every angler. With a little carpentry and plumbing skills, you can make a fairly effective bait that can lure fish with its action and attractive appearance, similar to a real food object. Translating the idea into reality will not require much time, and the material part, taking into account the equipment and tools suitable for the work, is not anything special. Materials and tools for making wobblers can be found in almost every household, especially since most avid fishermen, as a rule, do not neglect the possibilities of making homemade products that can increase the efficiency of any type of fishing and save the family budget.
The article presented to the reader will cover in detail the issues of making wobblers at home. It will offer the fisherman directions in choosing the most suitable materials for these purposes and determine the set of tools necessary to complete the work. After familiarizing yourself with this information, the spinning angler will be able to replenish his arsenal of baits with a unique exclusive wobbler endowed with individual playing qualities.
Advantages of homemade products
Making wobblers with your own hands has a number of advantages over purchased products. As you know, wobblers, no matter how much you might want them to be, are included in the category of consumables that support the fishing process. Loss of bait is not uncommon in spinning fishing for predators that live in hard-to-reach places in water bodies with many underwater obstacles that can firmly sit on the tees of a wobbler and break the cord. Purchased baits still have a high price and the loss of each one constantly causes annoyance to the fisherman. Homemade products cost much less, and it will not be difficult for the fisherman to repeat the products according to the remaining drawings and notes. The price factor is considered the main advantage of homemade products.
It will be equally important to give the product individual working properties, which, in a narrow specific way, the master gives to the wobbler for special fishing conditions in certain bodies of water, having studied the preferences of the fish as a result of the practice of previous fishing trips. Another advantage can be considered the ability to change the color design of the homemade product. After all, the color can be radically changed or modified by adjusting it to the desired perspective spectrum at home right after fishing, based on the experience of the last fishing. The same can be done with the game design by changing the settings of a homemade wobbler for fishing.
Drawings for manufacturing
To make wobblers you need to draw up a diagram. It will include not only a list of materials, but also their characteristics - size, weight, location and method of fastening in the structure. The simplest model consists of a floating body made in the shape of a fish. A wire with detachments is installed in the longitudinal section. She also performs the functions of a sinker. A blade is mounted in the bow.
Which headlamp is best for fishing - technical specifications and model overview
The advantage of such wobblers is the ability to make repairs in the field. However, they lack an important factor for bait - no sound waves. Therefore, it is better to make a complex wobbler with your own hands on the recommendation of a professional.

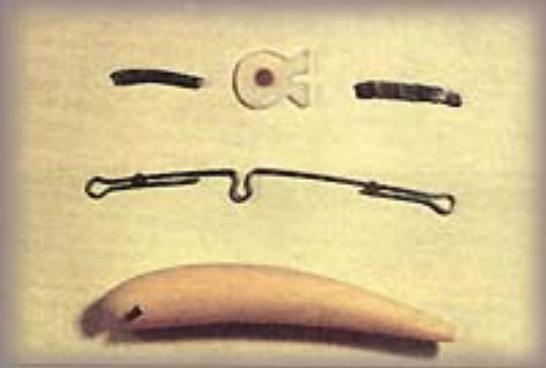
It consists of the following parts:
- Hollow body divided into three chambers.
- Large and small noise chambers located in the frontal part of the bait. To generate sound waves, small plastic balls are placed in them.
- Places for attaching hooks.
The disadvantage is that it is problematic to repair such a structure. To make such a beetle wobbler, you will need a complex operation to form cavities in two parts of the workpiece. Recommended material is wood.
Material selection
When starting to make a wobbler with your own hands, the first priority is to determine the material of the product body. The remaining elements of the product do not have any special differences in the choice of materials, and the frame and blade of wobblers in various variations of the bait body are made of the same materials. Only home-made paints and varnishes, which are selected based on the final planned production results, can be replaced in the compositions. In the following sections of the article, we will dwell in more detail on the principles of the approach to choosing materials and possible options for their use in the manufacture of homemade bait.
Frame
The body is the basis of a homemade wobbler into which all the auxiliary elements are mounted. The selection of material initially lays down certain qualities of the future bait, which affect the performance characteristics of the wobbler. For example, by selecting the hull material, parameters such as the buoyancy of the product are achieved. The presence of different body densities of the bait will not require shipping for deepening or, conversely, to keep the wobbler on the surface of the water. You can assemble a primitive wobbler from a toothbrush with your own hands in a matter of minutes, without focusing too much on its narrow operating parameters when hunting for active predatory fish. But we will consider a more careful approach, choosing solid frames for the future product from durable materials.
Tree
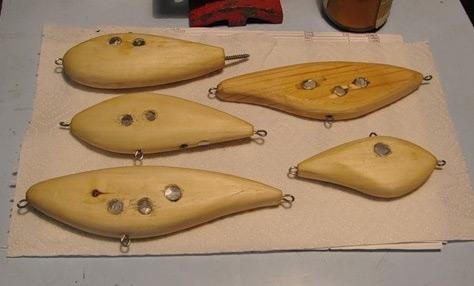
The cheapest and most accessible material for making wobblers is wood. Let’s not forget to say that the very first, already classic wobblers, were made precisely from wooden chips. Wobblers made of wood are distinguished by high initial positive buoyancy, and the workpieces are pliable to be processed and given the desired geometry without the use of high-tech equipment. Most often, alder, balsa linden and cork are used for blanks. Alder is a rather hard and difficult material to process. Linden is a hard, but easily workable type of wood. Balsa, despite its hardness, has the highest buoyancy properties. Cork, having high buoyancy, is soft and fragile, requiring special care in the manufacture of the product.
Synthetic material
Homemade products are successfully prepared using synthetic materials, without which in our time it is difficult to imagine modern fishing. Convenient and easy to process material such as polystyrene foam.
Important! For the manufacture of wobblers, it is worth choosing extruded, that is, high-density polystyrene foam, which is much more reliable in operation and more durable in use.
In addition, their preliminary preparation and painting itself are much easier to perform than operations with soft types of material. Another reliable and cheap material for blanks is the synthetic substance polyvinyl chloride, better known by the abbreviation PVC. This is a soft substance that is quite easy to process.
Blade blade
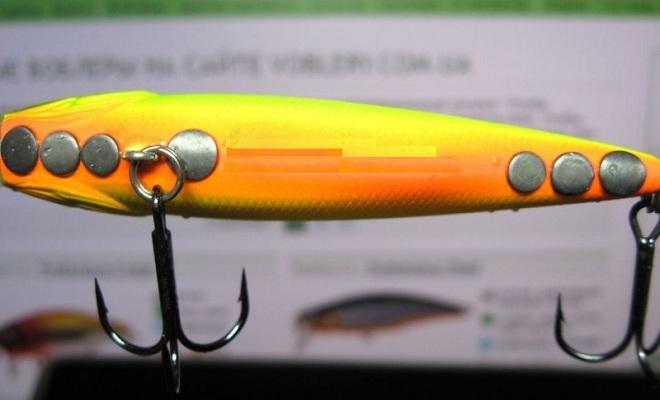
The distinctive part of most types of wobblers is its blade or tongue. This is a working organ that influences the depth of the bait and the pattern of its play. The blade must have significant hardness combined with low weight and plasticity, be little susceptible to abrasion and withstand loads from micro-impacts, which is typical for deep-sea models, on the soil of reservoirs. Most often, the blades are cut from metal or tin 1–2 mm thick, or made from viscous and mechanically resistant plastic polycarbonate 1.5–2 mm thick. These blade options are well processed into the shapes required by production conditions and are reliably glued into the frames of workpieces made of various types of materials.

Frame
Any homemade wobbler includes a metal frame, which is designed for mounting tees and connecting the bait to the main cord of the tackle. The frame is made of steel wire with a diameter of 0.3 to 0.6 mm, arranging fastening and winding loops using bends or twisting. Stainless steel is preferable to use, but in its absence, even carbon steels treated with anti-corrosion coatings last quite a long time. Subsequently, the frame is glued into the body of the bait. Visually, its presence in the product is noticeable only by the hinges protruding beyond the dimensions of the homemade product.
Shipment
Homemade products are shipped to balance the bait, giving it special properties of buoyancy, aerodynamics and style of play. For these purposes, hunting shot in various diameters, cut lead pellets used for loading float equipment, as well as all kinds of metal plates of different shapes and weights suitable in parameters for giving the bait the required weights according to the design conditions are used. Basically, the load is introduced into the body of the bait, and in some cases even the homemade blades are loaded, thus achieving optimal balancing and the desired diving horizon.
paints and varnishes
After assembly and shipment, homemade wobblers are painted. Before final painting, a preparatory layer is prepared using primers and epoxy resins, on which the paint adheres better. Paint is applied over the primers and resins used based on the workpiece material, most often BT-177 or any waterproof enamel in various color variations. After finishing painting, to maintain color stability and give strength to the painted layer, the product is coated with varnish.
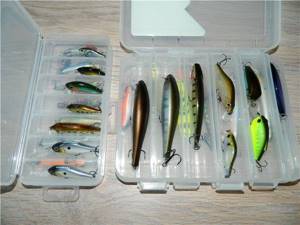
Types of boxes for wobblers
Fishing boxes for baits are:
- universal;
- specialized.
The latter option is sold by shops for anglers and is produced exclusively for storing spinners and wobblers. They may differ in design, number and volume of compartments and other configurations (for example, with removable partitions or double-sided boxes), which take into account the characteristics of a particular type and method of fishing. These boxes are made from high-quality special plastic, which is resistant to mechanical damage and does not react with the material of modern baits.
Not all fishermen have the financial means to spend money on branded boxes. Therefore, they adapt construction and carpentry boxes, food containers, first aid kits and other boxes for them, modifying them to suit their own needs. This approach also has a number of advantages: you don’t need to spend extra money, you can personally modify it and adapt it to your own needs; many of these boxes, especially construction and food boxes, are made of high-quality plastic, resistant to external influences, and designed for use in extreme conditions.
Both branded boxes and homemade boxes are actively used by fishermen; which one to choose depends solely on the wishes of the fishing enthusiast himself.
Specialized box for wobblers
The assortment of this type of box is so large that even fishermen with many years of experience get lost among the options offered.
If you have many types of baits, then large, spacious boxes are ideal for storing them. Such boxes usually have several levels, many pull-out pockets, and there are also models that, like a nesting doll, include smaller boxes.
Large boxes are usually taken by anglers who prefer to troll from a boat. Once installed on board the boat, the desired bait will always be at hand.
Matryoshka boxes are suitable for permanent storage of baits in one place and are not very convenient for transportation. Before fishing, simply select a smaller box with the necessary wobblers and remove it from the main box.
Bait storage
Wobblers and spoons have sharp hooks that can damage other baits. To ensure that active dangerous parts do not harm the bait, wobblers must be placed one in each compartment of the box. It is important that the compartment is slightly larger than the wobbler itself. A double-sided box is often sold on the fishing equipment market; this option is very convenient and compact, which is why we especially love it among spinning anglers.
Homemade bait box
Many people wonder how to make a box for wobblers with their own hands.
For these purposes, you can adapt and remake an ordinary lunch box or food container:
- We select a container of the required size; it is important that its lid does not dangle, but closes tightly;
- The inner part is framed with foam rubber, which will dampen noise during transportation, and it is also very convenient to attach wobblers to it.
Such a budget box for wobblers will save money and give the fisherman the opportunity to design a box to his own taste.
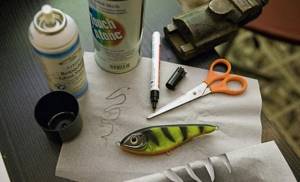
Tools
In order for an angler to make a wobbler, he will need to prepare a number of tools and equipment that will help facilitate and speed up production. To perform the work you will need: a sharpened penknife, a hacksaw for metal or a jigsaw with a fine file, a screwdriver with a set of wood drill bits of various small diameters from 0.5 to 3 mm, pliers, a small hammer, a file with fine notches, needle files, sandpaper 0,1 and 2 numbers of abrasive coating and tweezers. The equipment you will definitely need is a vice that allows you to reliably fix and subsequently comfortably process the workpiece.
Fishing tactics and techniques for retrieving this spinning bait
After a predator attacks on the surface of the water, I throw the bait to the left of the attack site and pull the wobbler 20-30 cm to the left and 20-30 cm to the right, doing this not with strong jerks, but with slow pulls with the tip of the spinning rod.
Or, in a similar situation (while casting along the shore or when fishing from a boat, after a predator comes to the surface), we throw along the attack of the wobbler and at an average pace we reel in 5-7 turns with the reel, then we pause for 2 seconds, and again we do 5-7 turns. 7 turns of the coil.
When fishing from a boat or along a narrow reservoir with vegetation, after casting the bait, set the tip of the spinning rod in the position with which the amplitude and intensity of the wobbler will behave. The tip is at the bottom - then the vibrations will be frequent and the amplitude will be small. And at the top of the tip there is amplitude and oscillations in the opposite position.
We recommend: Spinner for catching large pike using a live frog
It is better to make the first casts with the tip towards the top and after 4.5 turns of the reel, change the angle of the spinning rod to the left, right. If after 3 runs there is no bite, then gradually lower the tip to the very bottom. When fishing with this homemade bait, the exit of the fish until the moment of attack is very clearly visible, and this pleases the eye, especially when the fish is about to grab the bait.
Main stages of manufacturing
The entire process of producing a homemade wobbler can be divided into stages. This will give a clear algorithm for performing the work, including preparing the workpiece and materials and setting up the already assembled product. The most clear logical production path looks like this:
- production of main parts: body, blade and frame for the workpiece;
- assembly of parts into a product;
- testing and debugging the operating parameters of the homemade product;
- finishing, applying paint and varnish coatings.
Materials for homemade wobblers
Bulk baits are made from different materials. Branded wobblers are produced mainly from plastic. Previously, decoys made from the lightest balsa wood were held in high esteem. They are still available, for example, in the assortment of such a well-known company as Rapala. But balsa is clearly becoming a thing of the past. In addition, some models are made of hard foam or wood. Typically, foam wobblers are not expensive. They are classified as budget or mid-range. In this direction, examples of Salmo, Jaxon and some other manufacturers can be noted.
In artisanal conditions, working with plastic is quite difficult. So the basic materials for homemade wobblers:
- wood;
- hard foam;
- cork.
As for the filling and equipment, wire, sinkers, metal balls, and hooks are used.
The wire is preferably stainless steel. Pure iron, steels with low carbon content, like paper clips, of course, bend easily. However, they also rust very easily. So you need to find a wire that is stiffer, springs, rusts slowly or does not rust at all.
For the manufacture of blades, plastic or sheet metal is used, preferably non-ferrous (copper, brass).
How to make a wobbler with your own hands
Having become familiar with the main stages of production, the fisherman can only develop an independent plan for making a wobbler or, without bothering with unnecessary thoughts, follow the action plan presented below, which will lead to achieving the desired result.
Case manufacturing
The manufacture of the case is perhaps the main and rather important point of production. It is in this part of the work that it is worth deciding on the type of wobbler and its main performance characteristics, which will serve as the initial data for choosing the material and a set of tools for carrying out the work.
Important! Manufacturing the body while performing all the work takes the lion's share of time in the construction of a homemade product.
The final quality of the product depends on the accuracy of the geometry of the shapes and the accuracy of the mounting slots.
Wobbler drawing
A drawing of a wobbler can be taken from the Internet, or you can use a factory product for these purposes by placing it on paper and tracing the contour of the body with a pencil, then bringing the lines to perfect condition. For drawings and sketches, it is better to use thick, thin cardboard, which is more convenient to work with when transferring the outline of the product directly onto the wooden or plastic blank itself, previously prepared to the size of the future homemade product.
Making a rough model
After transferring the outline to the workpiece, we cut out the part along the lines that were outlined around the sketch cut out of cardboard using a fine-toothed saw. Using a penknife, we bring the rough shapes of the cuts to smooth lines, removing as much excess material as possible. From the bottom of the workpiece along the length of the entire body we make a cut for installing the frame, and in the front part at an angle we make a cut for mounting the working blade.
Making a blade
A drawing of the desired shape is made on the blank for the blade, and using a hacksaw for metal or a jigsaw, a blade or tongue of the bait is cut out of tin or plastic polycarbonate. The edges of the working element are processed with sandpaper or a file until all burrs are removed and the shapes are smoothed. When processing plastic, inspect the cut part for the absence of pores, chips and cracks both from the edges of the element and inside the material. A missed defect affects the reliability of the blade during operation.
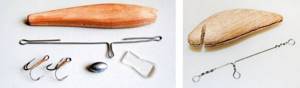
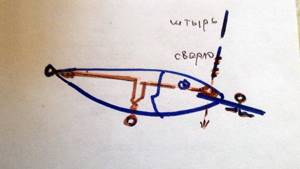
Frame
The frame is made from a piece of steel wire. When choosing a size, take into account the allowances for forming loops on the element. The frame will consist of two loops of ears or rings at their ends and one bend along the length of the part. The end rings are used for fastening the rear tee and the front carabiner, the bend is for mounting the central or lower tee.
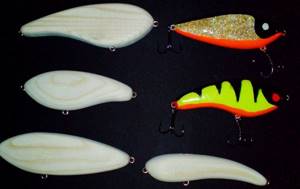
Assembling a wobbler from solid material
Having prepared the components of the homemade product, they begin to assemble the product. The frame is inserted into the lower slot of the body and filled with epoxy resin, after which dries, the sagging is removed with sandpaper. The blade is placed in the slot from the front of the product with glue or secured with a pin, drilling through the body and blade of the wobbler, subsequently connecting them with a pin coated with glue. If necessary, the wobbler is shipped by symmetrically introducing pellets into the body from the sides or mounting lead plates.
Wobbler tests
Having assembled the design of the bait, they begin testing.
Important! The easiest way to carry out the first tests is in a bath filled with water.
A piece of fishing line is tied to the fastening ring and they begin to draw the bait, monitoring the speed of penetration, manner, rhythm and stability of the game. If necessary, the wobbler can be adjusted by additional unloading, bending the fastening loops and changing the angle of the blade. Having achieved the required parameters, you can begin finishing the exclusive wobbler.
Assembling bait from soft material
Assembling a bait made of soft material is different compared to assembling a wooden wobbler. The body of the bait is made from soft materials from two mirror parts, in which slots are made for the frame and blade. The frame is glued into one part, after which the wobbler is glued into a whole product and after that a spatula is mounted, again using glue. After the glue has dried, the sagging is removed with sandpaper, the wobbler is equipped with tees and adjustments begin.
Finishing
After positive tests, the size and shape remain unchanged, and the product itself is subjected to a thorough visual inspection for the presence of cracks, pores and small chips. The so-called finishing treatment of the bait is carried out. Microdefects are cleaned with sandpaper and filled with drops of epoxy resin, the excess of which, after complete hardening, is removed with zero sandpaper. After this, the product is ready for rough and final painting.
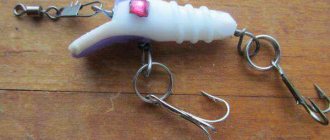
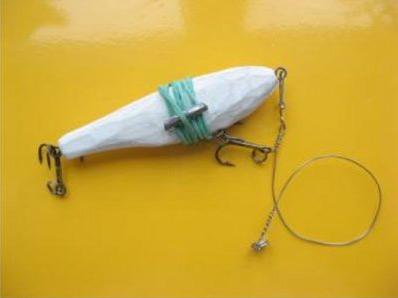
Wobbler loading
The most important thing begins - loading the wobbler. It is better to underload a wobbler than to overload it. I use hunting shot to load the wobbler (it’s easier for me to work with), we compress the shot with pliers, and insert the resulting plates into the slot (photo 5). (In the photo, I did not sink the lead deeper so that it can be clearly seen.) We insert lead plates along the entire length of the wobbler.
We fasten the clasp with a carabiner to the front loop and go to the bathroom to conduct, so to speak, pool tests of our wobbler. By adding and moving lead plates along the cut of the wobbler, we achieve normal, excellent play (photo 6).
The time has come to answer why it is better not to overload the wobbler. After testing, the wobbler slot is filled with epoxy resin.
When the resin dries, it will add weight to the wobbler, from floating it can become sinking. After filling the lower slot and the slot with the blade with epoxy resin and allowing it to dry completely, we process the wobbler, remove all smudges, sand it, and prepare the wobbler for painting. Lately I have been sharpening the blades into a cone; the thick side is inserted into the body of the wobbler and I make cuts at the end on both sides so that it does not fall out during use.
Painting options
In practice, there are several color options, two of which we will consider in more detail in the continuation of our article, and the fisherman will choose the most suitable one when making his own wobbler at home for pike or other fish of interest to him as prey.
First way
In the first painting method, the tested product is primed, preferably white or gray, onto which the base paint is applied in contrast. Lures made of soft and porous material, for example, a cork wobbler, will have to be primed twice. After the soil has dried, they begin painting with basic tones, applying, in the fisherman’s opinion, a combative and promising pattern to the new wobbler. After the paint has dried, the bait is coated twice with deck varnish.
Second way
The second painting method will require more effort and time. It begins with completely dipping the wobbler into epoxy resin, followed by hardening of the composition. The dipping operation is carried out twice. After drying again, the future design is scratched onto the wobbler, and if the product is painted in a single color, the body is rubbed with sandpaper until it has a velvety surface. Having brought the surface into one of the states presented above, the bait is painted with waterproof paint and, after drying, coated twice with deck varnish. The method is ideal for finishing soft foam wobblers, further strengthening and reinforcing their surface with epoxy resin.
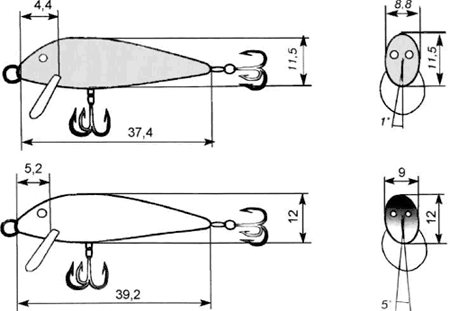
Blade parameters and wobbler depth
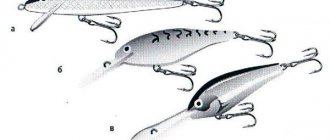
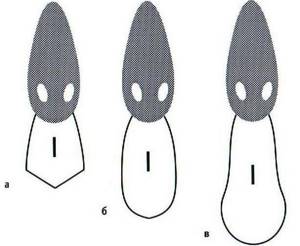
The blade of a wobbler has four main parameters: slope, length, area and configuration. Of course, their influence on the bait must be assessed comprehensively, but this topic is worthy of a separate book. Therefore, to begin with, let’s conduct a simplified comparative analysis and consider three blades of floating wobblers with different depths (Fig. 1).
Fig.1. Blades of floating wobblers "RAPALA" with different depths: a) Original Floating, b) Shad Rap, c) Down Deep Rattlin' Fat Rap.
The inclination of the blade determines the rate of descent. The smaller the angle between the blade and the horizontal axis of the wobbler, the steeper and faster the bait goes down.
The inclination of the blade partially affects the immersion depth of the wobbler. The most obvious example here is the floating model ABU GARCIA Hi-Lo (Fig. 2).
Fig.2. Blade with variable inclination.
The blade of this bait is fixed in one of 6 positions, thanks to which the wobbler goes to a new depth every time. The maximum depth is achieved when the blade is in the upper position, and the lower we lower it, the shallower the depth becomes. With the blade perpendicular to the wobbler's axis, the bait can no longer go deep, and with further deflection of the blade back, the wobbler begins to be carried to the surface.
The length of the blade determines the maximum depth to which the wobbler can dive. The longer the blade, the greater the working depth. However, in this case, the disturbing forces from the oncoming flow increase significantly. And if the bait is not stable enough, it is “swept” to the side until it reaches the surface. To balance such a wobbler, the line loop is moved approximately to the middle of the blade, then the bait retains its deepening ability and stability of play.
The area of the blade determines the game activity of the bait. In this case, the maximum rocking effect is achieved when the blade is perpendicular to the oncoming flow. If the water hits the blade at an angle, the disturbance and intensity of the game are reduced. Here, not the entire area of the blade works “for the game”, but only its projection, perpendicular to the flow. Therefore, despite the fact that different blades differ significantly in area, the play of their baits is approximately the same.
Made from foam or plastic
Foam or plastic are suitable for quickly making a disposable, but effective bait. The resemblance of an insect, for example, a May beetle, is cut out of the material using a knife or hacksaw blade.
Important! The credibility of the bait is not the most important factor; good presentation and realistic wiring bring good luck.
The cut piece is primed and a rigid wire is threaded through it, forming a fastening loop and an eyelet for mounting a tee. This option is excellent for making a surface bait known to spinning anglers as a non-hooking wobbler.
Features of selection and use
The priority criterion for choosing bait is the level of buoyancy:
- Floating.
- Neutral.
- Sinking.
Recommendations for use:
- Wobblers with floating features are used in the presence of standing water at medium depths, taking into account the implementation of fishing from the coastal parts of the reservoir.
- Neutral wobblers are primarily used in aquatic thickets where gaps exist.
- Sinking types of baits are used in reservoirs with a current in deeper layers of water. Fishing can be done from boats.
An equally important aspect of a successful perch catch is the presence of a wobbler shape. The following forms exist:
Form:
- Flat.
- Flat and elongated.
- Narrow, bar-shaped, with an exact imitation of live fish.
- Drop-shaped.
- Expanded, cone-shaped and cylindrical, covered with feathers and hairs.
Recommendations for use:
- Lures with a flat shape (SHED) are most promising for use in deeper water areas. The characteristic flat shape of the bait facilitates its use in reservoirs with a sandy, embossed or hard bottom.
- Lures with an elongated shape (RATTLIN) are considered sinking. They are used for catching perch, mainly in the autumn seasons, when, due to colder water, the fish go to greater depths.
- Lures with a narrow, block-shaped form (MINNOW) are considered the most universal due to their inherent varieties.
- Drop-shaped baits (FET) are effectively used in river backwaters, or in parts with small dams, where there is natural water noise and active surface water flow.
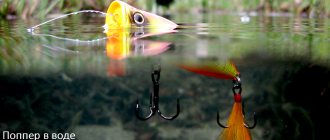
- Wobblers with expanded, cone-shaped and cylindrical shapes, with various coatings (POPPERS). Used with spinning rods and fly fishing. It is recommended to use poppers in shallow reservoirs, as well as in reservoirs where there is a lot of algae.
Color design:
- Design with golden shades. Used when fishing in the rain or in cloudy times.
- Design in silver colors, light shades. They are used when fishing in small, transparent and clean waters.
- Design with blue or blue shades. Used for deep-sea perch hunting.
- Decorated in bright shades of yellow or red. Used when fishing in muddy waters.
The sizes of baits, based on their varieties, amount to different volumes. There are wobblers of 2 centimeters in size up to sizes exceeding 30 cm. But the most practical baits range from 4 to 12 cm.
According to the classification of depths, wobblers are as follows:
- Subsurface wobblers (SSR).
- Wobblers, with shallow penetration (SR).
- Wobblers, with penetration to medium depths (MDR).
- Wobblers, deep (DR)
Recommendations for use:
- In the case of fishing on water surfaces, using SSR class wobblers, sizes from 2-4 cm (POPPERS) are selected.
- In fishing situations at shallow depths, taking into account the use of SR class wobblers, it is recommended to choose sizes starting from 7 cm (FET, MINNOW, POPPER).
- If fishing is carried out at medium depths, using wobblers of the MDR class, sizes from 8 to 10 cm should be selected (JERK-BAIT, MINNOW).
- In the case of fishing in deep areas of reservoirs, taking into account the use of DR class wobblers, the nominal sizes of baits should be from 10-12 cm or more (MINNOU, RATTLIN, SHAD).
There are other features of wobblers associated with the presence of movable connecting parts. As a rule, wobblers consist of several parts connected to each other. The presence of such a device ensures active play.
There are varieties of baits “equipped” with a source of sound signals (SHAD, RATTLIN, MINNOU, FET). Such baits are hollow inside, and metal balls are located in this part. Sound “equipment” serves to attract the attention of fish.
Foam fish

It is quite easy to assemble a wobbler-component from foam rubber. To do this you will need thick foam rubber and wire. Having cut out the first link in the form of a fish head or even a triangle with scissors, the element is threaded onto the wire, making two loops at its ends. The second part of the wobbler is cut out like a tail and, by analogy with the first part, is strung on a wire with loops. Now all that remains is to connect the central loops together, resulting in a two-part fish. A tee is mounted on the tail section, and the front loop is used to connect to the cord. Having loaded the bait with a Cheburashka, you can comfortably and most importantly successfully fish for perch, pike perch and pike.
DIY poppers
It’s quite easy to make homemade bulk baits for fishing from the surface of a reservoir: poppers or walkers.
The manufacturing scheme can be used the same as with cranks. The difference will be a more elongated workpiece. There is no need to make or position any blades. In the front part of the workpiece, it is enough to select a funnel-shaped recess. This is done either with a round chisel or with a large drill. They ensure that the popper does not sink, but lies on the surface, slightly immersing the lower part of the funnel in the water. Sometimes they perform models loaded in the tail.
From experience, such a homemade popper is easy to make. After a couple of attempts, we manage to make a bait whose characteristics are not inferior to good-quality store-bought samples.
So if you have a craving for creativity and homemade products, you can try yourself in the field of creating designer volumetric lures and wobblers.
Source: vizhivanie.com
PAID PONDS:
Source: fion.ru
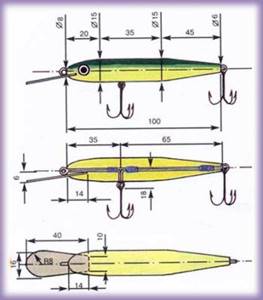
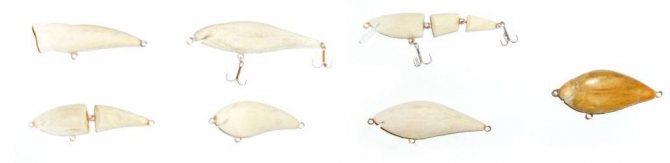
Drawings of wobblers with dimensions
Plan for manufacturing a blade wobbler
It is recommended to make a plan of sequential actions for making bait yourself, or follow a ready-made plan.
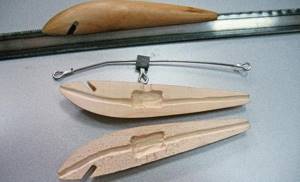
Case manufacturing
Wobbler drawing
- The contours of the bait are drawn on hard paper or aluminum foil - the wobbler is outlined with a pencil - side view, top view, adjusted using a ruler and patterns. You can make an accurate drawing using a caliper, patterns, or ruler. You can use drawings with exact body dimensions from the Internet.
- The outline is cut out.
- The contour is transferred to workpiece No. 1, outlined with a felt-tip pen or marker, and additional markings are made with a marker to indicate the places of fastening of the shipment, the frame for the tees, and the blade.

It is best to prepare preparation No. 1 in advance. A block of the required thickness from hard or soft material is cut to the size of the wobbler without a blade.
Making a rough model
- Using a fine-toothed saw, a rough model of a spatula is cut along a pre-marked contour from workpiece No. 1, made of hard material (You can use a jigsaw if you have the skill to work with a fine-toothed saw).
- Using a knife, a rough model of a spatula is cut out along a previously drawn contour from workpiece No. 1, made of soft material.
- The corners are trimmed with a knife, processed with coarse sandpaper, then with fine sandpaper. Recesses in the form of gills, eyes, and other profiles are sharpened with a knife and a file.
- Smoothed again with zero sandpaper.
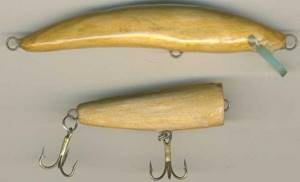
Rough model of a wobbler – Blank No. 2 made of solid material, ready for further processing.
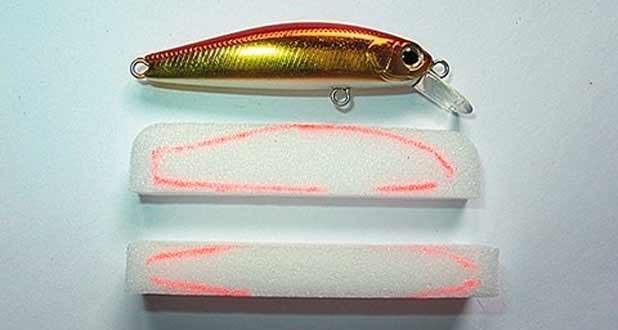
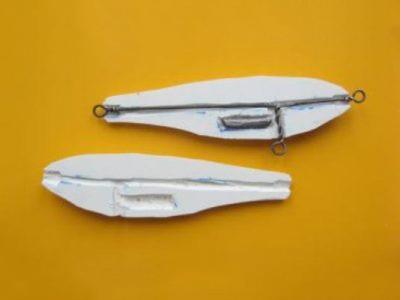
Workpiece No. 2 made of soft material is processed as follows:
- It is cut in half along the axis with a slight offset in any direction. You will get two halves - one slightly thicker, the other thinner.
- In the thicker half, channels are cut for the wire frame, and recesses are made for shipping. A lead shipment in the form of a small rectangle, which is easy to make with pliers and a hammer, works best.
- The two halves are processed with fine sandpaper to give the final shape of the wobbler.
- Wire frame is inserted and shipped.
- The two halves are connected, but until the bait passes the test, they do not stick together. The two halves are held together with a thin rubber band or thin wire.
- A slot is made in the head part of the bladed wobbler with a hacksaw at a certain angle to install the blade - the blade. When the blade is ready, it must be inserted into the slot, and the wobbler will be ready for testing.
Processing workpiece No. 2 from solid material.
The channels are cut with a fine-toothed saw for the wire frame and for the blade.
There are many shipping placement options:
- Fastening the pellets: in certain places, symmetrically on both sides, on the sides, holes are made with a drill with a depth slightly larger than the diameter of the pellets, the pellets are inserted, then filled with epoxy resin.
- Along the axis of symmetry: on the back or abdomen, in certain places, a hole is made with a drill to the size of the pellets, the pellets are inserted, and filled with epoxy resin.
- In the material of two halves, in the inner part, holes for pellets are cut in certain places.
- Fastening lead cylinders. In the solid material, in the right place, in the side of workpiece No. 2, a through hole is drilled to the diameter of a lead or iron cylinder, then the cylinder is inserted.
- The placement of rectangular shipments for soft material has been described previously.
Rattle made from pellets. A hole of the required diameter is drilled along the axis of symmetry of the wobbler, larger than the diameter of the balls. The balls are inserted into the hole, the hole is plugged with a plug made of wobbler material, greased with glue, and covered with epoxy resin. Or this: a thin-walled metal tube (can be picked up from children's toys or removed from a brush) is inserted into the hole, in which balls are pre-filled.
There are no clear instructions and recommendations on where and how to place the shipment. It all depends on the preferences of the angler. The main thing is to decide what kind of spoon you are preparing in terms of buoyancy, game, and retrieve. In any case, during testing, the weight and location of the shipment can be adjusted. Excess holes are plugged with a plug made of the same material as the wobbler, covered with epoxy or glue, and processed with a knife and fine sandpaper.
Making a blade
A blade of the required size is sawn or cut out of metal (1-1.5 mm) or plastic-polycarbonate (2 mm) along the prepared contour, the edges are processed with fine sandpaper or a file.
Depending on where the main line is supposed to be attached - to the head or to the shoulder blade, a wire frame is prepared. The loops are made in the places where the tees are attached. If you attach the fishing line to the blade ring, it is recommended, in addition to gluing the blade at the junction with the body, to prevent it from being pulled out of the body, to make a through hole in the body and blade, and insert a pin from a thin nail with a cut off head.
A nail slightly larger in diameter than the hole should fit tightly into the hole. In this case, the loop on the wire frame is twisted at the location of the stud pin. The pin will securely connect the body, wire frame, and blade. When loaded, the blade will not break out of the bait body.
The sketch shows that to attach the ring to the blade, it is recommended to make two or three twists in the wire bent in half to form a ring, insert both ends of the wire into the hole of the blade up to the ring, cut off the excess ends of the wire, straighten it, pressing the antennae tightly to the blade, cover with epoxy resin , clean up the sagging marks with sandpaper after drying.
Frame
The frame is made of ferrous wire. A wire with a diameter of 0.4-0.6 mm from a chain-link mesh used for country fences is suitable. Loops - rings on a wire frame are twisted at the points where the tees are attached. In the case of attaching the fishing line to the blade, the first loop in the front part of the frame is made in the same plane as the spoon. A pin - a nail - must pass through this loop, so it is made small.
Assembling a wobbler from solid material
- A wire frame with rings is inserted into the channel.
- Filled with epoxy resin.
- The spatula is inserted. Waterproof adhesive can be applied either to the paddle slot in the body or to the paddle.
- In the case of attaching the fishing line to the blade, a pin is inserted in the head part, as described above.
- We are waiting for the glue and resin to harden.
- We process frozen smudges.
Tests
For testing, a bath filled with water is suitable. The assembled bladed wobbler must be run-in. The fishing line is tied to the spatula either by the head or by the shoulder blade and pulled through the water.
If balancing, play, and buoyancy are satisfactory, then the bait is ready for further processing. If not, you will have to experiment with the inclination of the blade and the release. Excess holes can either be plugged with a plug with glue applied, or filled with epoxy.
After testing a wobbler made of soft material, we proceed to assembly.
Assembling bait from soft material
Let's repeat what was described above:
- After testing the bait in a bath of water, remove the temporary fastenings.
- Glue the two halves together.
- We are waiting for the glue to dry.
- Insert the spatula with glue applied into the slot.
- We are waiting for the glue to dry.
- We process glue smudges.
Finishing
Extra dents, holes, chips are not yet a reason to throw away a homemade product. Defects can be covered with epoxy resin. After the resin has dried, the sagging is treated with zero.
We finally clean up all the defects with sandpaper No. 0.
The body must be ready for painting.
Painting options
First
- Before painting, prime the body with any white primer enamel.
- The base paint is applied, and after drying the selected pattern is added.
- After the paint has dried, deck varnish is applied in several layers.
Second
- The workpiece is coated with epoxy resin with the addition of BT-177 paint to give the wobbler the desired base color.
- Before painting, the design is scratched onto the resin-coated body, or the body is lightly rubbed with No. 2 sandpaper.
- The selected design is applied to the spatula with waterproof paint.
- After drying, the homemade wobbler is coated with deck varnish in several layers.
Expert opinion
Knipovich Nikolai Mikhailovich
Zoologist, hydrobiologist. I am interested in fishing at a professional level.
Important. You don’t have to coat it, but put the homemade product in a container with epoxy resin. Next, you should pull out the wobbler and let the excess resin drain into the container. After the first layer has dried, repeat the procedure. To give strength, a minimum of two or three layers of epoxy is recommended.
The product is dry and ready for use.
Made from foam or plastic in the shape of an insect
You can make disposable baits in the form of insects, crustaceans, and worms. An insect, for example a cockchafer, is cut out of polystyrene foam (plastic) and processed with a file and fine sandpaper to give it its final shape. Portrait resemblance to the original is not necessary. For predatory fish, the main thing is that your work is in motion.
Next, the foam chafer is primed and painted. After drying, a ferrous wire is threaded along the axis, loops are made on both sides for a hook and a fishing line.
Two-piece foam fish
You can make a soft composite fish from foam rubber. Usually a two-piece fish is made.
- A loop is made at one end of a ferrous wire of the required length.
- From the other, sharp end, a blank of the first half of a soft fish cut from foam rubber is strung along the axis.
- A second loop is made.
- The wire for the other knee is threaded into the lower loop, and the loop is twisted on the second wire.
- A foam rubber blank of the tail part of the fish is strung onto the wire of the second bend.
- The last loop is made for the tee.
- The soft foam parts of the fish can be painted, although there is not much point in this. It is better to pre-paint the foam rubber in some color.
Whether or not to hang a tee in the middle is up to the fisherman to decide. Instead of tees, doubles or single hooks are sometimes used.
Such a fish is used with a lead sinker installed in front of the fish, or attached when fishing with a lead. When moving, if everything is done correctly, it will wag its tail and attract predatory fish.