You can supplement your fishing arsenal with homemade products, which often turn out to be even more effective than branded gear. So, you can make good quality jigs at home, which we will talk about in this article.
Making jigs is a simple process. You will only need some tools, some free time, minimal funds and personal imagination.
Sawing jigs
Sawing is the easiest way to make jigs. First of all, you will need a piece of a specific metal (copper, brass, bronze or stainless steel).
Using a jigsaw and saw, you need to cut the workpiece into the desired shape, then carefully process it with a file and sandpaper. Next, select a hook (preferably no larger than No. 4) and solder it to the made metal blank.
If you use a too small hook in which the eye will be sealed, you need to use a thin drill to make a hole for tying the fishing line. You can slightly change the shape with ordinary pliers, and to increase the weight of the bait, lead is used: it is melted and dripped onto the inside of a homemade jig.
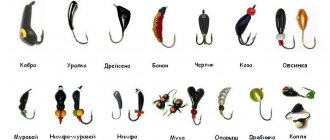
Winter jigs
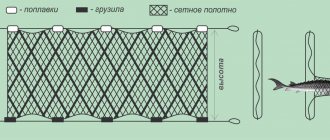
It is better to make jigs of provocative colors not monochromatic, but with dots, spots, and sparkles. When fishing in a current where fish are usually active, and large jigs have to be used, these lures are gray “camouflage” in color, but some part of the body is specially polished or has a contrasting color. At the same time, the fish perceives quite well the strong vibrations of a relatively large jig, and already close up it is provoked by a small, contrasting, noticeable part of its body. If we assume that the jig imitates some kind of familiar fish food, then it should resemble it not only in size and color, but also in the nature of its movements in the water. That is, a jig of each color, size and shape should have its own game. Theoretically, when you take two identical jigs, but different colors, their effective action should be different. Despite all the difficulties, the experiment calls for not giving up experiments. Firstly, it is quite exciting, especially when there is fish, but does not want to be caught. Secondly, if (even by accident and unconsciously) you manage to pick up a jig that is clearly quite catchy in these conditions compared to others, then this gives no less pleasure than the fish itself caught with it. In conclusion, a few more words about the color of the jig, but not from the point of view of its visual perception. An important issue is how this or that jig color is technically created. There are several ways to do this. The first and simplest is coloring. Good results are obtained by painting with hot drying and primer. But it’s better to paint relatively large jigs this way. You can also paint jigs with ordinary nitro enamels with atmospheric drying. In this case, the paint on the jig will not last long, but the lifespan of the jig is not that long. The best results are obtained by painting with the support of galvanic coating. Silver plating, cadmium plating, nickel plating, copper plating and copper plating with blackening give jigs the most commonly used colors. Unfortunately, none of the domestic manufacturers have yet mastered brass plating. Some anglers wonder if electroplating can be an ion generator and how this might affect the fish's attention? To this we can only say that in any jig, coated or uncoated, there is a galvanic pair, but the transfer of ions beyond this pair is unlikely to occur. Therefore, it is, of course, not forbidden to discuss the issue of jig designs that provide for the generation of cations, but the possible concentration will be so small that it will be very difficult to detect it against the background of the surrounding water.
Share on social media networks
To My World
0
Tweet
RќСЂР°РІРёС‚СЃСЏ
Forging jigs
- Jigs are forged from lead. First, a piece of metal is given the required thickness using a hammer and anvil, then it is processed with a file, achieving a certain jig shape.
- After this, we prepare the hook: we bite off its eye and clean the fore-end, then treat it with a special soldering acid.
- When the hook is ready, we make a small depression in the lead blank, put the fore-end into it and seal it with tin.
- All that remains is to process the entire bait, and the jig is ready.
Casting
The longest manufacturing method is casting jigs. But using this method, with your own hands, you can repeat the shape of the most catchy jigs and make their exact copies. You don’t have to be afraid of losing the best bait, because you’ll have the same ones in stock. Jigs are cast from lead.
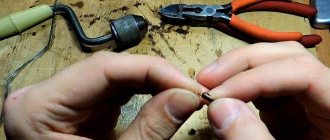
Casting mold
How to make a jig, and even with your own hands? To do this, you need to make a casting mold. For small specimens, an epoxy resin mold is used. For larger ones, a mold is made from plaster. Moreover, it is better to take gypsum not for construction, but to buy material for children’s crafts.
To cast a plaster mold, you can use a matchbox as a base. The gypsum mixture is poured into the box. The mixture is properly prepared from 1 part sugar-sweetened water (for strength) and two parts gypsum. All components should be well mixed to the consistency of sour cream. The box is filled to the brim, the surface is leveled, and the excess is removed.
The jig that you want to repeat is dipped in a thick soap solution, the consistency of jelly, then you need to let it dry. After this, drown the jig halfway into the plaster. In order to be able to pull it out later, two pieces of plastic juice tube are inserted vertically into the plaster, in opposite corners of the matchbox, to the very bottom. The length of these segments is 2 centimeters.
Matchbox form
After 15 minutes, after the plaster has hardened, the entire surface is once again coated with a soap solution. Another part of the gypsum mixture is poured into another matchbox. It also levels out.
The first box with the jig is turned over onto this still uncured mixture and both boxes are connected. After the plaster has dried, the boxes are separated. In order to pour lead, you need to make a recess in the sprue. And one more groove for the wire, which will act as a protrusion.
This form must be dried well for a week. Drying is necessary because when the lead is heated, moisture will evaporate from the mold. If there is a lot of moisture, then shells will form in the jigs, and this will lead to cracking of the mold. Gypsum and epoxy molds do not last long.
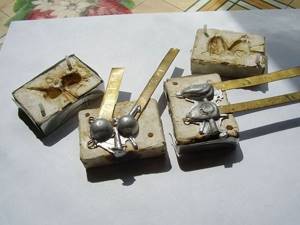
Aluminum mold
An aluminum mold will serve you the longest. It is made with your own hands using drilling. You can buy ready-made forms.
In this form, you can make a Lenka jig with your own hands. This is a fairly large bait, elongated in shape. Its size is length - 25 mm, width - 113 mm, height -11 mm. It is made of copper or brass.
On large nozzles, the hook is soldered at an angle to the jig; on smaller ones, the angle does not need to be maintained. It is better to use a hook with a barb.
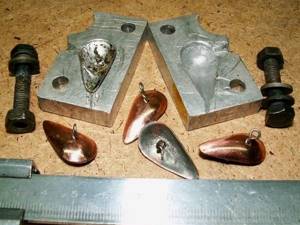
Aluminum mold for lenka bait
Casting
If the mold is ready, then the next process will be the casting itself. You can melt lead in an ordinary small ladle with a spout to make pouring convenient.
We do it in the following sequence:
- First you need to select a hook, bite off the excess shank, and tin the remaining shank.
- Place the hook and wire correctly - push into the mold, close with the other half.
- Pour the lead into the mold and cool.
- Pull out the jig, remove the excess, clean it with a file and sandpaper until it shines.
- Paint the jig.
Soldering jigs
- To solder the jig, you will need thin metal sheets from which the body of the desired shape is rolled.
- A hook is inserted into the hole and the entire workpiece is soldered.
- First, you can roll a screw along sheets of metal, which will leave a peculiar pattern.
- To increase the weight of such a jig, molten lead is also used.
Manufacturing from ordinary colored wire is also practiced. Several tight turns are made from the latter, a hook is inserted inside, which is also secured with wire. Then everything is soldered with a soldering iron, filling the mold with lead.
Casting jigs
To cast jigs, of course, you need a special mold. It is most often made of gypsum or aluminum and allows you to create quite a variety of jigs.
Aluminum or plaster molds can be purchased at a specialized store or made with your own hands. We will pay attention to simpler options for casting jigs.
Casting jigs in wooden blocks
- This method involves the use of two wooden blocks with a flat surface.
- Recesses are made in them in the shape of the future jig, and when folding the bars, these recesses should create a single whole.
- It is also necessary to make a recess for the hook and, of course, a small hole for pouring molten lead.
- When everything is ready, insert the hook, combine the two bars and pour in the metal.
- After the lead has cooled, take out the jig and sand it, making a hole for the fishing line.
Casting jigs in sand
First, a mock-up of a wooden jig is prepared, which is wrapped in foil and inserted into damp sand. Then we carefully take out the wooden model, and instead pour lead into the foil. Insert the hook and wait for the lead to completely harden. We process the product and get a good jig.
DIY glowing jigs
As mentioned above, do-it-yourself jigs made from luminous, light-accumulating lightweight material are not very suitable for individual use, not only for summer, but also for winter fishing. Therefore, to improve the dynamic characteristics of luminous jigs, it is necessary to increase their weight in the water.
Personally, I know three methods for making full-fledged luminous jigs with my own hands, suitable for summer and winter fishing. For any of them, we coat a heavy lead jig with a luminous composition.
The starting material for making your own paint to cover a lead jig that is not yet luminous is a figurine made of thermoplastic plastic containing a phosphorus impurity.
According to the first method, we separate the required mass from the luminous figure and dissolve it in a solvent for nitro paints. Then we paint the surface of the homemade lead jig with the resulting composition and give the luminous bait time to dry.
If we are not satisfied with the luminous properties of the resulting luminous jig, we cover it with the solution again.
The second method of making a luminous jig with your own hands is similar to the first, but to cover the bait we melt part of a phosphorus-containing figurine in a small thick-walled container and dip a lead jig of the shape and weight we need into the molten plastic once or twice.
Using the third method, you can make a luminous jig with your own hands if you were unable to melt or dissolve the starting material in acetone.
To do this, using a finely notched file, we obtain sawdust from the luminous figure, which we mix into the epoxy resin solution. Then we dip homemade jigs into the resulting composition and hang the baits to dry.
For any of the methods proposed here for making luminous jigs with your own hands, the painting operation followed by drying the baits may have to be repeated.
Painting jigs
The jigs are completely covered with wax. Remove the wax from those parts of the bait that need to be blackened. Next, the jig is placed in a container with sulfur and placed on the battery. After a couple of days, those places from which the wax was removed will noticeably turn black. After this, the jig needs to be immersed in water for several days to eliminate the smell of sulfur.
You can paint the jig with almost any enamel paint; nail polish will also work. In order for the color to be saturated, you need to paint the product several times. Jigs made from non-ferrous metals do not need to be coated with paint; they can simply be brought to a shine.
Color palette
Regarding the influence of the color of the bait on the intensity of the bite, I will focus on two points. The first is its external similarity to the typical food sources of fish in a particular lake or river. For example, on several river channels that I have well studied, almost all winter-active fish - roach, perch, silver bream, rudd, chub, dace, ide, bream - are best caught using amphipods, which fishermen have adapted to catch from vegetation stretched out from under the ice. . Accordingly, fish are caught most successfully with reelless jigs of brown and black colors. However, I will not turn this observation into a formula for absolute success. Even on other channels of the same river, the favorites are sometimes baits of different colors - green, red, golden.
Let's move on. The visibility of the “mothless fish” in the environment may be behind the fishing activity of fish. And this is the second point that I would like to note. A contrasting jig is better visible at a greater distance and therefore its degree of attractiveness is higher. Even if it does not resemble the usual food, the fish’s curiosity awakens. When it occurs against the background of hunger, the fish acts actively, attacking the challenging bait without hesitation.
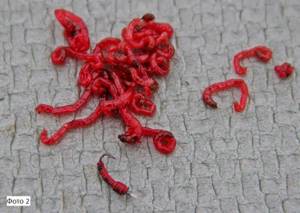
I am convinced that it is this last conclusion that explains the secret of the bloodworm’s attractiveness to all fish (photo 2). In addition to the smell and acoustic vibrations when moving, it is bright red in color and therefore stands out in the water and against the background of wilted vegetation. So the bait made for it has a high chance of catchability.
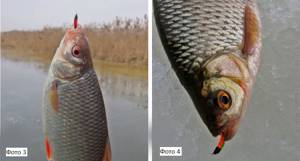
For a long time I could not understand why such an obvious conclusion was not taken into account by the manufacturers of “mothless guns”. As a result, I decided to prove that I was right through an experiment. I convinced a talented fisherman-designer I knew to make red wire-type tungsten jigs for me. After a while, I sent him a series of photographs with my trophies caught with it (photo 3). Soon the master tried to catch it himself and reached similar conclusions.
Moreover, I discovered that such jigs work flawlessly even on pressed-in reservoirs, where the fish are very picky and picky. As a result, he still thanks me for the “discovery” that seemed to lie on the surface. In general, red rewinders are a very good choice.
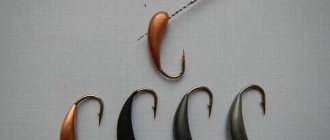
Of the other colors, you can't miss green. When aimed at catching roach, silver bream and other “white” fish, it is highly effective. What is behind this? There may be an association with the color of the vegetation that these fish feed on at other times of the year. Or perhaps it has to do with the spectral features of the absorption of this color by water, as mentioned above. It is the green jig, along with the yellow one, that are most clearly visible under water from a great distance (photo 4). However, the white jig also has a similar distinctiveness effect. In water it is associated with green. Well, the mentioned red one looks black and it is possible that this is precisely its feature.
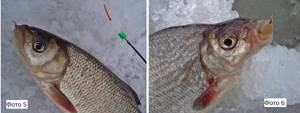
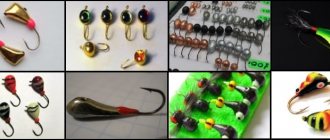
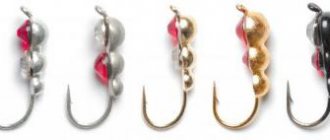
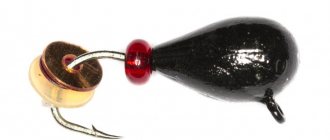
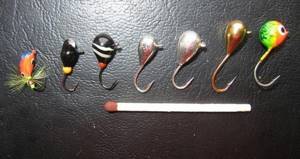
I’ll dwell separately on my favorite colors – copper, silver (photo 5) and gold (photo 6). They have a strong contrast, plus an associative similarity with fry. Even though they are many times smaller than the latter, they work flawlessly for perch. In case of a weak bite, I generally keep in stock jigs made of pure silver with a pendant of several links of a gold chain. A win-win option to persuade the most stubborn perches to bite. Well, golden and silver jigs also stir up roach and rudd.
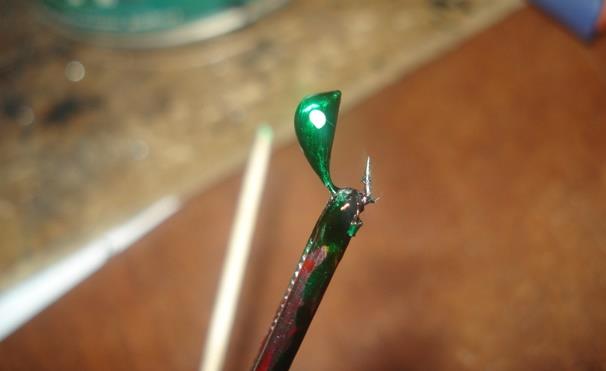
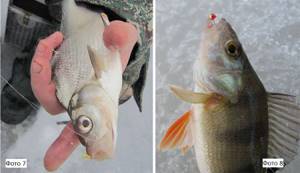
Today, on reelless jigs, “Goat” and “Devil”, you can see the so-called “crowns” (photo 7). Moreover, in some models they have a fluorescent effect. This means that such a “crown” absorbs light and re-emits it with the same or greater wavelength. As a result, the jig becomes significantly brighter and more noticeable than one painted with regular paint. But the cloudier and more opaque the water, the worse the colors differ in it.
Accordingly, the color of the jig loses its meaning. That is why, when catching bream at a depth of 8 - 10 m, black, bronze, red, golden and other imitations most often work quite smoothly, the efficiency of which can enhance the fluorescent effect. True, these depths are not the best choice for “mothless” fish. With this option, it is more rational to fish with baits and natural baits.
I recommend paying attention to jigs with crystals and bright hemispheres. They contain the effect of additional contrast, which echoes the reflectivity of light. They tempt any fish, but primarily perches (photo 8). For the same purposes, beads, sequins and other tinsel are attached to many “no-rewinders”, which enhances contrast and produces additional acoustics.