Now in our country feeder fishing is becoming more and more popular. And all feeder lovers know how necessary leashes are in this matter. Of course, you can easily tie the leash on the spot, but take into account that the weather will be good.
What if there are competitions or rain with a cold wind? Of course, there is no time to knit this gear. This means only one thing, you need to have ready-made devices.
But an important item in this matter is the leash, which helps protect the leashes from mechanical stress and also prevents the gear from getting tangled.
Of course, you can purchase this device at a specialized store, but it will be cheaper to do everything yourself, given that it will take very little time.
So, from today’s article you will learn how to make a leash with your own hands.
Insulation holder for pipes
As you can already understand, the first option will be made of polypropylene pipe. This method is not expensive at all, and production will take literally 15 minutes. The result is a simple leash for storing fishing leashes.
We will need the following materials:
- A polypropylene pipe with a diameter of 7 cm and another with a diameter of 8 cm
- Pins with balls at the end
Let's start manufacturing.
Read here DIY swamp vehicle for fishing trips: the manufacturing process from A to Z (video + 110 photos)
Using scissors, we cut 2 pipes 35-40 cm long. And insert the one with a smaller diameter into the one with a larger one. In this way we compacted our base.
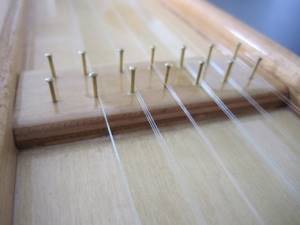
Now we take the pins and insert them on the side of our structure in a row. Choose the distance between them yourself, generally 1.5 cm is enough.
As you understand, the number of needles will mean the amount of space for leashes. If desired, you can make the length of the structure longer, so you will have more space for leashes. And so the leash holder, made with your own hands, is ready!
We also recommend that you label the places on the side so that you can be oriented by size and not have to look for the gear you need later.

For example, the most commonly used leashes range from 40 to 70 cm in length, so it is worth placing them in ascending order of length and hook number.
You see for yourself what gear you use and place them in the order that is convenient for you. By the way, you can also mark the length for yourself with the color of the pins, for example, red is 40 cm, blue is 50, etc.
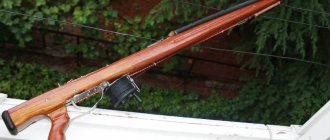
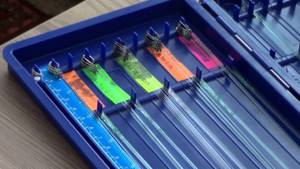
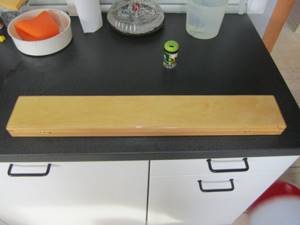
DIY tube for string leashes
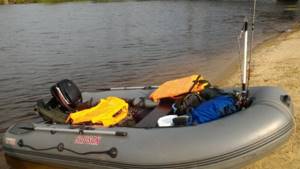
In this article I want to share my experience in making tubes for leashes from string. It just so happened that the experience of rafting fishing made its own adjustments in my attitude towards transporting gear. Unlike “home” fishing, the issue of preserving gear and ease of use is more important here than ever. One of my weak points has always been transporting string leads. Somehow it turned out that I just carried them in a bag on top of the cells in the boxes. It seems that safety was ensured, but in some conditions it was problematic to use the box, and “fishing” for leashes in some places turned into an acrobatic circus.
So, I set out to find a normal transport tube for leashes, but, as it turned out, the market is not very replete with such simple and necessary products. Okay, the question is, in principle, as old as time and many fishermen have asked it on the forums. And in most cases the answer was quite clear. In general, without reinventing the wheel, I took as a basis the classic method of storing fragile (flexible, brittle) rod structures. And without claiming originality, I simply want to share my process and technology for producing tubes for string leashes.
To begin with, I bought a plastic pipe for installing electrical wiring. It is light and quite durable. You can purchase such a tube at almost any electrical goods store. The price for a 2-meter piece in a large chain is 25 rubles, which is half the cost of public transport to the store and back. I think the purpose of the tube, taking into account the task at hand, is clear. And if you think about it, this is already more than 80% of the product’s readiness.
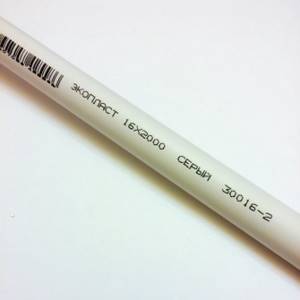
Cheap and cheerful...
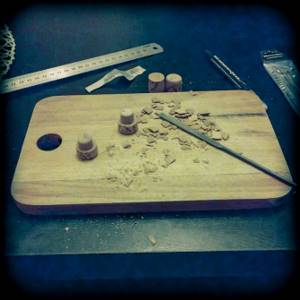
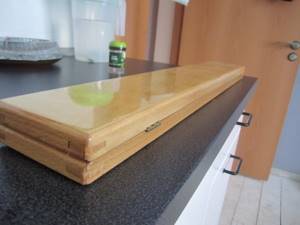
Next, you need to make end caps for the tube. I admit, I also wanted to find ready-made options, but I didn’t see anything interesting. I suspect that, given the diameter of the tube, caps from tubes with tablets like Validol would be quite suitable, but I didn’t have them on my farm. I decided to make the caps myself from scrap materials. I decided on wine corks and a few minutes later there were two neat “modernized” corks on the table...
Pinocchio...
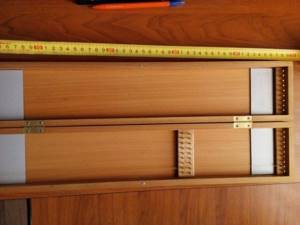
You can make the length of the tube universal, but I decided to fit the leashes to a specific size and have several options for different sizes, which minimizes the time spent sorting and searching for leashes in difficult conditions.
Final measurement for pipe cutting...
So, after some time, in my case it’s about 30-40 minutes, the finished product is already on the table. By and large, it’s quite possible to stop here.
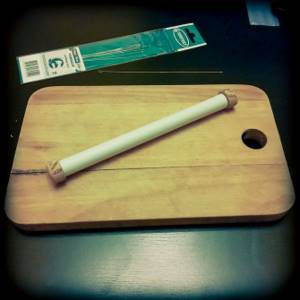
The manufacturing process is at the finish line...
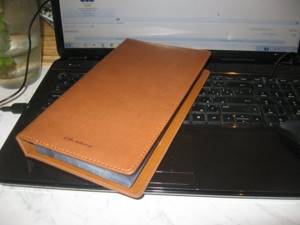
But my soul demanded something more elegant, so I decided to decorate the plugs a little with nail polish, kindly provided to me by my beloved wife. And, in the end, the product is ready to perform its immediate duties.
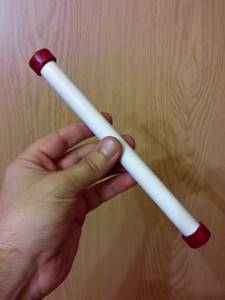
Here is the result...
You can, of course, make the plugs even more elegant, you can, in general, use other materials, but for now it is as it is. If there are any worthwhile ideas, I’ll be happy to take them on board. In the meantime, we have a convenient and practical tube for leashes made of string, which has a cost of no more than 3 rubles, which in itself is already pleasant.
That's all. Thank you for your attention. NHNCH everyone!
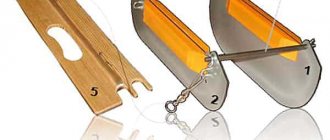
Leash holder cover
Oddly enough, it is best to store the leash in a case.
It can be done very simply, or rather, you don’t even have to do it. You can use a can of Pringles chips as a cover; it will serve as an excellent tube for the leash. You can also use the tube where the cognac was stored. In general, any cylinder-shaped box will do.
Foam material (thin)
When all the materials are prepared, you can start assembling the leash holder with your own hands.
We cut off all the unnecessary parts from the box - this is a small circle (which you need to press when you take out the disk) and the paws that are in the corners of the box.
We cover the side where there is no compartment for the disk with foam rubber material, 2 mm thick.
We take wooden planks and insert pins into them, at a distance of 1-1.5 cm. The long planks should be slightly less than one side of the box.
Note!
- A nod for do-it-yourself winter fishing - how and what to make good gear from. 115 photos and video tips from the pros!
Do-it-yourself spinners - types, features of homemade spinners and their assembly (100 photos and videos)
How to minimize fishing costs? Useful tips from experienced fishermen and an overview of current solutions (65 photos)
We place the strips on the inside of the box, top and bottom, opposite each other, and fix them with self-tapping screws on the reverse side.
Now you can wrap leashes around the pins.
How to make a leash for a feeder
The leash for the feeder can be made in several types. The most common shapes are rectangular structures, similar to small boxes in height, devices in the form of a cylinder and book leashes. The finished product must meet a number of important requirements and, above all, be compact, lightweight, impact-resistant, durable and preferably waterproof. Having decided on the functionality of the device necessary for the fisherman, they make sketches of the future homemade product and acquire the materials and tools necessary to carry out the work.
A homemade product on a ready-made frame will take literally ten minutes to complete the work, but a more complex product with finishing elements will require a much longer period of time and, of course, effort and a certain diligence. Continuing the article, we will look at a number of simple ways to independently manufacture leashes from familiar and common materials and things that have served their purpose, breathing new interesting life into them.
Tube for leash
Cylindrical feeder leashes, which are a fairly common and fastest option for preparing an effective and universal device for all leash sizes, are convenient to store and transport in a special tube. This kind of cover will protect both the product itself and the set of leashes from all kinds of mechanical damage and getting wet by water. The fisherman does not need to specially make a tube, spending extra time and money on it. For these purposes, you can comfortably use some types of packaging that has fulfilled its direct functions.
So, for example, the role of a reliable and lightweight tube will be played by a cylindrical chip package made of thick cardboard. In addition, it also has a sealed plastic lid. Similar to this kind of packaging are hard boxes of cognac, drilling tools and some types of pasta. They can be made not only from cardboard, but also from wood, plastic, and thin sheet metal, which can only add reliability and durability to the protective device. The fisherman can only compare the dimensions of the tube with the future homemade product and use a convenient, and most importantly, ready-made device.
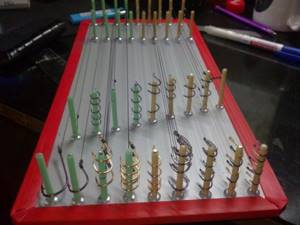
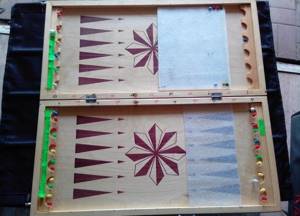
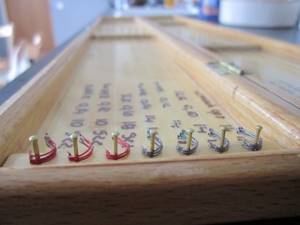
Homemade leash from a chessboard
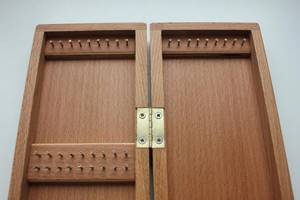
This homemade production option is suitable for those fishermen who have large arsenals of leash elements. Such a DIY leash holder will require the angler to find an unnecessary wooden folding chessboard. This blank will be an excellent basis for modification into a voluminous and structurally strong device. The inside of the chessboard is covered with foamed soft backing material. This modification will allow you to conveniently store individual hooks and stick the hooks of tensioned ready-made leashes of non-standard size into the substrate.
Along the edge of each section of the board, at the base of the smaller side of the rectangle, a wooden strip is stuffed, slightly lower than the edge of the lid itself, for ease of installation of fasteners and unhindered folding of the box. Small furniture nails must be hammered into the bar, with heads required, or pins, previously cut to the required size, are inserted deeply. If necessary, the same strips can be mounted on any length of the board section to suit the dimensions of the leash element stored in the device required by the fisherman.
Homemade book storage for leashes
It’s enough just to make a leash in the shape of a book. To do this, you will need to use an old, thick book cover as a base, first carefully, without damaging the surface where the binding was previously attached, and removing all the book pages. You can also use a school folder to store notebooks. The inside of the case is covered with porous and soft EVA material 2–3 mm thick. This pasting will serve as a surface for attaching the loops of the leash accessories using safety pins.
If desired, you can add a couple of additional pages from a plastic sheet 1-1.5 mm thick to the product, securing them with wire stitching into the binding and finishing them with gluing and also using them for storage. This device can accommodate up to a hundred leashes of all sizes without any problems, it is compact, and pages specialized for certain sizes of accessories will allow the fisherman to quickly find the leash that is required according to the parameters for the fishing conditions.
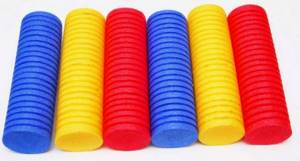
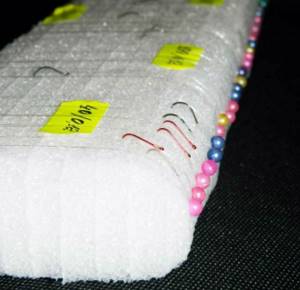
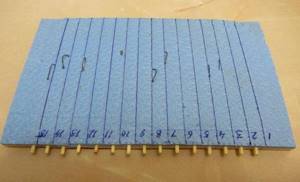
Leash holder made of polystyrene foam
A cheap and easy-to-make option is to make homemade polystyrene foam. It is also attractive that a product made from this material can be made in any flat shape the fisherman likes, be it an ordinary rectangle, a circle or an oval. To complete the work, you need to acquire a piece of extruded polystyrene foam 15–25 mm thick. This material is an integral part of construction processes for insulating buildings and installing heated floors, where it plays the role of a substrate.
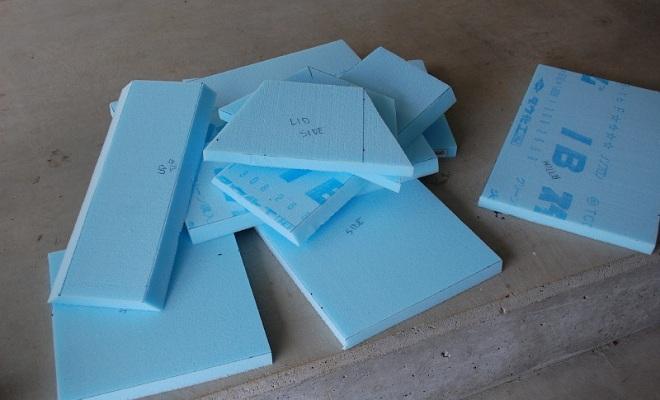
Next, using a knife or hacksaw for metal, a workpiece of the required size is cut out of a single sheet of material. At a certain distance from each other, cuts or recesses are made in the layer of expanded polystyrene, cutting out a recess 20 mm wide and 5–7 mm deep. These protrusions on one side of the product are equipped with pins, to which the leashes will cling in loops. The second notch will serve as a place for attaching the hook. Thus, the lines of the finished accessories are constantly pressed against the storage plane, which prevents them from deformation. The disadvantage of this type of homemade product is the fragility of the material and the tendency to break quickly even with low pressure on the product. Therefore, it is effective to make storage units that are small in length from polystyrene foam, a maximum of 20–25 cm with a width of 15 cm.
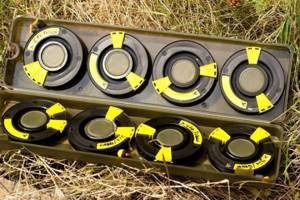
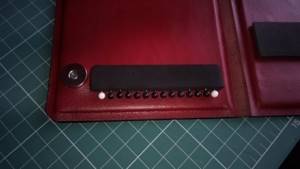
Leash holder from DVD box
Almost ready-made and aesthetically pleasing storage for leashes can be realized with only minor modifications by having empty DVD boxes available. The box selected for the work is freed from all built-in elements that were previously necessary to secure the disk. We cover one part of the future product with a millimeter-thick layer of foam backing, previously cut to the size of the box door. To attach the leashes, you will need to install fastening strips on which the pin heads are mounted into the backing-covered cache door.
Planks cut from sheet plastic or thin plywood are suitable. The length of the slats must match the width of the frame sash. The easiest way to secure the element is with quick-setting glue, and more securely using a rivet connection. The height of the pin head should not prevent the disk box from closing smoothly. The do-it-yourself leash made in this way is small in size, durable and easy to use, and, of course, has a modern high-tech look.
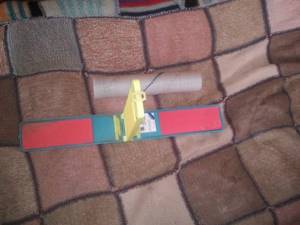
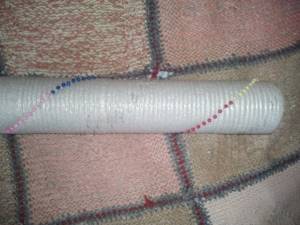
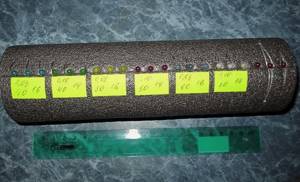
From a paint roller
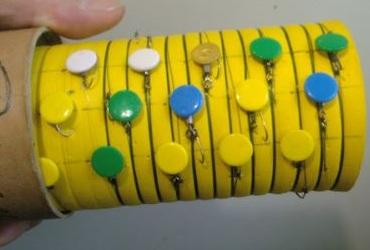
Almost all people who deal with construction are familiar with the appearance of a paint roller for painting surfaces of various purposes.
One of its varieties, only intended for pasting wallpaper, or more precisely, applying glue to walls or the pasting products themselves, can be successfully adapted to a leash. The glue roller has a smooth and elastic, but at the same time dense surface of a cylindrical shape. To modify the final product, you need to purchase pins with heads and insert them into the body of the elastic material along the longitudinal line of the workpiece, through dimensions of 5–7 mm. To ensure that the pins are held securely in the material, they are coated with glue. The product is ready for intended use immediately after the glue has hardened. A loop of the accessory is thrown onto the head of the pin, followed by winding the fishing line around the cylinder and fixing the hook roller into the body.
Cork leash
The most compact and fastest manufacturing method is considered to be the production of storage from an ordinary wine cork. On a miniature cork leash you can easily store 5-10 small leashes.
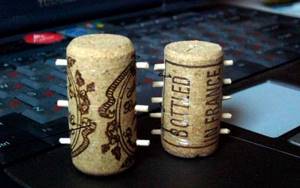
Several pins are stuck in a row into a regular wine cork, having previously selected them according to a length that will not exceed the thickness of the cork and will not pierce it through. In the absence of pins, even a wooden toothpick can play their role, only in this case, to securely connect the materials, the fisherman will need to use quick-setting glue. Three millimeters of height of a cut toothpick protruding above the surface of the cork will be quite enough for installation in the device of any spare leash.
Wooden fixture
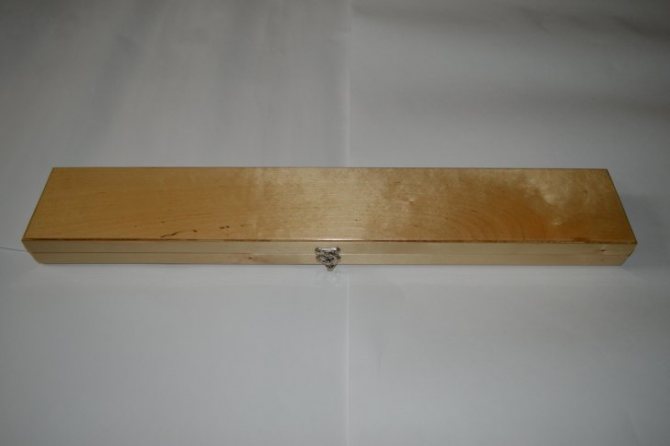
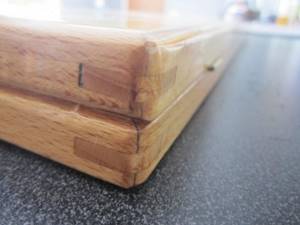
And, of course, the best option would be a wooden leash.
The box can be assembled from scratch, or you can use a ready-made one. For example, an old chess box or a small box might work.
You just need to hammer small nails or screws inside, opposite each other, and then tighten the leashes. This way you will get an excellent wooden leash with your own hands.
Note!

Do-it-yourself boat motor - tips for beginners, projects, drawings and step-by-step description of the construction of the main components and elements (video + 120 photos)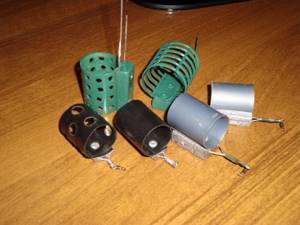
Feeder for winter fishing - secrets of use and techniques for feeding fish in winter (115 photos)
- Bottom gear - the most effective types of equipment and features of casting techniques (95 photos and videos)
Homemade
Advantages of homemade products
To save money, feeder lovers make leashes with their own hands, and this has a number of advantages.
Firstly, it saves money, and quite a lot, especially if you have to store several dozen, or even hundreds of leashes.
Secondly, each fisherman makes leashes “for himself” and for the conditions of the upcoming fishing. While still at home in a calm environment, many leashes are knitted, which help out when fishing. Accordingly, the storage for leashes is made of the required sizes that are of interest to each specific fisherman and feeder lover.
Thirdly, to create a homemade leash, reliable and durable materials are selected. Plastic is good, but it is fragile, but a wooden product is much stronger and it is logical that most homemade leashes are made of wood.
Fourthly, when making it yourself, they decorate the product at their own discretion and provide it with additional pockets or compartments for pins or elastic bands.
Homemade leashes for the feeder are:
- rectangular;
- square;
- round.
In preparation for the manufacture of the leash, the best materials are selected, and a drawing is made indicating the dimensions and other characteristics.
Homemade leash from a chessboard
A simple homemade leash is made from a chessboard or backgammon board. They close with a latch and are hollow inside; pieces and checkers are stored there when carrying the game board. Chessboards come in different sizes, and the length required for convenient storage of leashes is selected.
To make a leash from a chessboard you need:
- prepare wooden planks 5 mm thick and 10 cm wide, with a length equal to the internal width of the board;
- glue the planks along the four short sides into the inner cavity of the board;
- fix metal pins or pins in these strips for attaching loops and hooks.
The inconvenience of such a leash is due to the fact that leashes of a fixed length are stored in it, equal to the length of the board itself.
In addition, chess and checkers boards are limited in size or are too bulky for fishing.
Homemade wooden case
Therefore, instead of a finished board, they make a wooden case for the leash of their own required width and length.
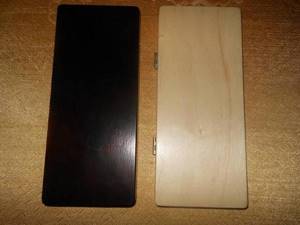
The wooden body is made from reliable tree species such as:
- oak;
- beech;
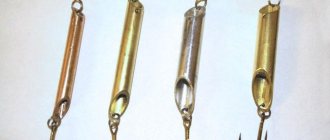
- larches.
The fastenings for the leashes are pins or studs with a brass coating that is not afraid of water and corrosion.
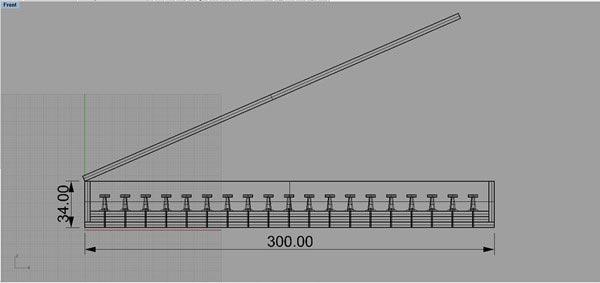
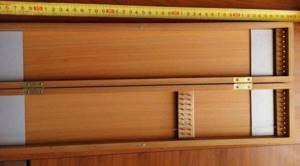
The strips for the pins are placed in the internal cavity of the wooden case at the required distance, which allows you to vary the length of the leads at your own discretion.
Leashes of a meter or more in length are stored in a homemade wooden case 60–70 cm long.
To protect against water, the wood is impregnated with tung or teak oil, which provides high water-repellent characteristics and increases the durability of the product. Oil impregnation effectively highlights the structure of the wood, improving its aesthetic properties.
Magnets or a hook, similar to what is found on chessboards, are used to connect and firmly fix the doors.
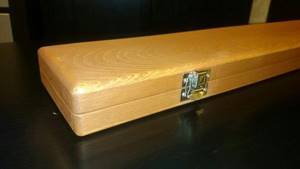
It is convenient to store a homemade wood leash in the pocket of a fishing rod case or a fishing bag, but to ensure safety it is placed on top of other things.
Homemade book storage for leashes
A “book” type leash is also popular among feeders, which is sold in stores, but can also be made independently. The store-bought type looks aesthetically pleasing, folds conveniently, does not take up much space and is secured with Velcro.
The homemade product is also compact and successfully protects leashes from external influences, preventing them from breaking.
To make a product like a book, they use ordinary school folders for notebooks or sew a body from a dense material with water-repellent properties. The body is divided into four parts, EVA material 2 cm thick is glued to each of them, for attaching the loops of the leashes with pins.
It turns out that the inner surface of the book's leash is divided into 4 areas covered with porous material. To maintain the correct shape, plastic plates 2-5 mm thick are inserted into each of the areas. The leashes are fixed using safety pins, allowing you to fasten products of arbitrary length.
The leash book holds 100 or more leashes of the required length; it is convenient to take it fishing and transport it in the pocket of a fishing rod case.
A tube for storing feeder tips, which has high rigidity and high water-resistant characteristics, is also suitable for transporting a leash.

If there is no tube, it is made from a plastic plumbing pipe of the required diameter, which is lightweight, reliable and durable.
Storage for short leashes or DVD boxes
For storing and transporting short leashes, the leash holder is made from a DVD box, which has the necessary rigidity and compact dimensions.
Strips of porous and soft material such as isolon are glued inside the box, into which needles and pins are easily stuck, necessary for stretching the leashes.
To fix the hooks, 5 mm thick strips are glued to the inside of the box along the short sides, into which stationery pins are inserted. If the length of the pins is longer than necessary, they are shortened with pliers to a convenient size.
The DVD case closes tightly and the only flaw of this product is its short length, but for flat-method leashes it is quite enough.
DIY leash holder video
From a school pencil case
Another convenient accessory used to make such leashes is a plastic school pencil case, which also closes tightly and hardly gets dirty even during long-term use.
The interior finishing of the pencil case is carried out in the same way as the “book” was made and several dozen leashes for the method and flat method will fit in it.
Since such leashes are made from soft leash material, and not from monofilament fishing line, they do not need to be stretched during storage for alignment.
Photo of a do-it-yourself leash
Help the project, share on social networks 
0