Making a devil jig with your own hands is possible at home. There are various ways. Let's figure it out , how to make a devil for winter fishing using various methods. Store-bought devils often do not meet the requirements of fishermen - either the hooks are incorrect or the body shape is wrong. In principle, there is nothing difficult about making these baits yourself. To make this bait correctly, you need to clearly understand the result that should be obtained. What a devil should be like for winter fishing is described in a special article.
Homemade devils
Globally, all methods of making devils for winter fishing with your own hands can be divided into two large groups:
- No soldering or molding;
- Soldering;
- Filling.
The simplest options can be done literally “on your knees” using a minimum number of tools and technical skills. Other methods are more difficult, you need to get better at them, but the baits made are in no way inferior, and often even superior in catchability to products from fishing stores.
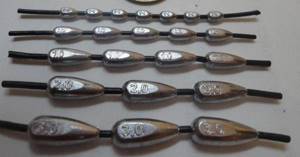
Punch for preparing jigs
The punches for stamping blanks—the crowns of homemade jigs—are shown in the photograph. Next, we will talk about selecting a suitable profile for channels and rods and methods for making punches.
In order to reduce the amount of grinding work when making punches yourself, you should look for metals with the appropriate profile sizes and shapes. That is, those that will require less time for mechanical processing of the working surfaces of the punches.
For example: for punches that serve as stamps for jig blanks, “pellets”, profiles of round rods of different diameters are better suited. And to make a punch for a jig in the shape of a droplet, it is advisable to look for a rod of rectangular cross-section.
Since the aluminum bar I took as a matrix is relatively soft in its physical properties, it is not difficult to find harder metals to make punches.
But the best results, in my opinion, are obtained when making punches from carbon steel grade 40 or 45. The metal is well processed in an unhardened state and is durable; various broken steel crafts sometimes lie literally under our feet.
In addition, carbon steel heats up well. If you make punches from carbon steel to form cavities in homemade jig blanks, then the devices will last forever after hardening. (By the way, many fishermen have knives for ice screws made of steel of these exact grades.)
Simple ways
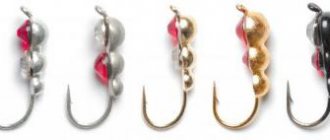
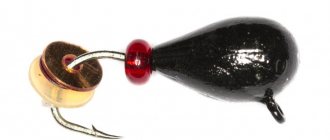
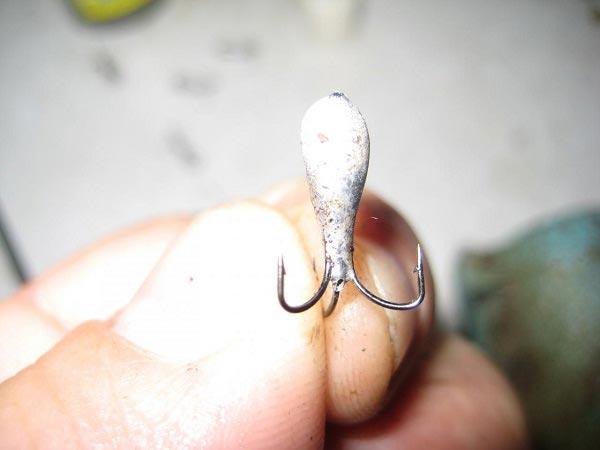
The simplest way is to put a sinker on the tee, fasten it and finish it with painting. To do this you will need:
- Set of “Drop” sinkers on silicone;
- Tee (small, with a long shank and thin hooks, No. 20 or smaller);
- Bead (beads);
- Pliers;
- Super glue;
- Needle file, file;
- Waterproof black varnish;
- Drill with a thin drill bit (may not be needed).
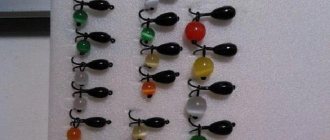
Sinker on a cambric
From the sinkers, select one of the required weight (it is indicated on each one), remove it from the tube. Carefully squeeze the tee ring (so as not to burst) with pliers so that it can fit into the sinker hole. You cannot completely compress the loop, because the fishing line will then be tied to it. If the tee still does not fit, then the hole in the sinker can be carefully flared or drilled out with a drill, after securing it in a vice. We put a bead on the tee and a sinker on top, crimp the lead and seal it at the bottom with superglue. Next, you need to process the workpiece with a file to the required shape, paint it, and place beads or other decorations on the hooks.
The main feature of making such a feature with your own hands is its simplicity and speed. In the absence of a tee, you can solder it yourself from ordinary hooks of the same size, more on that later. This way you can make other nozzle-free jigs.
What should you pay attention to when making your own jig?
There are dozens of types of gear, they have many distinctive features. For a novice fisherman, the procedure for selecting certain parameters is the most difficult. It is for this reason that you need to follow some tips for making bait.
Form
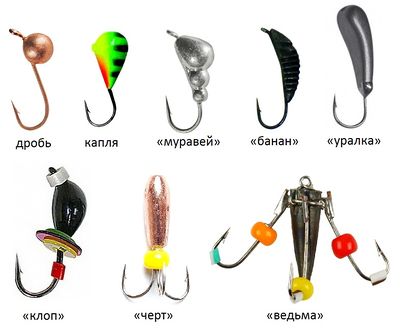
When searching for food, fish rely on hearing, smell, touch and vision, which is why when choosing a jig, its shape is important, as it influences good play with the bait.
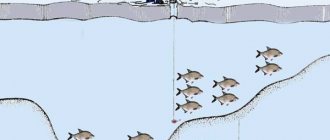
Every fisherman needs to know how the shape affects the play of the jig; often the fish starts to bite when it is very close to the bottom.
When making gear with your own hands, its shape will play a very important role.
The shape of the jig and its effect on the game:
- If the shape is flat, then it will form small clouds of turbidity and at the same time disperse them;
- Flattened on both sides (top and bottom), capable of raising turbidity and located near the bottom;
- If it has the shape of a pellet or drop, then hitting the bottom it will create fountains of turbidity;
- The “ant” or “Ural” bait does not deviate from the vertical during the game, but their hooks are capable of making turns left and right;
- With a “devil” or “barrel” shape, the bait is immersed in the mud; if the position is vertical, then deviations to the sides are excluded;
- If the jig is in the form of a cone, then at the bottom, it only enters the top layer of silt.
Weight
Types of these gears are divided by weight category, there are light and heavy. In the manufacture of the latter, a hard alloy of metals is used, but this type has a big drawback - they are difficult to process, which is why they are rough in shape, as well as with uneven edges and holes. Because of this, the fishing line may be damaged. A lightweight bait is made of elastic nylon or plastic, its weight does not exceed 35 grams.
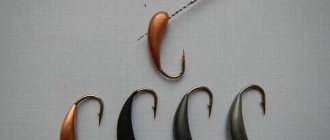
Hook
The hook also plays an important role; it must be soldered in very well, otherwise the fish will break off. The best would be a single-bend hook.
When purchasing a set of hooks, the set may contain overheated ones (they will be brittle) and unheated ones (they will be soft). Strength can be determined by pressing the middle of the hook with your fingernail. If the quality is good, then it will bend only with strong pressure.
The tip of the hook should be sharp enough (to ensure strong hooks). To make tackle, it is advisable to use hooks with a forged cross-section; they are many times stronger than similar ones.
Color
Research has proven that any fish can distinguish a range of colors; there are also species that distinguish a greater number of shades than humans. Waterfowl are able to distinguish colors even in the dark. It is for this reason that it is necessary to make bait exactly the same color as the food of this type of fish.
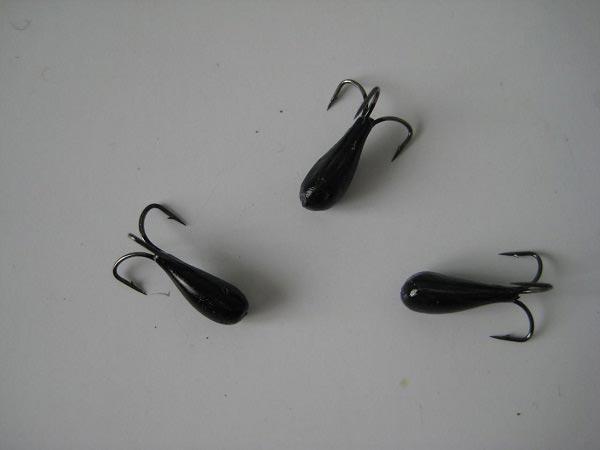
Red is generally preferred due to the fact that many fish feed on bloodworms. You can also make black baits; they look like leeches, bugs and crustaceans. Those feeding on fry will bite on silver or golden bait. If the fish eats algae, the color should be green.
Soldering a tee and a few more ways to make devils with your own hands
The basis of the bait when making a homemade devil for winter fishing is a tee. For smaller devils, the correct treble (small thin hooks, long shank) is difficult to find in the store. More often than not you have to solder it yourself. This preparation is the first step for various methods of making a devil in the future. It can be poured into a mold with lead, or solder can be manually soldered on top.
Materials:
- Hooks;
- Copper wire;
- Soldering iron, solder;
- Cork or drill (to hold hooks);
- Bead (if desired).
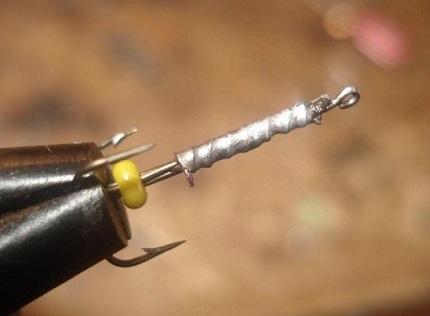
We bite off the rings of two hooks, leaving the third. You can bite off all three at the ring, and the fourth, on the contrary, at the bend, and then insert it into the middle between the first three (to get a devil ring. The hooks need to be tinned and secured in the correct position (in the drill head or in the cork (using pre-made cuts) Then we wrap the workpiece with tinned wire and solder it. The workpiece can be processed with a needle file.
Devil's body
All further manipulations depend on variations in the attachment of the devil’s body to the workpiece. You can do this in several ways:
- Solder by hand.
- Pour through the mold (more about pouring below).
- Solder a copper or brass crown on one side (more on this later).
- Prepare blanks from a lead plate and solder them on both sides.
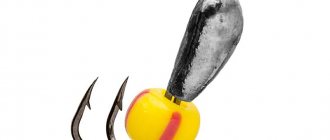
When manually soldered (filled) with tin, lighter and more voluminous devils are obtained; they are intended for fishing at depths of up to 5 meters with weak or no current. For greater depth or flow, it is better to use lead. By using copper or tungsten wire and adjusting its quantity, the correct weight is selected. This can also be done by winding tin-lead solder. The workpiece is wound and soldered until the required shape, weight and size are obtained, and then processed with a file.
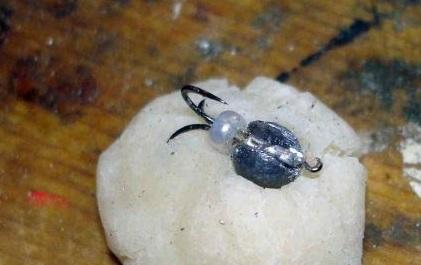
The tee can be soldered into a lead sinker (olive or pellet). If you do this with two pellets, you will get a devil ant (snowman). Then the devil is processed with a file and painted.
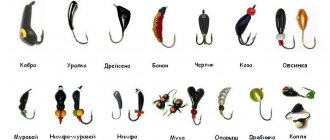
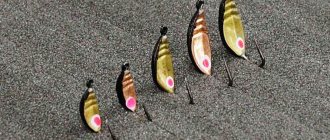
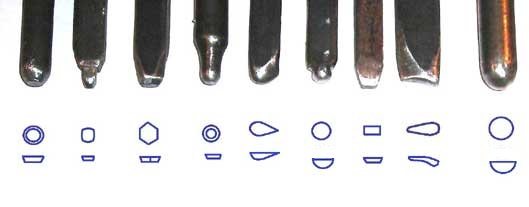
Shapes of jig crowns
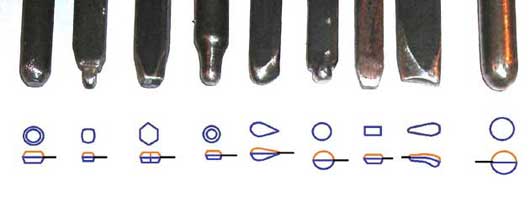
Popular crown shapes for homemade jigs are shown in the drawing. Based on the selected outlines of the upper surfaces of the baits, we make punches, with the help of which the crowns of the jigs are stamped into the matrix.
Blue outlines the contours of the blanks - the crowns of homemade jigs for winter or summer fishing.
The orange color corresponds to the shape of the solder poured into the crown after machining the homemade product.
The shapes of the working ends of the drifts make it possible to increase the volume in the cavity of any crown by increasing the depth of the cavity punched in the aluminum. With the help of such a simple operation, you can increase, along with the volume and weight of the finished homemade jig, while keeping the shape of the homemade jig unchanged.
Black paste shows the direction of the hook forearm soldered into a homemade jig.
In the third hexagon-shaped jig from the left, the hook shank can be soldered into the corner between the side edges or in the middle of one of the side ribs of the future homemade jig.
Compare and make sure that the outlines of the homemade jig blanks shown in the picture correspond to the shapes of the working surfaces of my punches.
For summer fishing, homemade jigs with a flattened shape and gliding properties are more suitable. To control the jigs, I use a side nod when hooking a telescopic fishing rod.
But I repeat once again, the shapes of homemade jigs for your fishing trips can be completely different. It’s just that the working ends of the punches should be sharpened differently for them.
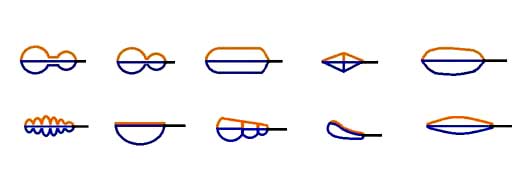
Just in case (for an amateur), I depicted the various shapes of the crowns of a dozen more popular homemade jigs for summer and winter fishing. For some homemade products, making punches at home will require a lot of time. But, believe me, your work will be compensated by fish catches.
Fill
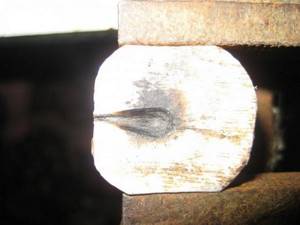
Pouring a devil with molten lead requires a mold for casting jigs. You can make such a device from scrap materials. Molds for casting jigs are made of pure aluminum without impurities or gypsum. This shape can be made at home by squeezing it out with a punch. It is also necessary to make grooves for the hook on both halves.
The easiest way is a paper tube wound on an object of the required diameter. Likewise, a foil cone. A tee is inserted into one end of the tube, and lead is poured into the other. Before pouring, the entire structure must be placed in sand or bread crumb, rolled out to the state of plasticine. Read more about this in the materials on casting jigs.
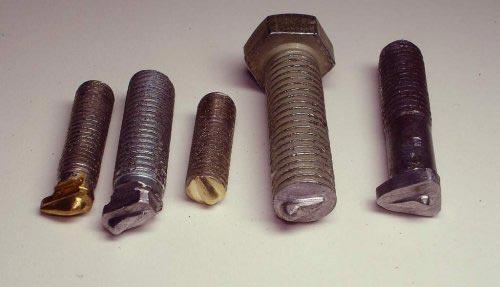
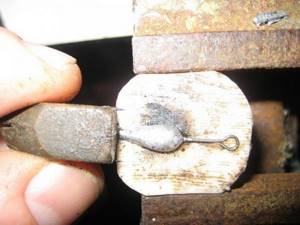
Devils with a crown made of non-ferrous metal
To make a bimetallic spinner, you need to make a crown from brass or copper. The crown is made by knocking out a shape on a sheet of metal with a special punch. Punches are turned from metal rods on turning fixtures. The crown is installed in the bread crumb, a tee is fixed on top, and then solder is soldered. When pouring, accordingly, the crown is installed in the mold. Naturally, it must match it in size and configuration.
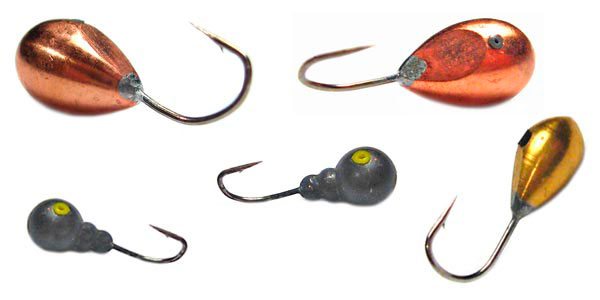
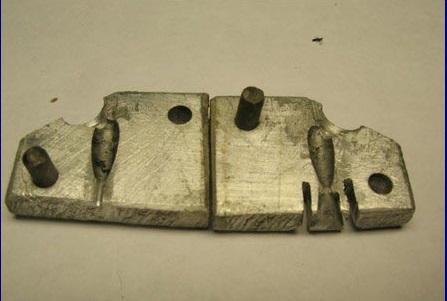
How to make a jig blank
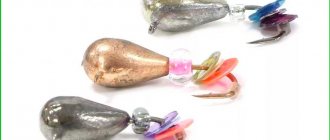
Blanks for most homemade jigs with crowns can be made using the method suggested below.
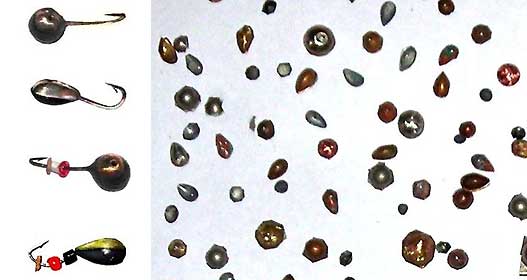
Blanks - the crowns of future jigs in the shape of a droplet and a pellet in a cut form, but unprocessed along the contour, are shown in the right position of the photograph. On the left in the picture are jigs that can be made by pouring solder into the contour-processed workpieces.
For those fishermen who have decided to make their own jigs from metal at home from scratch, the technical process for making a jig blank with a shiny crown surface in a short interpretation will be as follows:
We place the jig blank in the form of a strip cut from a metal sheet onto the cavity in the matrix and, using a hammer and a pair of punches, punch a recess in the blank. To do this, the shapes of the punch surfaces must be tied strictly to their recess in the matrix.
But this is the case if we already have all the necessary devices and thin-rolled metal for making jig blanks. Ready-made uncut jig blanks are shown in the photo at the very beginning of the page.
Devil Kalacheva
Many fishermen claim that the most catchy ones are the devils made by Andrei Kalachev. Their peculiarity is that they are suspended from a fishing line through a hole that runs vertically through the entire body of the jig. The fishing line is passed through it and tied to the hook. In the store, devils with such a connection are practically never found. We present the manufacturing instructions:
- Make a mold from fluoroplastic, squeezing it out manually with a punch or knife (one half, production is done by soldering).
- Secure three hooks and a pin (for the hole) into the slotted cork (or eraser).
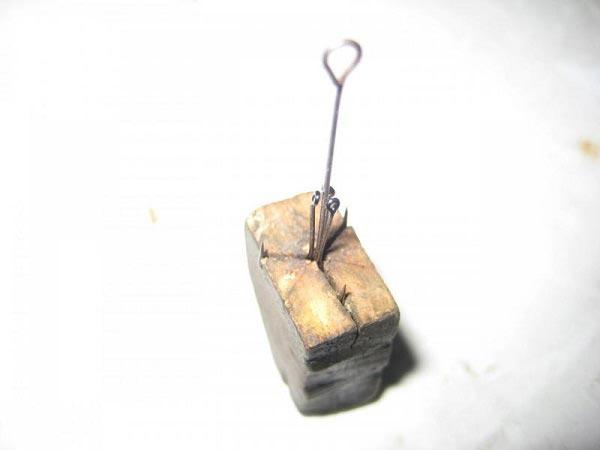
- Bring the cork with hooks to the form secured in a vice, apply solder with a soldering iron, and let it cool slightly.
- Remove the workpiece from the mold and remove the pin.
- Process the devil with a file, paint it with waterproof paint, and equip it with beads.
Nod for the devil
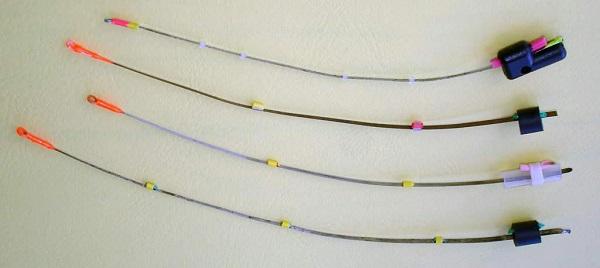
You can also make the devil's nod with your own hands from lavsan or a clock spring. The nod is made double-conical, that is, it should evenly taper in width and thickness from beginning to end. It is this design that allows the bait to play correctly and the angler to notice the bite in time. The fine-tuning of the rod is done for a specific weight of the devil, so the angler needs to have several already tuned fishing rods. The correct nod body kit for a devil is just below the horizon with a load, 15-20 degrees up without it. The reverse convexity of the lavsan nod is made by passing it between the finger and the nail.