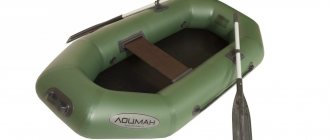
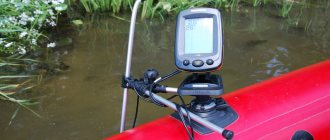
Retail outlets stock various designs of boats made from modern PVC material. As a rule, inflatable boats are of interest because they are more practical and easier to operate. Inflatable boats do not have excessive weight, so they are easy to move both along the shore and on the water. In addition, they do not take up much space, especially when uninflated. This is especially true when the boat needs to be moved to a pond or stored. Small models of inflatable boats do not require special means for transportation.
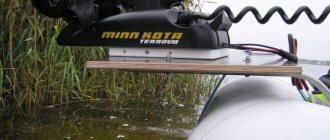
Such simple designs are subject to modification, which is what many anglers do. The most popular part of any boat is the hinged transom, which will later serve as a mounting location for the outboard motor.
If you buy a PVC inflatable boat and an outboard motor for it separately, it will cost much less. But there is a small problem here that does not allow you to simply install an outboard motor. The fact is that the motor is installed on a transom, which you can buy, or you can make it yourself. Naturally, making it yourself will be cheaper. The main thing is that the owner knows how to work with tools and various materials. On the other hand, our fishermen are jacks of all trades and can cope with such a task in no time.
Despite this, you need to be very careful and responsible, otherwise the design will turn out to be unsuccessful and dangerous during operation.
Do-it-yourself PVC boat mounted transom
The transom is where the outboard motor is mounted. It must be a reliable, firmly fixed structure. Therefore, the manufacturing process cannot be approached irresponsibly. This element must not be allowed to be unstable and not durable. Mistakes on the water can end in disaster. This is especially true when there are several people in the boat and their well-being depends on this structural element.
When carrying out work, you should strictly adhere to the basic recommendations, taking into account the technical characteristics of the PVC boat along with the motor that will be attached to this element.
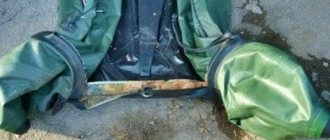
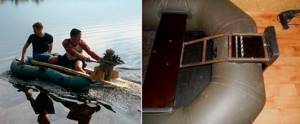
Homemade transom for a rubber boat.
Motor and transom
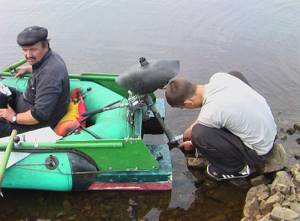
The transom for an inflatable boat is designed exclusively for a specific model of an inflatable boat, since boat designs come in a variety of sizes and vary in size. As a rule, those boat models that are sold without an engine and designed for oaring are not allowed to install an outboard motor more powerful than 3 horsepower. Such a motor will allow you to move in an inflatable boat through the water at speeds of up to 10 km/h. Such inflatable boats have limitations related to the weight of the motor. By and large, such boats are not designed to have outboard motors installed on them.
Before starting work, you should carefully study the technical data of the PVC boat and the motor in order to correctly calculate the suspended transom.
Since the boat is not large, the transom is an additional load, especially with a motor. At the same time, you need to take into account that the boat is made of thin PVC material.
And yet, such a transom is capable of supporting a boat motor with a power of up to 3 horses, which contributes to more comfortable fishing conditions. At the same time, you should carefully consider the entire structure, since it puts significant pressure on the stern of the boat. The more powerful the engine, the greater its mass and the greater the load it puts on the material of the boat.
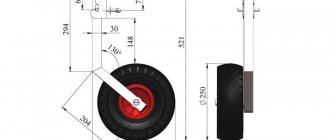
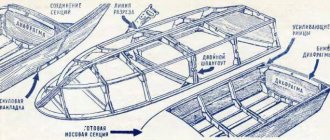
Transom design
As a rule, a hinged transom for a boat is a very simple design consisting of:
- From a plate.
- From fastening arches.
- From the rings, which are also called bubyshki.
The plate is made from a plate and can have any shape. Mounting bows are brackets that are attached to both the plate and the boat using eyelets.
The eyelets have a unique design, consisting of special brackets that have a flat base.
Materials for production
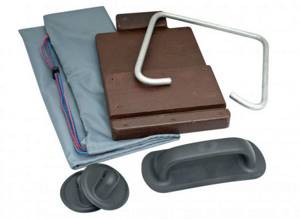
Only waterproof plywood is suitable for making the plate. It is quite light and durable, and at the same time has a polished surface that can protect the structure from negative natural factors.
For the manufacture of staples, rolled steel is used, which is bent depending on the given shape. The best option is to use stainless steel or steel with a special coating (chrome, nickel, zinc).
The presence of steel elements allows you to create a durable structure that is resistant to deformation. If the elements have a protective coating, the structure is durable and protected from corrosion.
The eye is made of plastic, which is characterized by lightness and resistance to moisture, as well as other negatives. In addition, the plastic easily adheres to the PVC base from which the boat is made. For fastening, only moisture-resistant glue should be used.
Manufacturing
All work begins with a drawing. Moreover, a drawing of the simplest transom design will do.
For the plate, plywood with a thickness of 10 mm is used. The edges of the plate should be sanded to avoid damaging the boat. Loops are attached to the plate, which will serve as a fastener for metal brackets.
The fastening arcs are bent manually or on a machine.
Eyes are purchased separately; if all the parts are ready, then they should be installed on the boat.
BEST DIY Canopy Transom!
Buying a ready-made transom is the optimal solution to the problem with the motor
No matter how good homemade products are, it is still better to use devices manufactured on an industrial scale using factory equipment.
Moreover, modern industry offers ready-made kits for PVC boats, the price of which is quite reasonable.
With your own hands, all that remains is to securely glue the fasteners and correctly install the hinged transom.
A kit consisting of a frame, a rigid element and fastening devices, similar to the one discussed above, will cost the owner inexpensively - its price is approximately 2,000 rubles.
As for the rigid fastening option using lacing, such a kit can also be purchased in an online store at a price of 600-800 rubles.
Do not forget that even after strengthening, such rigid mounts cannot be used with motors whose power exceeds 3.5-5 hp.
boatcity.ru
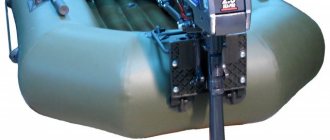
Installing a transom on a rubber boat
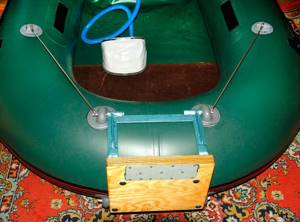
It is preferable to install a transom on a boat made of PVC material as follows:
- First of all, inflate the boat and, using glue, attach the eyelets. Moreover, it is very important that they are glued exactly in those places where they can be useful.
- The base of the eyelets is covered with adhesive, after which they are attached to the boat. The rest of the eyelets are attached in the same way. Depending on the size of the fastening arcs, the required number of these fastening elements is installed. When the glue is completely dry, the air should be bled from the boat and the mounting arcs should be connected to the plate.
- After this, the boat is filled with air again, but not completely, but half. The fastening arches are installed so that they can be secured using eyelets. Finally, the boat is fully inflated and the entire structure is held securely on the boat.
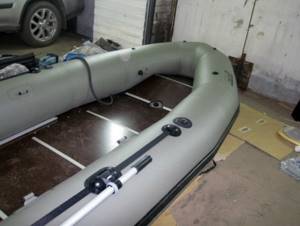
Installing a hinged transom on an inflatable boat
Transom height
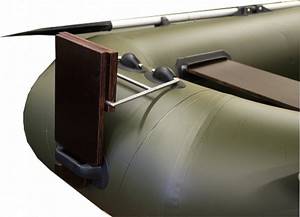
The height of the transom, or in other words the size of the plate, depends on the height of the sides of the boat in the inflated position. The transom may be equal to the height of the sides or may be larger, or smaller, but not by much. The main condition is that the motor is securely and firmly held on the transom, and is also safe during operation.
Reinforcement of the hinged transom
The classic transom consists of two brackets and four eyes. If you need to strengthen the transom, you can increase the number of brackets, and therefore the number of eyelets. At the same time, we should not forget that additional fasteners increase the weight of the structure, which is an additional load on the boat, including the material from which the boat is made.
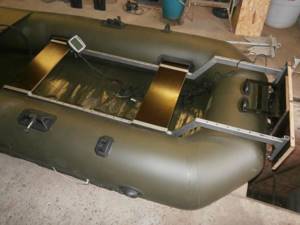
We use the motor “to the fullest”, or the transom reinforcement features
Practice shows that the considered methods of attaching a rigid element work well when the motor is running at half power.
In most cases, strengthening the rigid element allows you to get rid of this problem. The essence of the procedure is the correct distribution of the load from the motor over the surface of the boat. Making it yourself is also quite simple.
An acceptable option is to install additional “braces” made from a metal rod.
To do this, additional rails are glued to the sides of the boat, into the holes of which metal amplifiers are inserted.
Instead of the sides, to add additional rigidity, you can consider the option of attaching a hinged transom, where additional “braces” are attached to the bottom or bench (bank) of the boat.
Experienced fishermen have noticed that in order to make a PVC boat move normally using a motor, it is better to use not a bottom flooring made in the form of slats from separate elements, but one that is a solid structure.
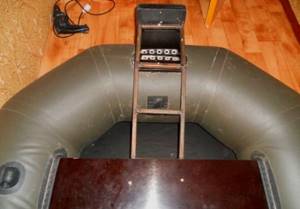
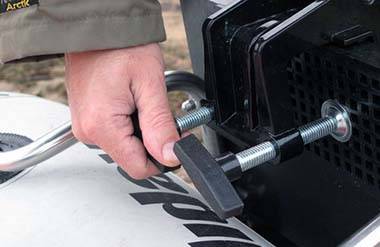
Stage 6. Miscellaneous stuff.
Now we attach to the transom various elements removed from it earlier. For fastening, you can safely use self-tapping screws, for example 4*25; in the store we ask for stainless steel ones. We planted the self-tapping screws after thoroughly covering them with sealant so that water would not go under the self-tapping screw.
After that, we decided to glue another layer of glue on the corners of the transom from below, in order to protect them even better from water.
The drain valve had not been installed yet, so we decided to swim several times without it. To be honest, I don’t have the courage to make a hole in plywood that is well sealed from water =), but then I’ll still have to make that too.
Stage 3. Impregnation of plywood
To protect it from water, it was decided to impregnate the plywood from water. To do this, we bought titicurilla impregnation, a liter jar and covered the entire board in 3 layers. It took 24 hours to dry between coats.
The result was a dense coating that penetrated a little deep into the wood and coated it on the outside, like paint.
As it turned out, there is a downside - the glue does not stick to the coating. You glue it and it comes off very easily. As a result, the board was sanded, not completely of course, but strongly, which significantly weakened the thickness of the impregnation.
The result was a dense coating that penetrated a little deep into the wood and coated it on the outside, like paint.
We suggest you read: Rating of PVC inflatable boats by quality
As it turned out, there is a downside - the glue does not stick to the coating. You glue it and it comes off very easily. As a result, the board was sanded, not completely of course, but strongly, which significantly weakened the thickness of the impregnation.
Awning
An awning can only be used on boats with a strong bottom that can withstand the load of the structure. Basically, 3 types of awnings are used on boats - folding, tensioned with fixed fastenings and awnings with special struts.
The folding version is always with you, it’s quick to set up, but it requires a lot of space, just like the second one. The third type can only be secured when moored to the shore. Using an awning, you will get good protection from rain and hot sun, but boats with an awning will not be able to move quickly.
Strengthening cylinders
Strengthening the cylinders increases the likelihood of swimming to shore without capsizing the boat and losing all its contents. These elements are under constant pressure from the air flow from the inside and compensatory water pressure from the outside. All these factors lead to premature wear of the mechanism. It can be strengthened using PVC tape. It is attached to the bottom and sides of the cylinder.
In order to properly strengthen the cylinders, you must perform the following steps:
- Buy special PVC rests or make them yourself. In stores you can find a stop for the size of a boat of any modification. And for self-production you will need waterproof material, from which you need to cut a piece corresponding to the size of the cylinder.
- Before gluing, you need to degrease the working surface with a special solution or alcohol. It is recommended to use PVC glue for connection.
- After completing all work on upgrading the cylinders, you need to let the glue dry for 2-3 days.
You can also install a side rest, which will protect the outer part of the cylinders during mooring or when colliding with various obstacles. If such a rest stop is equipped with a splash guard, then the cylinders will be protected from the back wave. The size of such an element can be from ¼ to ¾ the length of the entire cylinder. In some cases, it may be necessary to install stringers, because On many boats, the bow balloon has curved contours.
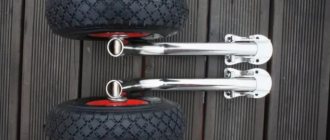
Making anchor fastening
Accessories for tuning PVC boats include anchor fastening. The weight of this element must be at least 10% of the mass of the entire vessel and no more than 1% of its length. When making it, the following points must be taken into account:
- Maximum wave height in those reservoirs where fishing takes place.
- Greatest wind force.
- The nature of the bottom of the boat.
- The strength of the cable that will be used for the anchor. It must be taken into account that it will be subjected to heavy loads: the greater the weight of the vessel, the greater the amount of force the cable must be designed for.
To make a PVC boat anchor with your own hands, you will need the following elements:
- metal pipe with a diameter of 25 mm and a length of 270 mm;
- fasteners;
- 4 metal pieces;
- 2 metal rings.
A sleeve must be attached to the tube. The stripes will be used as paws. All elements are fastened together using nuts and screws. In order not to lose the anchor, it is necessary to attach a buoy to the cable. In this case, the fisherman will always know where he threw the anchor.
In order to make this mechanism heavier, lead can be poured into a metal tube.
It is necessary to select a design in accordance with the reservoir where fishing takes place. The mechanism must hold the boat securely in one place, and it must be easy to remove from its hooks.