General information
One of the most common models of boats made from fiberglass material is the WaveRunner-285 boat. It is considered a full-fledged planing vessel, which is quite suitable for walking on the sea or tourism. The ship, which is characterized by the fact that it has an increased freeboard, as well as a fairly large width, is also convenient in that its bow can accommodate a comfortable salon with an adjacent toilet and galley. In the stern of the boat, you can make a double cabin with your own hands, the location of which will be located strictly under the cockpit. The unit control department will be located above the engine compartment, and it will also be protected from wind and water splashes by inclined glass.
Peculiarities
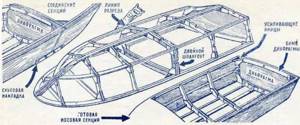
- When manufacturing a boat product, it should be noted that the main criterion is the base of the frame part, on which the remaining parts of the boat will subsequently be attached.
- The bow area is formed by the stem and will be fixed on one of the sides. The stern post is used to secure the stern part.
- To achieve transverse contours and curves, transverse parts are used to allow the boat to achieve a certain rigidity.
- To form the lower deck, it is necessary to lay flooring in the inner part. Next, the product must be covered with plywood.
- All products can be made on the basis of wooden products, which will subsequently be glued together.
- If desired, plywood boats can be equipped with motors and oars, but for this it is necessary to install a transom in the stern.
Read: Choosing a gasoline ice drill
Boat power
When equipping a boat with your own hands, you need to consider which engine will be installed on it later. This particular model is designed to install either one or two motors. However, it is important to consider here that the total power for the normal functioning of the facility should be in the range from 250 to 500 hp. With. They must also have a direct reverse gearbox, which will allow them to reach a speed of 15-30 knots, which in km/h ranges from 28 to 56. In addition, the vessel may also have propulsion systems or additional outboard motors.
It is worth noting that building a boat with your own hands saves from 50 to 75% of material resources from the amount that would have been spent if the unit had been purchased at a shipyard and not built independently. It is also worth noting that the given technology for building a small vessel is not the last word in shipbuilding. This is just a practice-tested, established method that will allow you to construct an acceptable fiberglass boat with your own hands.
Beginning of work
Starting the construction of a small fiberglass boat is no different from building from any other material. The first step is to lay out the theoretical frames, as well as the contour of the stem, on a plywood panel or on a sheet of cardboard. The breakdown should be carried out in the actual size of these parts.
It is also important to note that the board or plaza on which the layout is made must have a width corresponding to the width of the boat, plus 300 mm. The height of this object must be 400 mm higher than the expected height of the housing. Experts recommend first creating drawings of the boats, on which all the necessary parts will be marked with dimensions. This is done in order to avoid mistakes during the manufacturing process.
Another important detail is that the upper ends of all frames must be extended to the height that is shown as a horizontal line on the plaza. It is perpendicular to the DP line and is called the Shergel line.
Making a punt boat
You will need 3 sheets of standard plywood. We divide the sheet into 4 equal parts, since there will be bars on which the sides will be attached. Average size - 98 cm, Front - 64 cm, closer to the front - 90 cm, from the center to the back 90 cm, back - 74 cm.
After marking, we apply guide rails. It is better to use a small width, as it will be easier to bend. Secure with clamps. Then mark the fold with a pencil or felt-tip pen.
The next step is to cut off the resulting “wings”, they will go on the top sides. The wide part will go to the back wall, and the narrow part will go to the front. The base is ready.
The transom for the boat should have the following dimensions: at the bottom 76, and at the top 96 cm, the height of the rear transom is 42 cm, for the motor 38 cm. Next, we cut out a small seat for installing the engine. The transom will consist of a block, which should be 1 centimeter wider in each direction, since the boat is expanding. The side bar will also be attached in the same way.
Using sinuous movements, apply sealant to the width of the cut plywood. We install it on the bars and secure it with screws. The transom should be slightly tilted, but not 90 degrees. We remove the far corner with a plane, the main thing is not to touch the bolts. The width of the bar is 6 cm, thickness 4.5 cm. We apply sealants to the back part, then secure it with screws.
Read: How to choose a sleeping bag
The next transverse bars, we select the dimensions according to width 6.5 cm, thickness 4.5 cm. We fix the bar on the inside 1 cm from each edge. We fasten screws from the center of the base of the boat along all the features. The docking bar is placed halfway, because there will be a continuation of the “bow” of the boat.
For the left and right sides, it is necessary to nail 2 boards to the bow, after which they are bent along the contour and secured with a strong cord. The boards are attached to the ends of the bottom with nails.
Important! It is better to nail the side boards at the same time.
After constructing the frame, the bottom of the boat is attached. It is recommended to fill the joints with epoxy resin and seal them. After drying, the resulting seams are sanded and given a uniform appearance. Then you should glue the joints again.
Larch is best suited for benches. In the places where the side and bottom are connected, we sew the strip and also seal it. Along the sides from the top along the edges we just sew the strip. This will be the bulwark.
It is advisable to install a keel in the stern; it will help keep the boat on course. We cover the vessel with two layers of primer and five layers of paint. Each layer must take a long time to dry. It is recommended to paint all removable parts separately.
Additionally, you can make oars. They are mainly made from solid boards or slats. As a blade, you can insert plywood measuring 200 by 400 mm and 6 mm thick. They make it much easier to control the boat.
Read: Electronics and navigation equipment for trolling
Assembling patterns
When carrying out work on plasma marking of patterns, it is very important to take into account factors such as the thickness of the slats and the thickness of the sheet metal that will be used as lining of the inner surface of the matrix. In other words, when drawing up a drawing of a boat and subsequent assembly, it is necessary to set aside from the theoretical line of each of the frames the distance inward that will correspond to the total thickness of the slats and sheet metal. It is this marking option that should be used when cutting out patterns and their further assembly.
The individual parts of the transverse patterns must be connected using materials such as linings and brackets made from pieces of plywood with a thickness of 8 to 10 mm. A similar indicator is suitable for a boat whose length will be around 10 m. It is best to glue the linings to the patterns, and then additionally screw them with screws or nail them.
We build a boat ourselves
Building a plywood boat with your own hands is a much simpler task than it might seem at first glance. With due diligence, even a beginner can cope with the work.
The proposed design is very simple and affordable. It is designed for family walks (3-4 people), and it can be easily transported by car or carried by hand.
The product's own weight is close to the weight of a canoe or kayak, but unlike them, in this boat you can stand and change places on the go, without the risk of sinking the vessel. The design allows you to use not only oars, but also sailing or attaching a motor, hunting, fishing, swimming for pleasure purposes. (see also Building a plywood canoe with your own hands)
Construction and materials

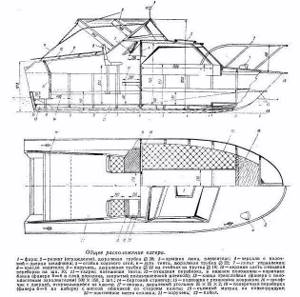
Boat of “classical” design.
As a sample, we took the most optimal and versatile version of the boat. The described boat has a length of 3.5 meters, a depth of 0.5 meters and a width of 1.35 m.
Advice! To check the seaworthiness of the chosen design, make a mock-up of cardboard and test it in a bath of water. If the structure does not sink, load it within reasonable limits to ensure that the chosen proportions are correct.
Materials you will need for work:
- FSF plywood sheets 4 mm, dimensions 1240 x 2450 - 3 pieces.
- Plywood sheets 6 and 10 mm thick.
- Epoxy resin ED-531 – 5 kg.
- Hardener (for example, Telalit) – 1 kg.
- Microspheres (Cobasil) – 2 l.
- 1 roll of fiberglass.
- 1 roll of old wallpaper for making patterns.
Carrying out work
Cut out the details.
So, we build a boat out of plywood with our own hands.
A simple instruction will help you with this:
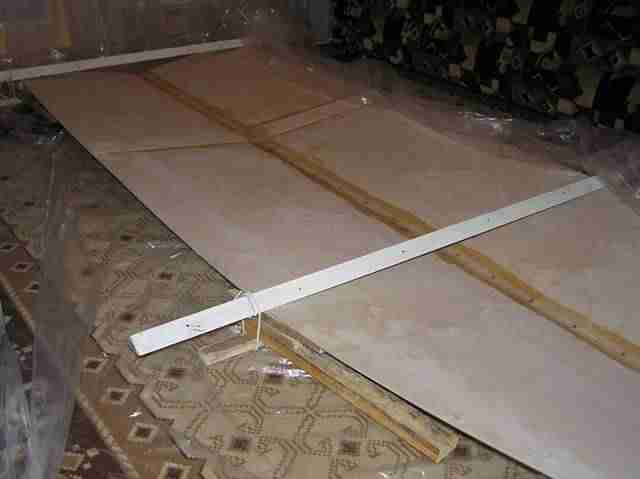
- We transfer the bottom patterns to the wallpaper sheet.
Advice! The easiest way to transfer the pattern is “in squares”. This technique allows you to maintain proportions. To do this, you need to draw a pattern with squares of 1 x 1 cm. After this, its length and width are measured. Next, the size of the squares for the boat pattern is calculated using proportions, based on its actual dimensions. A wallpaper sheet is marked, onto which the drawing is transferred.
- Transfer the pattern from the wallpaper sheet to a sheet of plywood.
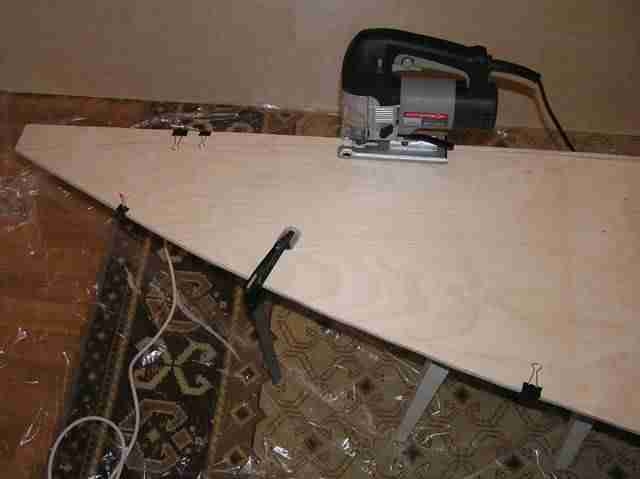
- We take a jigsaw and cut out the parts. (see also: Sawing out of plywood with a jigsaw: drawings and rules for working with the tool)
- We cut out the side elements. When carrying out operations where temporary fastening of elements is necessary, it is advisable to use binders.
- We process the symmetrical elements of the boat hull with a plane.
- We drill holes for sewing the body together at intervals of 100 mm with a distance of 5 mm from the edge.
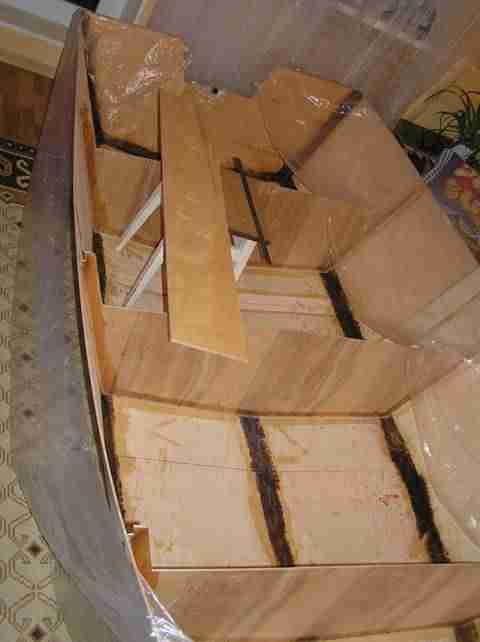
- We sew together two elements of the bottom using nylon thread (similar to sewing felt boots).
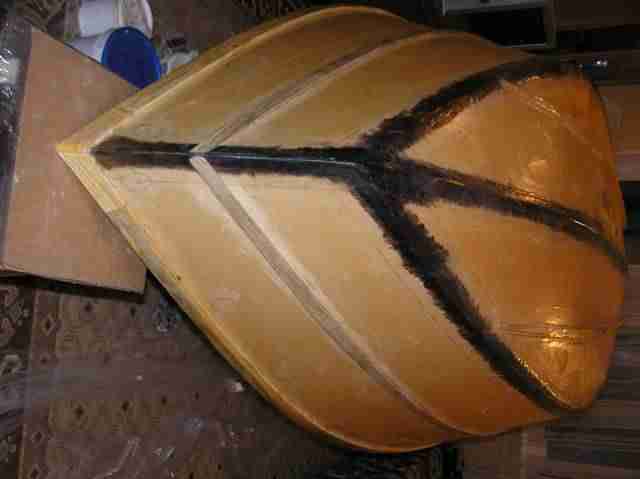
- We glue the bottom with epoxy resin and remove the fillet.
Glued bottom of the boat.
Advice! It is most convenient to remove fillets on seams using a plastic spoon.
- We cut the fiberglass into strips 5 cm and 7 cm wide. Cutting should be done at an angle of 45 degrees.
- We anneal the resulting strips over a fire.
- For the transom we use a plywood sheet, 10 mm thick. We glue the inner seam located on the bottom with fiberglass. Fiberglass fabric should be impregnated with “epoxy” by laying the film on the floor. This impregnation prevents the material from shedding.
- Next, the plywood boat is completely sewn together with your own hands.
- We sew in the transom using epoxy glue.
- We glue the transom and internal side seams with fiberglass.
- We make solid frames from sheets 6 mm thick.
- We sew in the frames, after which it is necessary to glue them.
- We make and glue the fender beam. Its outer parts should be pressed along the entire length with clamps and binders located between them.
- From the remains of plywood we make and sew in the front frame and deck.
Assembly of the structure.
- We glue the internal elements of the fender beam.
- We glue in the reinforcement of the transom board. It has the following dimensions: thickness – 25 mm, width – 130 mm.
- We glue in a transom shelf (15 mm wide) and vertical brackets.
Advice! The transom board reinforcement must be secured with screws while the epoxy dries.
- We turn the boat over, placing it on the slipway. Brackets are sewn and glued under the seats.
- All external seams must be covered with two layers of fiberglass.
- Remove the screws from the transom. Their seats should be drilled out and furniture chips should be glued in place of screws.

We install the deck.
- We make side steps that need to be “planted” with glue, secured from the inside with screws.
- After the glue has hardened, remove the screws from the side and bottom steps.
- We treat the boat with epoxy resin.
- A do-it-yourself plywood boat for a motor must be completely painted on the outside. Only the bottom and lower part of the side are painted from the inside.
- The boat is set in its normal position, after which the upper part of the fender is leveled with a plane and impregnated with epoxy resin.
- The boat is ready. As you can see, a do-it-yourself plywood motorboat is quite feasible. All that remains is to purchase a motor so that we have a full-fledged motor boat. The price of such a vessel will be significantly lower than ready-made analogues sold in stores, while externally the homemade watercraft looks no worse than those produced by famous companies.
Product before painting.
How to make a boat: plating and matrix
Next, before assembling the existing patterns into a matrix, it is necessary to attend to the creation of the outer cladding of the structure. In order to create the most comfortable conditions when working with the outer skin of the boat, it is necessary to provide a part that ensures the tilt of the matrix on both sides of the ship.
If you do everything correctly, you will be able to work while standing on the floor next to the workpieces. The matrix itself, in any case, must have a very strong and rigid structure. This is necessary so that during the construction of the unit the shape of its body is not distorted.
How to make a boat with a strong matrix? Large structures are assembled from longitudinal beams, which will form the horizontal base of the boat. Inside the resulting frame, it is necessary to install walkways that will facilitate the work of gluing the body. After the longitudinal beams, which are the base of the matrix, have been installed, the future position of all the patterns is marked on them, and a steel wire is stretched along the beams, which will be a string indicating the vessel’s DP.
Safety precautions during construction
- Avoid getting the resin in your eyes or face as it contains cyanide. The substances are a class of fast-acting chemical compounds that are deadly to both humans and animals. When working with toxic substances, use special protective equipment.
- Work outdoors or in a well-ventilated area.
- It is recommended to glue the stop at a distance that is convenient for the rower. The standard distance from the edge of the can to the foot rest is 70 cm.
- The boat is several times lighter than a person even if safety precautions are not followed. The likelihood of capsizing is much greater.
- It is prohibited to raft down mountain rivers and go out into the sea.
- Structural integrity is the key to safety.
Installation of patterns
It is recommended to start the process of installing blanks from the midship frame. Before securely fastening this element, it is very important to make sure that the pattern is strictly vertical and perpendicular to the DP. It is attached to the beams that serve as the base. After all the other workpieces have been mounted, the stand located in the transom DP has been installed, and all the elements have been braced with braces to avoid any movement, you can proceed to the stage of covering the inner surface of the matrix using longitudinal slats.
To perform this task, material with a thickness of 12 to 15 mm and a width of 50 mm is most often used. To equip the bottom of the boat, it is better to use slats with the same thickness, but greater width - up to 100 mm.

Aluminum water boat
The low cost of raw materials, as well as lathes, has led to the fact that many owners have decided to independently manufacture certain parts and elements from metal. It is believed that the production of an aluminum boat is one of the most difficult tasks, which is practically impossible, but at the factory they are created without difficulty, since they have special tools for this. However, this is not so.
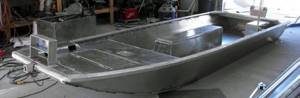
The most difficult thing in making this type of boat yourself is making its pattern from metal. This term refers to the marking of exactly how it is necessary to cut out the necessary parts from aluminum.
When making such a unit from metal, the whole process comes down to assembling a kind of construction set. This is true if the blanks are not cut out yourself, since this still requires a lot of skill and high-precision equipment, but a computerized model of the boat is purchased. Yes, the cost of such a model will also be quite high, but if you compare it with buying a ready-made vessel, you will see significant savings.
High-speed small craft
Another option for a vessel that you can make yourself is a speedboat. A rather important part in the construction of this type of unit is the choice of engine and its location. This part can be placed in the cockpit of the vessel, and the part that will protrude can be covered with a hood.
This definition of the place was not chosen by chance. It will expand the range of devices suitable for installation. You can use engines from cars such as Zhiguli or Volga. In addition to these models, it is quite possible to install a diesel engine from a tractor. However, this is only possible if additional hot air removal is provided. You can use a fake chimney for this.
Air-cooled engines can also be installed. Since a high-speed boat must have good stability when moving quickly through the water, it is recommended to place this part closer to the center of gravity of the entire vessel. The greater weight of the engine will give greater stability to the entire structure.