How to use it?
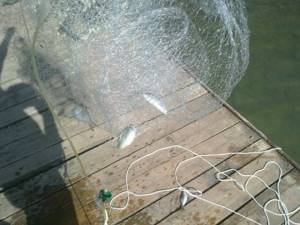
The principle of fishing using this means is that the fish gets entangled in a net thrown into the water. How to use it correctly? To begin, the fisherman wraps the net around his hand. Next, with a special throw he throws it over the surface of the river. The correct movement should be learned in advance. Having straightened in the air, the fishing net is immersed in the water and covers a certain area of it - it depends on the size of the gear. When the required part of the nets reaches the bottom, they are pulled ashore, along with the entangled fish. The water that was in the place where the net fell naturally passes through the cape. Therefore, the catcher pulls only the fishing gear and the catch itself onto the shore.
The effectiveness of the casting network
It should be noted that snares are one of the most common fishing gear. This equipment has a number of advantages. Firstly, when using nets, the catch is greater than when fishing with a fishing rod. And the process is faster. Secondly, when fishing with a rod, you need to take food or other bait, which nets do not require. And the main advantage of tents is that the fish are not damaged by hooks or other additional gear. Thanks to this, it remains alive and intact, which means it will not soon deteriorate. So we can say with confidence that casting net fishing is the most effective today.
But you should be very careful when using such gear. It is extremely important to hold the traction rope firmly in your hand or attach it to your belt. If he slips into the water, the net will hardly be able to be reached. And such a situation will not only leave you without gear, but will also cause problems for many plants and animals of the river, and can also cause difficulties for boats passing by.
The operating principle of casting nets and fishing features

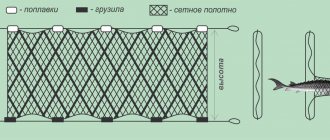
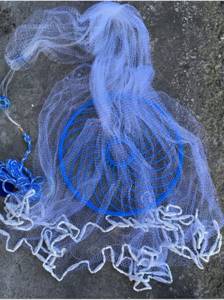
Casting nets are straining fishing gear. At the moment of splashdown, the properly cast net takes the shape of a circle. Due to the weights placed on the edges of this circle, the net sinks to the bottom, covering the fish underneath it. Next, it is pulled together by a cord attached to the base of the net and strains out the catch.
When using a casting net, it should be taken into account that buttons, unfastened hard flaps of pockets, drawstrings on laces and other protruding elements of clothing cause big trouble in the fishing process. At the moment of unwinding or casting, one mesh of the net can get caught on them, which completely disrupts the casting. Accordingly, the fisherman's clothing should be tight-fitting and without protruding parts.
Protruding parts of the boat or foreign objects on the shore can cause the same problems. The problem with low-lying objects can be solved by selecting a higher network from the ground. Foreign objects on the shore or casting trajectory must be removed, or a position must be chosen from which they will not interfere when casting.
The wind has a significant influence on the process of fishing with a casting net. During casting, the side wind compresses the opening circle, as a result of which the net splashes down in the shape of an elongated ellipse. You don’t need to have great knowledge of geometry to understand that the area of an ellipse with the same circumference will be less than the area of a circle. And the smaller the area the net covers, the less fish will fall into it.
When fishing in windy weather, it is advisable to cast the net into the wind, since in this case the entire net is blown away by the wind, and it splashes down, having the “correct” shape. It is a little more difficult to cast against the wind, but still, such a cast will be performed better than with a side wind.
The depth at the fishing spot is also important. As a rule, casting nets are used at shallow depths, although large-diameter nets can also be used to fish the channel parts of small rivers. On average, we can assume that the fishing depth should not greatly exceed the diameter of the net itself.
Lack of casting network
The only disadvantage of such tenets is their cost. Since nets are more effective in fishing detail and bring better catches, the fishing rod has faded into the background. It is now used by fishing enthusiasts, for whom it is not the catch that is important, but the experience gained. For real professionals who are interested in income, they need a network. Therefore, the demand for them is growing and the price, accordingly, too.
There is no point in buying cheap gear. Especially if you will use them more than once. After all, you will have to throw them into the water often. Poor quality equipment can only ruin the entire fishing experience. Good networks at low prices are hard to find in today's market. Therefore, many decide to make a casting network with their own hands.
What does a casting structure look like?
Making a casting net with your own hands involves a preliminary study of the design. The American type model is in most cases considered the most common.
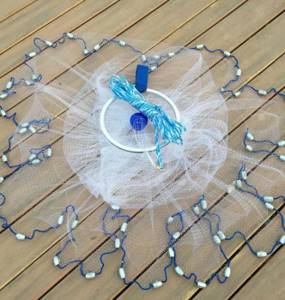
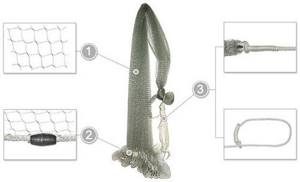
This type of fishing gear contains the following parts:
The woven base itself is made from a special monofilament material. During production, the fabric is treated with a special substance so that the resulting network is soft and pliable. For correct and comfortable opening, it is pre-stretched at the factory.
Read here Hook for winter fishing - what it is, what it is for and how to make a hook with your own hands (video + 115 photos)
The second component is a cord with weights, which helps, when pulled out of the water, to collect the net and all the prey that falls into it. By tightening the net, the fish are no longer able to escape from the trap.
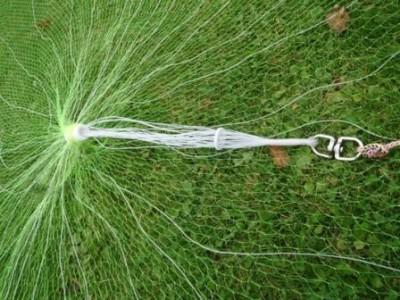
There is also a carabiner on the net that prevents the gear from twisting.

There is a horn that helps collect the top of the net.
Another component is the casting cord. It is made of polypropylene, which after casting remains on the surface due to the buoyancy properties of the material.
American
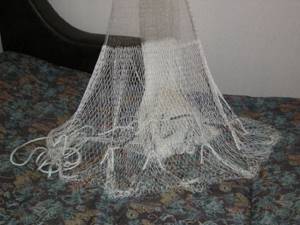
This is a casting network with a ring. It consists of many pieces of triangular woven fabric. They are stitched together in such a way that the resulting mesh has the shape of a dome. The bottom of the circle is covered with a special loaded cord, from which slings diverge along the entire border of the product. These are special ropes that are part of a fishing net. And they are always located on the inside of the gear. At the same time, they pass from the bottom of the network to its top. At the top of the system, the slings are sewn into a kind of ring, around which the bags are assembled.
Operating principle
Since the American network has a ring, it is much more convenient to use. It casts with greater precision and produces a corresponding catch. How to use it correctly?
Experienced fishermen advise shaking the nets before casting. This action straightens out the stale nets, which will further improve fishing.
First, you need to wrap the pull cord around your left hand with rings. Next, shake the nets while holding them by the hub. Check that there are no interfering loops or knots anywhere.
Also transfer the upper part of the snare to your left hand, continuing to hold the cord with it. Next, you need to unwind the cargo rope. To do this, take it in both hands and spread them as wide as possible to stretch it as much as possible. If everything is done correctly, the net will look unfurled and ready to be thrown.
Make a couple of swinging movements, then take aim and throw the net into the water.
During the throw, it opens completely above the surface of the reservoir, and with the help of attached weights it quickly sinks to the bottom. When you pull it back, the tackle will curl up into a bag, inside which all the prey remains. American is a standard fishing casting net.
Spaniard
This type of cast net has many similarities with the American one. Therefore, it has a similar design and is also very popular among fishermen. But these two types of networks should not be confused. Their main difference is that in Spanish snares the central cord is sewn to the center of the tackle, and not to its lower part. Also, this type of fishing tackle does not have its own ring on the top. Therefore, the catch is pulled not by a sleeve or ring, but by a special rope. The Spanish boat has cargo hangers, but they do not collect it in the water in the form of a bag, but are used only to better immerse the awning in the water. When a fisherman pulls the nets ashore, peculiar pockets form in their central part, which pull out the fish entangled in them.
What is a casting network?
A casting net, like any fishing equipment, has its own scope of application. But there is no big secret in this matter. It is important to only consider the fish you decide to hunt.
Casting network design
Previously, such networks became widespread in the Caucasian and Asian countries. Whereas today Europe and even Russia have been added to their number. We have entire clubs that unite casting fishing enthusiasts.
And if you have found a high-quality net and learned how to cast it, then the trick is in the bag. But it is also important to find a good place for fishing, so that people and various law enforcement services do not interfere. Because the latter consider a two-meter net to be poaching. Although there is no need to worry, there are enough such hot spots in the vastness of our country.
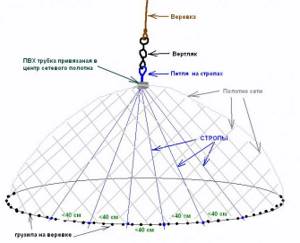
The casting network consists of the following elements:

monofilament fabric, which is distinguished by high-quality fishing line. The latter is capable of stretching well;- The cargo cord makes it possible to pull the equipment into a special bag after you pull it to the coast. It consists of a large number of small polyethylene fibers;
- additional lacing is used to strengthen the lower part of the mesh and ensure a reliable connection between the weights and the weight cord;
- the design of the net assumes the presence of a lead weight weighing 0.026 kg;
- a carabiner is used to prevent the cord from twisting;
- the horn is responsible for assembling the casting gear, increasing the level of its reliability and practicality;
while the line veins connect the weight line to the line to organize the casting;- The casting cord has an impressive length, and a small margin is assumed for casting both from the coastal zone and directly from the watercraft;
- loop to securely attach the cord to the left hand.
With the help of a casting net, you can, if desired, catch shrimp at great depths. But it is necessary to choose the correct cell dimensions.
There are fishermen who, while moving a motor boat, cast a net. It is recommended that the speed be kept to a minimum. After casting, you need to stretch the tackle a couple of meters and check it. There is nothing complicated about it. Moreover, in this way, you won’t even pick up debris and vegetation from the surface of the bottom of the reservoir.
What do you need to know about casting net fishing?
The technique of casting a casting net will be discussed further. But first of all, I would like to note that it is important to understand how to use it in general. To do this, one unwritten fishing rule will come in handy: the optimal depth for fishing is when the radius of the net is much smaller.
Before casting the net, it is recommended to check the surface of the bottom of the reservoir for the presence of snags, branches and other debris. To do this, you can use a standard cat. It will cope with this task perfectly and will protect you from network interruptions.
If you have a fish finder, it can be very useful. Because in this case you can find a hot spot full of fish. Plus, you shouldn’t stop where there are fishermen with spinning rods. This will only lead to quarrels, and maybe even worse. And we are for peaceful fishing.
If you decide to hunt for perch, then you need to cast with a splash. It is impossible not to notice the fight of this predator. It is important not to miss the right moment. If the water is clear, then it is better to look where the fish are and cast the nets directly into this place.

Additional use of complementary foods will allow you to catch small bleak in the autumn. In this case, the mesh is selected with a cell size in the region of 12-16 mm, but no more. The advantage of this fishing method is that you fish not along the bottom, but in the water column. And if you are sure that the predator has been caught, you can safely take out the tackle immediately after casting.
It is recommended to cast the net horizontally, ensuring that it lands as evenly as possible on the surface of the reservoir.
Important! A casting net is a unique fishing tackle with which you can go not only to catch fish, but also crustaceans.
But you should look for them not in the upper layers of the water, but at the bottom. Most often, crayfish are caught in nets completely by accident. A little complementary food, and medium-sized crayfish and shrimp can become your trophy. But the cell size must be appropriate.
Operating principle of Spanish networks
Since the Spanish cape and the American parachute differ in their structure, the casting techniques and principles of their operation have certain differences.
Wrap a thick traction cord around your left hand. Take the top third of the nets into another and stretch them as wide as possible. Then, cast your gear over the area of water you’ve noticed. At the same time, it is not recommended to keep your body motionless. When casting a casting net, a strong swing is required, and experienced fishermen recommend turning your body 180 degrees during the cast. Make sure that the nets fly with the correct trajectory - after the highest point of their flight, they should descend to the surface of the water without a sharp fall. A gradual fall will ensure that the awning opens correctly.
Submerging into the water, the tackle entangles the fish and traps it in pockets near the center. Once they have enough catch, you can pull the nets ashore. To do this, you must use a traction cord.
Casting net (cape or parachute).
1.Casting network.
A casting net (cape or parachute) is one of the most ancient methods of catching aquatic life with a net. You can fish with it from a boat from the shore or from a pier. Wherever there is a convenient place to throw it, and where there is a good bottom you can catch with this net.
Casting networks are divided into 2 groups: “Spanish Women” and “American Women”. This division means a difference in their design and functionality.
The main difference between the American ones is the presence of slings stretching to the center of the network fabric. These slings pass from a thick rope through a ring located in the center of the net and are tied to a rope with weights tied around the perimeter of the net. During the throw, the net opens due to centrifugal forces and falls onto the surface of the water in its entire plane. Then, due to the weight-weight, the net is quickly immersed in water around the perimeter, and in the center
Due to water resistance, a small dome of network is formed. This net can be used to fish both in the water column and from the bottom. If the bottom is good, then you can wait until the net falls to the bottom and immediately pull the rope. If the bottom is not very good, then without waiting for the net to fall to the bottom, you need to pull the rope tied to the slings in the center of the net. This will avoid unwanted snags. Further, continuing to pull, the slings will pull all the sinkers into one place - the net closes. At the same time, the middle of the net will lower and pockets will form on the sides where the caught fish will be clogged. When the sinkers begin to rise and press against the center of the net, the fish will not escape anywhere. Such nets are usually made from fishing line or nylon thread. The weight of a net with a diameter of ~3 m with weights is about 2.2 kg.
Spaniards do not have such slings. Closing the network is ensured by a cord stretched along the perimeter of the entire network, pulling which tightens the ring of the network - a circular drag is obtained.
Unlike Americans, due to these design features, the Spanish can reach up to 7 kg (D=3m) in weight! It all depends on the diameter of the network. They are usually made from nylon thread.
What type of network to buy or make for yourself is up to you! I advise you to go to the store, look and decide which one you need.
But for my region where there are silted ponds and small rivers, American is suitable for me. And it is easier to use. It’s easier to pull out the catch, easier to prepare for the throw, and it’s lighter. But for faster rivers the Spanish Flu would be more suitable.
The prices for casting networks in Russia are too high. You can buy a Chinese one with a diameter of 2.5 m in the store for 2-4 thousand rubles. And normal ones will cost even more. It would be cheaper to buy it in foreign online stores, but according to customs rules, all fishing equipment and their parts for catching animals are PROHIBITED for transportation! Therefore, it is more profitable to make such a network yourself. It will take a long time, but you will get the network you need.
To make a cape net (its fabric), a regular net fabric is not suitable, since such a net will have cells stretched diagonally in the four corners when thrown and pulled. Because of this, the canvas in the elongated state can have the same radius, and when it opens, it can become square-like (or vice versa). Because of this, it won’t be possible to throw and the canvas will get tangled. From ordinary fabric, you can sew a casting fabric from triangles, so as to prevent the cells from stretching diagonally. But such networks will have many seams and there may be problems with load balance, which will affect the quality of the network opening.
The fabric must be knitted by hand or ordered from craftsmen.
I made such a network myself with a diameter of 3 m. cell=1.7cm. The thickness of the fishing line is 0.24 in about 1 month, but I knitted it whenever I had to. As a result, 28,000 knots were tied, 900 m were spent. fishing line (250 rub.) +50 rub. 75m. fishing line 0.8 for slings +10 rubles swivel +35 rubles 20m. BRAIDED rope for body kit +20 rubles 10m. ropes for pulling (preferably also braided, but not essential) TOTAL = 415 rubles + lead from batteries. I used cheap “Klin” fishing line in reels, now I regret it. You need to take an inexpensive fishing line, but without memory! Klinskaya is a bit stiff, but it remembers the knitting position - then it springs back.
For knitting we will need:
- Make a shuttle and template
- Line for canvas. For cells from 15mm. up to 25mm, a fishing line D=0.20 (0.25) without memory is suitable. You can calculate the length of the fishing line and the expected amount of work in tablica seti
- Line for slings D=0.8. 100m coil is enough.
- Rope for body kit. Nylon, wicker!!! See the length in the same table. Select the diameter depending on the weight of the sinker. Usually they recommend 5mm, but for me it’s 3mm. went great.
- Rope for pulling the net. Nylon, thickness from 10mm (so as not to cut your hands) is also wicker.
- Sinkers calculated at 1.2 kg. at 1m of network radius.
- The swivel is stronger.
- PVC pipe (connection) 32”
- Plastic plate or bottle cap.
- more
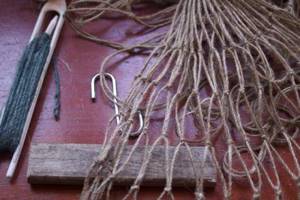
Making a shuttle for knitting a net.
Shuttles for knitting nets come in different types.
Basically, for weaving nets with large meshes, plate shuttles with two or one pointed side are used. Such shuttles are now sold in almost every fishing store and cost about 50 rubles.
These shuttles can be made of wood, plastic, textolite, metal plate or wire. It’s your choice of what to make from and what materials are at hand.
First, a plate is cut out in the form of a rectangle, the length of which should be from 15 to 30 cm. There is no point in making it longer as it will be inconvenient to weave. Longer ones can be used when weaving strong nets with thread or rope for hammocks. The width of the workpiece should be less than the mesh size of the future network, but sufficient to ensure the strength of the shuttle. For example, when I knitted a 1.7 cm mesh net, I used a 1.4 cm wide shuttle.
1. I recommend using a duralumin plate to make the shuttle. It is easy to process, the material itself is quite elastic and light, and sharp edges can be smoothed to a mirror state, which makes weaving easier.
2. Next, on one side of the plate, you need to make two cuts with a hacksaw at the same distance from the edge (see the black dotted line on the left), and on the other side, cut off two triangles, giving the shuttle a pointed shape.
3. Next, use pliers to break out a piece between the slots as in the picture along the red line. You should get two horns. And at the other end, many holes are drilled in a “U” shape. For braiding with 0.24-0.35 fishing line, the optimal gap at the top of the “U” will be about 2-3 mm. If you do more, the line will spontaneously fall off the shuttle during weaving.
4. Carefully process the break point (on the left) with a file, smooth out all sharp edges and irregularities. At the right end, use a file or other tool to grind off the partitions between the drilling holes and also remove all irregularities.
5. Next, you need to process the entire resulting shuttle with sandpaper or a needle file. There should be no sharp edges or irregularities on it.
The line needs to be wound from one edge to the other. On the left, the fishing line is passed between the horns, then from the side where it comes out the fishing line is put in a loop on the remaining rod inside the “U”, then the fishing line is again led between the horns to the other side. etc.
The same shuttle is sometimes made pointed on both sides. But it seems to me that this will create more problems when making it and winding the fishing line.
In the next version of the shuttle, there is no core inside the “U”, but thin cuts are made on the edges for the passage of the fishing line. These shuttles can hold a lot of fishing line. The fishing line is wound by alternately threading it through thin cuts at the edges.
These same shuttles are sometimes made of elastic wire. The wire is bent in this shape, after which another thinner wire, thread or electrical tape is wrapped in the center to give the shuttle strength. The fishing line is wound in the same way as the first shuttle discussed. In fact, this is what it is, only made of wire.
For knitting with a thin thread or thin fishing line of a network with a mesh size of less than 10 mm. It is better not to use a regular plate shuttle. In this case, due to the small size of the mesh of the network, every millimeter of the mesh should be saved so that as much fishing line as possible can be wound on the shuttle, and then it can be easily pulled through the mesh when tying knots. A needle-shaped shuttle made of thin elastic steel wire is suitable. To make it, you need to cut two pieces of wire of the same length. Next, using a vice and pliers, bend both ends of the wire as follows:
Both wires must be bent at each end so that the edges and places of bends coincide along the axes indicated in the figures.
When both wires are prepared, they need to be connected by wrapping them with a ton of wire or in some other way to ensure their immobility relative to each other.
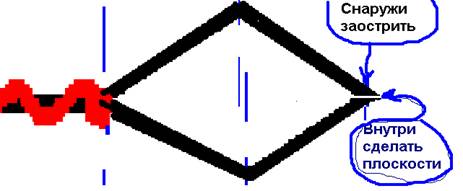
Now the ends of the wires (see left) need to be slightly bent so that they rest against each other (see right end). And additionally, the ends of each wire on the outside can be sharpened, giving them a pointed shape. And grind down the places where the ends of the wires come into contact so that planes are formed with which they will touch, but sharp edges of the wires must not be allowed to remain in these places!
Now the shuttle is ready for winding fishing line or nylon thread onto it. The fishing line must be wound from one end of the shuttle to the other, passing it between the touching ends of the wire. To make it easier to wind the wire at both ends of the shuttle, you can bend it slightly (only while winding the fishing line) - this will not only make it easier to thread the fishing line between the ends of the wire, but will also prevent unnecessary friction and damage to the fishing line on the remaining sharp edges.
To ensure that all network cells are the same size, a template plate is used. It can be made from anything. The main thing is that it is thin and durable. During the weaving process, you will repeatedly wind loops of fishing line around this template, which can lead to the appearance of cuts from the fishing line on its edges, to which it will cling. Therefore, in order not to make the template several times, it must be made of scratch-resistant material. For example, textolite, aluminum or some types of plastic. If you knit a little, you can use unnecessary plastic cards (bank cards, discount cards, etc.)
The length should be about 10-13 cm (this depends on the size of your palms). The length should be such that the template fits comfortably in your hand. The width of the template is equal to the cell size of your future network.
After you have cut the template to the required dimensions, carefully sand it with fine sandpaper to make it smooth. There should be no sharp edges or edges on it!
3.Knitting the net fabric.
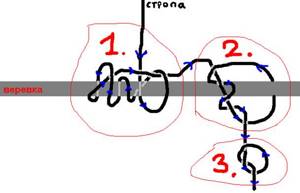
I don't know exactly what this node is called. I have been knitting with it since childhood, as someone taught me. In principle, the knot is good, it does not stretch, but perhaps in comparison with the others it takes a little longer to knit, but when you learn how to knit it you will be able to knit very quickly.

I divided the knitting order shown in the picture into 6 stages using colors and numbers.
1. (necessary at the very beginning of knitting when we don’t have a single row yet) We tie a loop on a fishing line, the edge of which is fixed somewhere. See Fig.1 - Black
2. We already have a loop or loops from the previous row of the network. We thread the shuttle through the loop. See Fig.2 - Blue
3. Insert the template plate into the resulting new loop and pull the shuttle, pulling the fishing line and squeezing the template with it. See Fig.3 - Gray
4. While the fishing line is still stretched, press it with your finger to the template, thereby fixing it. Hold your finger. See Fig.4 - Orange
5. We hold our finger. And we draw the shuttle with fishing line around the previous loop (into which we threaded the black one in steps 1 and 2 ). We move the shuttle to the side. See Fig.5 - red
6. We hold our finger. And we pass the shuttle into the previous loop (into which we threaded the black one in steps 1 and 2 ) on the right. In this case, the loop from point 5 should also remain on top as in the figure. Then we pass the shuttle into the loop, which we still hold with our finger on the front side (closest to us).
Now, without releasing your finger, pull the shuttle and line down. at the same time, the loops of points 5. and 4 . And when you feel that the tension of the fishing line has reached your finger and there is no excess fishing line left on the loops, loosen your finger and continue to pull the shuttle until the loop under your finger is completely tightened.. See Fig. 6-Purple
You should start knitting the network with a set of primary loops. The knitting itself will be from the center of the network circle to its edge, so you can choose the diameter of the network yourself, the one you need or how much patience you have.
So, first you need to decide which way to knit in the round. There are two ways. The first is in a spiral from the center and the second in circles.
In any of the options, first we make a loop on the fishing line, see in Figure “1”, onto which we then cast on the required number of initial loops. I usually knit about 16 stitches. But it should be taken into account that the other end of the fishing line (not the one on the shuttle) should be left longer - approximately equal to the radius of the future net.
Now we knit the second third and fourth row. This way we get a rectangular network fabric. see figure “2 and 3”
For this fabric you need to tie the beginning and the end so that you get a ring of mesh. see figure "4"
Next, we knit the remaining rows of the future network to the ring from one of the edges, simultaneously increasing the number of loops in each subsequent row (this is necessary for your network to increase in radius).
see in figure "5"
Well, if you want to weave in a spiral, then when tying the edges of the network, make a shift by 1 row (i.e. tie the end of the 1st row to the beginning of the 2nd, the end of 2 to the 3rd), after which the end of the 4th row will remain free. Next, to the free end of the 4th row, we will begin to knit the remaining loops, gradually increasing their number in each subsequent row, thereby increasing the number of spirals of the network and increasing the radius of the network, and so on ad infinitum.
Now about adding loops. This is necessary so that your network increases in radius, but at the same time remains flat and not in the form of a pipe or cone. To do this, you can calculate for yourself that it is necessary to increase the number of cells of each row or spiral by the number = PI = 3.14 - this is ideal. But in fact, after you tie it, the net will be pulled into a cone due to the memory of the fishing line. Therefore, increase the number of loops by 4 or 5 cm
in Figure “6.”
Now about knitting methods. I would still advise weaving in rows (parallel rings). With this method, when casting, the net opens up better.
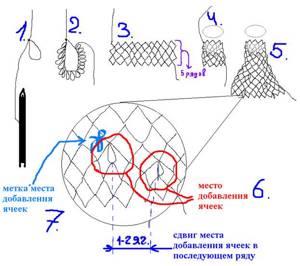
I also advise you to mark with some marks on the network canvas the places on the circles where you need to add the number of cells (for example, I use tapes with Velcro). This is necessary in order to remember to add cells exactly where needed. Naturally, they need to be removed and moved to the right places.
see in figure "7"
Also, in order to avoid curvature of the mesh circumference on each new weaving row, you should shift the place where cells are added by +1 cell!
For example, we started the network with 16 cells, we need to add 4 cells to each new row, which means that on the new row the places where +1 cells are added (four times) will be located through 4 cells of the previous row 16/4 = 4, etc. for the next row the number of cells is already 16+4=20, and the places where cells are added are 20/4=5 cells. Etc. But do not forget to shift the places where you add cells by +1 cell in the row.
see picture
If during knitting you forgot to add cells in any place, it’s okay to make another +1 cell in the next row - in the future this defect will be leveled out and will be invisible, but try not to make such mistakes. It’s better, of course, if you notice the omission of adding a cell before you finish the row and add the missing cell to the same row.
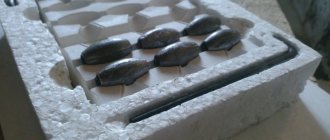
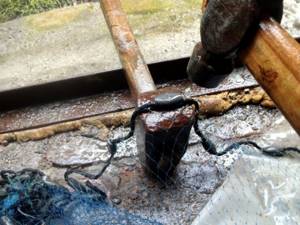
4. Casting sinkers.
There are many different options for casting sinkers with ready-made holes for the rope. Basically, they are based on one simple principle - lead is poured into a mold with a steel core (rod) in it, which is then removed. Believe me, drilling holes takes much longer, and due to the viscosity of lead, there is a chance of breaking a bunch of drills.
First I tried to carve the shape of the sinkers into two plaster plates. At the same time, it is very difficult to carve in the already hardened plaster the very shape of the future sinkers, a groove for placing a steel rod in it, and even so that it is all symmetrical on both plates!
Accordingly, due to these same difficulties, the resulting weights were very crooked, scary, and the injection molds did not always match.
After struggling with them, I found an easier and faster way to cast with a hole.
In the same plaster plates, using this device, I drilled several holes of the diameter I needed. And the knitting needle sticking out in the center additionally drilled a small recess into which I later inserted a steel rod to create a hole in the weight. This can also be done using drills and drills. And this thing just fell into my hands. This seems to be the former pointer of a pressure gauge or other pointer instrument.
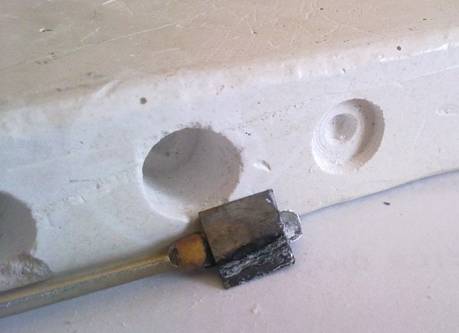
During the casting process, I tried to drill such holes from the flat side of the plaster, but this greatly increases the overlay on top of the mold, which will have to be trimmed further in the future. Therefore, I advise you to make a gypsum plate 3-5 mm thick. larger holes (on the sides), which will ensure easy drainage of excess poured lead from the surface of the mold.
The casting process itself is very simple. Melt lead in an iron tin can. Insert the steel core into the center of the mold (exactly into the recess whose diameter should approximately coincide with the steel core rod). The diameter of this rod should be equal to or slightly larger than the diameter of the rope later used to hang the net.
Once all the lead has melted, take the jar with pliers and pour it into the mold. I advise you to tilt the mold a little so that excess lead flows to one side. While the lead is cooling in the mold, but has not yet hardened, rotate the steel rod along the axis - this will prevent the cooling lead from sticking. As soon as the lead begins to harden (it becomes like porridge, even grains are visible J), pull out the rod.
Next, fill in the remaining mold holes in a similar manner.
Having cooled a little in the mold, the lead shrinks and you can pull out the resulting sinker blank by lightly shaking it.
The plaster mold must be dry! You can’t cool it or the lead in it with water! In the first case, there is a chance that lead will splash on you and burn you, and in the second, the form will simply crack!
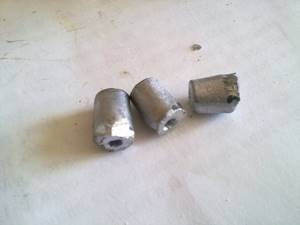
It should be noted that from my own experience I know that in order for the sinkers to be less confused with the net fabric, they need to be made of an elongated, cylindrical shape. It is desirable that their length be equal to two cell sizes.
When casting, you get these ready-made but not yet processed sinker blanks. Here you can clearly see that the excess lead has stacked on the side of the mold, and the buildup is very small.
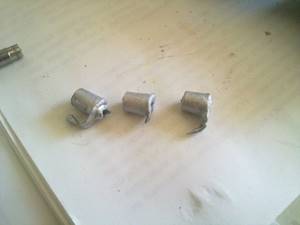
Next, you need to cut off the entire overlap with wire cutters. Carefully collect the scraps and pour them into a jar for re-melting.
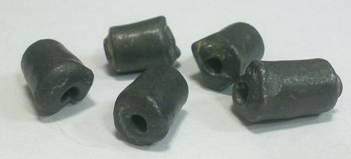
So that when using the sinkers they do not cling, scratch or cut the fishing line or rope, then it is necessary to smooth out the sharp edges remaining after trimming the excess. Although the metal is soft, there is a small chance of damaging the network fabric.
We will smooth the edges using the rolling method. To do this, pour all the finished, cut weights into a plastic bottle or canister (it all depends on the volume and size of your weights). According to the technology, you can also add several large balls from bearings, but special +
will not be. Now this bottle or canister needs to be shaken, kicked or whatever else you can think of, the main thing is that the weights inside shake, hit and rub against each other. They need to be taken out when ready. The edges should be rounded, without burrs or sharp edges. You can also add a little paraffin to the bottle when rolling, so that in the future the sinkers will get less dirty on your hands.
5.Assembling the body kit.
Finished weights with holes should be washed with water and dried.
To make a net kit, weights need to be placed on a nylon braided rope. A twisted rope is not suitable, as it may subsequently affect the opening of the net when throwing. Or simply, it will get tangled with slings and nets, twisting under the weight of the sinkers.
Since the net is nylon, and even braided, to make it easier to attach the sinkers, as well as to prevent the upper braid of the rope from moving relative to the inner one, one end of it must be melted over a fire and while it is hot, give an elongated, refined needle shape.
Having strung all the sinkers, they need to be secured on a rope at an equal distance, so that the weight is enough for your net (1.2 kg/1 m radius). This can be done in 3 ways:
- Simplest. You can squeeze the sinkers a little by holding the rope inside. But with this method there is a chance of crushing the rope. And if you make a mistake with the distance between the weights, it will be impossible to redo it, and the weights can only be cut off and melted down.
- Having placed the weight at the required distance from the previous one, secure it by tying knots with fishing line or nylon thread on both sides. In this case, it will be possible to redo the detected errors.
- Secure the sinkers with knots of the same rope. It will also be possible to correct the error without damaging the weights. But you will have to untie knots, a bunch of knots, or cut the rope.
6. Linking the body kit to the network.
You can tie the kit to the net using fishing line or nylon thread pre-wound on the shuttle - this is more convenient.
Before tying the body kit, you need to calculate how many net cells should be located between the weights and at what distance so that the net cells are neither compressed nor stretched. And monitor the uniformity of the number of cells while knitting. It is advisable to tie a suspension to each cell to more evenly distribute the load on the network fabric.
After the kit is completely tied to the network, you need to tie the ends of the rope with two ordinary knots and tighten them tightly with pliers. The knot can also be wrapped with nylon thread, giving it additional strength. Or, after tightening the knots, both ends can be cut off, melted over a fire and fused into one ball, which will also prevent the rope from coming undone. It would be enough.
If the loads are small, then they can be secured to the rope several at a time. For example, my loads turned out to be too small, 5-6 grams each. For my network with a radius of 1.6 m, 2 kg of weights are needed. At the base, the network had about 410 cells. Which means to hang 2 kg. Weights then need to be tied 1 to each loop. It would be long and tedious, so I grouped the loads in groups of 3 and secured them with knots of the same rope. In this version, the rope with weights gets even less tangled in the net and its mobility is not limited.
7.Attaching the slings
Before we start tying the slings, it is necessary to make and secure a pass-through ring. This ring is necessary so that when casting and pulling the net, the lines do not get tangled with the net itself, but pass freely through it.
For manufacturing you will need a PVC adapter tube with a diameter of 32-25 used for welding PVC water pipes.
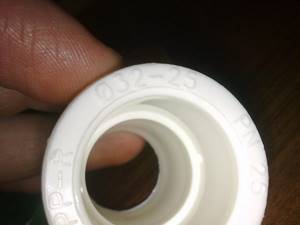
On the wide part it is necessary to machine or melt a groove of small depth.
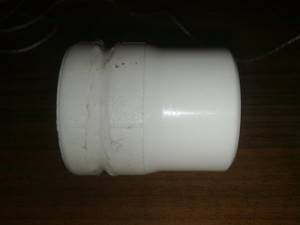
Next, string the center of the network fabric with a nylon thread (around the hole left during weaving). This hole in the center is where you started the first rows of your net when weaving
Then pull the hole with the nylon thread onto the prepared PVC tube and firmly fasten the net fabric to the tube by winding it with the remnants of the same nylon thread. It should look like in the photo:
The photo shows that I fused two wires in the center of the PVC tube. They are necessary to divide the slings into four groups - according to sectors of the network. This will provide additional separation between the lines so that they do not stick together when casting. Later I removed them, but it turned out in vain! Without these wires, wet slings began to stick together more strongly, which greatly interferes with the good opening of the net.
8.Manufacture and fastening of slings.
Slings for American-type casting nets are made from fishing line with a thickness of 0.8-1 mm. The fishing line must be without memory so that it does not get tangled. First you need to calculate how many slings you will need. Many casting network manuals offer this calculation option. Considering that the slings should be tied at least every 40cm. you need to divide the circumference of the straightened net by 40. Let’s say I have a net in the straightened state (flat circle) with a radius of 1.6 m. Then its length is L=2*P*R =10.048 m. number of lines = 10.048/0.4=25.12
It turns out that my network will require 25 lines. But there is a minus in this calculation! The number of weights tied to the net between the slings may be different, which will upset the balance of the net.
It is better to count the total number of sinkers (or groups of sinkers) connected to the network. measure approximately how many sinkers need to be placed so that the distance is within 40 cm and divide the total amount by the amount in the measured distance.

You may have to experiment a little with the distance between future sling attachments and the number of weights between them. It is necessary to select such a number of weights between the lines that when dividing the total number of weights by the number of them between the lines, the number closest to the whole is obtained.
Now cutting the slings:
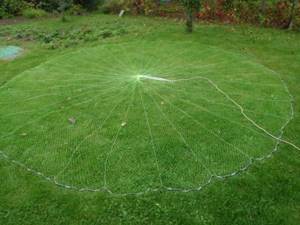
The length of the sling differs from the radius of the circle of the straightened net! When you take the net by the ring in the center of the circle and lift it from the net, all the cells are stretched diagonally. This extended length should be used for slings. You can measure it with a meter, having stretched out the net in advance. Or a more accurate method is to count the number of rows of the network (the number of circles of the network) from the center to the edge (you can count the knots). Then multiply the calculated amount by the size of the side of the cell. This is exactly how long all slings should be + allowance for a loop and knot of about 15-20 cm for each sling.
On each cut sling, you need to tie a loop on one side with a single or double knot. The loops of all slings should be approximately the same.
To align, string all the slings in loops onto a hard object, such as a nail driven somewhere. Next, smooth out the slings, untangle them along their entire length and pull them out. Now measure the distance of the length of the sling from the knots of the loops (without the previously added margin) and add 1 cm to it. (The slings are still gathered together and extended) at this distance we will tie the rope with weights. This distance now needs to be marked with a marker on each line!
Now everything is ready for binding. Place the net with the inside facing up.
One sling at a time, alternately tie them to a rope with weights at the previously calculated distance. And don’t forget about the mark on the lines made with a marker! The knot must be located at this mark! I do not recommend using a regular knot tied twice as it ruins the fishing line. In the place where you pull the knot, the sling may break (as it already happened to me).
I tried this one (1)
knot and it hasn’t let me down yet (the line in this knot does not tighten, but wraps around the rope and has a self-tightening knot):
Having tied this knot, I advise you to tie the remaining short end to the rope with a double knot, just in case. (2)
, and then tie a single one next to it
(3).
All three knots must be knitted very close to each other. This line catch combination will last forever!
By the way, do not rush to cut off the remaining short pieces from the slings. In many methods of casting a casting net, the lower edge of the net (the rope itself with weights) is taken into the mouth, but since after the first cast it can already be dirty, it is better to take with your teeth not the rope, but just these remaining pieces of lines. The fishing line still retains less silt and dirt on its surface.
Now, so that the lines do not get tangled in the future when casting, take them one by one along the circumference of the net and string them on a thick rope. When all the slings are strung, tie all the loops of the slings with several knots and pull the entire resulting bundle through a ring of PVC tube tied in the center of the net.
Now the net can be turned over with the outer side up. Pull a plastic plate with a hole in the center with a radius of about 1.5-2 cm over the sling loops tied together; this will serve as a limiter for the slings. You can use a plastic bottle cap. The plate (plug) must be lowered below the nodes (on the slings themselves). Wrap the hinge nodes with several layers of electrical tape so that the nodes cannot slip back through the plastic plate.
Tie a strong swivel onto the same rope after the knots with loops. The swivel will prevent twisting of the pulling rope, slings and net web, since when casting the net rotates along its axis. A thick braided rope is tied to another ring of the swivel to pull the net out of the water.
To pull the net, you need to tie a small self-tightening loop at the free end of the rope, which will secure the rope to your hand when casting.
All! Now your casting net is ready to fish. Good luck with your fishing and fewer snags!
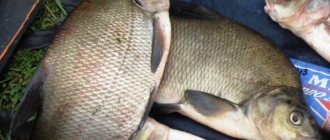
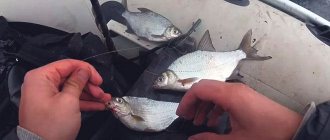
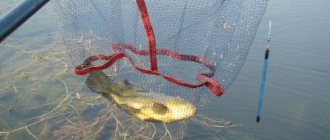
PS photo of my first catch:
You might be interested in:
- DIY spray gun.
- Error while initializing the application (0xc0000005).
- The printing subsystem is not available.
- How to restore Task Manager
- Personal information in the properties of “My Computer”
- How to crimp a twisted pair cable with an RJ45 connector?
Necessary materials for weaving nets
In order to make fishing nets yourself, you need special materials. To knit a fishing net with your own hands, you need to purchase a high-quality net fabric. It is better to buy it in a store than to weave it yourself, since the design of this material is very complex. It is made from strips of different widths and lengths. Although experts with experience in fishing can try to weave the fabric themselves. They know exactly how to make a casting net with their own hands.
It is important to decide in advance on the size of future gear in order to buy the required amount of material. As a rule, the size of the network is considered to be the circumference, and the diameter is equal to the width of the purchased web multiplied by two. To correctly calculate the size, use the formula “2аП = в”. Here a is the width of the canvas, P is a number equal to 3.14 and c is the size of the resulting mesh.
The length of the material can correspond to its width, so in this case no calculations are required.
The weight cord must be more than 4mm thick. Its length can reach up to five meters. Both parameters are very important. A satisfactory length will ensure good casts, and if the rope is thick and strong enough, it will be easy to hold and will not cut your hands when hauling the gear ashore.
Casting Network Comparison Chart
| Title, description | Cell size (mm) | Material of manufacture | Price (in rubles) |
| KIPPIK (American type) | 20 | nylon | 900 |
| American woman with a small thread ring “Best catch of fish” | 20 | nylon | 1600 |
| Spanish type casting net (IM40) | 20 | fishing line (0.35) | 1980 |
| FindFish Original | 12 | depending on the model: fishing line (0.3 mm) or nylon (0.535 mm) | 2490 |
| KALUGA D4.4 m | 20 | nylon thread | 2250 |
| Kippik | 16 | fishing line (0.3) | 2400 |
| Fishtex (Cast Net) American type | 20 | fishing line (0.28) | 4500 |
| American D-3.6 m | 8 | nylon thread (0.66 mm) | 5600 |
To use casting nets, the user does not need to take out a special permit or permit, however, the use of such equipment requires the fisherman to strictly comply with special regulations for catching various objects in water bodies. When choosing casting nets, it is recommended to pay attention to the material from which they are made, as well as their sinking ability. If you use the equipment presented in our rating in everyday life, or use other products, please share your experience and opinion in the comments.
See also:
See also:
How to make a casting network with your own hands?
Now you can start collecting the networks itself. The fabric must be cut into equal triangles, which are then sewn together in the shape of a circle. Next, a braided rope is fixed along its entire length. Sinkers are attached to it at a distance of 10 cm from each other. The best option would be lead blocks.
To do this correctly, it won’t hurt to practice with professionals who demonstrate to beginners how to make a casting network.
The central ring is sewn at a distance of one third of the net from the top. Slings will be lowered through it along the entire perimeter of the awnings; ordinary fishing line is used to make them. One end of it will be tied to the casting rope, and the other to the braided cord. The slings are tied using thin fishing line - its thickness should not exceed 0.4 mm.
In order to properly weave a fishing net with your own hands, it doesn’t hurt to contact experienced fishermen who know how to knit a casting net. This will save time and effort.
RusCamping - exchange of experiences and opinions
A quick way to make a castin net yourself or modify a factory net.
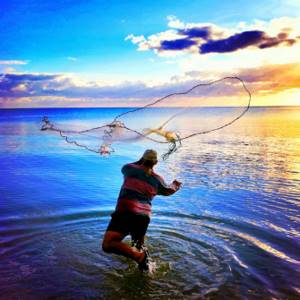
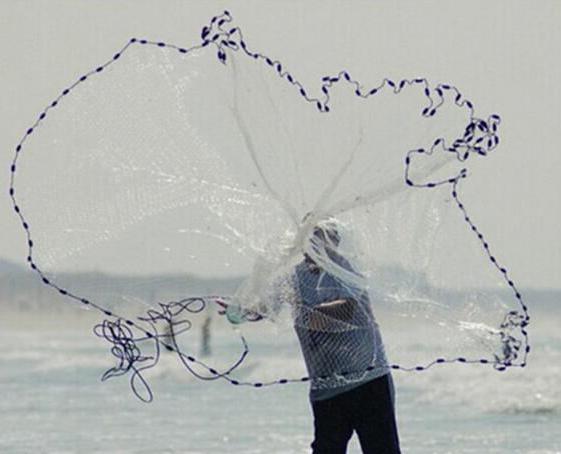
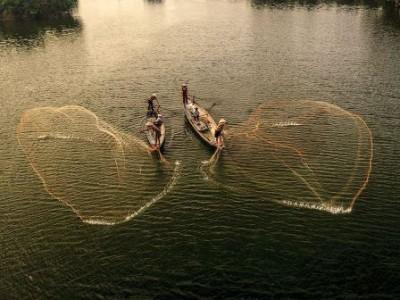
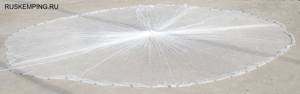
a beautiful shot of throwing a casting net at sunrise.
Of course, it is better to knit or purchase a good casting net made according to all the rules. But if you are not ready to spend a large sum on high-quality fishing gear or devote several months of your time to personal knitting, then there is an economical option that will be quite workable. We will talk about making a casting net from ready-made net fabric (Delhi), which is now available in abundance and inexpensively in the retail chain.
Let’s determine that the height of the fabric will be equal to the radius of our future network; if you need a network with a larger radius than the fabric you have, then you will need to knit two or more fabrics along the edge, which is still much faster than knitting a network from scratch.
The easiest way to make an American-style network is from canvas. The principle of operation of which (forming a bag) is shown in the figure.
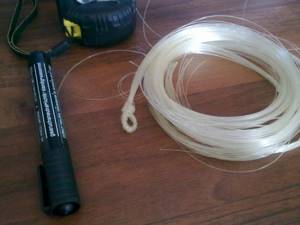
In addition to the net fabric for making a casting net, you will need: fishing line with a diameter of 0.8 to 1.5 mm for slings, a swivel carabiner, a cord for the lower loaded edge and a throwing cord, a ring with a crimp (or its household replacement, which I will discuss below). Well, a little diligence and patience.
Let’s say we are making a net with a radius of 2 meters, then the length of its cord on which it will be placed around the circumference will be about 12.5 meters. As we know from mathematics, the circumference of a circle is determined by the formula Calculation of the circumference of a circle based on knowledge of its radius. The radius of a circle is a segment connecting the center of the circle with any point on the circle, for example, P = 2πR, where R is the radius of this circle, π is a constant value equal to approximately 3.14, and P is the circumference of the circle. And to tighten the net when pulling it into a good bag, you will need to tie about 16 slings to this cord, each of which will be equal in length to the radius of the net, that is, 2 meters.
From the production of a 2-meter network we will “dance”. To begin with, we measure a 2-meter high canvas on a hood and cut it stretched to a length 2 times greater than the circumference of the future network, approximately 25 meters. We place the lower edge of 1 to 2 on a weight cord, simultaneously hanging weights on this cord every 10 centimeters. The total weight of the sinkers for a casting net of this size should be approximately 2 - 2.5 kg. It is important that the loads do not fall into the yoke.
An option with a metal chain is not bad for loading, the rules are the same - so that the link does not fall into the hole, and also does not rust.
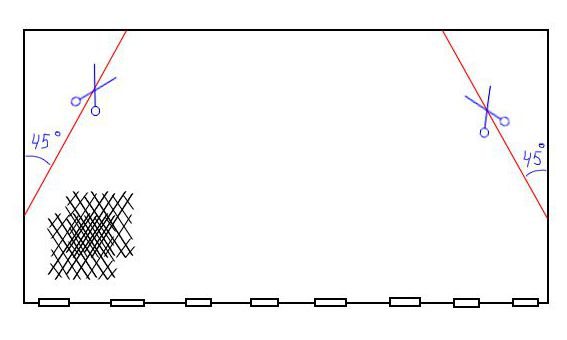
the net folded in half is cut off at the sides and sewn together (2 more wedges are also removed symmetrically)
When the bottom of the net is ready, theoretically, you can assemble the upper edge of the net fabric and distribute it around the ring to begin tying the slings. But in this case, the net at the top will have the same amount of fabric as at the bottom, and when casting it will be somewhat in the way, besides affecting the weight and opening of the net. Therefore, before planting the upper edge on the ring, it is better to symmetrically cut 4 wedges of fabric from the net, as shown in the figure, and tie their resulting edges together.
To quickly and efficiently distribute the fabric around the ring, it is first put on a thread or fishing line. This way, when clamping, you don’t have to fill each cell.
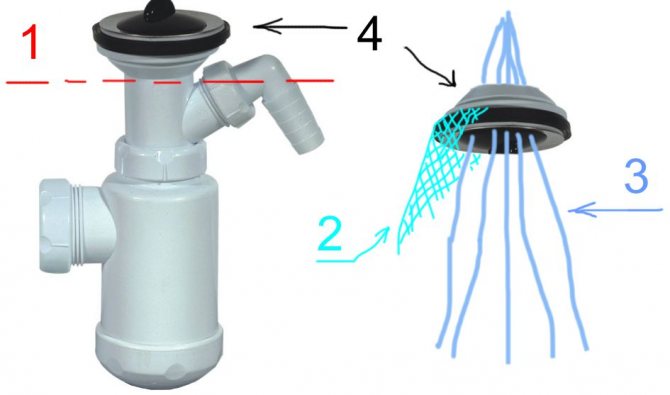
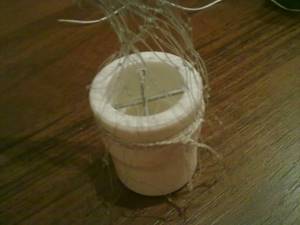
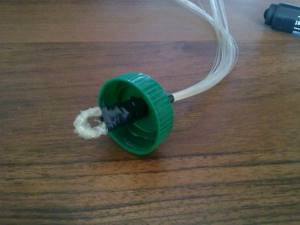
1. Cutting line; 2. Net 3. Slings 4. Siphon neck.
For the top ring, if you don’t have a familiar turner, I recommend using the neck from a regular kitchen siphon. In which you can conveniently distribute the mesh along the edges, and pass the slings into the center.
The slings are made from fishing line with a diameter of 0.8 - 1 mm and are tied at an equal distance from each other along the cargo cord. For a 2-meter net there should be at least 8 of them, preferably 16. And passed through the inside of the ring, they are brought together by attaching to one end of a swivel carabiner, to the other end of which a throwing cord is tied.
An important note about the throwing cord - it must float! Be sure to saturate it with wax or paraffin or tie a float that does not interfere with the edge. Because in the heat of the excitement of fishing, you will thank him more than once for the fact that when he flew off your hand, he did not drown along with the net, but saved your dear fishing gear.
casting net made of canvas on ruskemping.ru
This page is also found through search engines by queries: how to make a casting net, make a cape, making a casting net, drawings for making a casting net, how to make a parachute casting net, cast net, do-it-yourself casting net, step-by-step instructions: how to make a casting net at home conditions, castnet.
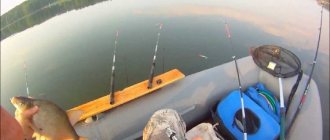
Well, watch a video of casting such a casting net from an ordinary rowing rubber boat.
And this is how the casting network should be cast in the classic way (video lesson):
Well, by the way, whoever, having read the article, still thought that what the heck - it’s easier to buy a ready-made casting net, rather than knitting it yourself, I recommend this article . To each his own.