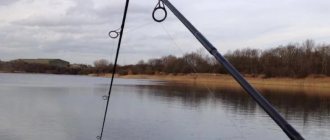
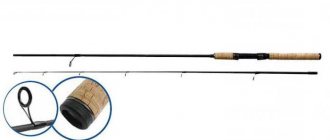
How to repair a broken spinning rod
In order to repair a spinning rod with your own hands, you must first prepare the tools and materials:
- sharp painting knife;
- gas-burner;
- lighter;
- pliers;
- small file;
- sandpaper size 1000;
- cloth for metal;
- pieces of carbon fiber rods of various lengths and diameters for repairing a spinning rod knee that is damaged or broken;
- adhesives - waterproof PVA, epoxy, “Super glue” gel, for fixing bandages, guide rings, and repairing handles;
- waterproof clear varnish;
- nylon thread for fastening the installed access rings to the form, masking the place where the spinning rod broke;
- set of pass rings;
- corks from wine or champagne bottles.
Having prepared everything you need, you can repair both the failed last pass ring and the broken form near the butt.
Form repair
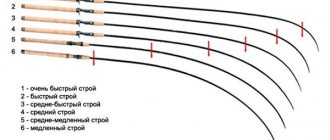
In modern two-piece plug spinning rods made of high-modulus graphite, the following types of breakdowns occur:
- cracks or breaks of the first (butt) leg of the spinning rod;
- cracking or breaking of the upper leg.
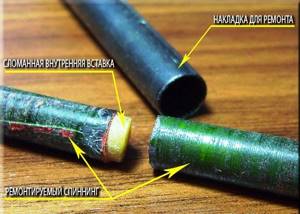
![]()
Repairing the form in both cases does not require significant expenses. It consists of the following steps:
- We inspect the rod at the point of breakage for longitudinal cracks. If they exist, the knee cannot be repaired - under load, the crack will inevitably increase in length and lead to complete failure of the entire knee.
- If no cracks are found, use a metal blade to trim the edges of the damaged knee.
- From old, but not split graphite knees from another broken fishing rod, we select and cut out a piece 10-15 cm long, which fits tightly inside the parts of the broken knee - a scupper.
- If necessary, grind the piece a little with sandpaper and a fine file.
- We insert the scupper into one of the parts of the repaired knee, so that it fits tightly inside it by 7-8 cm. We generously lubricate the edge of the knee and the scupper inserted into it with epoxy glue. When repairing the butt knee, the scupper can be passed inside it by removing the plug located at the end of the handle after the spinning reel seat.
- We insert the second end of the spigot inside the other part of the broken knee so that the gap between the two joined parts of the broken knee is minimal.
- Cover the joint with epoxy glue.
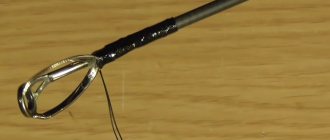
- We wind a thin nylon thread over the connection, trying to match its color to the tone of the form coating.
- We cover the nylon thread bandage with waterproof varnish.
- If one of the rings of the spinning rod is very close to the place of breakage, then to strengthen the blank and disguise the bandage, remove it and fasten it above the junction of the broken parts of the knee with nylon thread.
- If the breakdown affected the varnish of the spinning rod rings or damaged the winding that attaches the ring to the blank, then it is easier to remove it and reinstall it.
As a result of such repairs, the rod retains its strength, flexibility, slightly changes the structure, but at the same time will allow you to avoid the purchase of an expensive exclusive knee. For the money spent, for any ordinary spinning player such repairs will cost a negligible amount
It is always necessary to take into account the feasibility of restoration using the method described above - for example, when telescopic spinning rods made of fiberglass or composite, which have less wall thickness, strength and flexibility, break, it is best to choose a new one to replace the damaged knee. The repair will not return the form to its original strength, it will make it significantly heavier, and if a serious predator bites, the repaired knee will break in the place of the previous damage.
Top repair
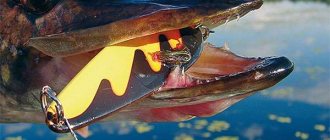
A broken tip is a very serious damage to the rod that affects its functionality.
When fishing with light jig baits for spinning rods, the tip is very important. Thanks to it, the angler makes long, accurate casts of miniature twisters and vibrotails. It allows you to make the game of baits more attractive. In addition, the tip is able to signal the weakest, hesitant bite before the angler feels it with his hand.
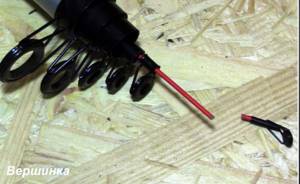
Repairing the tip of a spinning rod differs for a number of reasons from repairing similar damage to the butt or second knee. Its internal diameter is either very small (it is extremely difficult to select a suitable insert), or the tip is solid (does not have a cavity for a scupper repair connection). Any increase in the rigidity of the tip will lead to a change in its sensitivity, worsen the casting range, and negatively affect the performance of the bait. When loaded, the insert installed in the tip breaks the thin walls from the inside and completely disables this part of the rod.
Therefore, in order to eliminate this breakdown, you should resort to another more delicate repair method:
- We inspect the broken parts for longitudinal cracks;
- If no cracks are found, we process parts of the top in the places of breakage with a small needle file to a length of 15–20 mm from the edge. During processing, the varnish is removed and the thickness of the top wall is slightly reduced;
- We connect both parts with a spigot - a tube of thick paper, which we first lubricate with quick-drying epoxy glue. When connecting parts of the top, it is necessary to ensure that the throughput rings are located along the same axis;
- 20-25 mm below and above the joint we wrap sides of electrical tape, which will prevent glue drips from forming during further installation of the bandage;
- To eliminate breakage of the tip, carbon fiber is used. Since it is very difficult to buy it in a store, it is most often burned out from pieces of old high-modulus fishing rods. To burn out carbon fiber, take a piece of carbon fiber elbow 20-25 mm long and 10-12 mm in diameter. Holding the piece in pliers, hold it over the flame of a gas burner until the smoke stops coming out. Carefully unwind the tube with the burnt out binders, dividing it into a strip of carbon fiber and a carbon mesh (backing);
- Lubricate the junction of the two parts of the broken tip with slow-drying epoxy glue diluted in a ratio of 10:1 with hardener;
- We wrap the backing over the glue, pressing it tightly to the joint;
- We wrap carbon fabric onto the substrate. We coat each turn of carbon fabric with epoxy glue;
- We forcefully wrap a layer of tape over the bandage;
- After the glue has hardened, use a sharp knife to remove the tape and duct tape edges;
- We grind the bandage under running water with a file, and then with fine sandpaper;
- We cover the bandage with waterproof varnish.
With this method of repair, the place where the tip of the spinning rod broke is almost invisible, and the rod itself retains its strength, flexibility and other important properties.
Adviсe
- If the tip of your spinning rod breaks while fishing, you can fix it with the help of improvised materials for a while; it is better to carry out a complete repair at home, where you have all the necessary tools, or take it to a workshop.
- Do not use hard metal objects as stated above, you will only make the damage worse.
- To obtain a beautiful and smooth surface like on factory products, use epoxy glue, applying it to the part, while the part must be slowly rotated either manually or using an electric drive. It is very important that the glue sets at least on the outer layer, then dry it with a hairdryer.
- You cannot lift a fish, even a small one, above the water - this risks breaking your fishing line, and in the worst case, breaking your gear.
- At the last stage of landing fish, make sure that the length of the fishing line from the fish to the tip is not significantly less than the length of the spinning rod. You risk breaking your rod when catching fish in a net or by hand.
- Before each fishing trip, carefully inspect your gear to avoid further problems.
- Do not cast until you are sure that the line passes freely through all the guides.
- In the last meters of retrieving the catch, it is better to slow down the speed of reeling in the reel and lift the spinning rod up. This will help you avoid snagging and breaking the tip.
- When moving from place to place, carry the rod perpendicular to the ground to avoid breakages; if there are trees nearby, then carry it with the handle forward.
- Before and after fishing, wipe the spinning rod at the joints with a rag.
- If the knees are jammed, then under no circumstances should you use organic solvents, since the varnish will then dissolve and the knees at the joint will stick together forever.
- To assemble and disassemble gear, only special silicone-based compounds should be used. They are sold in fishing stores.
Problems will pass you by provided you follow these instructions. This concludes the story about the spinning tips. All the most important and necessary things were described in this article. Happy fishing and big catch!
Handle repair
Among all the materials used to produce a spinning rod handle, one of the most common is cork. Having many advantages (softness, a pleasant-to-touch surface, the ability not to harden in cold weather), this material has one big drawback - with prolonged use, pits, cracks, and chips form on it, leading over time to the destruction of the handle.
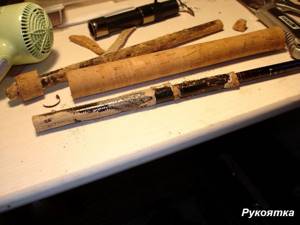
For small cracks:
- Grind the cork from a wine bottle on a fine grater until it becomes fine chips;
- Mix the resulting shavings with PVA glue, fill all defects with the resulting composition;
- After the glue has dried, sand the surface with fine sandpaper;
Instead of this composition, you can use a wood putty that matches the color.
For large holes and cracks:
- We cut out the damaged piece by making a rectangular notch in the cork covering of the handle;
- From a cork that does not have internal cavities, cut out a piece (insert) slightly larger than the recess;
- Lubricate the recess and insert with waterproof PVA glue;
- We press the insert under force into the recess and fix it with electrical tape;
- After 12-14 hours, remove the electrical tape and cut off the part of the glued insert protruding above the surface of the handle with a sharp knife;
- Clean the handle with fine sandpaper.
How to increase your fish catch?
Over 7 years of active fishing, I have found dozens of ways to improve the bite. Here are the most effective ones:
- Bite activator . This pheromone additive attracts fish most strongly in cold and warm water. Discussion of the bite activator “Hungry Fish”.
- Increased gear sensitivity. Read the appropriate manuals for your specific type of gear.
- Pheromone -based lures .
Restoration of the tubular part of the whip
The double bandage method is used. It is performed in the following sequence:
- the rings are removed from the upper, broken part (they interfere with putting on the upper tube of the bandage); This is done by heating the attachment points with a hair dryer and then removing the rings from the seats; if the rings are fixed with a wound thread, it is cut off with a knife; the seats, after removing the rings, are sanded with emery cloth;
- grind the fracture sites with a file;
- prepare bandage inserts: these can be fragments of old fishing rods; if they are unavailable, you can purchase, for example, a cheap Chinese product; make an internal insert and an external one;
- manufacturing the internal insert: remove the end plug in the handle: insert the workpiece with its thin end into the opened hole; pull it out at the fracture site to its maximum length (do not apply much force - the form may crack); mark on its surface with a marker the place where the broken parts of the spinning rod join; remove the insert, measure from the mark in both directions
4 cm, saw off excess; again insert the insert into the form and put the upper broken part on it; if the fault line coincides normally, they are disassembled in the reverse order;
- the inner insert is easily sanded with sandpaper, lubricated with glue, inserted into the lower part and the upper part of the spinning rod is placed on the protruding end of the bandage; the glued structure is left to dry for at least a day; Use any glue suitable for plastic, preferably proven;
- for an external bandage, place a cone-shaped tube from the tip of the fishing rod until it fits tightly into the fracture site; the length is measured more than 1 cm on both sides from the ends of the inner insert; They do it this way: make a mark with a marker at the lower end of the pushed-in tube; remove the tube; measure the distance from the mark to the fracture site, subtract 5 cm from it and shorten the lower part of the bandage by the resulting value; measure up 10 cm and cut off the excess; As a result, you get the required tube for the upper bandage;
- the place where the upper tube will be installed is sanded and coated with glue; put on a tube; left to dry;
- after final drying, smooth the ends of the upper bandage tube with a file, the difference is leveled by applying layers of glue;
- sanded, painted, varnished.
- find the place where the solid part of the whip turns into a hollow part, and saw it off;
- glue a new one in its place; you buy it in a store, if you don’t have the original one, buy a similar one, selecting it by diameter;
- The place of gluing, for strength, is bandaged with a thin mesh, lubricating it with epoxy glue;
- The gluing area is sanded, painted, and varnished.
Restoration of the tip of the whip
Option one is to replace the glued top.
This is done in the following sequence:
Spinning tulip repair
The work involves the need to replace the tulip after defects are discovered on it. They appear due to the long-term exposure of braided cords to the hard insert of the ring.
The tulip can be easily removed. To do this, the tube with which it is placed on the tip of the form is slightly heated, for example, with a lighter or an electric soldering iron. Then they are pulled together using pliers or using an unbent paper clip, one end of which is placed on the frame of the tulip ring.
A new tulip purchased in advance is placed on the free tip of the rod using glue, for example, “Moment”. At the same time, make sure that it is fixed coaxially with the other rings on the spinning rod.
Spinning rod cork handle repair
A problem that requires restoration of the cork handle, the appearance of cavities. It is difficult to restore the integrity of the coating, since conventional putties can withstand a maximum of one year of subsequent use of the spinning rod.
From the advice of practicing fishermen:
- cavities in the cork coating are sealed with acrylic putty; it is better to use it with an oak color, but the places will still stand out in light colors;
- take some high-quality cork and grind it into dust using 500-grit sandpaper; drop a few drops of waterproof PVA glue (marked D3) onto the substrate, add twice as much water, a couple of drops of zinc white; add cork crumbs to the desired consistency; The cavities on the handle are sealed with the resulting putty; after drying, the surface is leveled with a knife and grinding.
Spinning reel seat repair
Often the reel begins to “not hold”, causing the latter to “wobble” and cause a lot of trouble to the fisherman. One of the reasons for this is the absence of an elastic element in the system. It can be easily eliminated: take shrink film of the appropriate size and place it on the end of the reel foot. It is better if you plant it in shape, dipping it in boiling water.
Repair of access ring
Often the internal metal-ceramic liner in the passage ring fails. The process of repairing such an element is very simple:
- We buy a set of rings of different diameters with internal inserts of the same or better quality as on the rod;
- We select a passage ring with a suitable diameter;
- Using a sharp knife, carefully remove the inner metal-ceramic liner from its metal frame;
- We remove the damaged liner from the frame using pliers, clean its inner surface with a small needle file;
- We insert the new insert into the prepared frame of the access ring and fix it by gluing it on both sides at the junction with the frame with super glue.
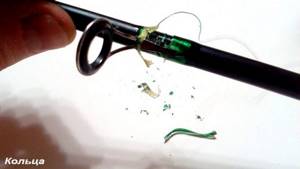
In case of damage such as a crack in the support leg or wire frame, it is better to replace the ring with a new one.
Replacing rings
Replacing rings consists of the following simple manipulations:
- It is better to start replacing the lower large ring, gradually moving towards the top;
- In order to remove the ring, we heat the place where it is attached to the form over a lighter until the varnish covering the fastening winding made of thin nylon thread softens;
- Using a sharp knife, cut the winding layer parallel to the plane of the form;
- Remove the winding and ring;
- We clean the area from any remaining varnish, winding, and degrease;
- Apply a little epoxy glue;
- We install a new ring, fix it tightly, winding a nylon thread over it in even turns;
- Apply a layer of colorless waterproof varnish on top of the thread;
- In order to remove the last ring - the tulip - a thin wire is attached to it, heated over a candle flame, while at the same time trying to pull the ring off the top with the wire.
Do-it-yourself spinning rod repairs
Spinning rods tend to break.
Such a nuisance can happen to anyone, regardless of his neatness or carelessness. It’s just that one day the stars will align in a certain way, and the spinning rod will be broken.
- Do-it-yourself repair of a broken spinning rod
- Rearranging the tulip
- Replacing the pass ring
- Knee repair
- Top repair
- Spinning reel repair
In this case, you should not panic and start looking for ways to buy a new spinning rod. Every thing can be repaired. Including spinning.
Do-it-yourself repair of a broken spinning rod
If a breakdown is detected, you should not immediately take action. Repairing a spinning rod with your own hands is a serious matter. Therefore, you first need to carefully examine the breakdown and think carefully about what can be done in this particular case. There will definitely be a way out.
Rearranging the tulip
A broken tip at the very base of the tulip is easy to fix. You should clean the broken end and move the tulip to a new place.
IT IS IMPORTANT TO KNOW! Fishermen caught 25 kg of fish using the Fish XXL ! Read more.
To free the tulip tube from the broken tip, you need to heat it. Next, estimate the difference in diameter of the tube and the new seat. The difference in this case will not exceed fractions of a millimeter.
By sharpening the inside of the ring with a file, you can equalize the diameters and insert the tulip into a new place, having previously lubricated the joint surfaces with glue. “Moment” or “super cement” is quite suitable for this.
Replacing the pass ring
To replace a broken pass ring, you need to carefully melt the coating and remove the braid.
You'll have to buy a new ring. Then wrap the ring with a strong cord, glue the place where it was tied, and apply several turns of electrical tape to be sure. Before purchasing a new ring, you can use the spinning rod without this broken part.
Sources:
https://primanki.com/snasti/spinning/polomka-vershinki.html https://zen.yandex.ru/media/id/5c57ab8bea64bc00ac1eb81b/5d346a0d43863f00ad3ad0cd https://www.rybalka73.ru/forum/viewtopic.php? p=864 https://fishelovka.com/gear/slomalsja-konchik-spinninga-remont-svoimi-rukami-jetoj-i-drugih-polomok-udilishha https://fish.rybalkanasha.ru/primanki/kak-pochinit- konchik-spinninga-esli-on-otlomilsya/
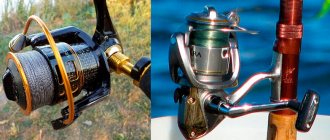
Spinning reel repair
Among the most common coil malfunctions and how to fix them yourself are:
- Noise inside. Disassemble the reel, remove sand and dirt from the drive mechanism, check the bearings in the handle and spool, and replace if necessary.
- Rotation mechanism jammed under load. Replace the drive gears with new ones;
- The line-laying arm snaps spontaneously when casting. Tighten the screws that secure the temple. If this does not resolve the problem, replace the spring responsible for latching the shackle with a stiffer one;
- The reverse stop does not work. It is necessary to lubricate the overrunning clutch, which is responsible for the operation of the mechanism;
- Creak. It is necessary to add lubricant inside the reel body;
- The fishing line gets under the front clutch nut and breaks. It is necessary to replace the thick felt gasket under the nut with a thinner plastic one.
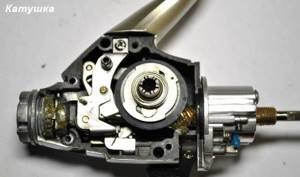
These methods will allow you to effectively repair the reel with your own hands, eliminating serious problems, extending the life of this expensive component of spinning gear.
Read: Repair of spinning reels
Top repair
Ignoring test data, using equipment that is heavier than required, and improperly fishing for fish are the most common causes of breakage and fracture of the tip in the middle or at the tulip. Repairing the tip of a spinning rod can be an alternative to purchasing a new tip, while the repaired part will not lose its main characteristics, including sensitivity.
Breakage of the hollow tip
The hollow tip will require reinforcement of the structure from the inside.
- Using a needle file, it is necessary to process the ends of the broken parts. It is important that there is no longitudinal damage of more than 3 mm on the surface.
- Roll a small narrow piece of sandpaper into a tube and sand the insides of the hollow tip halves to improve adhesion.
- A sewing needle that is suitable in size (diameter) and can be firmly fixed in a thicker part also needs to be sanded.
- Lubricate the needle with epoxy and insert it tightly into the thick part of the tip. We put the thinner part on top. It is important that the size of the needle (or thick wire) is at least 10 cm. After connecting the broken parts, check the evenness of their installation and, placing the fishing rod in a vertical position, leave it for a day until the resin has completely dried.
- After a day, apply waterproof varnish to the joint and around it and tightly wrap a nylon thread over the top.
- After drying, coat the repaired area with varnish again.
This method is suitable if the top is damaged between the winding rings - approximately in the center.
Breakage of the monolithic tip
A monolithic top will require reinforcement of the structure from the outside.
- Sand the inside of a thin-walled metal tube (ideally a piece of antenna from an old radio).
- Finish the ends of the broken parts of the top with a file. Sand the ends that will be inserted into the tube, removing the layer of factory varnish.
- Place the tube on the thicker part and generously fill it with epoxy resin or glue based on it.
- Insert the second part from the other end and also treat it with epoxy. Please note that the presence of cavities at the joint may lead to another failure in the same place. Try to completely fill the joint (inside the tube) with resin/glue.
- Level both parts and leave until the epoxy has completely dried/cured - about a day. Leave the rod in a vertical position.
- Cover the joint with waterproof varnish and wrap tightly with nylon thread. After this, varnish the winding again.
Knee repair
It is possible to repair a spinning rod with a broken knee if the damaged area does not have long (over 3 cm) longitudinal damage to the surface.
- The edges of broken parts must be prepared for major repairs. If they are uneven, it is necessary to saw off all the irregularities using a diamond tool (this is what is recommended for processing carbon fiber).
- We process the smooth ends of both parts of the knee using a needle file, removing small roughnesses.
- We prepare a tube that will serve as a stiffener at the fastening point. This can be a piece of suitable size and diameter from any other old spinning rod or even a new cheap fishing rod. It should fit snugly inside both broken parts. The outside of the tube must be sanded with fine sandpaper and degreased.
- Lubricate the tube with epoxy resin/glue and put the elbow pieces on both sides. We align the parts as much as possible so that there are no kinks.
- The carbon fabric must be generously moistened with epoxy and wrapped around the joint. For thinner parts of a broken spinning rod, 3–4 turns will be enough, and for the thick part (closer to the handle) 6–8 turns. Before winding, the carbon fabric is carefully wrung out to remove excess glue.
- Scotch tape is tightly wound over the carbon fabric and a nylon thread is wound round to round. At this stage, compaction will force out excess epoxy, which can be immediately removed from the surface with a clean rag.
- The rod is left in a vertical position for a day for the glue to dry. It is better to place it in a warm place or near a radiator.
- After a day, the nylon thread and tape must be removed. The joint is sanded with sandpaper and coated with moisture-resistant varnish.
In order to achieve more aesthetics, before varnishing, you can paint the repaired area with moisture-resistant acrylic paint to match the rod.
When can a spinning rod break?
Immediately after purchase, the angler handles the rod very carefully, even overly carefully. As a result, the spinning rod does not “open up” completely and it seems as if the purchase does not meet expectations. This behavior is typical for beginners, for whom this fishing rod is their first or second serious acquisition.
Over time, the angler gets used to the spinning rod, begins to behave more boldly and in some situations loses his vigilance. Such negligence most often leads to rod breakage. While on the shore, on the way to a reservoir, or when storing at home, the following troubles may occur:
- You can accidentally step on your rod or a colleague’s rod. This happens if you carelessly put the spinning rod on the ground. Therefore, you should always place the fishing rod vertically, leaning it against a reliable support.
- When assembling or disassembling a fishing rod, some people forget and lean the spinning rod on the car door or on the open trunk. An accidental gust of wind or touching the door can easily slam it, breaking the fishing rod.
- When fishing from a watercraft, when casting, retrieving or retrieving, you can accidentally hit the blank against the side of the boat. More often than not, this does not immediately lead to failure, but a crack appears on the spinning rod, which reduces its strength and leads to failure at the next load, which is close to critical.
- Experienced lovers of sea fishing know well that carrying the fishing rod tip first is strictly not recommended. The slightest loss of concentration leads to the fact that he can stick into the ground or “rest” against the nearest tree or bushes. The spinning rod should always be carried with the handle forward.
- Each spinning rod has its own safety margin. One of the characteristics that shows its power is the lure test. Sometimes situations arise where you need to exceed the upper limit of the rod. However, not all fishing rods allow this. As a result, we have a breakdown, which, unfortunately, more often occurs in the handle area. Such a “stick” will no longer be repairable. Unless you can make yourself a “tool” for winter glitter from the upper knee.
Many Japanese rods do not allow the test to be exceeded. “Americans,” on the contrary, have an extraordinary margin of safety. Chinese products need to be tested during fishing, gradually approaching the upper limit.
fishelovka.com
What to do if the tip of the spinning rod breaks?
Good afternoon Today we will talk about spinning rods, and to be more precise, about their tip. We all love to fish and sooner or later our rods break, this is a common thing. But most often, due to our own negligence, the tip of a spinning rod becomes unusable. This article will go into detail We are talking about this very part of the rod.
So, what is a spinning rod tip? The tip of a spinning rod is, simply put, the end of the rod, very thin and fragile, which ensures its flexibility, and in some cases can even signal a bite, but this is only with a large catch. Without this part, our tackle will most likely break if a large fish bites. We will not dwell in detail on the concept of the tip, since every fisherman knows what it is. But what to do if it does break? Of course, a broken tip is the worst case scenario short of fatally breaking the rod, but there's no need to panic. There will always be a way out.
There are two ways to solve this problem:
- The first is a complete replacement if the tip cannot be repaired.
- The second is manual repair.
First, determine the extent of damage to your tip, is it worth shelling out and getting a new one or can it be repaired?