Avid fishermen know that you can save money wisely on your hobby. For example, you can make your own molds for casting fishing weights and not spend money on purchased ones.
When fishing, sinkers are consumables along with fishing line and hooks. When catching large fish, the fishing line often breaks, and the rod may even break. It’s expensive to buy a new weight every time, because in stores their cost directly depends on the weight. The costs become even more noticeable if multiple gears are involved.
Advantages and disadvantages of homemade fishing weights
The abundance of homemade gear suggests that making it at home has many advantages:
- Saving money. The shape can be made from a variety of things, and the material for the sinker is much cheaper than the pre-made ones sold in stores.
- The casting process takes a little time.
- You can make gear in bulk or individually, it all depends on the patience of the fisherman and the casting method.
The disadvantages of homemade products include:
- the need to polish finished products;
- wasting time preparing forms and materials;
- lower manufacturing accuracy.
Homemade mold for casting sliding weights
Hello, dear readers and DIYers, as well as fishing enthusiasts and professionals! In this article, the author of the YouTube channel “Folk Craft” will tell you how he made a mold for casting lead weights at home.
The homemade product is very easy to make and does not require complex machines.
Materials. — Aluminum plate 12 mm thick — Thumbscrews — Steel rod — Bolts.
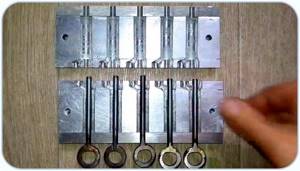
Tools used by the author. — Grinder — Dremel — Screwdriver — Drills, pliers, wire cutters — Tap. Manufacturing process. To begin with, the author cut several blanks from an aluminum plate 12 mm thick. Four rods and two plates. Marked and drilled holes for screws at the ends.
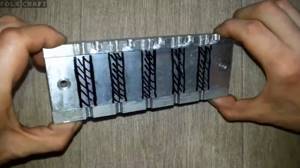
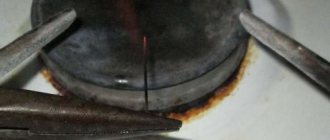
Now I pulled the main plates together and drilled molding cavities with a diameter of 12 mm.
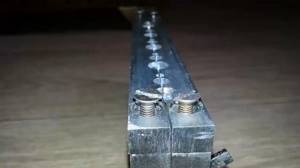
All that remains is to drill the injection channel with an engraving machine and install the pins. To make them easy to remove, they should be lubricated with laundry soap.
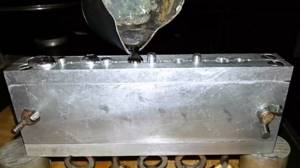
After the metal has hardened, you must first remove the pins from the mold.
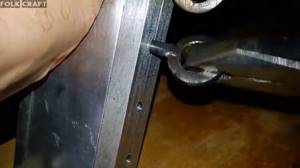
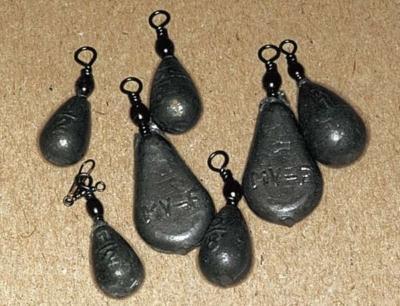
Next, simply remove the finished weights and bite the sprues.
The author's video can be found here.
Source
Become the author of the site, publish your own articles, descriptions of homemade products and pay for the text. Read more here.
Product Configurations
For now, let’s omit the division into factory-made and home-made, let’s look at professionally made gear. First of all, such forms can be divided into marine and freshwater.
Expert opinion
Knipovich Nikolai Mikhailovich
Zoologist, hydrobiologist. I am interested in fishing at a professional level.
Sinkers for sea fishing are, as a rule, larger, which is reflected in the size of the forms.
Matrices for filling can also be stamped or milled. Molten aluminum is poured into the stamped matrix. This is a cheap process because the required shapes are produced by the hundreds on an assembly line. The manufacturer decides which weights are popular and based on this he orders casting dies and then simply clones the molds. Milled products are more expensive.
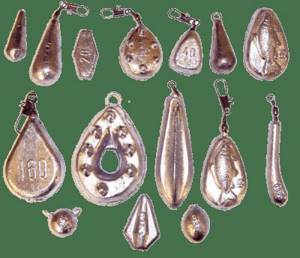
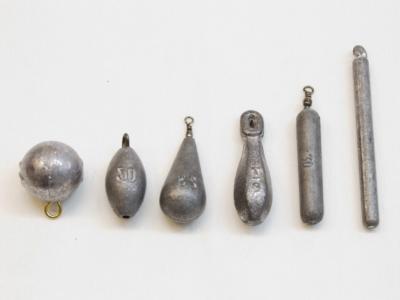
Sinkers are made in almost any shape:
- diamond-shaped specimens;
- spherical;
- spoon-shaped;
- teardrop-shaped, etc.
The shape of the sinker is determined by the type of fishing and the reservoir where fishing is planned.
Which ones are needed for a fishing rod?
To answer this question, you need to decide on the type of catch you expect and what kind of fishing rods you will use.
For float
This type of fishing does not require a lot of weight. You just need to immerse the fishing line to the desired depth in relatively calm water. This task is accomplished by one or more pellets attached to a fishing line.
Expert opinion
Knipovich Nikolai Mikhailovich
Zoologist, hydrobiologist. I am interested in fishing at a professional level.
Experienced fishermen advise attaching several pellets by cutting them and inserting the fishing line into the cut. In this case, the smallest one should be closer to the hook. The distance between the pellets should be from 5 to 7 cm.
There is no consensus on what the size of a single pellet should be. Typically, balls with a diameter of 3 to 7 mm are placed.
For spinning
The presence of a sinker is not necessary for this fishing method. If the bait is heavy, casting is carried out without it. If the weight of the bait is small, more advanced products are required. Shape and weight become categorically important, since casting distance depends on them.
- Spoon-shaped weight. You can easily make it yourself by pouring molten lead into a hole in the ground.
- Rhombus. Such products are produced in factories. The average weight of a lead diamond is 30 g, although some specimens reach up to 75 g. They are designed for casting at an average distance.
- Ball. A mathematically ideal shape is not ideal for fishing. Such sinkers are not recommended for use on fast rivers, since the current can roll them along the bottom.
- Spindle-shaped weights. Good for long casts.
For the donkey
Expert opinion
Knipovich Nikolai Mikhailovich
Zoologist, hydrobiologist. I am interested in fishing at a professional level.
For this kind of donk fishing, weights are cast from gart or lead.
There are several nuances:
- For fishing on a flat coastal area, you need a heavy weight.
- If you plan to fish on a pond, lake or calm river, you need to take a sinker that is not too heavy.
- For fishing on muddy or rocky bottoms, it is better to use a round, conical or pear-shaped weight.
- On a sandy bottom and in strong currents, a flat sinker will help out.
- If there is a lot of debris at the bottom, choose a weighting agent like a vanka-stand. It has a floating top, and the weight occupies a vertical position, supporting the hooks with bait above the bottom.
How to make molds for casting a weight
Molds for casting sinkers with your own hands are also quite easy to make from plaster or silicone sealant. A very original and at the same time simple solution is to make a mold for casting from silicone sealant such as “Germesil” or any similar one. The criterion for choosing a sealant is the ability to withstand high temperatures without changing the properties of the material. Most household sealants have an upper temperature limit of about 150-180°C. This forces us to use not lead (melting point about 350°C) for casting sinkers, but special alloys with a lower melting point. First of all, we are talking about Wood, Rose and typographic alloys (melting point from 60 to 110 ° C). When using these particular alloys, the silicone mold will serve for a very long time without deteriorating the quality of the castings.
Read also: How to get a bolt if the thread is broken
In the case of lead, a mold made from household sealant can withstand up to 10 castings, and the quality of each subsequent load becomes worse due to the gradual burnout of the sealant over the entire area of contact of the molten lead with the mold. Currently, silicone sealant is easy to buy in auto stores or stores selling building materials. This silicone mold, despite its amazing elasticity and seeming unreliability, can easily withstand high temperatures and a large number of castings. In addition, silicone sealant gives the angler an amazing opportunity to almost perfectly replicate any, even the most complex, shape of a sinker or spinning bait.
Form for weights
The shape of the weights itself is very simple to make. A small box is taken, which is then filled to the brim with silicone sealant. During filling, you need to ensure that there are no bubbles in the sealant. Next, the weight or bait that you are going to repeat is lubricated with a solution of wax or paraffin in gasoline, dried and lowered on a wire into a box with sealant so that it is completely immersed in the sealant, but does not touch the walls of the box. In such a suspended state, a sample of the future fishing weight or bait should be kept until the sealant has completely hardened. The polymerization process of silicone sealant throughout the entire volume of the mold is not uniform, and complete hardening of the silicone mold can take five to six days. Therefore, you should not remove the sample from the mold until complete polymerization occurs.
This moment can be easily controlled by periodically carefully feeling the shape. When fully cured, the sealant should resemble the consistency of a well-inflated soccer ball. Next, a small sprue hole is carefully cut from the top, through which the sample is removed due to the elasticity of the sealant. After this, the silicone mold is separated from the box and becomes completely ready for multiple castings. Pouring lead into this form and removing a finished hand-made weight or bait occurs through the same sprue hole. At the moment of removing the finished sample, the mold stretches each time and, as it were, “spits out” it, after which it instantly takes on its original form and is again ready for more and more castings. The advantages of a mold made from silicone sealant are obvious: it is very cheap, extremely simple and at the same time quite reliable. In addition to the ball-shaped ear molds, we highly recommend that you make several lentil-type molds for casting. Outwardly, it somewhat resembles a plum pit flattened on the sides. The lentil is lighter than the spherical eared fish, but due to its shape it slips much more easily through the closed mouth of the fish, significantly improving hooking. The most important use of lentils is when catching pike perch with its bulldog grip. Here are some simple tips on how you can make weights for fishing with your own hands and at no financial cost to you.
Where can I get raw materials for casting at home?
The raw materials for the mold can be:
- gypsum;
- potato;
- cardboard;
- paper;
- sand.
The following may be useful in production:
- ballpoint pen caps;
- plasticine;
- wires;
- pieces of plastic;
- talc;
- wire and other small things.
Expert opinion
Knipovich Nikolai Mikhailovich
Zoologist, hydrobiologist. I am interested in fishing at a professional level.
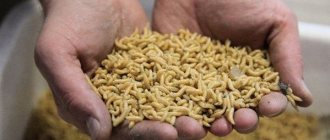
Shot is the most popular source of raw material for casting. It can be purchased at a hunting store. If you are a hunter, then you can take already shot shot found in the carcass of your prey.
You can ask for lead at car repair shops and tire shops. A lot of it usually accumulates there, and workers are ready to give away raw materials for free or for a nominal fee. Any scrap metal will do, quality doesn’t matter.
Where can I take a cast?
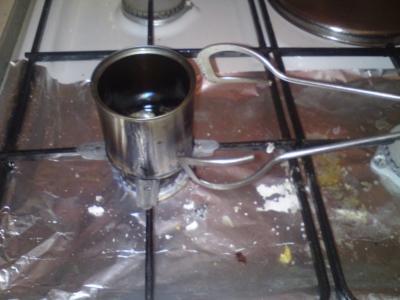
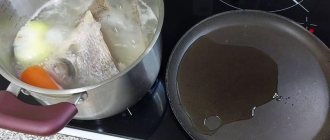
Lead is very easy to melt at 327.5 degrees. An ordinary burner does the job, and many people melt metal right in the kitchen.
This method is dangerous. Lead vapors poison the body and there is a risk of fire. If you do decide to work in the kitchen, be sure to open the windows or turn on the hood.
Melting lead over a fire looks preferable. This way there is no risk of poisoning, and there will be no unpleasant odor in the room. The disadvantage of this method is the length of the process. It takes a long time to maintain the flame; a lot of wood is wasted. Under no circumstances should you melt in the rain, as water getting into the liquid metal will cause splashes.
Expert opinion
Knipovich Nikolai Mikhailovich
Zoologist, hydrobiologist. I am interested in fishing at a professional level.
The best, but also the most expensive way is to work with an electric crucible. It can quickly and safely melt a large amount of metal, and do it at home, in the garage or on the street.
To come in
Already registered? Sign in here.
There are currently 0 users on the page
There are no users viewing this page.
Fishing is a hobby that requires considerable financial costs, and many of us, if possible, reduce them by making bait and consumables with our own hands. In addition to saving, a significant role is played by the pleasure that the fisherman receives from catching fish with gear made with his own hands. For jig fishing enthusiasts, weights are one of the main expense items. It’s especially a pity to lose weights on a microjig, since with a weight of 1-7 grams their cost is comparable to weights for a heavy jig.
So, like many of us, I cast weights myself and tried many different methods of making molds, from the classics - plaster to aluminum.
I don’t think it’s worth writing much about plaster molds. Everyone who tried to cast anything from easily fusible metals used it to make molds. What can I say about plaster molds; So this is that their production is quite simple, low-cost, allowing you to copy any complex shapes, that is, to make shapes not of simple Cheburashkas, but also of cargo with a more complex geometric shape. For example, a weight in the shape of a fish head, where the mouth, gills and eyes are visible. Which, of course, will not increase your catch, but, you see, when choosing baits, the fisherman takes what he likes and only then what he thinks the fish will like. All of the above are inherent huge advantages of gypsum forms, but one huge disadvantage, which often outweighs all the advantages, is the service life. That is, one mold is enough for one, two - maximum five castings of good quality. Afterwards, the mold begins to crumble, crack, and the quality of the casting results in sagging and roughness, which, of course, does not affect the quality of fishing, but it all looks ugly and sometimes you have to spend time and effort removing excess sagging, which is also a huge minus. In general, it is possible and even necessary to make plaster molds, but only if you need to make one or two copies.
As for aluminum molds, of course, these molds are durable - they are enough for at least a couple of thousand high-quality castings, but there is a huge “but”, they are quite expensive, and making them yourself without access to sophisticated metalworking equipment is quite difficult, and sometimes not even possible. And it’s quite difficult to find the material from which the molds are made.
I made molds for casting eared Cheburashkas in the following way, which can be used in garage conditions. I took two aluminum plates with a thickness exceeding the radius of the Cheburashka by at least 4 mm, cut out two equal pieces, then drilled holes with different diameters and different depths, increasing the depth while decreasing the diameter of the drill so as not to exceed the size of the hemisphere of the required load. For greater clarity, see the diagram.
Then two half-forms are connected between them into drilled recesses, a ball from a bearing of the appropriate diameter is inserted and pressed in order to smooth out the steps formed during drilling. Then we process the mating plane of the half-forms with a file, press again and repeat this action until the two halves of the form fit perfectly against each other. After this, without removing the metal ball from the mating forms, we use a drill to make holes for the centering holes. Only then do we drill holes for the sprue and gas outlet.
Read also: Manual cylindrical reamer GOST 7722 77
At the moment, I have found for myself one method of making molds for casting sinkers, which, in my opinion, ideally combines two important factors: ease of manufacture and durability of the mold. In addition, my forms (like plaster ones) are easy to make and copy even small details, such as numbers indicating weight, eyes, mouth, gills on fish head weights. Along with the above qualities, these forms are durable and cost little more than plaster forms.
And so I make my forms from heat-resistant sealant.
I use this sealant because it is freely available.
And plaster. Figure No. 2
You can use any silicone heat-resistant sealant, any automotive or instant sealant.
So, we take a container (I use a plastic jar as a container) and pour a handful of plaster into it. Add a small amount of sealant to the plaster and stir with a wooden ice cream stick until all the sealant is mixed with the plaster.
Then pour the resulting mass onto a plastic bag and knead it like dough, adding gypsum if necessary. Knead until you get a homogeneous elastic mass with the consistency of dumpling dough.
After this, the mass is placed in the formwork. It must first be sprinkled with gypsum, which acts as a separator and prevents the mass from sticking to the formwork. For me, the function of formwork is performed by a container for bait. Then we put our dough into the formwork, press it tightly and level the top plane.
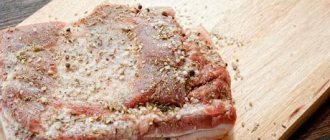
We half press the weight into the resulting workpiece, a copy of which we want to make, having previously coated the surface of the workpiece and the template itself with plaster. We trim the plane so that the mass fits tightly around the template. As a template, you can use not only ready-made weights, but also original forms made, for example, from polymer clay.
After the first half-mold has dried, make at least a recess in the free space on its plane for centering the forms. Then we make a new batch, coat the first half of the template with dry plaster (don’t forget about the separator) and place the second portion of dough on the first half of the tuyere, pressing it tightly to avoid the formation of voids.
We wait for it to dry, remove the mold from the formwork, cut out the sprue with a utility knife and wait for complete polymerization. Usually, this is 12 hours and the form is ready for use.
If anyone has any questions, write. There is a little video - I filmed it for a friend - but the quality is not very good, since I filmed it on my phone. If anyone needs it, I can send it to you via email or messenger.