Many novice fishermen do not know how to correctly measure the depth and topography of the bottom with a feeder, as well as find out its structure, which is why they miss promising fishing points, which certainly affects their catch.
There are several ways to measure depth and determine the bottom topography:
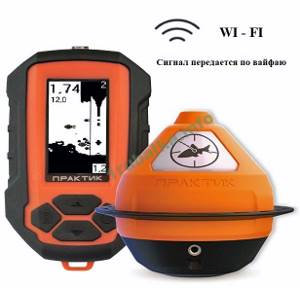
- The first is to use an echo sounder, and now it is not necessary to have a boat for this. There are echo sounders on sale that you can cast with a fishing rod and receive information on the screen.
- Second - use a marker weight;
Since the first option requires significant amounts of investment, let's talk about the second. There are also two ways here:
Reading the Bottom with a Marker Sinker
This method allows you to quickly “break through” the structure of the bottom, the presence and position of zebra mussel colonies and identify rises and falls in the bottom topography without accurately measuring the depth.
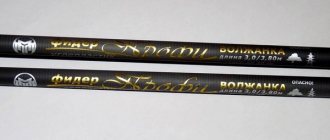
The essence of the method is that a marker sinker is tied to the end of the cord, and the structure of the bottom is “read” by dragging it. An ordinary “olive” or spherical sinker will not work here—you need a marker sinker, with a pronounced influx in the lower part and characteristic protrusions (horns). The weight of the load is selected depending on the feeder test and generally ranges from 50 to 100 grams.
Since braided line is not resistant to abrasive damage, on a rocky bottom and in the presence of shell colonies it is better to use an insert made of fluorocarbon or monofilament line . Dragging the load along the bottom is done by pulling the rod, in which the tip of the feeder clearly conveys everything that happens with the sinker.
The peculiarity of this method is that to correctly understand the structure of the bottom, certain skills are required, which are acquired over time. But there is nothing particularly complicated here. Using the examples below, we will look at how the marker weight behaves when moving along various bottom elements.
Standard method
Measuring the depth with a feeder is best done with a working rod, the one that will be used for fishing. Simply, instead of equipment, a weight is attached to the end of the fishing line, approximately the same weight as the feeder will be used later in the fishing process. Ordinary lead bottom weights or special marker weights are used. You can attach such a load to the main line using a regular noose in a loop. Read more about marker weights.
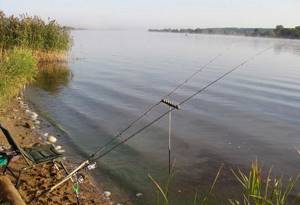
Bottom sounding is far from a simple undertaking. There are many little things in it that depend on the characteristics of the reservoir - depth, strength of current, bottom topography. The search and selection of a point is also influenced by the type of fish the angler is hunting. There is no single measurement algorithm - it all depends on the goals of the fisherman and local conditions. Each feeder develops over time his own specific actions when searching for a point. For beginners, it is recommended to practice what is written below on a well-known body of water in order to understand the nuances in terms of tactile sensations from the rod in the hand.
So, we take measurements with a working rod. Most amateurs have one. Advanced fishermen and athletes often collect special separate tackle just for measuring, and the working length of the tackle to the point after determining the composition and structure of the bottom is transferred to the working tackle using pegs (more on this later). The goal of an ordinary angler is to clip the line into the reel in such a position that when casting, the feeder always falls into the same place found during the measurement - this is a critically important aspect of feeder fishing in general. Until this moment, you will have to make a lot of casts and clips, the ultimate goal of which is to find the desired fishing point (or two).
While examining the bottom, you need to build up in your head a rough understanding of the bottom topography in the fishing area. The location of the point imposes its own nuances on tactics and equipment. As in any other fishing method, first of all we are interested in any deviations in the relief - edges, slopes, local pits, changes in depth. In reservoirs with complex terrain (rivers, reservoirs), the first thing of interest is the edges and tables (flat areas, terraces) underneath them.
It is more difficult to search on a uniform terrain - you need to calculate small changes in depth (canals, ponds). There are many moments. The purpose of this article is to provide a framework from which to build. The simplest thing is to determine the edge when fishing with a feeder, for example, on a river when searching for bream. Let's focus on this. The feeding spot and the fishing point should be located a little further from the lower edge of the dump, on a flat area after it (terrace). Finding such a place is the main task of the feeder who arrives at the reservoir.
So, instead of working installation, we hang a weight, regular or special marker, on the feeder. The weight is selected depending on the conditions of the reservoir:
- 15-30 g on small ponds and canals with a muddy bottom (heavy loads will simply fall into the bottom sediments);
- 30-60 g. – ordinary rivers, lakes and ponds, medium flow and hard bottom;
- 90 g and more - large rivers with strong currents, long distances, fishing with Heavy and Extra Heavy gear.
Dragging
First, we cast to the maximum possible distance. After immersing the load, we place the feeder rod with the tip down, to the side, and slowly rotate the reel and pull it along the bottom. Depending on the structure of the bottom, tactile sensations and behavior of the quivertype occur differently.
- Soft muddy bottom – constant light load;
- Hard, flat bottom (clay) – the load is less, the sinker slides;
- Shell - small taps on the hand;
- Stone - stronger, louder twitching.
- Getting stuck means getting caught in snags or grass, but more often – the sinker comes out under the edge. This is the signal we are looking for. During repeated castings it will become clear whether this is actually so.
- Sharp acceleration, easier movement of the load - on the contrary, a sharp increase in depth, the sinker jumps down the step.
Dragging the sinker along the bottom is just the initial stage. The goal is to roughly understand the structure of the bottom and find out disturbances in the relief. The method of dragging a sinker along the bottom cannot accurately paint the picture. This is just reconnaissance. Therefore, after the initial rough determination that there seems to be something interesting over there, we move on to carefully breaking through a specific segment. To do this, the method of determining the depth by dropping a sinker on a quick count is used.
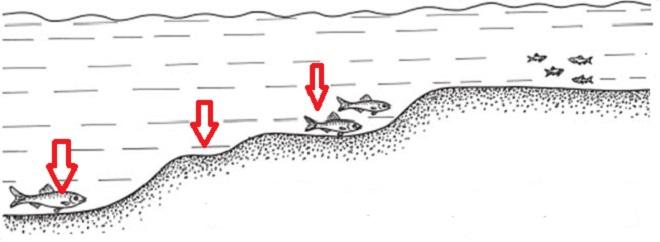
Tables under dumps
Dragging along the bottom
This method is used primarily to determine the structure of the bottom. It should be used at the final stage of studying the site, when depths, their differences and promising points have been selected. Dragging allows you to understand where the zone is strewn with shells, where there are pebbles or small twigs, where there is clean and hard sandy structure, where there is silt and other soft rocks.
Studying the bottom by dragging a sinker is performed as follows:
- The load is thrown to the desired point and allowed to sink to the bottom.
- Then they perform a leisurely reel, not allowing the weight to come off the bottom. It is important that it continuously drags along the ground.
- Such wiring is carried out all the way to the shore, which makes it possible to put together a complete picture at the final stage of studying the site.
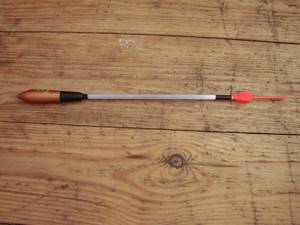
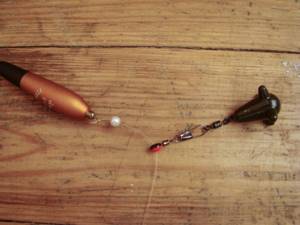
For this measuring method, you can use “lead” in the form of a ball or pear. But it is most advisable to use a special marker weight. It is shaped like a "mace" and has several projections or spikes. Attaches to the fishing line using a clasp or swivel located at the top.
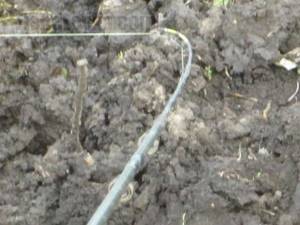
Photo 3. The top “shows” the bottom topography.
Additionally, dragging the sinker along the bottom will help identify steep, sharp edges that are not always possible to detect using the jig method. Such points cannot be ignored. They retain food, which attracts fish. Such places are very promising, so they should be fished first.
Consecutive casts for a quick score
Dragging and counting work together - this is the only way to survey the bottom topography and measure the depth with a feeder at the same time. For example, during pulling, we suspect that we have found a suspected edge in some place (the sinker gets stuck and is released only after some effort - the so-called pulling). Next, you need to make sure of this and study the area more thoroughly. Checking the bottom of a reservoir for feeder fishing using the quick count method is the simplest and most accurate option.
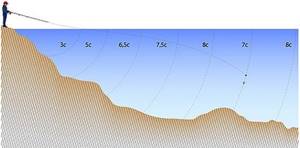
The essence of the method is to measure the time the weight falls after the splash with a count. We count quickly so that even a slight change in depth can be determined. Naturally, for each operation the counting frequency is needed to be the same - to eliminate the possibility of error. Over time, this skill is trained. Comparison of counting indicators at different distances gives an idea of the change in depths. Accordingly, the more you count, the deeper it goes, and vice versa. How to break through the bottom with a feeder?
Let’s say that while dragging, there is a place where the marker weight gets stuck, and it needs to be pulled. This is a clear suspicion on the edge. The sinker usually gets stuck in the lower part of the edge, as it rests against the fall, and the main cord rests on the ridge. We find the point again. We stretch until the load gets stuck.
Important point! Further activities are specifically related to the fishing point and determining the final clipping position. Therefore, during all manipulations after casting, we keep the feeder rod in almost the same position in which we will fish (so as not to make a mistake by a meter or two due to the difference in the location of the gear).
- So the load is stuck. We assume that he is on the lower edge. Under the edge we are interested in a flat area, completely horizontal or with a slight drop (5-10 cm per meter). This is a promising place for catching bream, ide, roach and any other white fish in the river. We place the feeder in the correct position and clip the cord. We cast using a clip with a count. You can check again - stretch the load a little, if it gets stuck again, it means everything was done correctly. The count is the relative depth at this point (presumably under the edge). Everyone has their own account, so exactly how many meters of depth is not so important. The very fact of the difference is important.
- Don't forget - the feeder is in working position. We remove the clip and unwind the fishing line from the clutch, for example, a meter or up to the first ring. Let's clip again. Thus, we increased the range by this distance. We assume that when casting, the load will fall a meter further, not reaching the edge. And if there is a level table, the score will be about the same.
- We unwind the line and cast, counting. If the score is the same, the desired terrace has been found. You can measure even further, for the sake of interest and confirmation of this. It is also performed through clipping and counting. If the depth (count) continues to increase greatly, we measure further until we find the table. The ideal place is a flat terrace under the slope, the point for final clipping is at the beginning of the table. If the edge is too steep, then it is better to choose a point a little further from the rise to make it easier to drag the feeder during subsequent fishing. We strongly recommend that beginners thoroughly familiarize themselves with the training videos from recognized feeder masters Fadeev and Kolganov, below and at the end of the article. Correct bottom measurement and choice of point is the entrance gate to the fascinating world of feeder fishing.
Video - Fadeev’s detailed instructions on searching for edges on large rivers.
Jig method
The most basic method of “punching” the bottom, which any angler engaged in feeder must certainly master. It allows you to both study the depths in a given area, determine the nature of the relief, and determine the structure of the soil by choosing the most promising point where the probability of a fish bite will be maximum. It consists of the following:
- The angler casts to a given point and lets the weight touch the bottom. In this case, the time of fall should be noted, as in the method of successive casts, in order to represent the depth in a given place.
- Then you need to make several turns of the reel, lifting the load above the bottom.
- Then we wait again until the sinker reaches the bottom. The fall time on a flat area should be 2–4 seconds. Then you will be able to track all changes in the terrain as accurately as possible.
If during wiring the fall time begins to shorten, then the depth at a given location decreases. If, on the contrary, the sinker begins to hang longer, then the relief decreases.
Important! Selecting the appropriate weight for the jigging method is paramount. A weight that is too light will hang in the water column and will not allow you to clearly monitor all changes in relief and structure. Too heavy, on the contrary, will “plow” the bottom and also will not provide the necessary information.
Experienced feeders who master the jig method of studying the bottom are able to “tap” the selected fishing zone in 10–15 minutes. If no noteworthy points are found on it, then it is advisable to move on to the next one, where it may be more interesting.
A complex approach
This is just one specific measurement case. Namely, the location of the table under the edge. There are much more conditions for fishing with a feeder and possible variations in the reservoir. For example, on reservoirs with a uniform topography it is generally difficult to determine anything. Only careful measuring of each meter will help, dragging it in order to determine the structure of the bottom. For example, finding a strip of shell among sand or silt. Finding the edge with a feeder can be easy if there are quite significant differences, but if there are no such differences, the process becomes more complicated. For example, where to form a fishing point for crucian carp in a pond with a flat bottom and a depth of 1.5 meters without drops?
Here you need to look for anomalies that are absolutely invisible at first glance - a change in the strength of the depth difference (for example, not 10 cm per meter, but 5), or bushes of some kind of vegetation, different bottom soils (light or heavy silt, clay, shells).
In addition to measuring one direction, it is important to measure the bottom topography to the left and to the right, fan-wise. This is the only way to draw a general picture of the point in your head. Maybe it is there, and not right in front of you, that the treasured folds of the bottom topography will be found. You can transfer measurements to paper by sketching diagrams with depths and distances. What can result from failure to comply with this - in Kolganov’s video:
You can use pegs. These are just two sticks on the shore, located at a fixed distance (3,4,5 meters). With their help, the working length of the clipped descent of the tackle is measured. This gadget will come in handy in case of a break and you need to restore the working length. Or to transfer the required distance to another feeder. Athletes usually use special line marker pegs, but they are very easy to make with your own hands. Two pokes and a rope between them - and there is a lot of benefit. To take the measurement, the feeder trough clings to one of the pegs. Then the working cord is wound around the pins, up to the clip. The number of revolutions is multiplied by the distance between the stakes - we get the working footage to the point.
In addition to pulling up and lowering the sinker on a count, you can use other methods - jig tapping, wireless echo sounders, tackle with a marker float. It doesn’t matter how exactly, the main thing is to find the fishing point and clip the distance to it on the gear. You can use various measuring methods, combining them with each other.
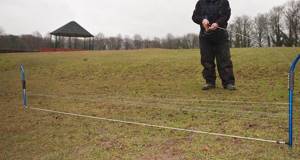
Maintaining distance on pegs
Muddy bottom
The marker weight runs smoothly along the bottom, without knocking, but with sufficient tension. If the layer of silt is large and the silt itself is very soft, then the load may fall into the silt during a pause. At the same time, at the very beginning of the pull, the tip of the feeder will bend strongly, and then a soft but heavy pull will follow.
Colonies of the toothless mollusk may be found on the muddy bottom. The encounter with them is characterized by short blows with a short weighting of the stroke of the weight.
Rocky bottom
The passage of cargo along a rocky bottom lined with large round stones is characterized by heterogeneous, intermittent movement of the cargo. Frequent hooks, including dead ones, are possible.
If the bottom is lined with small stones, then the behavior of the load resembles the passage of zebra mussel colonies, but softer. You can distinguish where the load passes over a small stone and where through the zebra mussel colony by the general bend of the feeder on the broach. On a colony, it will be harder to pull the load, and accordingly the tip will bend more. Plus, a small stone will never be on a steep slope.
Aquatic vegetation
When entering thickets of aquatic vegetation, the load travels with great resistance, but without impact. Sharp jerks are possible, which are caused either by a break in the vegetation or by the release of cargo from individual thickets. Since even after leaving the thickets, tufts of vegetation remain on it, further measurement will not be informative.
At the same time, everyone needs to take into account that the movement of a load up a slope will always occur with greater resistance than when moving along a relatively flat bottom. At the same angle of rise of the dump, its influence on zebra mussel colonies will be more significant than when rising along a clay bottom.
In order not to repeat the painstaking process of studying the bottom on subsequent fishing trips at the same point, it is advisable to write down all measurement results in a notebook. To record the distance after the first cast, the line is inserted into a clip on the reel, and during the marking process you need to constantly count the number of turns of the reel.
In this way, you can quite accurately study the structure of the bottom along the entire casting line. If it is known in advance that the channel or edge of interest to the fisherman is located in the selected area, then by studying the structure of the bottom it is easy to calculate it. If the place is new and there is no information about it, then additional study should be carried out to the left and right of the selected point by performing a series of fan casts.
If, in the case of an edge, a rise in the bottom topography is also observed in lateral measurements, then the fact of detection of the edge is confirmed. Otherwise, the anomaly found may be a local “navel”, which in some cases can also be a promising point, especially when it comes to high-speed fishing for small roach and silver bream. To catch bream, it is still advisable to find a linear anomaly associated with the main bottom topography.
Studying the relief using the method of counting the time of the fall of a load
The method described above gives a clear picture of the bottom structure, but does not allow for depth assessment. This method, on the contrary, allows you to quickly find differences in depth, without studying the structure of the bottom.
The method is based on measuring the time the bait falls from the moment it splashes down until it touches the bottom. The information it provides is quite relative, but it allows you to probe holes, depth changes, edges and other elements of the bottom.
This also includes the jigging method. For all its simplicity, it allows you to very quickly probe the desired edge or fall into a hole. When jigging, it is important to pull with the same force each time to lift the load to the same height from the bottom. If the time the load falls on two pulls (steps) remains unchanged, then the bottom is level. When entering the dump, the time will decrease; when lowering into the pit, it will increase.
The methods of studying the bottom described above complement each other perfectly, so fishermen often use a combined method.
Determination of the composition and structure of the bottom
Naturally, while measuring the depth, experienced fishermen simultaneously determine the composition and structure of the bottom. The result of fishing directly depends on this. It is very important to find an anomalous point in a given area where food will linger or there will be shelter from predators. This certainly attracts peaceful fish there, and there is a chance of a trophy specimen biting.
The drawing method is used to study the soil. The load is pulled through at a minimum reeling speed, fixing the nature and structure of the bottom at the tip of the feeder. The sensitive quivertype transmits any change in composition, as evidenced by its behavior: • The soft structure of the bottom or bottom algae are transmitted by a light continuous tension.
• A clean sandy bottom provides minimal resistance; the tip, making a slight tremble, bends almost under the weight of the load. • If the sinker hits a spot strewn with shell rock, the tip begins to constantly tremble and “cowardly.” • As the load moves downward, the resistance weakens, with rise - increases.

• If a sharp edge or local bump is encountered along the path of the sinker, then a sudden increase in load occurs, which quickly goes away when more force is applied. Having determined the optimal point for casting, you need to mark the landmarks on the opposite bank and clamp it. Experienced feeders can easily send the feeder to a given point, so they quickly create a feeding spot on the bottom and “put the fish on the feed.”
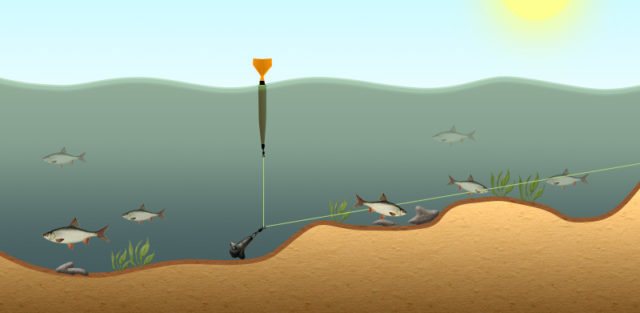
Reading the Bottom with a Marker Float
This fishing method gives the most complete picture of the structure of the bottom and the depths in the fishing area, but it is not without its drawbacks. Firstly, using a marker float you can study the bottom only in areas of reservoirs without a current. Secondly, the method is labor-intensive and time-consuming.
To study the bottom you will need a marker float, a special marker sinker and a fishing rod. In carp fishing, a special rod is used for these purposes, but there is no special need for it - a feeder will do. The only thing you need to do is put marks on the rod blank corresponding to a distance of 0.5 and 1.0 meters from the reel.
When installing the marker equipment, the fishing line is freely inserted into the swivel ring on the marker sinker. Next, at the end of the fishing line, a float is tied to the bottom ring with a blind knot. Since during the marking process this knot will constantly hit the swivel on the sinker, it is useful to place a bead between them. That's it, the marker equipment is ready. It remains only to note that it is knitted exclusively on monofilament fishing line. If the reel is equipped with braid, then you will have to use a monofilament shock leader .
Next, the equipment is thrown to the required distance. After the sinker touches the bottom, this can be seen by straightening the tip of the feeder, you can begin to study the bottom. First you need to do a small stretch, moving the feeder to the side in a horizontal plane. This will already give an idea of the structure of the bottom and is guaranteed to bring the float to the sinker.
If the reel is equipped with a baitrunner system, then you can turn it on, otherwise you will have to open the line handler and release the line by hand along the meter marks until the float appears on the surface of the water. The depth at the point where the marker is located will correspond to the amount of cord removed. To increase the accuracy of measurement, a half-meter mark may be required.
After fixing the depth, the cord is again wound onto the reel until the float rests against the sinker. After the next pull, the process of releasing the line and measuring the depth is repeated.
As with other methods, it is useful to make a series of fan casts, which will allow you to measure the depth to the left and right of the fishing point.
Measuring the depth and topography of the bottom before fishing with a feeder: where to start
Correctly determining the nature of the bottom before fishing is an important component of a rich catch. An important question is of great importance, lies on the same plane in parallel with other aspects: how to find a promising place for fishing, know about the habits of fish, taste preferences in a specific period of time, standing on the shore. Scanning with a marker weight is relatively quick and quite simple. Any beginner in the field of fishing with a float or feeder can successfully cope with this task. There are no difficult moments in the process of determining the bottom topography.
Before measuring the depth with a feeder or marker weight, you should carefully prepare for fishing at home. Experienced catchers make the device with their own hands, use their own know-how, and do not use the services of retail chains. Beginners can be advised to buy the necessary device, and when they gain experience, use it in practice. Usually such a load is a ball, a bullet, a bomb with stabilizers at the edges. A very good shape for studying the nature of the bottom with maximum sensitivity and great chances of long casting.
It has been noticed that bottom fish prefer those areas of the bottom where there are some pronounced heterogeneities