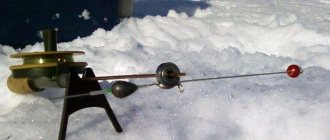
Vladimir Sokolov, St. Petersburg | February 10, 2021
The active use of “reelless” baits on fishing trips last year pushed me to the conclusion that it was time to make tungsten baits myself. After all, previous experiments with lead were partially disappointing - for example, the fact emerged that even the high-quality lead jigs I made when fishing in the wind are noticeably inferior to their tungsten counterparts.
The active use of “reelless” baits on fishing trips last year pushed me to the conclusion that it was time to make tungsten baits myself. After all, previous experiments with lead were partially disappointing - for example, the fact emerged that even the high-quality lead jigs I made when fishing in the wind are noticeably inferior to their tungsten counterparts. And although there seems to be a selection of tungsten on store shelves, this is only at first glance, and as you master the nuances of reelless fishing, you come to the realization that the range of commercial baits is still not enough. And in principle, expanding your tungsten arsenal using purchased products is problematic, there are four completely objective reasons for this.
Firstly, recently the price of tungsten jigs has increased significantly, and it is not so rare that they are, in fact, consumables. Secondly, the possibilities of retrofitting purchased products due to their design features are noticeably limited. And quite often, especially during intensive fishing, all attachments are destroyed and the jig stops working.
Thirdly, a product made with your own hands can be made of any, even the smallest dimensions and, which is very important for such sizes, relatively large mass, which makes such baits all-weather. And finally, fourthly, many technical solutions can be incorporated into your own designs, which will make the bait more durable and suitable for any fishing conditions.
Therefore, when the winter season came to an end, I began to collect elements and components of baits in order to realize all the ideas that arose on the ice and were actively discussed in our fishing company. This was followed by sketches on paper, prototypes and their tests, more discussions - and now we can say that the preparation of the first batch of baits for baitless fishing has been completed. How this was all created will be discussed.
Maybe someone has already gone through all the stages of such creativity, I don’t know, but unfortunately, you can read about how all this was done by someone - with all the details and pitfalls - nowhere, not in the press, nor on the Internet, it was not possible. Everywhere there is only the most scattered information. Somewhere there was information about how tungsten can be processed, but only in a workshop with machines. Somewhere - how to galvanize it, but using such chemicals at home, without good ventilation, is simply dangerous.
And even now it’s rare that anyone has free access to such equipment. And collecting and manufacturing such equipment, if you do not plan to establish serial production of baits as a source of your income, is not feasible from a financial point of view. In general, in the conditions of an average city apartment, I would like something simpler. That’s why I’ll tell you about my “rake” and successful steps in how you can make bait, as they say, “on your knees,” in an evening in the kitchen.
I decided to add three main types of baits for reelless fishing to my arsenal - “Devil”, “Goat” and a regular jig with one hook. Some of them have already been tested during ice fishing, some have been tested in the summer when fishing from a boat, and some are waiting for the new winter to come.
I'll start with "Devils"
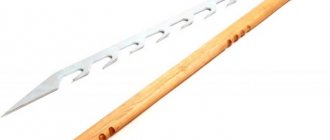
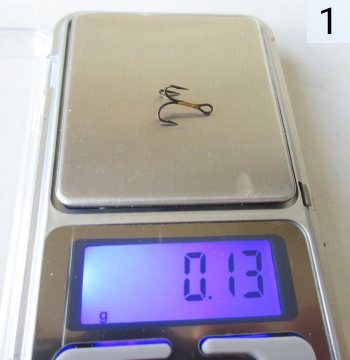
Perhaps the simplest technological option for making a “Devil” is to select a suitable tee, so as not to deal with soldering, and make a bait based on it. When I was looking for suitable tees, I was faced with the fact that tees in sizes 14 and 16 (according to the Western European classification) and with a long forend cannot be found on store shelves. Short please, or there are larger sizes available. And I found suitable tees with a long forend (photo 1) only at trade centers from old stocks - probably still Soviet.
I made “devils” from them using tungsten wire VA-1-A with a diameter of 0.3 mm. If you hold the tee in the screwdriver chuck by the hooks and leave the forend outside, you can very carefully, slowly, lay down two layers of wire.
I started from the hook and moved towards the eye (photo 2). When passing the first layer, I climbed a little onto the eye (photo 3) so that the first layer of wire would be more securely fixed on the tee fore-end, and would not jump down and rotate when laying the second layer. The second layer was also carefully passed, turn to turn, just below the beginning of the tungsten helix (photo 4). In this case, the result is a design without sharp elements sticking out in different directions and with a ready-made eyelet. The mass of such a “Devil” on hooks No. 14 and 16 is in the range of 0.4 – 0.45 g without suspension (photo 5). If you want to have a bait of the same size, but heavier, you need one or two additional layers of tungsten.
This is where the first “rakes” appeared. Nothing good came of trying to wind the third layer of tungsten wire on top: it cannot be laid flat, and a lot of voids appear in the winding due to the high elasticity of tungsten. How did I get out of this situation? On one of the “Devils” I measured the outer diameter of the already laid two layers of wire - and made a kind of jig from the rod of a blind rivet purchased at a hardware store. And then, holding this conductor in the screwdriver chuck, I wound a very neat spiral on it (photo 6).
Then, having precisely selected the length of this spiral, I placed it on top of two layers (photo 7). To securely fasten this prefabricated structure, I initially used Moment-gel glue, but in subsequent installations I switched to Finnish polyester resin Norpol (photo 8). The resin seemed more technologically advanced to me, because I immediately introduced black dye into it. This could be nail polish or ballpoint pen paste. And after polymerization, the “Devil” obtained a very neat body, which did not require any additional work other than equipping it with decorative elements.
But this technology also has one, in my opinion, important drawback: such a “Devil” can be equipped by putting on all the accessories only through the hooks. And in order to somehow fix the “body kit”, you have to fix it with pieces of silicone cambric. And in the process of intensive fishing, such equipment, unfortunately, does not last long. Well, without equipment in our waters it has not yet been possible to catch “Devils”.
And one more exciting moment: how will the fish react to the thick wire from which the tee is made? And there the diameter of the hooks is more than 0.8 mm. When I experimented with different hooks for jigs, I came across the following: jigs on which hooks made of wire more than 0.7 mm thick were placed did not have a special arrangement for the perch. I can’t say that they were completely ignored, no, but there were noticeably fewer bites on them. Maybe “Damn” is a little different? Winter perch will dot all the i's.
The second option for making “Devil” is to assemble a tee from single hooks. Although such an assembly turns out to be much more labor-intensive, this option has one important, in my understanding, plus. On two hooks that do not have an eye, beads can be placed through the shank, choosing them so that they do not slip through the sting. What will make such a “Devil” much more “long-lasting”.
To assemble such a tee, I tried several options. Attempts to assemble a tee with two already equipped hooks in various jigs were a fiasco. Therefore, I assembled the structure in stages. For the tees, I took Saikyo fly hooks Nos. 12 and 14 and Kamasan Nos. 14 and 16 ; they were made of wire with a diameter of 0.4 to 0.65 mm. To increase the strength of the solder joint, I first scratched the shank of each hook a little by using a strip of sandpaper (Photo 9) and simply making a few rotational movements with it.
Having put multi-colored beads through the forend, I first assembled the double on the board, inserting the hooks into the end so that there was approximately 120° between them (photo 10). I moistened them with soldering acid and soldered them with PIC solder. Got a double. A third hook and eye has already been applied to this double. For preliminary fixation, I made a winding with thin copper wire from stranded wire (photo 11). And after that, having adjusted the corners more precisely, I soldered the entire assembly (photo 12). Using a diamond file, I slightly smoothed the ends of the hooks without loops, which slightly extended beyond the winding.
Simply holding the tee in your hands and carefully winding the tungsten will not work. Needs good fixation. But clamping the assembly in this form into a screwdriver chuck is already problematic, so I fixed it using round nose pliers in a vice (photo 13).
And I wound the tungsten wire by analogy with the above winding method. If the soldering was carried out without sagging, then the tungsten can be laid very evenly, turn to turn. But, again, one, maximum - two layers with one piece of wire. I pre-wound the third and subsequent layers on the jig (photo 14), put it on, glued it - and this is the result (photo 15).
What are tungsten jigs?
A tungsten jig consists of a fishing hook and a weight made of high-density metal. It is easy to find in fishing stores. But there is one important drawback - the high price. Therefore, this gear is often purchased for sport fishing.
Knowing the advantages of combining large weight with small size, fishing enthusiasts have mastered the production of tungsten jigs at home. Many fishermen have achieved such skill that homemade baits are superior in catchability to industrial models. To make cheap tungsten jigs, all you need is patience and a simple set of tools and materials.
Next on the list is “Goat”
I also tried using hooks of different shapes and sizes, made from wire of different diameters. Last season I experimented a lot with this, but to form the body I used lead wire winding. And I came to the following conclusions. The thicker the wire of the hook, the easier it is to work with it, the lower the risk of its breakage during various manipulations during its manufacture. But at the same time as the thickness of the wire increases, the catchability of the bait also decreases.
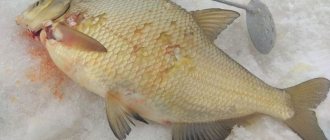
You lower such a “fat girl” into the hole - and there is silence. I even used an Aqua-Vu underwater camera to make sure there were fish - the bass were swimming calmly. But it doesn’t react to thick hooks, and if it does, the hook rate is also lower.
I don’t rule out an explanation for this phenomenon: beads strung on a thick wire move more poorly along it, thereby not making the jig attractive. Therefore, all subsequent baits were made only on hooks No. 12 and 14, which have thin wire, in the range of 0.4 - 0.65 mm. True, I slightly changed the shape of the hooks so that the hook section had a slightly smaller radius of curvature. Regular round nose pliers are excellent for this operation. And the only thing that needs to be taken into account is that you need to bend very carefully, gradually moving along the hook - excessive load leads to breakage.
To make the “Goat” I used two hooks of the same size. On one of them I broke off the loop. And on an abrasive stone I slightly rounded all the edges on the fracture surface. And in order to give the required angle of rotation of the loop on the other hook, I slightly released the metal in this place, heating it in the flame of a match. And after that, he turned it around the longitudinal axis by about 30 - 40° (photo 16), so that after assembling the “Goat” the loop would look in the middle between the points of the hooks.
Before soldering, using an abrasive (both a block and sandpaper will work here), I applied marks on the forends of both hooks - extra burrs on the metal strengthen the soldering. However, during this processing, damage to the sharpening of the tip and, especially, the surface of the loop should not be allowed. Otherwise, microgrooves will cause the line to break.
After bending work and estimating the general shape, I clamped both hooks in a vice to very carefully make one layer of copper wire winding from stranded wire, and lightly soldered it (photo 17). After this, I turned the hooks with force, setting the desired angle between them (photo 18). To accurately fix this desired angle, I stuck both hooks into the end of the block on which I soldered. Soldered with acid and regular POS type solder. Then he fixed the workpiece in pliers, which, in turn, were clamped in a vice. And only having securely fixed everything, I made the winding with a piece of tungsten wire (photo 19).
If the copper pre-winding and soldering were done carefully, then the tungsten winding could also be done carefully. But again, only in two layers (photo 20). The third layer, as on the “Devils”, was made first on the conductor, and then fixed with resin on the bait (photo 21).
I also tried this option for making the “Goat”, when at the preliminary stage I strung a bead or ball onto a hook without an eye. And with such equipment he carried out all the stages outlined above. True, such a half-assembled “Goat” is quite difficult to work with - especially problems arise during fixation, when you wind the tungsten wire.
To simplify manufacturing, I did not bend the section of the fore-end. And winding with tungsten wire gives the body of the bait the appearance of an elongated cylinder.
Last year I tried a couple of variants of the “Goat” while fishing - with a body of exactly this type and with one where, after assembly, this cylinder is slightly curved. I didn’t find any difference in the catchability of these two baits. Therefore, in the next batches, the bodies of my “Goats” are only in the form of a column with minimal bending (photo 22).
Winding with tungsten wire can be started from any side of the double, this is not important. On all the baits I reeled from the trend (that’s what anchors call the place where the lower ends of the horns and the lower part of the spindle meet), and not from the very beginning, but slightly retreating. And already near the loop I made a neat transition to the second layer. The second layer was lowered a couple of turns lower, to the trend itself, in order to remove the beginning of the winding and, most importantly, the protruding tip under it.
Last year, an acquaintance who also decided to take up the “mothless” thing found one very interesting thing on the vast expanses of the Internet. Probably, those who themselves are engaged in tying fly fishing “flies” know about it, but for us, non-reelers, it was a revelation.
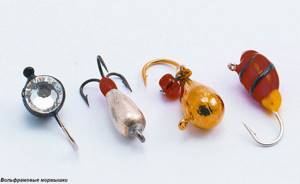
We are talking about tungsten blanks “shrimp” or “caterpillar”. They look like these shapes (photo 23). They already have a groove for placing a hook (photo 24), which can be glued there. But, as it turned out, tungsten is already coated with something and can be easily soldered with acid without any additional processing (photo 25). These "caterpillars" are sold in two colors and four different weights. After some thought, I took only the three largest ones - and with their help I made several experimental baits, the first of which was “Goat” (photo 26). You could say that I succumbed to the completely natural temptation to make the bait as small as possible and as heavy as possible.
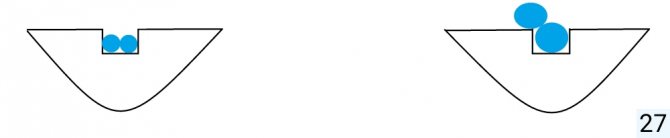
But here the following dilemma immediately arose. Photo 27 schematically shows a cross section of this load. The width of the groove is such that only two thin hooks fit there normally - with a wire diameter of no more than 0.35 mm. I bought a small bag of similar hooks to try. And I was disappointed - the steel was very hot. I tried to release it very pointwise in order to give it a normal shape, and at the same time carefully place it in the groove. Outwardly everything turned out well. But the very first tests on perch led to a fiasco. Out of three jigs made, three broken hooks after only five to ten bites. As a result, I abandoned hooks made of thin wire. And he took a simpler path. The hook, on which the loop remains, was placed in the groove. And the one without a loop was already attached nearby.
I also had to solve the second dilemma: what kind of jigs should I make, with or without a body kit? I did both options. The first is simplified, this is when the “Goat” is simply assembled without a “body kit” - in order to paint the finished bait and then equip it. Option two - immediately put beads or a ball on a hook without an eye (photo 28). This made the assembly process somewhat more complicated, but quite tolerable. But I received a non-removable body kit.
To secure the load, I made a V-shaped recess in the block with a knife, into which I inserted and lightly pressed the “caterpillar” blank with a hammer. Next is applying soldering acid, tinning the surface and filling the groove with tin. For this batch, “Koz” chose one medium load and three minimum loads. I really wanted little “Goats”.
I also chose hooks of minimal sizes. I made a couple of sets with No. 12, and all the rest with No. 14. Of course, working with them is quite difficult, given their miniature size. This time I almost didn’t bend the hooks, except that I slightly tightened the loop, and on one of them I changed the angle of the hooking section so that the bead wouldn’t come off. I was wondering about the possibility of using hooks of different sizes in one “Goat” to compensate for the fact that they are buried differently. But I decided that this would be unnecessary. You can successfully animate such a bait.
I placed sequin washers on a couple of blanks to fix the beads (photo 29), but in the end I managed to avoid frying only one with the soldering iron. The work is too delicate, and my soldering iron is powerful, but the tungsten heats up quite quickly.
When making an empty “Goat”, a hook with an eye was fixed on one side with a piece of tungsten wire, threading it through the eye, and on the other, a pair of needles was placed to limit the angle of the hooks (see photo 25). After soldering, the main thing is not to rush: tungsten has a very high heat capacity - and tin cools very slowly.
When it came to the “Goat” equipped, the hook with the eye was also fixed with wire, but the second hook with beads or a ball was put on a toothpick - and so it was soldered (photo 30). Such hard contact turned out to be the most technologically advanced. In principle, the work is not difficult, but it requires good eyesight and some soldering iron skills. But I think any needleworker can easily master it.
I also worked out another option for making the “Goat” from ready-made doubles. Two models No. 14 Kamasan were used, they are also from the salmon-trout series for fly fishing (photo 31).
One type of hook just fit perfectly, but on the second I had to bend the eye. Everything worked with it only after heating it over a gas stove. From these hooks I have so far made four experimental “Goats” of different weights - from 0.56 (photo 32) to 1.13 g (photo 33). For one I used tungsten wire winding, and for the other three I used different tungsten “caterpillars” (photo 34). This option for making baits seemed to me the simplest.
How to tie tungsten jigs correctly
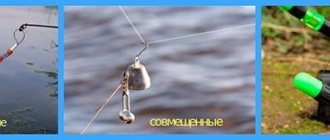
Three categories of knots have been developed for how to properly tie a jig with an eye:
- Rigid tightening knots covering the ring with strong fixation. Recommended for use on thin lines.
- Loop knots that slide freely along the line loop are used on reelless gear.
- Hook knots, which are a compromise between loops and rigid knots. The strength is higher than on a loop, but lower than a rigid knot. Similar units are also used for attaching jigs without loops, with a hole.
Single hook lures
While exploring the practice of making tungsten jigs on the Internet, I came across a method for wrapping a hook with wire. In an article about making jigs using this technology, the author called them “Lesotki”. First, of course, words of gratitude to the author of the idea “Lesotok”. But it was not really possible to repeat his idea with tungsten wire with a diameter of 0.5 mm. In fact, it is very stiff, this tungsten wire, and in order to carefully lay it on the hook, you need to press it very hard with your fingers. And the force is such that a single hook, even made of relatively thick wire - about 0.65 mm - simply broke on the second or third turn. And when I tried to wind it on a tee to make a “Devil”, the turns turned out to be not very even. And in the end, the mass of the bait turned out to be almost the same as its lead counterpart, which is much simpler to make. Therefore, I abandoned the 0.5 mm wire and switched to 0.3 mm.
With her, everything turned out much easier, but, to be honest, it was not elementary. The wire is very springy, so all winding has to be done under tension, constantly squeezing with your fingers and not allowing it to unwind so that the diameter of the winding does not increase. At the same time, in order to avoid kinks, the wire cannot be held rigidly; it must unwind around its center. For this reason, it was not possible to wind wire onto a workpiece from a common reel. Having estimated the length of the piece needed for two layers, I immediately cut it off from the reel - of course, with some margin.
Particular precision cannot be achieved in this process; it is inconvenient to work with a short end, so you have to put up with the fact that somewhere around 10–15, if not more, percent of the wire goes to waste. But we can say that the resulting products are quite aesthetic (photo 35). And with a relatively small size, they have good mass, which allows them to be used even in windy conditions. This is the first bait that I tried to make on my own, from scratch, after reading how its author did it. Therefore, I made several jigs, again on hooks Nos. 10 and 12 for fly fishing “flies,” from 0.3 mm wire. The hooks themselves, depending on the size and model, are made of wire from 0.45 to 0.63 mm.
If there were no problems when winding on thicker hooks, then I had to work very carefully with thin ones. This is the only way I got two suitable layers of wire (photo 36). Depending on the size of the hook, you can make a jig from three layers of wire. I wound the third layer separately, on a jig in a screwdriver. And then, as I wrote above, I secured everything with Moment-gel glue or Norpol-type polyester resin with the addition of dye.
To prevent the first layer of winding from dangling or rotating on the fore-end, you need to do the following. Remember how Saikyo hooks have an eye bend? So, I wound the first layer of winding onto the bent part of the hook (photo 37). And from there he began laying the second layer. It turned out to be a kind of castle. The coil does not rotate and cannot move anywhere, even when you apply significant force to the body of the jig when releasing it from the perch’s mouth.
I read somewhere that it is recommended to bend the resulting body a little to bring the shape closer to the average “Banana”. I tried both options: I left it in the form of a nail, and I bent it, but I didn’t find any significant changes in the perch’s reaction to them. He willingly eats both. The main thing is to get into the theme with the color of the beads.
DIY tungsten jigs
Tungsten jigs occupy a special place in the arsenal of a winter fishing enthusiast. Due to the high density of this metal, they have significant mass with small sizes. When fishing at great depths and in strong currents, tungsten jigs are unrivaled. And, despite the wide selection of gear in specialized stores, avid fishermen prefer to use homemade products. Tungsten is a very refractory metal, and casting methods applicable to tin and lead are not suitable in this case. So serial manufacturers resort to all sorts of tricks, selling, under the guise of tungsten, jigs sintered from powder, which, in addition to the main component, includes various low-melting additives, and this significantly reduces the specific gravity of the product. You can get a jig from pure tungsten only by turning it from a blank. Therefore, let’s look at how you can make tungsten jigs with your own hands.
Soldering jigs based on Chinese tungsten weight
This, in my opinion, is one of the simplest ways to make jigs of the highest quality, because these loads were originally created for such operations. The tungsten blank has a very interesting shape. There are notches on its outer surface (photo 38), which, when moving in the water, create additional vibrations, undoubtedly caught by fish. And I think the radius of acoustic coverage of such a bait can be noticeably larger than that of a jig, the body of which has a smooth surface.
And on the flat side of the workpiece there is a groove for placing a hook. The manufacturer of these cargoes offers two color options - something vaguely reminiscent of coal, and the color of gold. I chose black for my installations because I plan to use mainly three color options: leaving the surface unchanged, this is one, covering it with black, this is two, and finally, covering it with dark burgundy manicure varnish. I tried soldering similar jigs in two ways.
Option one is using one hook. As with all other lures, I use the Saikyo trout series in sizes No. 10, 12 and 14 or Kamasan No. 14. As a rule, hooks No. 10 are intended for greater depths, since the jigs with them weigh more than a gram and size 16 - 17 mm (photo 39), which, in my experience, is close to the limit - larger baits very often do not attract perch. But Nos. 12 and 14 are the most popular and in demand. Therefore, most of my soldering is done on these hooks.
When making a jig from one hook, it is quite possible to assemble the bait with a “body kit”. Some samples of beads and small beads, as well as metal balls that are gaining popularity among Ladoga perch, have holes of fairly large diameter, through which a relatively small loop of hooks Nos. 12 and 14 easily passes, thereby significantly simplifying the task for the lure creator (photo 40) .
As a result, there is only one operation left - soldering - and everything is ready. True, you need to check how the moving element on the hook behaves. Doesn't it fall off the hook? And as a last resort, all that remains is to slightly bend the hook, creating a bend with a smaller radius on the underhing (photo 41). The soldering operation begins by coating all workpieces with soldering acid.
To increase the soldering strength, the hook fore-end can be pre-treated by applying transverse marks using an abrasive block, coarse sandpaper or a diamond file. I placed the tungsten blank in a groove sawn in a wooden block so that it rose slightly above the surface. To make it easier to fix the hook with a bead or ball on it, I used a regular toothpick. If a hook is soldered without equipment, it can be fixed to the workpiece by inserting a tailor's pin or thin steel wire into the eye (photo 42).
Another way to make jigs is to use two hooks. On one, the loop is broken off and the equipment is put on the fore-end in advance, and the second hook serves as a “donor” for the loop, i.e., it breaks off entirely by prying it off (photo 43). Only the length of the fore-end on both hooks should be slightly less than the length of the tungsten blank. Before soldering, I used an abrasive (photo 44) to grind the metal from both hooks onto a cone, or rather, a little with a wedge. So that there is some semblance of overlap. And this allows you to place this part of the forend in the technological groove and close it with solder on top (photo 45).
Which manufacturers make the best jigs?
It is very difficult to say exactly which company has the best jigs. Each of the organizations produces them in a huge variety and in a wide price range, trying to satisfy the needs of many fishing enthusiasts, who must independently choose the jig they need, taking into account specific fishing conditions.
It’s also a good idea to study the list of manufacturers before purchasing a tungsten jig. Read the characteristics, reviews and other data of each manufacturer. For example, first purchase one copy of a “drop”, “devil”, “ball” or any other type and test it in action in your own conditions.