Is it necessary? How far from the hook should I set it? What size should it be? What is its real return? Here is a constant set of questions that come to the editorial office every day about the shepherd.
I will try to answer them as simply and clearly as possible, but, first of all, it seems to me important to know what we are talking about. Who was the first to talk about shepherding? I confess that I have no idea about this, but in my opinion this person made a semantic error. In fact, if you consider only the words, you understand that this is a sinker that causes or indicates a bite (direct translation - “biting sinker”). This is partially true, but this is far from its only function: the most important is its influence on the forest, and especially on the bait. So it could be called a demonstration sinker." But why not make life easier and call it the “end sinker”: after all, it is nothing more than the sinker closest to the hook!
The simple fact of using this terminology allows us to answer the first of the questions: “Is it necessary?” In fact, it immediately becomes clear that unless you are using a rod with only one olive, the “last sinker” is present in any type of installation. Neither their size, nor their shape, nor the distance at which they are from the hook are of great importance: as soon as there are sinkers on the fishing rod, it means there is always the latter, and it is this that plays the role of a biting sinker. Does everyone agree with this definition? Okay, let's move on. Now we can take a closer look at what it actually serves.
As I just said, the main feature of the under-sheath is its influence on the presentation of the equipment, therefore the bait. Considering that it is the one that is closest to maggots, bloodworms or corn grains, it is easy to understand that it noticeably changes their behavior in the water mass, especially in the presence of a current. The larger the feed and the closer it is to the nozzle, the more the latter will tend to tend to the bottom. And on the contrary, the smaller the feed and the further away from the nozzle, the more the nozzle will fluctuate under the influence of water movement: it will acquire “natural” behavior, but - contrary to what is almost always written - this is not necessarily what contributes to more frequent bites.
These are the basic rules that everyone can understand, but if I stopped there, it wouldn’t be worth writing an article for D_clic. So the size and placement of the hook is paramount, but couldn't the same thing be achieved by using a large lead mounted far from the hook and a smaller one placed closer to the hook? Of course not, and these issues need to be analyzed carefully to determine the components that actually influence each of these two aspects. As for the distance to the hook, this can be the length of the bait dragging along the bottom, the type of bait, or the nature and visibility of bites, the latter depending on the size of the sinker, the type of bait used or the lifting force of the float. Although all of this is closely related, let's look at all the factors one by one.
Slack length
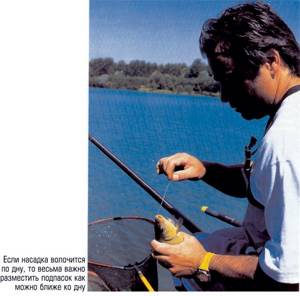
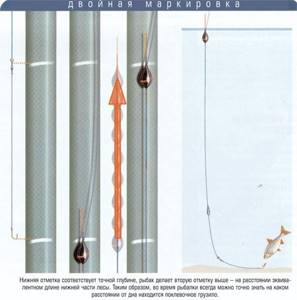
The longer the line lying on the bottom, the less the demonstration influence of the bite sinker. In order for this sinker to play a truly active role, it is necessary that it be as close to the bottom as possible and even at the very bottom, in an overhanging or other form. The importance of measuring the depth and subsequent adjustments immediately becomes clearer. Indeed, measuring the depth should not serve only to determine the position of the float, but also to determine the position of the sinkers, and especially the bite sinker. That is why, as I already wrote in one of my previous articles, it seems to me that after measuring the depth it would be necessary to always make two marks on the fishing rod: one for the float, and one indicating the real depth; and another higher, at a distance equivalent to the length of the lower part of the line, which would allow you to always know at what distance from the bottom the bite sinker is located.
Loading a float while fishing
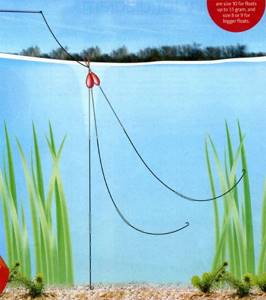
It is much easier to load a float near a pond. Use the same instructions, just make sure that the distance between the float and the sinker is as small as possible, otherwise when testing the weight in shallow water, it may seem to you that the float is unloaded, but in fact the weights will lie on the bottom.
An example of a poorly loaded float, too much of the float is visible above the surface. It will be difficult for the crucian carp to pull the bait down, it will feel resistance and spit out the hook. And you won't see any bites.
Bait type
It is a fact that the placement of sinkers in general, and the bait in particular, can vary significantly depending on the type of bait, simply because the behavior of the fish itself is not identified. The two extremes are, of course, bait with a lot of flour and groundbait. In the first case, the fish are concentrated at the bottom, and the main part of the sinkers should be concentrated in the lower part of the water column. But the bait is aimed at moving fish that move at all levels, and the weights should be distributed more evenly. Therefore, it is logical that for fishing with bait, the bait should be further away from the hook than for fishing with flour-based bait. But here we are talking only about general data: in practice, everything is much more complicated, in particular when fishing with bait, and when you start to lure fish, especially if you do it with a mixture that forms suspended clouds in the water, and this mixture is not very compacted. Then you find yourself in an intermediate situation, where the distance from the sinker to the hook is also related to the correct interpretation of bites, as well as the presentation of the bait.
Loading the float for lifting
This is a method of loading in which the fisherman does not expect the float to sink, but rather to surface above the surface. We highly recommend it when fishing for bottom fish such as crucian carp, carp and especially bream.
How to make the float rise when biting? Using three main pellets, load the float a little weaker than usual so that part of the body is still visible above the surface.
And then load the rig 10 cm from the hook and 30-40 cm from the rest of the pellets under the heap. The weight of this pad should load the float to the middle of the tip. When biting, the stock will rise first, thereby raising the float.
Character of bites
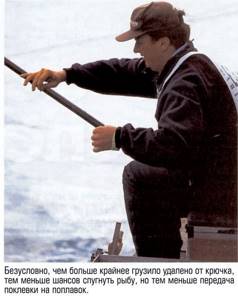
The closer the bait is to the hook, the clearer and faster the bite is transmitted to the float, but the greater the chance for the fish to detect it and, therefore, spit out the bait. Once again you are convinced that it is necessary to take into account one particularly changeable parameter - the mood of the fish! You can even come to the following paradox: the most effective placement of sinkers is not the one that allows you to better see bites. In this case, I don’t hesitate for a second: I prefer to have a little less bites, but few missed ones, than to spend time doing false strikes, or removing a completely sucked bait. The distance between the hook and the sinker is of great importance here, but the size of the sinker is still more important. The larger it is (and therefore heavier), the more the float is destabilized when the fish grabs the bait. That is why I am not at all a supporter of using very small pellets as a bite sinker, of course, with the exception of the case when using floats with very little lifting force.
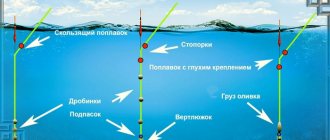
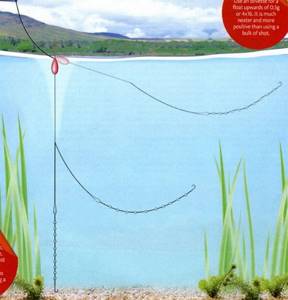
What is a shepherd
Typically, most anglers have a float loaded in accordance with its own weight . It reacts to bites, stays on the current correctly in accordance with its own markings, but does not have any particular sensitivity. This means that a cautious bite, like an active one, can be ignored by the fisherman.
What conclusion follows from this? The float must be loaded correctly so that it is able to respond to the slightest changes in the hook and bait. This will help you not to miss the moment of the bite of the most cautious fish and make a timely hook.
The so-called under-feed will help to load the float correctly. It plays a vital role in the equipment of fishing rods. This is the small pellet that is closest to the hook or jig. The equipment is made in such a way that the weight of the float is balanced not with one sinker, but with several pellets, distributing them along the entire length of the leash.
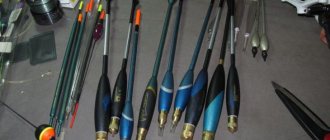
Float size
So, the largest bite sinker, but this does not mean that you need to put N 6 on a float weighing 0.5 g! I am absolutely convinced that the size of the bite sinker is closely related to the size Micro beads are used only with the smallest bobbers and a mud worm on the hook Large bait does not work well with a small bite sinker, and vice versa float, and vice versa, I have never been able to understand why install N 13 for a river fishing rod with a sinker weighing 2 g. Not only will such a sinker have no effect on the presentation of the bait, but how can moving such a small mass transfer the bite well to the level of the float? But, with the advent of large flat floats and fishing with rod locking, you can safely use huge bite weights (up to one or two explosives, i.e. from 0.40 to 0.80 g!). In the end, if you calculate the percentage difference between the weight of the bite sinker and the total weight of the fishing rod, in other words, if you install an N 10 sinker for a float weighing 1 g, then for a flat float weighing 40 g you need an SSG sinker (i.e. weighing 1.6 G!). It is worth dwelling on another issue, the diameter of the antenna, or the surface part of the float; It’s equally stupid to use a large sinker if the float has a thin metal antenna or fiberglass antenna, and to use an N 13 pellet complete with a plastic or bamboo float with a diameter of 2 mm for catching carp!
Loading the float rod
Alan Scotthorn. “Do you know how your equipment works?” Article from Angling Times Advanced
Five-time world float fishing champion Alan Scotthorn shares his experience.
Wherever you fish, to achieve the best results, it is very important to understand how the equipment on your fishing rod behaves in the water. The most important thing is that the loading pattern of the float rod matches the fishing conditions.
Usually fishermen try to find answers to some questions, the solution of which would help them catch more fish than their neighbors in the pond. But more often they have a limited understanding of how the loading schemes on their fishing rods work.
What to use - an olive with two under-grazing, or a two-part load, which should be more effective? Will a distributed load force the cautious roach to bite, or will a sparse main load make the bait delivery ideal? Will this affect the result of changing the load?
I have many years of experience fishing in the most inappropriate conditions. I have accumulated a lot of observations about the behavior and nutrition of fish, and made conclusions about how best to surround a float rod in order to imitate the natural supply of food.
I spent a lot of time talking with individual float fishing masters, and as I learned from their knowledge, I began to trust certain loading patterns. This trust arose from the fact that I began to accurately understand the behavior of these circuits in water.
I will try to simplify the story about loading a float rod as much as possible, without going through dozens of options in detail. Because the truth is this. In most situations, I stick to just half a dozen load types. Next, brief information will be given on each of the schemes I use, with a description of their advantages.
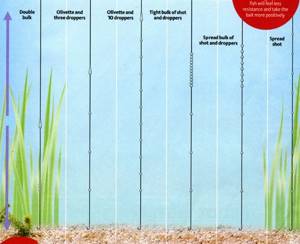
Distributed scheme
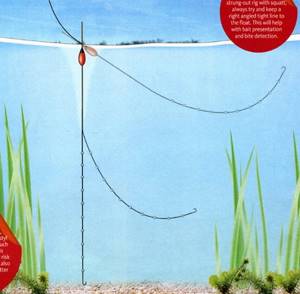
This load sinks in an arc, which looks completely unnatural for the fish, since in fact ordinary food sinks vertically downwards.
Alan uses a distributed rump only when fishing for falling small maggots. He believes that in this case the fish rushes about in the water column, picking up falling larvae, and the natural presentation of the bait is not relevant.
Tip: When squeezing pellets on a fishing line, use pliers with thin jaws or special pliers for pellets (steels). The pellet clamped by them will slide along the fishing line much more easily, and the risk of causing damage will be minimized. Also, the pellets will hold up better under loads when fishing for carp.
It will be news to many that I use a distributed load only for catching small falling maggots. I don't use a spread rod rump with any other bait.
Such a load, when immersed, behaves unnaturally. Imagine this: The float lies on the water away from the load, because if you lower the distributed pellets vertically, then the equipment will get tangled. As a result, the nozzle sinks in an arc instead of descending vertically to the bottom.
Now imagine supplementing the fish with food. Any food you throw on the float will sink strictly vertically downwards, or shifting in the direction of the water flow. But not in an arc. The fish located at the bottom will see the falling bait only if it moves in the direction of the float. In this case, the fish will not take the bait, since its fall looks unnatural.
I have successfully fished with a distributed load for small maggots many times and cannot explain the behavior of the fish other than its activity, while the fish quickly grabs light sinking larvae, which can be carried by movements (flows) of water in different directions.
The slow immersion of light larvae forces the fish to rise higher in the water column in order to get ahead of competitors already in the middle layers, preventing the bait from lying on the bottom.
In this case, supplementary feeding plays a major role. It is more important than the method of feeding the nozzle. If you supplement correctly, you can neglect feeding the bait, but this is not possible with any other bait. This is just my theory, although it may be somewhat contradictory, but it works well.
I am surprised by the large number of fishing enthusiasts who make a starting feed of 10 dense balls of bait, and then fish with distributed equipment. This method, I think, contradicts the very essence of this method of feeding fish, which concentrates the fish at the bottom.
Here, the distributed load of the fishing rod only slows down the fishing and reduces the size of the caught fish, since the slowly sinking bait attracts mainly small fish, which were forced out with bait and are located in the middle layers of the water.
To ensure the required fishing speed and quick delivery of the bait when fishing at great depths, I suggest placing a group of pellets closer to the hook and installing a more lifting float.
I think that a float with a carrying capacity of 0.5 grams, loaded with small distributed pellets, is not reasonable to use at a depth of 2.5 meters. The first three to four feet of drop bait are completely useless unless the fish are feeding in the upper layers of the water. But even in this case, I would fish more intelligently, setting the descent to the depth at which the fish feed.
Tip: Always try to understand how your rig works. If you are getting more bites when you put your rig on the water in a certain direction, try to understand why this is happening.
Two-part loading
Tip: This is one of the most effective loads. If you hit a fish, then with the help of this weight you quickly feed the bait and get effective bites. As an active fan of fishing with a float rod, I never stop trying to take the maximum amount of fish from my sector. Whenever possible I use a two-part load. If this load corresponds to the fishing conditions, then it will add extra pounds to your catch.
The two-piece weight is very effective and is my favorite weight when dealing with active fish. This load very quickly delivers the bait to the fishing point, and the bite indication is much clearer than when using other schemes.
Use this type of fishing rod when the bite is active, and you are guaranteed to save seconds of time on each fish. Now think about the number of fish and these seconds will add up to minutes, and over the course of the whole day they will add several extra kilograms of fish caught to you.
If, after lowering the equipment, a bite immediately follows, then it’s time to use a two-part load. I start fishing with a rod loaded with one olive and three distributed pellets. And if I detect an active bite, then I move the entire shot towards the leash. By the way, note that the length of all my leashes is 18 centimeters. This is necessary so that the last stage of immersion of the equipment looks natural, reducing the number of empty bites to a minimum.
The way you place your equipment on the water is of great importance. Try to make sure that the equipment sinks vertically, while ensuring that the angle between the keel of the float and the axis of the olive is as small as possible.
In my case, the olive and pellets sink quite quickly. But the last 18 cm of the rig sink naturally. You will be convinced many times over that the fish will bite confidently, and you will be able to fish faster than any of your neighbors. I know some anglers who, for high-speed fishing, place two or three pellets 5-7 cm from the hook. My closest pellet to the hook will always be, except when fishing for minnows, no closer than 18 cm from the hook.
I am convinced that a two-part load is very effective, especially when fishing for bloodworms (small or large). I always fish with this bait at or near the bottom. That is, this loading scheme is also well suited for high-speed fishing over bait.
Tip: With a two-piece cast, use a float with a wire keel, this helps keep the keel and line aligned because the wire keel adds weight and stability to the float.
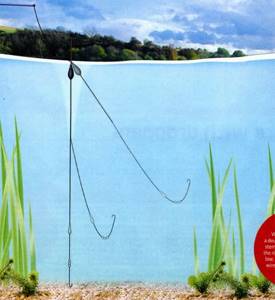
Olive with shepherds
Tip: Use olives with floats with a carrying capacity of more than 0.5 g. An olive is more efficient and neater than a group of pellets as the main load. My favorite loading pattern is an olive with three #10 pellets placed below it. I use it in many situations, excluding river fishing. I usually start fishing with this pattern. If it turns out that the fish is being caught well, then I simply move all the pellets to the leader and thus get a two-part load.
In a situation where the bite is far from “mad”, but the fish is still caught, I leave the pellets in their places. I think three evenly spaced #10 pellets provide a slower drop of the bait that the fish can see. At the same time, the registration of bites still remains quite clear.
Also, the advantage of this scheme is that it is trouble-free. Such a rump does not get confused like more complex distributed loading schemes. Success here lies in the equal distance between the pellets. This is necessary so that the pellets cannot make pendulum movements relative to each other and get confused when laying the equipment on the water.
I always start fishing with an olive and three pellets, together with a float of 0.5 grams or more, unless I am fishing on a river. But sometimes it is extremely rare to fish on paid reservoirs, where a float larger than 0.5 grams becomes in demand. I usually add the main weight with shot.
We must not forget that when fishing in deep places, you should use sliding olives. They do not shoot back, as happens with “deaf” olives stopped by silicone cambrics when fishing for active carp. All my olives from Drenanna exactly correspond to the declared weight and their purpose.
For river fishing I will again use an olive and a few pellets. But now my shipment will include, for example, 10 pellets No. 10. This used to be my biggest secret and no doubt helped me achieve many victories.
The fact is that the movement of water causes a significant deflection of the fishing line between the pellets. For example, if there are only three pellets installed on a certain segment. As the number of pellets on the same section of fishing line increases, the gaps between them will become smaller, and therefore the bends of the fishing line will decrease.
When fishing, I always try to make the bait behave as naturally as possible. But it is also necessary to notice the largest number of bites.
With more pellets, I can hold the rig if necessary and thereby swing the bait in the flow of water. By performing this action, I can always determine the position of each pellet by the behavior of the float.
All this is very similar to fishing with falling small maggots. When you try to keep the line taut between the fishing rod and the float, and at the same time you should notice the fish intercepting the bait in any water horizon.
Tip: Use sliding olives to catch carp. They do not shoot back from a loaded line when fishing for lively carp.
Group of pellets with additional shepherds
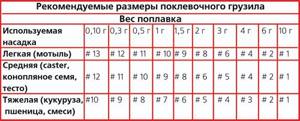
Tip: Don't put too small pellets. Alan's choice: shot number 10 for floats up to 1.5 grams and shot number 8-9 for floats of greater buoyancy. The use of several pellets makes the tackle universal. Because the pellets can be redistributed at your discretion if the bite is not decisive and you want to use a new bait feed. Do not forget that pellets moving along the fishing line can damage it.
Tip: If the bite is active, move the pellets together, then the equipment will sink to the bottom faster.
A few pellets sink slower than an olive. This means that this weight allows you to more naturally present the bait to fish that feed near the bottom. This weight also gives the fish more chances to notice the bait. Loading with pellets is universal.
Dispersing the load for a smoother and slower delivery of bait can be achieved by surrounding the tackle with shot. If you use olive, this is impossible. It can be moved up or down along the line, but cannot be separated. The shot also makes the nozzle feed softer. If we use a distributed main load, then the fish, when taking the bait, will feel the weight of the load less than if we made the main load in the form of a tightly assembled group of pellets or an olive.
But using multiple pellets in a group brings its own challenges. If a group of pellets are used that are not in contact with each other, then the load will be prone to entanglement.
Also, moving a lot of pellets along a line can damage that line. I want to say that when I started using pliers to clamp the pellets onto the fishing line, this problem ceased to exist in most cases. I still load floats up to 0.5 grams with shot, because I only use lead shot, and its use in sizes larger than number 8 is prohibited.
I don’t need a long chain of small pellets because I waste the time it takes to move the pellets along the line. Since I am an athlete, I have to manage my time wisely. I'd rather have a different rig to suit my needs instead of moving these pellets around all day. This additionally saves me minutes, which translates into additional weight in the cage by the end of the fishing trip.
Let's summarize the results
The diagram shows Alan's placement of shot and olives on the lower third of the rod rigs. There is no doubt that these are very general tips, but they will help you take your first steps in fishing with a float rod.
Two-part loading.
It implies the presence of a main load, usually in the form of an olive and a group of pellets used together as additional graze. It’s a good idea to use such a load when bites occur one after another, because such a load speeds up fishing.
Olive with three pellets.
Presented as the original equipment for fishing in deep places. It is more often used with three feeders to ensure a fairly slow fall of the bait in the last 60-90 cm. In addition, it makes sense to use an olive instead of a group of pellets in shallow places with light floats if you want to feed the bait to the bottom faster.
An olive with a string of pellets.
The potential of this loading scheme is most fully revealed when fishing in rivers. A large number of pellets reduces the gap between them and the kinks of the fishing line that occur under the force of the water flow.
A group of pellets with pods.
The main load of pellets sinks slower than one olive. But this scheme is more universal, because the pellets, unlike olives, can be dispersed along the fishing line. More often, floats with a carrying capacity of up to 0.5 grams are suitable for loading pellets. Because larger floats require more pellets. It is taken into account that moving 10 or 15 pellets can very easily damage the fishing line and reduce its strength.
Distributed load.
Very good when the fish bites on a falling bait, provided that small shot is used. I don’t think that at depth the fish notices the bait falling from the very surface. Therefore, excluding fishing for small maggots, I use more effective patterns and focus on presenting the bait in the lower third of the distance.
Tip: If you are missing bites with a rig that is loaded with pellets pushed together, try spreading the pellets apart. Then the fish will feel the weight of the load less, and bites will become more confident. “The science behind… shotting patterns” by Alan Scotthorne from Angling Times Advanced.
Nozzle type
In the water, the bait - or rather the hook with the bait - has a certain weight that must be taken into account. The mass of the mud worm can be neglected, since more than 95% of the worm consists of water. It’s a completely different matter when it comes to wheat or corn grains. Therefore, it seems to me important to use a bite weight that matches the weight of the bait, i.e. do not put N 13 if the bait is corn, and vice versa, N 6 if the bait is bloodworm on N 22. I emphasize that in this case, this has nothing to do with the size of the float: thus, for specific fishing for carp, for example, you have to use a fishing rod of large diameter, a large hook with two grains of corn, but a float whose mass does not exceed 0.30 g. So, in this case, you can safely use a bite sinker N 8 and even N 6. Trying to be more clear and precise, I I intentionally omitted various factors that influence the choice of a bite sinker, but do not forget that in the fishing process all these factors are closely intertwined. However, don’t grab your head; after all, if there’s no bite, it’s not at all difficult to change or move the sinker!
Nicolas Beru
Article from the site https://matchfishing.ru
Choosing the right floats and fishing line for your rig
Before learning how to ship a sliding float, you need to choose the right equipment, focusing on a number of factors.
Domestic and foreign manufacturers of gear offer a huge variety of universal and special accessories, when selecting which it is necessary to take into account the following factors:
- fishing conditions and features of the fished reservoir;
- weather and fishing season, reservoir depth and fish activity;
- level of fish activity and chosen fishing method;
- materials for making the float and properties of a particular model;
When choosing a fishing line, it is necessary to take into account its rigidity and strength, the presence of so-called shape memory, the color and thickness of the equipment.
Features of fishing with a fly rod
The main features of fishing with moss float tackle are the following.
Constant line length - unlike Bolognese and match gear, when fishing with a fly rod, the length of the equipment is constant and cannot be quickly shortened or lengthened if necessary.
Storing equipment separately from the rod - fishing equipment is wound on a reel and transported separately from the rod in a compartment or pocket of the tackle case. The equipment is attached to the tip of the rod using a connector and a shock absorber.
When choosing a connector, you should pay attention to the fact that it fits the tip of a particular fly-float rod. In addition, the connector should not have sharp corners or joints that could rub the fishing line attached to it.
Light weight of the tackle - due to the absence of guide rings, a reel seat and the reel itself, the tackle is light in weight, making it easier to fish with it.
The use of thin equipment and light and medium floats - most often when fishing with a fly rod, fairly thin fishing lines and small alarms are used, which makes it possible to make the equipment invisible in the water, but at the same time very sensitive.
Concentrated loading involves fixing several loads at one point on the line; for distributed loading, the loads are attached at a certain distance.
What is the correct loading procedure?
By watching the proposed video on how to properly load a float, you can visually familiarize yourself with the loading technology used. This simple method will help you quickly and easily, at home, prepare different gear tied to a fishing rod, ensuring the effective operation of the equipment used:
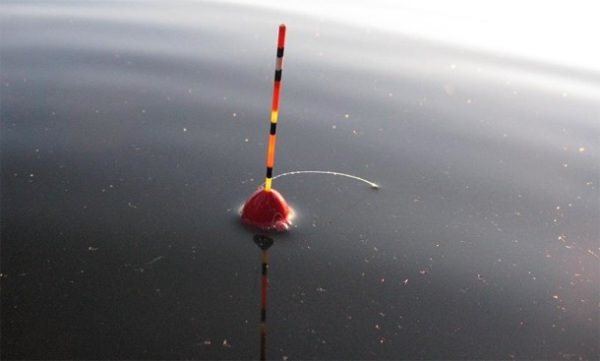
- underload, characterized by the use of weights of insufficient weight, while the float buoy is visible above the surface of the water;
- overload is easily determined by the significant immersion of the upper rod of the float under water, which leads to the fish disappearing.
The correct weight of the float is considered to be the state when only the antenna of the float is visible above the water surface, and its buoy is completely immersed in the water.
The loading procedure can be carried out at home, but for proper and accurate preparation of equipment, it is recommended to carry out this process directly on the pond, before starting fishing.
We invite you to read: How to salt mackerel at home quickly and tasty
At home and as a fisherman, there is a practical opportunity to prepare several tackles at once by attaching a fishing line with a weight or weights and a hook to a float. To properly prepare the gear, it is necessary to take into account a whole range of factors, to which experienced fishermen include the following nuances:
- correct selection of the weight of the load used;
- the weight of the hook used, selected for the tackle;
- the bait used and its activity under water.
Even with insignificant weight, the bait and hook can throw off the setting of a float made at home, so it is better to stock up on several ready-made tackles.