The palette depends on the colors of the insects living in a particular body of water. The fly is tied on a hook, supplemented with a lead wire weight. Grayling and trout bite well on this bait.
Fantasy baits are similar to insects, but may not have real prototypes in nature. They are made in any color range, different sizes and shapes. Catching fish with a fly created based on your imagination will be successful if you take into account the food preferences and behavior of the predator. Fishing with fancy bait for pike perch is effective.
Emergers imitate various insects at the stage of transformation from pupa to adult. Grayling can be successfully caught with this bait, especially when it’s mayfly season. The creation of emergers is a separate direction in the manufacture of flies.
Spinning fishing
Catching fish with a fly equipped with a spinning rod has its own characteristics. For this you will need:
- rod from 3 to 3.5 meters, medium action;
- sinker – the main element of equipment;
- braided or monofilament fishing line;
- leashes;
- coil;
- flies;
- double hook.
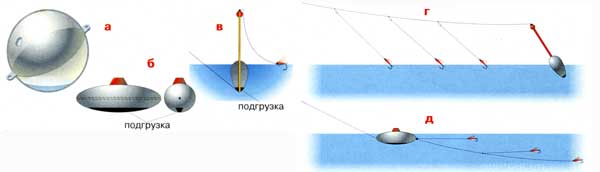
The sinker plays a special role. Its weight is selected depending on the characteristics of the reservoir. Instead of a sinker, many use sbirulino or a medium-weight bombard (20-50 g). Sbirulino can be floating, sinking or slowly sinking. A sinking float is suitable for pike perch, as it loves depth. It is advisable to catch grayling and trout using floating sbirulino.
Installation of the gear is simple. This can be done in two ways:
- The fishing line with the leash is attached after the sinker located in front.
- The sinker is hooked at the end, and the leashes are in front of it.
The first method is suitable for shores washed away by currents and deep-sea holes. The second one is more common and convenient for guiding along a flat bottom.
When fishing with a sinker, a fishing line is wound onto the reel. Its free end is threaded into the hole of the float and a loop is knitted. A leash of about 2 meters is attached to the main fishing line. Along it, a row of 3-4 short leashes (from 2 to 5 centimeters) is mounted to the rod. The flies are attached to the end of the leashes. Tackle with a sinker is suitable for fishing near the bottom. The movements of the bait should be sharp and active.
In medium and high layers of water they fish using heavy floats. They can be mounted as a weight - before or after the leash. But when assembling such gear, they use one long leash, at the end of which a fly is attached. It is attached to the fishing line using a swivel. The bait is baited slowly, with smooth movements.
Front sight and spinning rod
Ballerina Sinker
The key point when selecting tackle using flies is the selection of the sinker. Considering that its main task during the hunt will be to move along the surface of the bottom, the optimal option for a weighting material is a spherical or pear-shaped shape. If fishing is planned in an area with a strong current, then choose a heavy sinker, and to catch prey in calm water, choose a light one. The shape and weight of the sinker directly depend on the specific fishing conditions.
For information! A “ballerina” sinker, made of wire material, with an eyelet at the end, is good because it reduces the likelihood of snagging.
Spinning equipment:
- Rod . The length of the fishing tool is 3-3.5 m, the action is medium. For fishing in overgrown areas of the reservoir, it will be important to use a light spinning rod 1.5 m long, and for fishing hard-to-reach places - a soft rod with a light weight.
- Reel _ The model used must be from a trusted manufacturer and equipped with a smooth handle.
- Hooks . For fly fishing, it is more rational to use a double hook; it is more reliable, unlike a tee, from which the prey can easily get off (shake off). Another advantage of this choice is less snagging in dense vegetation.
- Main line . When catching fish with a fly, it is good to use monofilament or braid. If you use a braided thread, the sensitivity of the gear increases. And in the case of monofilament fishing line, the artificial insect begins a more active and interesting game.
- Float . A plastic version in the shape of a teardrop will be most successful here, where its narrow part goes to the fly, and the thick part goes to the rod. But devices that are spherical or thick in the center are quite appropriate.
- Leash. The length of the leash is adjusted depending on the type of bait used; it can be 1.5-2.5 m. The material used is monofilament, conical undergrowth.
There are two ways to assemble the gear:
- The leash is mounted first, and the sinker second. This option is effective when working on a flat bottom surface.
- The sinker is fixed first, and then the fishing line and leash. This is an excellent piece of gear for fishing from the coastal zone.
Options for rigs for spinning rods with a float
Assemble the rig as follows:
- Attach a “ballerina” to the thread wound on the spool.
- Attach 2-3 leashes up to 5 cm , or 1 long one. It is best to use short leashes that prevent tangling of the line during fly fishing.
If the sinker will be fixed at the end, then mount it on a thread of smaller diameter than the main one. This approach will prevent the fly from breaking off when hooked. When catching predators or other fish in the upper and middle layers, it is more advisable to use floats rather than sinkers. They are mounted both in front of the float and behind it.
Depending on the fishing conditions, the technique is also selected.
Fishing techniques on rivers (on the current)
The cast is made upstream, when the sinker is at the bottom, you need to select the line until it bends slightly.
The work of the load is carried out due to the force of the water flow; the main thing is to control its approach to the coastline and the watercraft. Artificial baits, moving with the current, do not frighten potential prey and make it want to attack it. When moving the fly with the current, the work occurs on the surface. Casting should be done perpendicular to the coastal zone. There is no need to choose a fishing line here; the flow of water will carry it out on its own. The bait should be started when the sinker, having reached the rod, is directed towards the coastline. The main thing is that the fly should remain in the upper layer and periodically appear on the surface. This behavior of the bait almost immediately attracts the attention of potential prey.
For information! Casting bait on a river should be done at an angle of 45 degrees, while keeping the line above the surface.
Fishing in still water
Wiring on lakes and ponds is carried out by yourself. Being on the shore at an angle to the water flow, the bait is cast obliquely. To attract fish, the artificial insect must be frozen for some time, after which it must be gently shaken with the tip of the spinning rod. If there is no bite with the left hand, stretches are made through the index finger on the right. To avoid discomfort when fishing, you must choose a promising place on the site without excessive vegetation.
Technique "boat" and "pull"
You can fish with a fly using different gear and methods. It all depends on what kind of fish the catch is planned for. But, with any technique, the hook and fly are selected depending on the size of the prey. The smaller it is, the smaller the bait.
One of the old ways of fishing with a fly is the “boat” or “water kite” technique. It is suitable for rivers with current. Required gear items:
- main line;
- additional fishing line for leashes;
- floating body made of foam or wood;
- a few flies.
The main fishing line is tied to the plywood or foam structure. Along it, leashes (from 20 to 50 centimeters) are attached, to which flies are attached. The main line is tied to a spinning rod or a simple peg driven into the ground on the shore. With a spinning rod you can fish upstream and downstream.
The “boat” is thrown away from the shore so that it begins to move in the direction of the water. The flies jump after the moving body, attracting the fish. This bait is good for catching asp, pike perch, grayling and other schooling fish. First, you can use several different flies, and then determine which ones lure prey better. To quickly and easily change leashes, loops are made on the main line for attaching them.
The “pulling” technique is possible with two spinning rods. They are placed on different sides of the river, and the main fishing line with leashes is pulled between them. You need to fish this way together, moving slowly along the banks. Each tackle is controlled by one person.
If there is no partner, then the second end is attached on the opposite bank to a stationary object using a rubber shock absorber.
On large rivers they do a “pulling” with two boats. During the flight period, insects are caught using dry devices, raising and lowering a fishing line with leashes, imitating the flight of flying creatures. The rest of the time they use streamers or wet flies. This technique is good for catching ide and chub, but using “pulling” you can also catch bleak, grayling, trout, pike perch, asp, rudd and other fish.
Source: fishelovka.com
Fly in spinning and fly fishing
There are several differences in tying a fly when fishing with a spinning rod or when using the overlap method.
Spinning fishermen mainly use the following method of tying bait:
- At the first stage, you should securely attach a special weight (Tyrolean stick) to the main fishing line. The attachment location is chosen by the fisherman - either to the fishing line itself or to the winding ring. The second method is considered the most acceptable; it allows you to create a reliable connection that practically does not wear out on the rocky bottom of the reservoir in which you are fishing.
- At a distance of 10-15 centimeters from the fixed sinker, a lead is made; its length can be 10 centimeters or more.
- At the end of the leash, the bait is directly attached - the selected fly.
In fly fishing there are quite a few ways to attach a bait; below we will consider the most popular attachment methods.
Fly in spinning and fly fishing
Features of grayling fishing in August in Siberia
Spinning fishermen equip their fishing gear as follows:
- The main fishing line is taken, which is wound on a reel.
- A Tyrolean stick is tied to it. The Tyrolean stick is a specially shaped weight. It is attached both directly to the main thread and through a winding ring. The second fastening option is more durable, since it practically prevents abrasion of the nodal part on the rocky bottom of the reservoir.
- At a distance of 10-15 cm from the load, make a lead leash, 10 cm long.
- A fly is attached to the end of the leash.
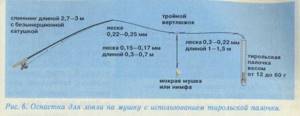
Fishing equipment with Tyrolean stick and fly
In fly fishing, the bait in question is tied directly to the main line. There are a lot of ways to do this. Let's talk about some of them.
Methods for tying a fly to a fishing line when fly fishing
Once you have chosen a method of fishing and have made or purchased a suitable fly, you can begin to study methods for securing the bait. A correctly executed knot will not allow you to lose the bait while fishing.
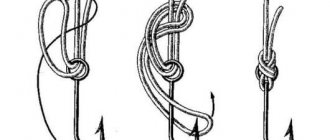
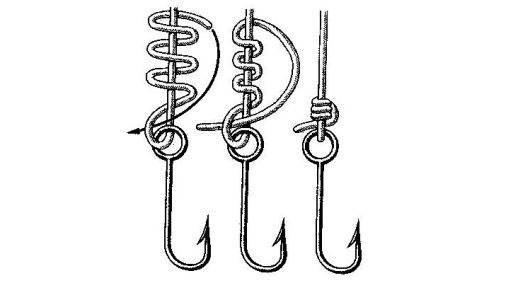
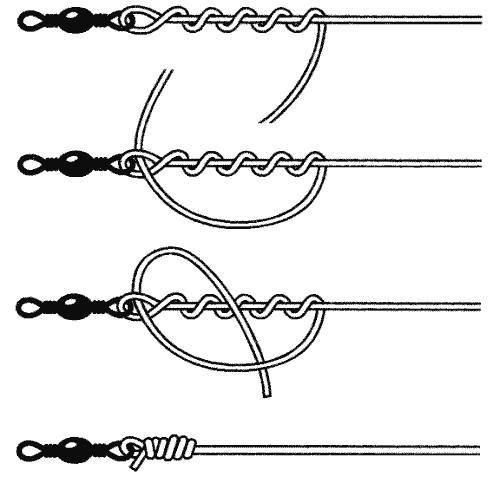
Clinch Knot
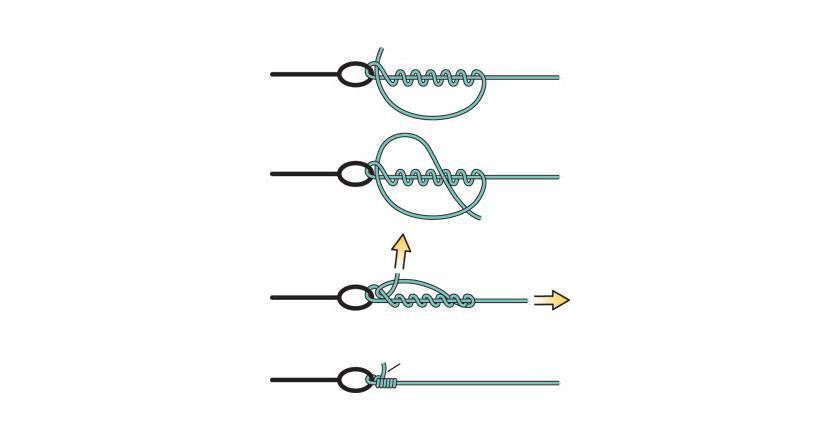
It is distinguished by its characteristics of strength and reliability ; most often it is used by American fishermen to secure bait.
The process includes the following steps:
- We secure the hook so that you can freely access the fastening ring, thread the end of the fishing line from the reel through it and form a loop at the end.
- Then, with the same end, perform 5-6 revolutions around the main axis of the fishing line.
- At the final stage, we thread the fishing line through the loop formed at the very beginning of the process.
- The final tightening is carried out using the main cord. Make sure that the final knot is located as close as possible to the fixation point.
- We carefully inspect the fastening and trim all excess sections of the fishing line.
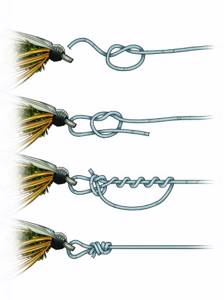
Davy knot
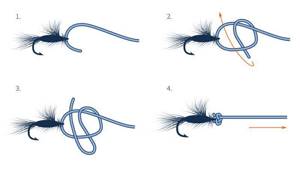
There are two types of knot - single and double , both are simple and allow you to securely attach the fly to the fishing line.
Working with a single node involves the following steps:
- First of all, we thread a free piece of fishing line from the reel into a loop above the hook, then we form a simple loop at the end.
- We thread the cord into the formed loop.
- The lower part of the loop is wrapped with fishing line, the tip is inserted into the loop and brought out from the opposite side.
- By gradually tightening the main cord, you get a knot that is fixed at the very base of the hook.
- At the final stage, it is important to carefully trim all protruding ends of the fishing line, as they can scare away the fish.
A double knot is a variation of a single knot, which allows you to attach the fly to the fishing line even more securely. Instructions for executing the node include the following steps:
- The first 4 steps are repeated with the steps from the instructions for tying a single Davy knot.
- An additional turn of the fishing line is made around the main cord, then the tip is again inserted into the ring.
- Gradually tightening the main cord, you get a knot formed at the hook ring.
- All excess fishing line is removed.
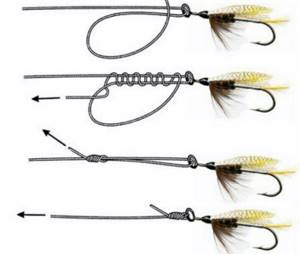
Siberian Knot
The main difference between this knot and all the others listed in the article is that the front sight in relation to the main line is located at an angle of 90 degrees , and not 180 degrees. As a result, the tip of the fly is located on top, and not below, as with other methods of fastening, this allows you to perform hooks more successfully.
The Siberian style fly tying method includes the following steps:
- The bait is tied to the fishing line using any of the listed knots.
- We tighten the resulting knot onto the forend, while passing the end of the fishing line through the bait.
- Make sure that the bend of the hook and the fly itself are in the same plane, this will mean that the knot is made correctly.
Knot
The use of a sea knot allows the fly to slide relative to the location of the main fishing line . Using this method allows you to make the bait more attractive to fish. The mounting method involves the following steps:
- A loop is formed at the end of the fishing line, into which the tip of the fishing line is reinserted.
- A free piece of fishing line is threaded through the ring on the hook, then passed through the loop and wrapped around the fishing line. It is enough to make about 5 revolutions.
- The free end of the cord is again inserted into the loop that was formed in the first stage.
- The knot is tightened by pulling on the main line.
- All excess fishing line is cut off.
Gripping unit
The knot is considered the basic and simplest ; it allows you to achieve a strong and reliable fixation of the bait. Most beginning fishermen begin learning the basics of tying knots with the gripper.
To fix the fly on the fishing line, you need to:
- The free edge of the fishing line is threaded into the eye of the hook.
- Several turns of the fishing line are made around the axis of the hook.
- The free edge is threaded between the knots.
- By tightening all the elements are securely fastened together.
- All unnecessary elements of the fishing line are cut off.
Rapala knot
The knot received its name in honor of the one who invented it. The company specializes in the production of fishing gear and related products.
Step-by-step instructions for tying a hook:
- A loop is formed from the free end of the fishing line, which is wrapped at the end with the free tip.
- The cord is passed through the ring on the hook and then passed through the loop formed in the first step.
- The main cord makes three turns with its free tip, after which it is pulled into the loop obtained in the first step, then again pulled into the loop formed in the second step.
- All elements are pulled together to form a knot.
- Excess parts of the fishing line are cut off.
Triline node

The unit is characterized by increased reliability. To tie you need:
- The consolidated end of the fishing line is passed through the fastening ring twice (without tightening).
- The free section wraps the main line 5-6 times in the direction from the hook.
- The free segment is threaded into the formed ring between two turns of fishing line at the first stage.
- The main cord is pulled with force.
- Excess pieces of fishing line are removed.
Methods for tying fishing line to fishing line
Different diameters are connected to each other using different nodes. The following options are used when connecting two lines, the difference in diameter should not exceed 30%:
Albright
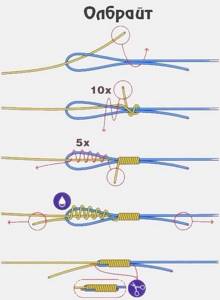
Albright
Peculiarities:
- The most versatile;
- The diameter of the line doesn't matter;
- Fixed on the feeder, spinning rod, float;
- Solid braid is popular.
Connects according to the following scheme:
- Choose a fishing line with the largest diameter.
- Fold it 2 times. In this case, the length should be 10 cm.
- Make a loop. Wrap one ponytail around the base 6 times.
- Its density depends on the number of turns.
- Make 3 turns inside the loop.
- Moisten and tighten the structure.
- Trim off any protruding ends.
Shkotovy
Clew knot
Peculiarities:
- Sliding and self-tightening. You can’t untie such a knot, you can only break it.
- The connected lines must have the same diameter.
The fishing line is tied in stages:
- Place 2 lines parallel.
- Tighten the loop at the bottom end.
- Pass the upper end of the fishing line through the loop.
- Connect the top and bottom cords.
- Pass the lower end through the loop of the upper one.
- Fix the nodes.
- Connect the nodes as closely as possible.
The maximum number of turns around the loop reaches 6 times.
Counter eight
Peculiarities:
- Connects identical fishing lines (the difference in diameter should not exceed 0.05 mm).
- Not recommended for connection through a rod ring.
Counter eight
It is performed in several stages:
- Place 2 lines parallel. In this case, the ends must match in length.
- Tie a knot at a distance of 20 cm from the end.
- It is necessary to ensure that the ends do not bend during tying and are parallel.
- Tighten the line.
- Cut off both ends.
If all steps are completed correctly, the loop will appear in the shape of a figure eight.
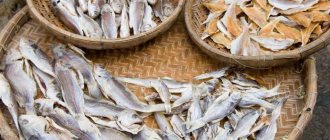
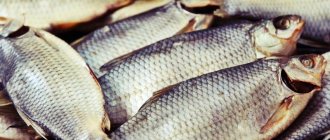
Review of catchable flies for grayling, store-bought and homemade models
Many anglers consider grayling to be a noble fish, the catching of which requires a very scrupulous approach. Any little thing that is underestimated by a beginner will lead to a complete fiasco in fishing. Of particular interest to anglers are flies for catching grayling. Having good sharp vision, the fish instantly notices inaccuracy in the artificial bait.
It is not for nothing that grayling hunters spend a lot of time studying the food supply of fish in each area. And only after this they begin to select or manufacture imitations of insects and their larvae. What is good about the fly, and what are the weaknesses of this bait?
Advantages and disadvantages, types of artificial bait
Fishermen were forced to start producing artificial insects by problems associated with the extraction and storage of natural baits. How long does it take to dig up worms or catch insects? But how to bring them alive if the path to the “black stones” is covered in several hours.
Having taken a closer look at the insects that fish love, craftsmen began tying artificial flies. It turned out that using available materials, it is possible to successfully imitate insects and their larvae. And this is the main food of grayling. The advantages of flies include:
- versatility;
- minimum weight and dimensions;
- reliable installation on the fishing line;
- long service life;
- low costs for self-production.
As for the negative aspects, many anglers categorically do not want to engage in tying flies for grayling. There is simply not enough patience, skill in handling thread and creativity. It’s a shame to lose catchy models when bitten by a toothy predator or with a dead hook.
All baits are usually divided into two groups.
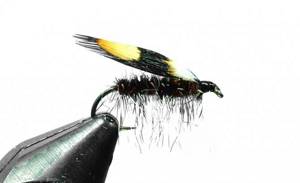
- Dry flies are designed to imitate the behavior of insects that have fallen into water. Outwardly, they resemble wasps, moths, dragonflies, flies, etc. A distinctive feature of this group is the presence of fluffy plumage. For knitting dry patterns, materials such as bird feathers, fur of domestic and wild animals are used. Hooks are selected to the minimum size from thin wire.
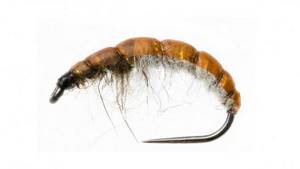
- Wet baits should remind the fish of insects, their nymphs, and pupae that live in the water. These are water beetles, tadpoles, caddis flies, etc. A characteristic feature of wet modifications is minimal plumage combined with thick hooks. Metal wire is often used to weight the bait.
Requirements for bait for grayling
Grayling lives in various rivers and lakes of vast Russia. In each region, fish have a certain food supply to which they are genetically accustomed. There is one more point related to the seasonal preferences of grayling. It is hardly worth offering fish in early spring imitations of insects that appear in late summer. Flies for grayling must first of all meet these most important requirements. If you monitor the feeding habits of this fish from spring to autumn, you can determine the necessary parameters of artificial baits.
- In spring, grayling leads a mainly bottom-dwelling lifestyle, which is explained by the absence of anything edible on the surface of the water. During this period, the fish feed on worms, mollusks, crustaceans, eggs of spawned fish, caddis flies, and stoneflies. Accordingly, it is necessary to select a nymph for catching grayling that will resemble natural food, both in appearance and in behavior in the water. Most spring baits should be sinking. At the end of spring, a mass emergence of the mayfly butterfly begins in many rivers. At this point, the angler should prepare an artificial copy of the mayfly. The fly is made in a dry design, and the fly line is installed as a floating type. If you miss the moment of departure, then later it will be problematic to seduce grayling with such a model.
- In summer, you have to look for grayling in small rivers and pools, where there are deep areas after rapids. Trophy specimens are very rare to come across in hot weather. The main food in summer are insects such as ants, amphipods, flies, butterflies, and dragonfly larvae. To guess what grayling eats, experienced fishermen use gear that allows them to simultaneously cast 5-6 leashes with different baits. As soon as a fish is caught on one of the flies, the remaining baits can be gradually replaced with a more catchable variety.
- Autumn is considered one of the most productive seasons of the year for grayling fishing. Of all the insects and larvae that fish feed on at this time, the grayling likes the caddisfly the most. If the imitation turns out to be realistic, then the fish will bite both in cloudy weather and in the dazzling sun.
The best flies
It’s hardly worth blindly trusting numerous ratings of flies for grayling. While foreign fish are really attracted to these baits, our grayling is wary of them. It is better to evaluate the performance of the bait based on its similarity to natural food.
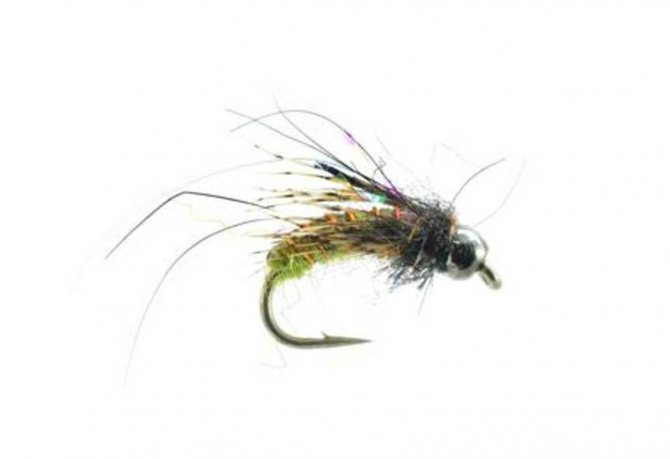
- Most anglers prefer flies that imitate caddis flies. This type of bait can be used both on mountain rivers and on Karelian lakes. The imitation works properly throughout the open water season. Although the caddisfly copy is small in size, the bait adheres well to the surface and accurately repeats the movements of a natural insect.
- In the spring, there is no equal to a fly that imitates an emerging mayfly. Once the insects fly out, the angler can count on a good bite in any weather. Bycatch may include fish such as whitefish and small taimen.
- The nymph attracts the attention of grayling in summer. When the fish concentrates in the middle horizon or near the bottom, the sinking bait is confidently attacked by grayling. The nymph gives good results throughout the fall until freeze-up.
- Universal baits that can be used to catch grayling from spring to autumn include imitation bunting larvae. In the classic version, the fly is attacked by whitefish, chebak, trout and ide. It is important to guess the color scheme at a certain time.
- The caddis fly pupa is perfect for hunting trophy prey. Such a fly can be placed on a regular float rod, letting it go with the flow. Most often, bites occur at the end of the riffle, where there is a quiet pool.
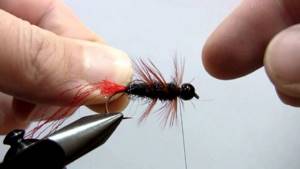
How to tie a catchable fly
Tying a simple fly is not that difficult. For work you will need a small vice, scissors and tweezers. The materials you should prepare include wool and feathers, thin threads, diving, beads, a sharp hook and waterproof glue.
- A hook is inserted into the vice, onto which the bead clings. She will play the role of the head.
- The backing is formed with black thread, starting from the bead and ending with the bending point of the forearm.
- To make a tail you need a piece of bird feather. Four barbs are applied to the hook and wrapped with thread up to the head of the fly. The excess feather is trimmed off around the bead. The thread is wound in the opposite direction.
- The body of the fly is formed from diving, which is first wrapped with thread, and then even turns are made in one or two layers on the hook.
- By attaching a feather from a decorative rooster, the wattles are pulled away from the head, after which the front part is fixed with a thread. Now the feather and thread are wrapped 2-3 times around the hook. The thread is wound in the area of the head.
- The excess feather is cut off. To prevent the thread from coming undone, it is treated with glue.
Mounting the fly on the fishing line
When a fishing method has been chosen and a catchy fly has been made, it’s time to learn how to tie the fly to the fishing line. To do this, you can use one of the reliable nodes, for example, a Uni node.
- The fishing line is threaded into the ring of the fly hook from the outside, a piece about 20 cm long is applied parallel to the main thread.
- A loop is made from the segment below the base. The end of the fishing line is wound inside the loop, wrapping both threads.
- To form a knot, you need to hold the fly with one hand and pull the free end of the fishing line with the other.
- When a nodule forms at a distance from the front sight, it is necessary to moisten it. After this, the knot is tightened, moving to the eye of the hook. The protruding end of the fishing line is cut off.
With the right choice of fly and precise determination of the grayling's parking spot, catching the fish will remain a matter of technique. Let the bait float with the current until it disappears at the moment of the bite.
Source: karp.rybalkanasha.ru
The most catchy flies for grayling
For more successful fishing, this list presents the most catchy flies for grayling.
Parachute Adams
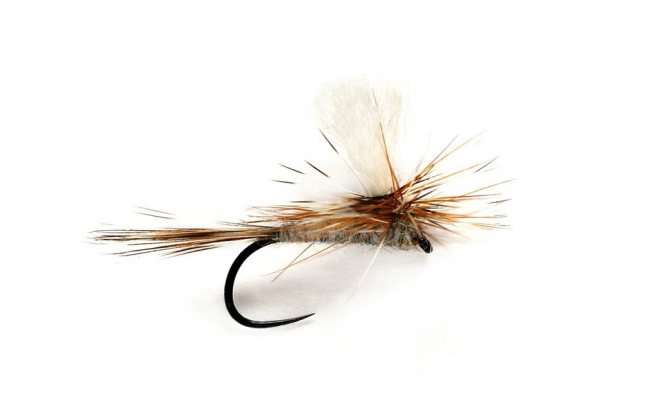
One of the most effective flies. The first ones began to produce it in America. There is no connection to any particular insect, this is just a fantastic fly. But her game and appearance do not leave the fish indifferent. Parachute Adams is made from rooster goatee, but a homemade version can also be made. Detailed instructions can be found on the Internet.
Superpupa
Refers to the dry type of flies. Excellent for catching grayling. Many novice fishermen do not often turn their attention to Superpupa because of its inconspicuous appearance at first glance. But this fly gained its popularity due to the fact that fishing with it is carried out throughout the entire grayling fishing season.
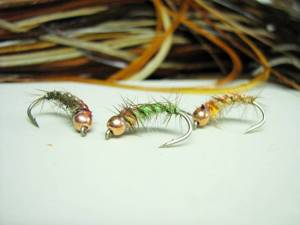
Hydropsyche Nymph
This fly can be classified as the most realistic fly. It is highly effective in catching trophy grayling. Hydropsyche Nymph can be used either with the flow or with the rolling nymph method. It is not easy to knit it at home, but it is quite possible. In the store, such a fly can be found from 70 rubles.
March Brown
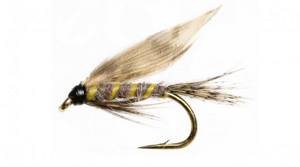
March Brown is a very catchy fly, belonging to the “wet” class. It has become widespread in the UK. Its shape resembles a mayfly. May occur in variations similar to caddisflies. The front sight has been used from 1916 to the present. The only change in this bait was the replacement of silk with Lurex. More catchable in the spring.
Loop Wing Emerger
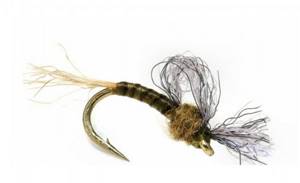
The Loop Wing Emerger fly simulates small and large midge or mayfly larvae. It is used most often on the surface, but with special skills you can also fish in the water column.
Jassid
A small-sized fly, used to simulate various beetles, flies and small midges. She was first mentioned in his book by Vincent Mariner. About this fly you can confidently say “If you don’t get a bite, use Jassid!”
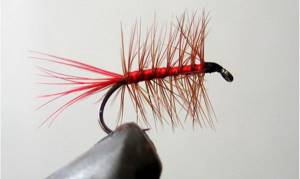
Red Ant
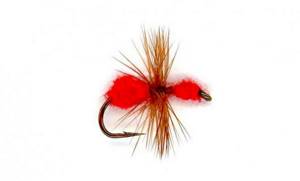
The Red Ant is a very effective fly in the summer. When fishing with this bait, you should always reel in the line, since grayling can accompany the “prey” almost all the way to the angler.
{banner_vnutri-kontenta-3}
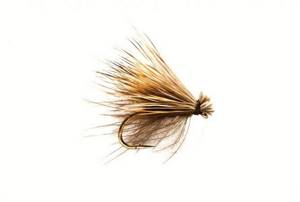
Deer Hair Caddis

Classic dry fly. Shows itself perfectly in all seasons. Models an adult caddisfly and is very active in the water. Made from thin and oval lurex. Hook sizes 16-17-18 work well for Deer Hair Caddis. Quite difficult to make at home.
Mini Leech
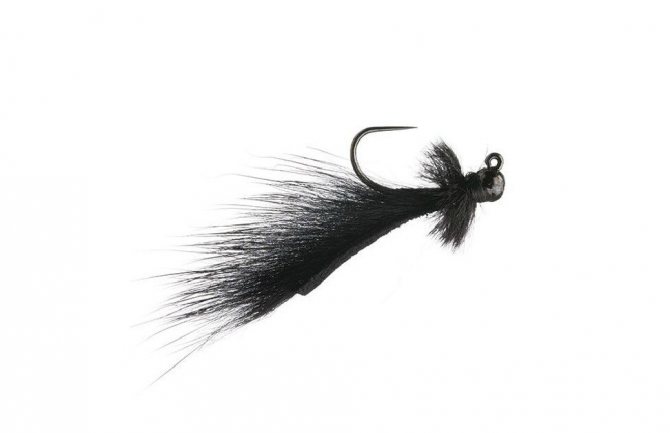
Mini Leech fly imitating leeches, small fish, shrimp. It is worth noting that when creating such a fly, you should not leave a short tail. With a more elongated body, the performance of the bait will be simply amazing, which will definitely attract grayling.
Buck Caddis
The last catchy fly in this article. This bait performs well in trout fishing, but grayling will not stand aside either. Another advantage worth noting is the rigid structure of the fly, so it does not deform after bites. Buck Caddis imitates an adult caddis fly, so consider this when choosing a hook for this fly. To create such bait, it is recommended to use thick fur, as it is quite dense and easily frays.
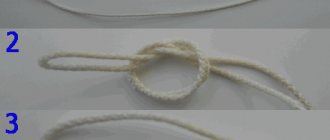
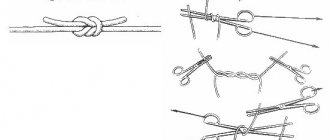
Bloody knot - we knit line to line. Tying two lines
It happens that you break the fishing line and need to reconnect it securely. So how to tie two fishing lines correctly? To be honest, I usually throw away the shortest piece of line. Firstly, it is not so expensive and in short supply these days, so you can donate. Secondly, an extra knot on the reel always means an additional brake when casting, hooks and, of course, less reliability . But sometimes you still have to splice the line. Let's look at the most reliable way of tying fishing line to fishing line.
I use the old proven figure eight knot. Tie the line with the most ordinary knot, but make not one, but two overlaps. When tightening, take your time, a figure eight will form. Insert the opposite ends into the formed rings. Everything can be delayed. This unit has never let me down.
The video shows well how to knit this knot. Nothing complicated:
This method is also suitable for tying a leash (a fishing line with a thinner diameter than the main one) to a float rod.
How to tie a lead leash to the main line
There are several ways to tie a leader to the main line, but I use two. The first one is very convenient and fast. First you need to prepare the leash itself. We tie the hook to the fishing line and cut it to the required length. At the end we tie a knot with a double overlap. Now on the main line in the right place we make a loop with a knot. We insert the end of the leash into the loop and tighten it. Done, the knot on the leash will prevent him from jumping out of the loop. This method is very simple, but I do not recommend using it on heavy gear for large fish.
The second method is more complicated, but also more reliable. You need to fold the main line and the leader line together, and then wrap them in a loop, without overlaps, just in a loop. After this, with the free ends, together, we make three turns and run the ends under the first turn. After this, you can tighten it and trim off the excess line.
Video on how to tie a leash to the main line:
Types of forest knots
To connect lines with different diameters, different knots are used.
When connecting elements with a difference in diameter of no more than thirty percent, the following nodes are used:
Double sliding
It belongs to the category of sliding and self-tightening, as a result of which it cannot come undone, but only tear. Mainly used to connect elements of the same diameter.
Step-by-step instructions:
- Place the two ends of the tackle element that need to be connected parallel to each other.
- Make loops from the bottom element.
- Insert the end of the top line into the loop.
- Place the top and bottom pieces together.
- Lower the end of the bottom element down and bring it into the resulting loop.
- Lower the end of the top line and bring it into the resulting loop.
- Tighten the two knots and move the knots as close to each other as possible by tensioning the ends of the connected elements.
In the process of connecting two elements, it is allowed to make up to six winding revolutions inside the loop.
Serpentine
In some literature it is called “blood knots”. This design can be used to connect threads of different cross-sectional diameters. It retains up to ninety percent of the load-carrying capacity of the connected element compared to a solid product.
Step-by-step instructions:
- Place the two ends of the fishing line overlapping in parallel, so that its ends point in the direction of each other.
- When making a snake knot using the internal spiral method, you need to wrap one end of the thread several times (from three to six) around itself and the other end, then pass the free end between the resulting loops and pull it, forming a spiral. Repeat the entire process for the second end of the element to be connected, after which it is necessary to tighten the knot by pulling both ends.
- When connecting in this way using the external spiral method, it is necessary to wrap one end of the element around the other, then bend one of them and pass between them before the first turn of the spiral. A similar procedure must be carried out with the second end of the structural element, after which you need to pull the ends, thereby tightening the knot.
A correctly executed connection should be located clearly in the center. Even though the line twist on both sides is in the same direction relative to the center, they can appear in a mirror image style.
"Loop to Loop"
Ideal for joining threads of the same diameter. A slight discrepancy in this value is allowed. At the same time, the main fishing line is taken with miniature parameters compared to the leash, due to the fact that it is the main component that is folded in half.
Step-by-step instructions:
- In the main line, step back thirty centimeters from the edge and fold the segment in half.
- Tie an ordinary simple knot from a double fishing line, pass the doubled fishing line through the loop twice and pull it off.
- On the auxiliary line on the leash, you need to do a similar procedure.
- The loop on the leash must be placed over the loop on the main line and the end of the leash must be passed through the main loop.
- Pull the main line and leash in different directions.
If the knot is performed correctly, before forming a loop, the double line should be folded into a figure eight.
Triple fisherman's knot
It is used to connect lines of either the same diameter or with a difference in this value of up to 0.05 millimeters. Its use is not recommended in places where it is planned to pass through rod rings.
Step-by-step instructions:
- The two components that need to be connected are placed in parallel so that the ends coincide.
- Tie a simple knot twenty centimeters from the edge. In this case, the two components should be parallel and should not bend.
- Pass the fishing line through the knot ring twice on one side and the other.
- Tighten the knot so that the loop takes the form of a figure eight.
- Trim the protruding ends to a length of one millimeter.
Albright
It is a universal knot for connecting lines of any diameter. It is successfully used in various types of fishing, including carp fishing, spinning fishing, as well as feeder and float fishing. The most effective way is to combine a thin solid line with braided line.
Step-by-step instructions for executing a node:
- Folding a component element with a larger diameter in half so that the distance from the edge when folded corresponds to ten centimeters.
- Thread the braided element through the loop and wrap it around the doubled first element six times. The more turns, the stronger the knot is considered.
- Returning the thin line to the loop and making three turns inside it.
- Wetting and tightening the resulting structure.
- Trimming protruding ends to one millimeter in length.
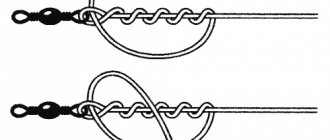
We tie the leash to the fishing line on the spinning rod
Of course, you can buy ready-made equipment at a fishing store, attach it to a carabiner, attach bait and cast. But the equipment is not always connected well, and sometimes it simply comes off due to a snag. Then you need to show skill and learn how to knit leashes yourself.
For leashes we need a fishing line with a thickness of 0.3 -0.4 millimeters. At the end of it we make a loop of 10-15 centimeters. We make a double overlapping knot on the loop and tighten it. We have a loop that we pull into the sinker hole several times. We insert the other end of the fishing line into the loop.
Once the load is secured, you can begin tying the leashes. Three or four leashes can be prepared in advance. These are hooks of the required size with tied ends of a fishing line 15-20 centimeters long. The leashes will become shorter, but we need to leave a free length for manipulating the knots.
Let's say we want the length of the leash to be 12 centimeters from the hook, then at this level we knit a knot with a triple overlap.
Now we select the place where the leash is attached to the fishing line, which is tied to the load. At this point we knit a double knot, which, when not fully tightened, forms a figure eight. All that remains is to thread the end of the leash through the first and second ring of the figure eight and you can tighten it. The same operation must be done with the remaining leashes and the tackle is ready. Attach a carabiner ring to the end, and the tackle becomes removable.
If you need to tie a leash made of steel and fluorocarbon, then the knot on the leash is tied in the same way as on a carabiner or swivel:

Method of tying various fishing elements to a fishing line
Attaching to a leash
The leash plays a protective role as a fishing line at the place where the bait is attached , from uneven bottoms in the form of stones and sharp fish teeth. Incorrect connection of elements can lead to fish disappearing at the most crucial moment.
Swivel connection
A swivel is a special device - a fastening necessary to avoid twisting of the components of the gear. This connection method helps to significantly increase the use of fishing gear, reducing the risk of premature wear and failure.
Connection with front sight
The fly plays the role of bait in fishing and it is important to secure it in such a way that the fastening is invisible and reliable. To tie a fly to a leash, a gripping knot is usually used.
Technology for attaching the leash to the front sight with a gripping unit:
- Pass the line through the ring of the lure's carabiner.
- Make four turns with the carabiner ring.
- Place the end of the fishing line between the turns with the carabiner ring.
- Pull the connection elements in different directions.
Connection with a spinner
“Unconditional”
A spinner is an artificial metal bait for fish. A knotless connection is used to secure it.
The technology of attaching a spinner using a knotless connection consists of connecting a special element - a knotless connection. Here it is important to observe the proportions of the ratio of fastening elements and the knotless number.
We recently published a new collection of knots: sea knots for fishing.
We tie the jig to the fishing line
A jig is the same fishing hook, but connected to a weight, and often decorated to look like a fly, bug or fry. And as a rule, the jig has a hole somewhere for attaching a fishing line. You need to pass about 15 centimeters of fishing line into this hole.
We wrap the fishing line around the shank of the hook towards the “body” of the jig, but leave a loop. After this, we pass the free end of the fishing line into the loop and tighten it. The result is an elegant, strong knot and, most importantly, reliable. The jig is ready for fishing. Excess line needs to be trimmed. Leave the tip of the fishing line no more than one millimeter.
Attach the hook to the fishing line
Without the ability to tie a hook to a fishing line, a fisherman becomes one of the losers. Not only will not every fish bite on a carelessly tied hook, but even a fool who has bitten is guaranteed to get caught with the hook.
If you are going to make tackle for small fish, such as roach, rudd, bleak, then you can use the old proven method. Using a double knot, we form a figure eight on the fishing line and thread the shank of the hook into the first and second rings. We tighten it, and the hook sits firmly on the fishing line.
Video illustration of tying a hook with the most popular and reliable knot:
Instructions on tying various fishing elements to a fishing line
The most common problems occur when tying line and leader, swivel, fly or spinner. This requires certain skills. This is due to the fact that during the installation process the fishing line slips out, complicating the work.
Leash Attachments
There are 2 ways to attach the fishing line to the eyeliner.
Option 1:
- Secure the line to the hook.
- Cut the fishing line, leaving the required length.
- Tie a knot using a double wrap.
- Make a loop at the base of the cord.
- Insert the end of the wire through the loop and tighten.
This method will help secure the leash.
But this option should not be used on heavy gear or when catching large fish. Because the simple method is less reliable.
Option 2:
- The main line and the leader line are folded and wrapped in a loop (do not use overlap).
- Make 3 turns around the loop.
- Thread both ends under the first turn.
- Secure the knot.
- Trim off excess length.
The technology is the most complex, but reliable.
Swivel connection
Swivel connection
The knot is characterized by simplicity and is fixed in several stages:
- Make a loop.
- Pass the loop through the swivel.
- Tie the loop and fishing line using a double overlap.
Connection with front sight
Most often, the fly is made by fishermen themselves and attached to fishing gear. The peculiarity of the fixation technology is that the location of the fly on the surface of the reservoir is hooked up.
Connection with a spinner
Spinner connection unit
Fixing the spinner takes place in several stages:
- Make 4 turns of fishing line around the spoon.
- Make a loop at the end.
- Wrap it around the loop.
- Pass the end of the fishing line through the ring.
- Tighten.
How to tie a line to a fishing rod correctly
It would seem that tying the fishing line to the fishing rod is not a difficult task; I tied it with an ordinary knot, and that’s all. But a real fisherman won't do that. He doesn’t need the equipment to fly away during casting or simply float away with an uncaught trophy.
All that remains is to tie the fishing line. So that you can change the equipment, do not tie the line tightly. Make a loop at the end large enough to fit all the rigging through, thread it through the hole in the paperclip, and pull the line and rigging through.
How to tie a swivel to the main line
The swivel is easy to attach. We make a loop and pass it through the swivel ring. We tie a loop with a fishing line using a double overlapping knot. A very interesting detail, which, by the way, applies to all knots - warm up the fishing line or braid in hot water before tying a knot. You can also heat the knot, for example, with a curling iron to 90⁰C. But don't overdo it.
Tying leashes to the main line on a winter fishing rod
Ice fishing enthusiasts often use a retractable sliding leash. It is very easy to attach to the main line. You need to prepare the leash itself. We tie the hook to the fishing line, put the cambric on the fishing line and tie a loop at the opposite end of the hook. A little higher than the weight, we wrap a loop around the main fishing line and thread the other end of the leash into it. Tighten and fix the knot with cambric. Also, cambrics can be installed on the main line, above and below the leash assembly.
The following video shows how to organize lead leads on the main line in winter gear:
DIY flies for grayling
As you know, heavy flies, dry flies and nymphs are suitable for catching this fish. Let's look step by step at how to make each of these types of flies for grayling with your own hands.
Nymph:
- We take hook number 5. We fix it either in a vice or with pliers.
- We wind the thread that we chose to make the fly onto the hook.
- We use dabbing to make the body and head of our insect.
- Don't forget to leave some material for the tail of the bait.
- We simply cut off the remaining thread.
Dry fly:
- Hairs of dark and orange colors are suitable for installation.
- The hook should be taken with the most curved tip, approximately size 5 to 7.
- We thread the wool into the eye of the hook and form a kind of cocoon on it.
- Using a regular needle, we fluff up the hairs, thereby obtaining a resemblance to an insect.
How to properly tie a fly to a fishing line
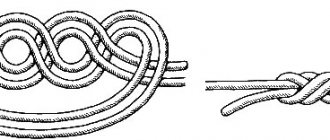
The fly, the favorite bait of fly fishers, is often one they make themselves and, of course, tie to the tackle themselves. In Siberia, many fishermen tie the fly in a slightly special way, so that the hook is in the water with the shank down and the hook itself up. In this case, hooking fish that hunts for floating insects is much more reliable.
The principle of tying a fly is no different from tying a hook, but the leash is rotated so that the fly rests on the water with the hook up.
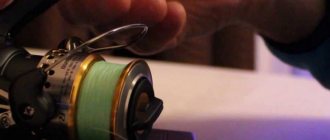
How to properly tie fishing line to a reel
Actually, I never bothered with this topic, because there was always a triple supply of fishing line on the reel, until I cast and realized that I had lost all the equipment along with the bait, which safely flew away to the center of the Dnieper. I thought about it and started doing this.
I make three or four turns of the fishing line around the reel pin, and at the end of the fishing line I make a loop, which I wrap around the “output” end of the fishing line. I wrap the free end of the fishing line around the base of the loop. The famous figure eight is formed, and I thread the free end into its rings. We tighten it and your tackle will not fly away.
You can also look at an alternative option for tying the fishing line to the spool, which is also quite simple:
Source: hariuz.ru
How to tie a fly to a fishing line