Fishing with bottom tackle with a rubber shock absorber, popularly called “rubber band,” is very interesting and catchy. This equipment is used throughout our country. Its popularity is explained by the fact that it allows you to catch both peaceful and predatory fish, and is capable of covering all depths of interest to the fisherman. When properly manufactured and installed, it guarantees you a good catch and a great mood.
Advantages and disadvantages
The advantages of this gear are:
- The ability to cover all coastal depths without changing the location of the gear.
- Using a large number of baits, both live and artificial, at the same time. At the same time, their combination is allowed if it is necessary to find out what type of fish is present in the reservoir.
- There is no need to transfer the sinker when fishing for fish and changing the nozzle.
- Possibility of quickly changing leashes in case of breaks or snags.
- Use from both boat and shore.
- Compact transport dimensions. The tackle can fit into any fishing backpack, bag or bag.
Flaws:
- The complex design of the gear with many hooks and leashes contributes to snagging and twisting of the leashes with the main fishing line.
- When casting over long distances, extraordinary strength or a floating device is required.
- In medium and strong currents, sailing of the gear is observed. It is stretched with the flow in the form of a parabola, which does not have the best effect on sensitivity and hooking.
- Often, in the current, hooks collect floating debris such as twigs and algae.
Pros and cons of elastic bands
Experienced fishermen note that the presented tackle has its advantages and disadvantages, which should be mentioned.
Among the advantages it should be noted:
- Considering that the nozzle lies on the bottom, this tackle is not afraid of waves and wind.
- Invisibility, due to which you can fish as much as you want in one place.
- Ease of use. It is quite easy to catch bottom fish this way.
- Due to the elastic band, the jerks of the fish are softened, and this reduces the likelihood of slips.
- Good shock absorption for large fish, which significantly reduces the likelihood of line breakage.
- The fish will not be able to drag such gear anywhere; a heavy weight will not allow it to do so.
Minuses:
- Constant control. The tackle can get caught in the fishing line of a neighboring angler, for example, who is fishing with a regular fishing rod.
- Sufficient strength. Not everyone can throw such a heavy rubber band the required distance.
Who and where can you catch with a rubber band?
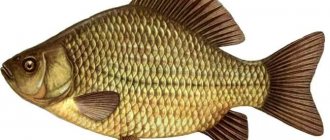
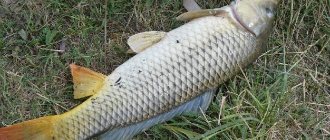
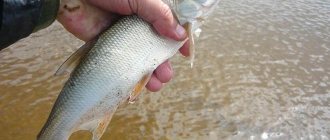
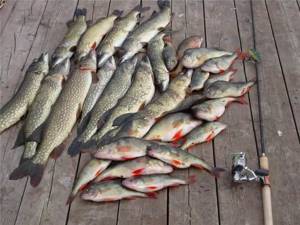
You can use the tackle on a body of water with standing water or slow current. Suitable: lakes, river pools, reservoirs. There should be no algae or snags in the fishing area. You can catch both predatory and peaceful fish. Basically, the following fish are successfully fished with an elastic band: crucian carp, bream, roach, rudd, pike, pike perch, and perch. But for each type, small adjustments should be made. This mainly concerns the replacement of leashes and hooks, as well as the bait used.
Choosing a place and time of fishing
You can catch large predatory fish with a rubber band, but landing the trophy will be difficult and memorable. To do this, it is important to know the best time, weather conditions, hunting and resting places for predators. Let's try to answer a few basic questions.
Where is the best place to fish?
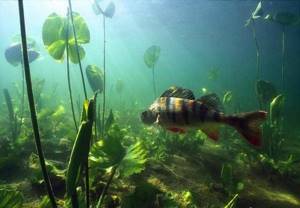
The choice of fishing spot depends on the type of fish. While pike perch likes to hunt in areas of reservoirs with a sandy or rocky bottom, pike or perch prefer muddy surfaces. On a river or lake, the choice of location can be radically different. Pike prefers places with a steep bank. Her favorite places are small creeks, bays, and snags. But for elastic fishing, it is better to find a point on the border of clear water and thickets of aquatic vegetation.
Pike perch will be attracted to a small bay with calm water or an island in the middle of a large river with a sandy bottom. In any of these places there are sure to be schools of young peaceful fish, hunting for which a predator comes out.
What time of year and day?
There are 2 periods in the year when fishermen forget about all household chores. This is the time of spring feeding, when predators are actively feeding after winter, and you can go fishing at any time. Pike or pike perch approach places of accumulation of peaceful fish that are gaining fat. During this period, the best place for fishing is the confluence of meltwater streams, from which food for prey and oxygen enter the reservoir.
The second time of active fishing is pre-winter. The first drop in temperature causes predators to become more active and begin to gain fat before winter. The time for autumn food is coming. A rubber band for pike or perch allows you to quickly secure an excellent catch and gives pleasure when fishing for a strong opponent.
Summer is the time when fish are caught in the wee hours. The water has cooled, large individuals go hunting, and small ones return from night fishing. If the fisherman manages to find the place where they meet and throw the rubber band at the right time, the result is guaranteed. In general, summer is a time when predators slide into deep holes with cool water and hunt in the rare hours of dawn.
But if there is a sudden drop in temperature, predators try to catch up and become more active.
Influence of weather conditions
Everything is simple here. If a north or east wind blows, it is better for fishermen to stay at home. Powerful southwestern or western winds blow, you can safely go fishing. Strong excitement lifts crustaceans and other food of peaceful fish from the bottom, and it begins to actively move throughout the reservoir. The predator will definitely react to this.
High atmospheric pressure - the fish will be passive and difficult to find. This is due to a decrease in the amount of oxygen in the water. The fish rolls into deep holes with springs and stands there. Catching pike perch with an elastic band will be successful and effective if strong waves push the thermocline away from the shore. Warm water sinks into the depths, followed by schools of small fish. At the depths they will be guarded by fanged predators.
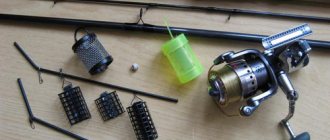
Basic elements of an elastic band
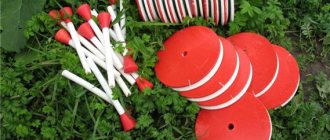
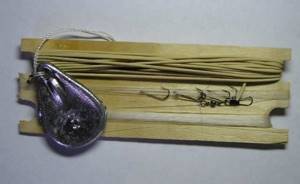
- Reel. Necessary for storage and transportation. It should freely accommodate all the gear, securely fixing the hooks. It should be rigid, without allowing kinks. For production, they most often use a piece of plywood sheet, with cuts at the ends, and hard foam plastic. But it is permissible to use any other material that meets the above requirements.
- Fishing line. As the main fishing line, you should use a strong, thick, wear-resistant monofilament thread with a diameter of at least 0.40 mm, and a breaking load of eight kilograms. For leashes, you need to use fishing lines of a smaller diameter; it is selected depending on the type and size of the fish. When fishing for crucian carp, you should choose a leader line with a diameter of 0.16–0.20 mm. If you are catching a predator, then you should set it to 0.30–0.40 mm. It is possible to use leashes made of special leash material made from strong fibers that pike cannot bite through.
- Hooks. They are selected depending on the fishing object. For predatory fish, double, triple, or offset hooks should be used. When fishing for peaceful fish, hooks No. 8, No. 10, No. 12 will work.
- Cargo. Even a brick or a large stone will do. You can cast a lead sinker yourself, or purchase a ready-made one in a store. The main task of this part of the equipment is to hold the “elastic band” in place when fishing, without changing its position when frequently reeling in to change bait or fishing for fish. It’s worth remembering that you won’t be able to cast a sinker that’s too heavy; you’ll need a boat or raft. A light sinker will constantly be carried away, you will have to reel all the gear ashore and re-cast.
- Rubber. Samples with a round cross-section, capable of stretching three to five times, perform best. The square section is less suitable, since the edges often burst, which leads to the breakage of the entire equipment and loss of the sinker. Always take into account the stretchability of the rubber, and select the right amount of fishing line based on this fact.
- Swivels and tees. An excellent solution when making gear would be to use swivels and carbines. They will reduce hooks and twists several times, increase the catchability of the gear, and make it easier to replace leads.
Classic rubber band, live bait – do it yourself
Let's prepare for work:
- Big load. You can use lead braid from power cables or cast lead weights.
- Round rubber.
- Stock of main scaffolding of the required section.
- 5–6 leashes made of fishing line or steel thread.
- Reel.
- Hooks, carabiners and swivels.
Assembly steps
The work is carried out in several stages:
- At the 1st end of a meter-long piece of nylon cord we attach a load . In the middle we make a loop for the hand. This way, it will be easier for you to cast the tackle over a long distance.
- At the 2nd end we attach a carabiner to connect it with a section of the main line . Many people use a direct connection between the weight and the rubber, but this design will quickly come off. The length of the rubber insert depends on the casting distance. If the place is located 20-30 m from the shore, the rubber section should be 10 m or more.
- We attach a carabiner with a swivel to the end of the rubber . We connect it with a section of the main line, on which loops or carabiners are tied for attaching leashes. Depending on the species of fish or fishing conditions, the thickness and length of the leashes may vary. Every fisherman should have a supply of leashes with different hooks and sizes.
- We attach the leashes to carabiners or “loop to loop” . We knit spare leashes of different lengths and tie them to the hooks in a figure eight. If possible, it is better to use small carabiners or tie a loop at the end.
- We fasten the hooks . To do this, we stick them into the body of the donkey. If wood or plastic is used to make the reel, glue pieces of foam plastic to its edges and attach hook tips to them.
Our gear is ready.
Important! For successful fishing, experienced fishermen advise stocking up on fishing rods.
Installation of gear
Next, let’s look at options for making gear yourself:
- Classic rubber band. To make it you will need: sinker, rubber, main line, and leader line, hooks, reel: Tie the sinker to the rubber; you can do a direct tie, but it is best to first tie the sinker to a nylon thread, having first made a casting loop. Then we tie the thread to the rubber using strong, multiple knots.
- We measure out the required amount of main fishing line. For example, if you use ten meters of rubber, you need thirty meters of fishing line. The proportion of fishing line - rubber depends on the tensile ability of the rubber.
- We knit a secure loop at the end of the fishing line and attach the free end of the sinker through it. Now the sinker, rubber and line are connected into a single whole.
- We retreat one and a half to two meters from the place where the fishing line is tied with the rubber, and begin to knit the small loops necessary to secure the leashes. This is done by folding a small piece of fishing line in half and tying a knot around its axis. The interval between the loops should be at least one and a half meters to prevent the possibility of snagging between the leashes. The number of loops is selected depending on the total length of the tackle. For ten meters of elastic and thirty meters of fishing line, it is optimal to use ten loops.
- Making leashes. Take a little more than a meter of fishing line of the required diameter. A hook is tied at one end and a loop is tied at the other. It would be useful to tie leashes in reserve and attach them to the free part of the reel. Breakage of leads in the “elastic band” is a frequent occurrence, and the presence of spare ones will significantly reduce the time for replacement.
- Installation of ready-made leashes on the tackle. We pass the hook through the loop of the main line, then through the leash loop, tighten. This results in a very reliable “noose” connection.
- Winding on a reel. First you need to secure the load, having previously secured it with rope or tape. Then the rubber is wound evenly. Next comes the main line with leads. Place the leashes on different sides of the reel, securely fixing the hooks in it. The tackle is ready.
Advanced "elastic band". Its production is similar to the classical scheme, but during production it uses fittings that are used to prevent twisting, the main enemy of all “rubber makers”: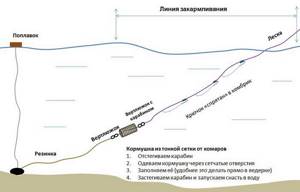
- Tie the sinker to the nylon thread, tie a loop under the cast. Connect all this to the rubber through a double-sided swivel. The connection of the main fishing line and elastic is also done through the swivel.
- One and a half meters from the connection of the rubber and the main fishing line, we install a tee, which is used for classic spinning fishing. Thus, for every one and a half meters we install nine more tees. You get a tackle assembled on moving elements, resistant to various twisting influences.
- We mount the leashes on the free ears of the tees. Using an “advanced” elastic band, you will save time and nerves on constantly twisting the leashes. Increase the catchability of the gear several times, since the bait will always develop freely. Replacing leashes will be much easier.
Fishing technique and tactics
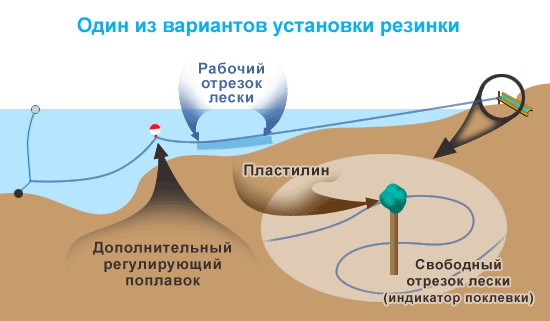
For effective fishing, you need to cast to the right place and not lose your gear. It's good if you have a boat. Then the casting issue is easily resolved. We unwind the tackle, go by boat to the desired place and lower the sinker. In this case, in order to easily remove the load from the water, we tie a line with a bright float to it. Now after fishing you can easily find and remove the cargo from the bottom. Successful fishing for pike perch is possible even in urban areas, especially when predators go to spawn.
Let's take a closer look at the fishing technique if the boat is inaccessible to the fisherman:
- We unwind and carefully place the elastic band and the main line on the ground . In order not to lose the tackle when casting, we unhook the carabiners, lines and leashes in the area between the main conductor and the elastic band and connect these parts directly.
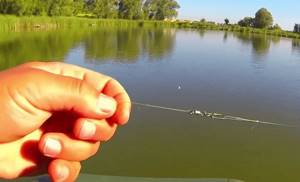
- Having unwound and laid the line and elastic in a clean place, we take the cord with the load by the loop and throw the donkey to the place you like, or rather, a little further . It is important that after the rubber is loosened, the hooks are on the border of vegetation and clean water.
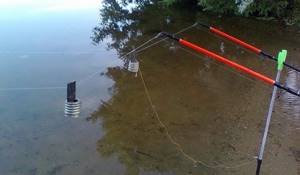
- We drive 2 pegs into the soil . One is near the water, and the other is 4–5 meters from it. The second one will be used to secure the tackle when replacing bait and live bait, and the first one will serve as a support for installing a bite alarm. Signaling devices are used in different ways. If we go night fishing, it is better to use a luminous or electronic bell that indicates in the dark which gear has worked. During the day we use a simple bell or a lump of damp soil stuck on the wood.
- We select the line from the water to the point where it connects with the rubber . Before disconnecting the carabiner, we recommend fixing the elastic band so that it does not go into the water if you move it carelessly.
- We attach a section of the line with leashes with carabiners, and gradually release the line . When it loosens, we can determine whether the cast is correct. But we are in no hurry to make adjustments. We take the hooks out of the water and attach live bait or bait.
- Only now can you adjust the casting and finding the hooks. If the leashes do not reach the site a little, we attach a float in the front part of the main line; it increases the range of lowering the hooks to the bottom. If the tackle is thrown with a flight, on the far side, near the last hook, we hook sheet lead. The additional weight lowers the bait exactly to the intended location.
- Self-made equipment allows you to install the required number of hooks. Right on the pond, by quickly unhooking the leash with a large hook and setting a smaller number, you can catch perch if the pike perch doesn’t want to bite today.
- We carefully begin to reel in the slack in the line , after we feel a slight tension, we fix the cord on the first peg. We attach the alarm and move on to casting the next tackle.
- After the bite, we wait for a new series of jerks. We hold the line in our hand and cut smoothly and carefully.

Important! Don't forget to pack an extractor and a reliable yawner in your backpack. This way you will protect your hands from the predator’s teeth and quickly remove the hook from the fish’s mouth.
Fishing technique with an elastic band
- When you arrive at a pond, find a place where there is no current at all or will be minimal. The section of shore should have at least five meters of level ground behind you. This will be needed for safe casting. There should be no visible algae, reeds, or branches in the water.
- If you are going to catch predatory fish with fry, then catch live bait. If the object is civilians of the reservoir, prepare the required amount of complementary food.
- Lay out the tackle on the shore. Unwind in the form of a “snake” starting from left to right. Space the hooks as far apart as possible from each other and from the main line.
- Prepare a stick or short rod to which you tie the free end of the fishing line. Place the stick on the bank. Remember! The installation must be “thorough”; it has happened more than once that fishermen carelessly put all their gear into the water, losing it.
- Prepare a stick or a stiff short rod with which you will cast.
- Insert the stick into the casting eye located on the sinker.
- Stand so that the tackle remains to your side when casting. This is necessary in order to eliminate the possibility of the fisherman getting caught with hooks.
- Cast with a sharp and strong movement without swinging. After casting, quickly jump in the opposite direction from the tackle.
- When the elastic is successfully thrown into the desired place, pull out the main line to the last leader. Place bait on the hooks. Slowly release the line back into the water.
- Install a bite indicator on the main line. This could be a twig, a bell, a warning light, or a digital bite sensor.
- If you are fishing for peaceful fish, start feeding. This should be done like this: You need to “bomb” the entire length of the main line with complementary food, forming a path. If fishing takes place in the current, throw bait balls at a short distance in front of the tackle so that the bait picked up by the flow of water lies on the bottom in the area of the hooks, and not behind them.
- Fishing. There are two methods of fishing with a donk with a rubber shock absorber: active fishing and stationary fishing. With an active fishing method, the fisherman constantly tugs on the main line, causing the leashes to move from side to side, provoking the fish to bite. With the stationary method, no manipulations with the tackle are necessary. This method is effective in currents when the leashes are already well swayed by the water.
- When the bite indicator is triggered, or when a blow to the hand occurs during active fishing, make a hook with a sharp sweeping movement towards you. Start catching fish. Try not to pull too hard, as this may cause the fish to escape and the entire tackle to become tangled. You shouldn't pull too slowly either.
- Remove the fish from the hook, place it in the tank, or release it.
- Adjust or replace the bait, and return the tackle to the water with smooth movements.
If you tear off a leash or hook while fishing, you need to pull the gear ashore. If you have spare leashes, install them in place of the lost ones, passing the hook first into the loop of the main line, then through the loop of the leash, and shade the knot. If you don’t have spare leads, first make them and then reel the gear ashore.
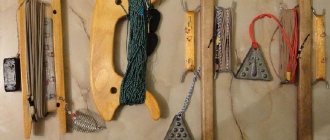
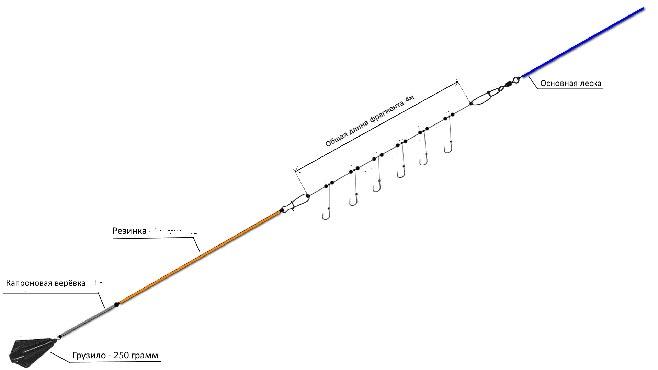
“Elastic band” tackle device
An important component of a tackle with a rubber shock absorber is a heavy sinker. It must have such a weight that it cannot be moved either when playing fish or when changing baits. Most often, the role of such a sinker is a railway spike (a nail for fastening rails and sleepers) or a lead ingot. Someone takes an ordinary plastic bottle and pours screws, nails, and other metal objects into it. In general, the optimal weight of the load is about 300 grams. (more is possible).
Next, you need to tie a rubber cord to the sinker. Its length may vary. The main thing is that it stretches more than 3 times. The best option for rubber is when it stretches up to 4-5 m with its own length of 1 m. A rubber cord with a diameter of 3-3.5 mm is suitable in thickness. If you plan to fish in a strong current, then about 5 mm. The length of the rubber shock absorber directly depends on the distance from the shore to the fishing spot. As a rule, it is equal to 1/10 of the length of the main line.
It is necessary to tie the rubber to the sinker very tightly. Otherwise, all the equipment will remain in your hands, and the load will lie at the bottom.
An important part of the tackle is the sinker
Choose a rubber band with a round cross-section, not a square one! Otherwise, it will cling to rocks and the bottom, and then burrs and other damage will appear on it, which can lead to a breakage.
A fishing line is tied to the other end of the elastic band. You can make a loop or install a winding ring. There are many options. It is better to use a swivel, which will reduce the number of tangles and twists of the tackle. Again, it is important that the fastening is as reliable as possible.
It is advisable to take the main line thicker than for the feeder or float rod. A cross section of 0.3-0.4 mm will be sufficient. Then, at a distance of about 40-50 cm from the elastic band, a series of leashes are attached to the main fishing line - from 3 to 5 pieces. You can do more, but fishing with such gear becomes more difficult.
The optimal distance between the leashes is 20 cm. The fishing line for their installation is taken with a thickness of 0.18 to 0.22. The length of the leashes themselves should vary from 7 to 10 cm. If all parameters are observed, the tackle will be as effective as possible and protected from tangling and overlap. As for hooks, for elastic they most often take number 10 or 12.
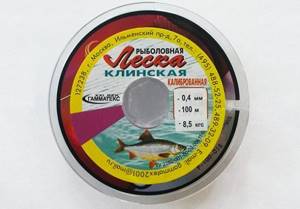
For the “elastic band” you should use a fishing line with a cross-section of about 0.4 mm
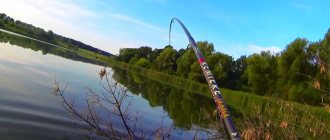
Do you need a rod to fish with this type of gear? In our opinion, it is better to use a strong rod, a large reel or a stick equipped with a spool mount. The fact is that a fishing rod for an elastic band is not needed and it is irrational to use it only for mounting equipment. However, such fishing is impossible without a bite alarm. For example, a bell, which is attached to a fishing line, like on any donkey.
Features of fishing with an elastic band
The peculiarities are that when fishing from a boat and the shore, with or without a current, it is necessary to change tactics:
- Fishing on the current. It is necessary to cast at an angle of 50 degrees to the current. This is explained by the fact that during the fall the tackle will be carried away. And the final place of its fall will be slightly lower than the casting point. The current will pull the tackle in the shape of a parabola, and if you cast in a perpendicular direction from the shore, the first hooks from the fisherman will lie in the shallows. The same applies to complementary foods; they need to be fed “in advance” of the current.
- Fishing in still water. In the absence of current, the cast must be made strictly perpendicular to the shore. This will ensure maximum coverage of coastal depths. It is preferable to use an active fishing method. Since the fish can ignore the bait lying calmly on the bottom.
- Fishing from a boat. It is carried out both in current and in still water. The difference is that the tackle with this fishing method plays the role of an elevator. The load is located under the boat, the tackle is reeled up. Thus, the fisherman gets the opportunity to fish all layers of water at the same time. Small changes are also made to the design of the elastic band. A safety line is tied to the sinker, the thickness of which is comparable to the main one. It is either tied to the side of the boat, or a large foam float is mounted on its end, and released with the flow. Insurance is needed to remove the rubber shock absorber along with the load to avoid premature wear and tear. Only then does it make sense to feed the fish. When you are fishing in a body of water with no current. Carry out feeding around the boat, throwing bait balls at a radius of one and a half meters. It is also necessary to throw several large lumps directly under the boat.
- Catching peaceful fish. To do this, the tackle must be equipped with leashes made of thin fishing line, the hooks must correspond to the size of the fish being caught. A large amount of bait will be required, which will need to be scattered evenly over the entire length of the main line. Follow a simple rule: what’s in the food comes on the hook. If the components of the bait include corn or peas, then you should bait them with at least 2 - 3 hooks. Fishing a peaceful fish with an elastic band requires some skill; you need to learn how to hook it instantly. Unlike a predator, a peaceful fish, having pricked itself on a hook, immediately moves away.
- Catching a predator. To do this, you need to install leashes made of thick fishing line on the tackle, or, as mentioned earlier, use special leash material. Choose bait, live (fry) or artificial (vibrotail, twister), you can combine baits. Use special double or offset hooks. Set the bait and start fishing. It would be more correct to use an active fishing method.
Modernization of gum for crucian carp
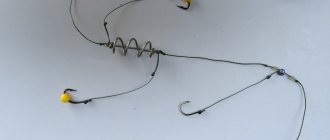
Many fishermen slightly change the design of the elastic band, installing a small spring in the middle of the equipment; after such manipulations, catching crucian carp with an elastic band becomes many times more effective. The positive effect of this modernization is explained by the creation of a bait spot around the baited hooks.
In addition, thanks to the elastic properties of elastic, the equipment is delivered to the fishing spot without unnecessary noise, and exactly to the same place. This property also has a positive effect on crucian carp, given its caution and how easily it is frightened by noise.
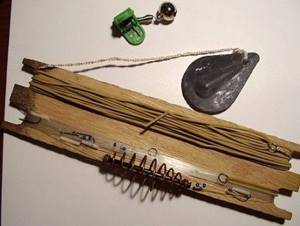
Due to the cushioning of the elastic material, the jerks of the fish are softened and it becomes easier to pull out a fish of impressive size. Another big advantage is the ability to fish in strong and gusty winds without the formation of “beards” and other problems that beset anglers when fishing with a bottom line.
Adviсe
- Use only “fresh” round tires. Determining suitability is simple. Good rubber should not have cracks or scuffs when stretched.
- Try to combine bait. This way you can quickly determine what the fish likes at the moment.
- Have in stock a number of ready-made leashes equipped with hooks. It is advisable to have two sets, one for peaceful fish, the second for predators.
- If possible, try to “ring” the bottom for the presence of algae and snags. Otherwise, you are guaranteed to lose your gear.
- Install several safety loops on the main scaffolding. One in the middle, the second at the very end, closer to the sinker. This will make it more convenient to remove fish, change bait and broken leashes. To do this, simply throw these loops on a fixing stick, or fishing rod, and calmly maintain the gear.
- Do not make sudden reelings or lowering of the tackle, this will lead to the leashes getting caught in the main line.
- Always keep your hooks sharp. Hooking an elastic band even without blunt hooks suffers from the necessary sharpness and informativeness of the transmission of movement to the leashes; adding to this not the sharpest hooks, you risk being left without a catch.
- Carry out regular visual inspection of the fishing line and rubber shock absorber for chafing, cracks, and tears. It is better to replace defective parts on shore than to lose the entire tackle.
Baits and lures
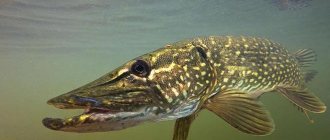
When catching pike perch using a rubber band, small fish are used. Usually this is a small roach or bleak. It is this type of fish that pike perch bites best at the end of autumn. You can buy it or catch it in advance in the same reservoir.
And frozen sprat also works well as bait.
Artificial baits are also used for pike perch: fish made of silicone or even just ordinary foam rubber. This material is lightweight and well follows the movements of small fish in the current.
Attaching live bait to a hook is carried out in one of the following ways:
- the hook is placed behind the lip;
- under the gills;
- behind the back;
- by the tail.
Attaching live bait to a hook “on the back”
The third method is the most popular; it is also considered universal, suitable for any type of bait. When using a tail bait, the hook is hooked through a thread that is wound around the tail of the bait.