Yuri 09/23/2020 515
For some reason, novice fishermen do not attach much importance to measuring the depth of a reservoir. Meanwhile, this indicator must definitely be taken into account when fishing, because the success of the hunt depends on it. Numerous casts in a chaotic manner will not lead to a good result (except in exceptional cases). Measuring the depth of a reservoir and studying its topography is the key to successful fishing. You can throw bait into a promising point, and then the equipment along with the bait.
Today we’ll talk about the ways in which you can measure the depth of a reservoir and study the bottom topography, and we’ll also talk about the most popular methods among experienced fishermen.
Measuring the depth of a reservoir
Even inexperienced fishermen know that large fish like to live in great depths, going to the edges and dumps to search for food. In fact, before starting fishing, it is worth determining the deepest and shallowest place in the water area: between them there will be a dump (an area with a difference in depth) - it is in this place that representatives of the ichthyofauna most often gather.

Measuring the bottom with a marker float
In summer, when it is especially hot, the fish accumulate in holes where the water is slightly cooler, and go out into shallow water in extreme cases. This means that targeted fishing needs to be concentrated there.
How to determine the depth at a fishing spot

How to determine the depth at a fishing site How to set the depth and determine the bottom topography at a fishing site?
Of course, it is better to use an echolocator. If you have the opportunity, then it is best to sail on a boat with an echolocator and look, find the bottom that is the most even in depth, but that there are some obstacles on it. Remember that the fish avoids a completely flat bottom. Ideally, you need to find a place where there is a flat bottom, and along the entire length of the wiring there will be one, two, three mounds or some kind of obstacles at the bottom. You need to fish the depth and record it not only along the length of the line, but also along the river alignment, in other words, a little closer, a little further from you, even further.
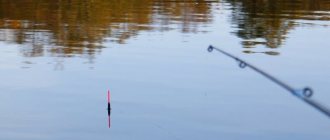
And so you need to find the most promising place. In order to set the depth absolutely correctly, firstly, we must select the carrying capacity of the float, ideally suited for this place. If we fish in a strong current and at enormous depths we use a float with a small carrying capacity, we simply will not reach the bottom. If we use a float that is too heavy, the equipment will be too rough. After we have selected the carrying capacity of the float, we need to set the depth. This is done quite easily. We make the depth approximately, by eye, greater than we need. The float floats smoothly throughout the process.
When setting the depth, we must watch the antenna reading. If the float goes along the entire length of the wiring and the antenna does not sway, it means the depth is too shallow. We slowly increase the depth, and at some point the float begins to move in certain sections of the swim. So, if it floats downstream, it begins to tilt. What does this show? During the determination of the depth, the sinkers are concentrated in one place, and the tilt of the float indicates that the entire mass of the sinkers has touched the bottom. Of course, the float slowed down a little; later, after we had passed this obstacle, it again took a vertical position and floated. Ideally, there should be from one to three such obstacles along the entire length of the wiring. Much more often, the domestic bait that we throw is retained in these obstacles, and this is where the bites occur.

If during wiring the antenna is ahead of the body of the float (Fig. 53-19), this is an indication that the depth is too enormous, which means it needs to be reduced.
Rice. 53-20 After we have set all this up, we will distribute the domestic sinkers along the fishing line, and as a result, during the free swim, the domestic bait will remain at the very bottom. And in those moments, when we see that the float is approaching the place of the obstacle, we can make a strong hold, stop the float in place, it will take the position as in Fig. 53-20, due to the fact that the line will bend in an arc, and the nozzle, smoothly bending around the obstacles, will also jump over it without any snags. Later we can release the float, it will again take a vertical position and set off for a free swim with light holds.
How to break through the bottom with a feeder and examine its structure [salapinru]
A simple marker for studying the bottom of a reservoir
Manual methods for measuring depth
As a rule, they involve the use of special equipment. Measurements can be made using the usual equipment elements, sharpened for these purposes, or with improvised means. Beginning fishermen should give preference to simpler methods of measuring the depth of a reservoir: using marker equipment or tapping, for example. It’s good if there is an experienced huntsman nearby who will show by personal example how easy it is to measure the depth of a reservoir. By the way, we, at Sazanya Bay, have experienced employees who are ready to show several secret ways to measure the depth of a reservoir.
Marker float
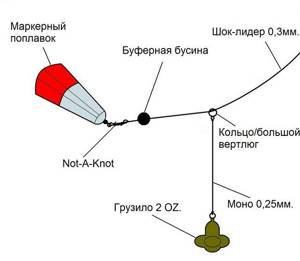
A marker float is a piece of equipment specially designed for measuring the depth of the water area. First you need to build an appropriate sliding structure. To do this, we recommend using ready-made marker devices, which can be purchased in specialized stores. We proceed as follows:
- We take a retractable leash with a carabiner at one end, a swivel and a carabiner at the other. Ideally, there should be a soft “dust” on it that protects the installation from clinging algae and other debris.
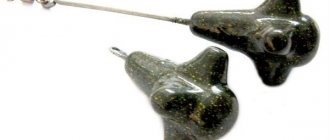
- We attach a weight to one end of the leash. Its weight can vary significantly. At long distances and with strong currents, it makes sense to use a sinker weighing 100 g or more.
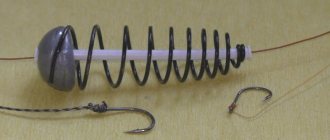
- We put a large foam rubber bead on the opposite end of the leash, passing it through the carabiner. It is needed in order to slightly raise the installation above the bottom, preventing the load from burying itself in the ground.
- We attach a swivel to the carabiner near the bead and pass the main fishing line through it. By this time it should already be attached to the reel.
- After retracting the line with a load, we put on a rubber limiter bead and a rubber cone with an expanding hole inside.
- At the free end of the fishing line we tie a carabiner with a secure knot (for example: we wrap the free end around the base several times and pass the “tail” into the loop near the fastener).
- We fix the marker float on the fastener and cover the connection point with the rubber cone on the fishing line.
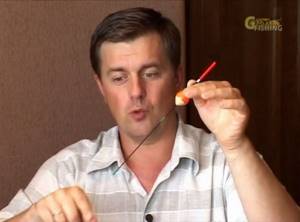
That's it, the marker equipment is ready. All that remains is to figure out how to use it to measure the depth of a reservoir. We proceed as follows:
- We make length marks on the rod (with electrical tape or any other method). For example, from the end of the reel spool to the mark is exactly 0.5 meters.
- Next, we cast to the most promising (in your opinion) place. This could be an island with vegetation, for example.
- Moving the rod slightly to the side, we pull the load along the bottom, observing its “behavior.”
- Based on the reaction of the load (sticking, “Sticking at the bottom”, vibration, etc.) we determine a promising place for fishing (a hole, the border between vegetation and shell rock, etc.).
- While holding the cord taut, loosen the clutch.
- Manually pull the cord from the spool to the mark on the form, counting the number of broaches. Simply put, we measure the length of the line being pulled out.
- We finish by bleeding as soon as we notice the floating float. And then we count the releases: for example, we released the fishing line 6 times, 0.5 meters each - the depth in this place is 3 meters.
For a more accurate result, you need to add the mounting length from the weight to the marker pen to the data obtained - let’s assume it will be 40 cm.
Having taken depth measurements and drawn up an approximate picture of the bottom topography, it is worth starting a more accurate study of the irregularities and composition of the bottom. Moreover, closer attention should be paid to places with greater depth. Our task is to find those promising places that we talked about above - i.e. edges, exits from pits, bottom ditches, places with harder soil not overgrown with algae, as well as places where bottom shells accumulate.
For this purpose, experienced fishermen “tap” the bottom with a sinker. This is done as follows. We take a regular feeder rod with a soft tip. The soft tip transmits the slightest blows more accurately. We attach a sinker weighing from 1 to 3 ounces to the fishing line. We make casts to the selected sector. After lowering the sinker to the bottom, use the rod to slowly drag the weight along the bottom, recording vibrations and impacts with your hand and the tip of the rod. We perform dragging only with the help of a rod, not a reel. With the reel we select only the excess line. What can you “read” from the behavior of the sinker during posting:
* Muddy, soft bottom or overgrown with grass is transferred with a constant light load.
* If the bottom is hard and without grass, the resistance to the movement of the load is much less.
* The movement of the sinker over the shells produces a frequent, small tapping sound in the hand.
* The upward movement of the sinker is transmitted by increasing load, and the downward movement, on the contrary, is transmitted by weakening resistance. The sinker sinks into the hole without any resistance at all, until a push in the hand determines that the sinker reaches the bottom.
* The edge is “read” by a sharper increase in load and subsequent sharp relaxation.
If a suitable place is found, you need to remember, or better yet, make a note in the direction of which landmark the cast was made, and at what distance from the shore the promising place is located. We remember the distance to the place by the number of revolutions of the coil. Why it is better to take notes on the location of promising places. The fact is that during reconnaissance there are usually several good places; of course, you won’t remember everything. It’s good if the first suitable place gives you a good bite. But you shouldn’t count on it, it doesn’t always happen. Therefore, we have to keep in mind a couple more attractive places for such a case.
In order to hit the feeder with great accuracy when casting to the chosen place, you need, firstly, to determine and remember the landmark towards which we are casting. The reference point can be anything, a tree or bush on the opposite bank, a large stone, etc. The distance to the selected location is counted by the revolutions of the reel and fixed by winding an elastic band directly onto the reel. The elastic band will help maintain the required distance while holding the fishing line. It is not advisable to use a clip on the reel to hold the fishing line, since there is a high probability of the fishing line breaking at the pinched point.

It is clear that the experience of “reading” the bottom does not come immediately - it takes time and constant training directly while fishing, and sometimes it makes sense to come to the chosen place in advance and practice measuring the depth and determining the bottom topography. By choosing a suitable place in advance and making the necessary notes in a notebook, you will save such precious time on fishing. In general, such notes, collected in different years, on different reservoirs and under different weather conditions, recording the composition of groundbait, bait and caught fish are worth a lot. Your fishing experience will be formed on this basis, and you will never be without a catch again.
Finally, I suggest you watch a wonderful film about feeder fishing. This is the real ABC of the feeder. Probably the best film about feeder fishing. It will definitely be useful to you, and not only to novice fishermen, but also to experienced feeder experts.
“Catchy feeder ” (after the end of each series, wait a little - the next series will turn on automatically).
Other measurement methods
The tapping method is especially popular among fishermen. It allows you to obtain not entirely accurate data and takes more time than working with a marker. But it is quite an interesting and fascinating way to study the bottom.
If you are seriously interested in fishing, pay attention to even the simplest models of echo sounders. Yes, these are additional costs, but they save you time and effort. Let us remind you that the rangers at Sazanya Bay know several simple ways to measure the depth of a reservoir and are ready to share their secrets with other fishermen.
TAGS:
Methods for determining the depth of a reservoir from the shore
Correct depth measurement and choice of distance are the key to successful fishing. You can throw bait at a promising point, and then a rig with bait. And while it’s very easy to find interesting depth changes from a boat, doing this from the shore can be difficult. A depth meter and one of the measuring methods can come to the rescue. The choice of method depends on your fishing style.
- Since ancient times, fish have been caught using a fly rod. The fishing distance was limited to the coastline. It was possible to determine the nature of the bottom by shifting the sinker. If the float lies on the surface of the water, then the load is at the bottom. As soon as the displacement of the sinker causes the float to take its working position, the depth is set correctly. In this simple way you can measure the coastal waters and find an interesting place for fishing.
- But spinners know how to determine the depth at a long distance. During step-by-step retrieving, the bait sinks to the bottom, the moment of contact is transferred to the tip of the rod or transferred to the hand. By calculating the time the equipment falls, you can roughly determine where the deeper areas are and find exits from the pits.
Today, anglers have many ways to accurately study the topography of the bottom surface. After this, you can select the appropriate fishing distance and adjust the gear for the chosen location.
Tags
Carp Buffalo Spring Vobla Asp Winter Crucian Rudd Summer Fishing baits Lower Volga Perch Autumn Fisherman's reminder Lures Bite forecast Fishing in Astrakhan Fishing baits Fishing tackle Fishing secrets Catfish Fishing methods Pike perch Catch Pike