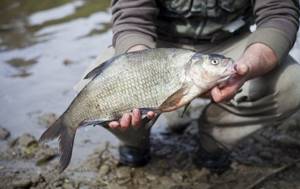
Choosing a fishing spot
When it comes to choosing a habitat, bream cannot be called a permanent fish, because it is equally often found both in shallow water and in deeper zones of reservoirs, therefore, when choosing an unfamiliar area of a reservoir for fishing, you should focus on the season of the year and stock up on an echo sounder (a device for research) in advance bottom irregularities).
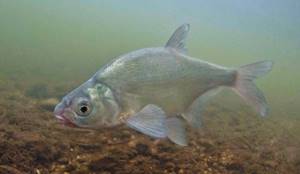
Thus, with the arrival of the first spring warmth and the disappearance of ice, this fish is found mainly in warmed shallow waters of lakes, rivers and reservoirs, often entering warmed spills and tributaries. It is more difficult to spot schools of bream than schools of roach, but closer to evening the chances increase.
Did you know? Bream can be considered a long-lived fish, especially if they live in stagnant water. In such conditions, their maximum lifespan reaches 20–23 years, while in rivers with running water it does not exceed 10 years.
After a few weeks, when the water warms up well in other parts of the reservoir, the fish moves to deeper places and begins to actively feed there. In the southern and central regions of the country, this time often coincides with the cherry blossom time, however, much depends on the area and maximum depth of a particular river or lake. After spawning (usually in mid-May), bream is successfully caught almost everywhere, with the exception of very deep places.
In summer, experienced fishermen advise looking for fishing spots in quiet, moderately deep areas, with plenty of food. If there is not enough natural food for the fish, you can artificially feed it by scattering bait in pre-selected places. The main “pastures” of bream are not in the deepest holes, but in reaches and irrigation areas with medium depths.
Important! If you have a boat, you should go away from the noisy shore, catching fish from the upper warm layers of the reservoir. Loud noises and people swimming are not the best for productive fishing.
How to anchor correctly
The optimal way to anchor a boat in a future bream fishing area depends on the strength of the current in the chosen location and the direction of the wind during fishing, so several options are possible here. In moderate gusts of wind, the optimal solution would be a classic stretch across the current, in which you first throw one load on a long rope of 30–50 meters, and then swim away and throw the second. Having chosen the rope of the first anchor, all that remains is to place the boat in the most suitable position and finally fix the vessel.
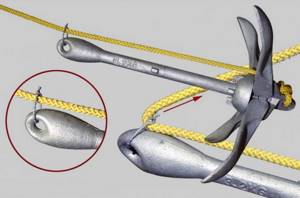
If the wind speed reaches 3-4 meters per second, and it blows along the riverbed, you can still fish, but this will be associated with certain inconveniences. You can’t place the boat across the current (the waves will hit the sides and shake it), so after throwing out the bow anchor, it’s better to stretch out in the direction of the wind.
The second load is placed in the place where the wind carries the boat, however, if its direction changes, you will have to throw a second anchor. A large cobblestone or a heavy iron object tied to a long rope, the dimensions of which will correspond to the depth of the reservoir in a particular fishing location, is perfect for the role of cargo.
Video: How to anchor a boat

What gear to choose and how to equip it for fishing from a boat
The simplest gear option for catching bream from a boat would be a regular float rod, but some fishermen prefer to use special onboard or feeder gear, arguing that their choice is more efficient than the process. To decide on the most effective fishing tool, it is worth studying the characteristics of several possible options, especially since some of them can be made independently.
Please also pay attention to the description, characteristics and uses of sea bream.
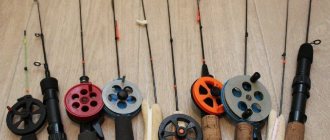
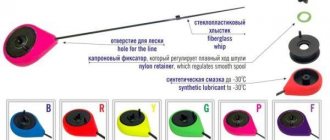
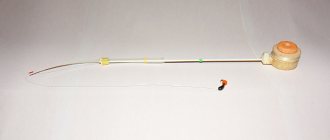
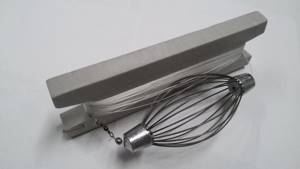
Onboard fishing rod
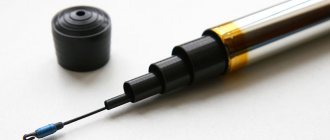
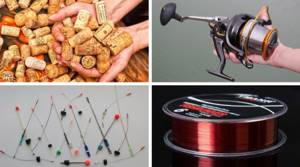
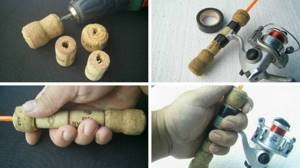
Catching bream using such gear is generally reminiscent of winter fishing using a short winter rod (up to 0.8 m in length) and a hard nod. One of the advantages of such a compact product is the ability to use several fishing rods at once, located in different directions (this allows you to simultaneously cover a large area of water). If you don’t have a ready-made fishing rod, you can use a homemade one, which can be created using the upper part of an old tackle (possibly a spinning rod).
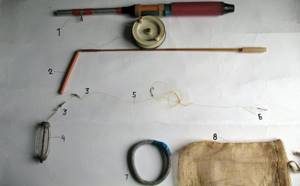
1 - fishing rod with reel, 2 - rubber tube, 3 - carabiner, 4 - feeder, 5 - leash, 6 - hook, 6 - ring, 7 - feeding bag
The design of the onboard fishing rod ensures comfortable catching of bottom fish even in unfavorable weather conditions, in particular in strong winds, intense currents or in rainy weather, when casting bait with a long rod is not very convenient.
Instructions for creating a side fishing rod with your own hands
In general, creating an onboard fishing rod yourself is not as difficult as it might seem at first glance, and even a beginner can cope with this task. There are many options for homemade designs, and the choice of a specific manufacturing scheme largely depends on the availability of component parts.
Also find out the difference between bream and white bream.
In the simplest version you will need:
- fiberglass tip from standard telescopic rods (usually has a sufficient margin of strength and is suitable for playing medium and large species of fish);
- several bottle caps (suitable for wine or champagne), pre-drilled along the axis with a drill, with a 6 mm diameter;
- spinning reel, winter point-and-shoot reel or spincast reel with a closed spool;
- factory rings from telescopic fishing rods;
- a nod from winter gear in the form of a spring with a ball;
- 25-meter main line, with a diameter of 0.2–0.25 mm and a high tendency to stretch, as well as 25 or 60 cm of line for leashes, approximately 0.18 mm thick;
- sinkers with a through fastening and an anti-twist outlet, weighing 30–50 g, based on the strength of the current in the intended fishing location.
Having prepared everything you need, all that remains is to connect all the parts of the future fishing rod together, adhering to the following requirements for completing this process:
- Pull the drilled bottle caps through the narrow end of the prepared whip and trim the outermost one at a suitable distance for maximum ease of use of the handle. After making sure that the parts are optimally positioned, fasten them with glue (it is better to place them one at a time).
- You can secure the coil in the standard old-fashioned way by making 3-4 turns of electrical tape on each side of the foot on the part. As an option, you can use a relatively inexpensive ready-made reel seat for fixation (designed mostly for Bolognese rods).
- Attach the prepared ring to the center of the whip (one piece will be enough). For fixation, you can use the same electrical tape or simply clamp the ring, pulling/wedging it on the base.
- After installing the ring, install a nod on the fishing rod and pass the fishing line inside the spring and through the ball, which will subsequently compensate for the vibrations of the boat on the wave and register the bite. When fishing at night, you can additionally install chemical fireflies on it.
- Attach a silicone stopper to the main line to prevent the load from hitting the nod during transportation. During fishing, it is raised 20–30 cm above the end of the fishing line, to which the swivel itself or a part with a clasp is attached, allowing you to quickly change leashes twisted by the current. The knot formed when tying can be hidden under a small rubber bead. This will protect the fishing line from tangling at the knotted site.
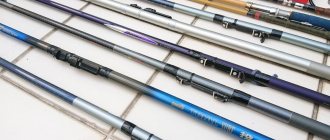
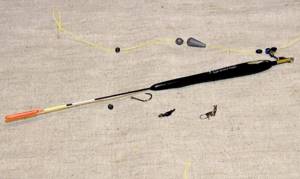
Float rod
A standard float rod with a fly rod can be used when fishing for bream from a boat, but only if the terrain conditions allow it. For fishing in reservoirs with medium depth, it is better to use gear with a main part length of no more than 3 m, which will not greatly limit the maneuverability of the fisherman. As for the material used to make the fishing rod, a fiberglass “stick” with a good margin of safety is perfect (it will allow you to catch even large fish).
Here you can read how to bake bream in the oven.
You can achieve the most comfortable fishing using a float rod only if the current in the fishing area is moderate. Otherwise, it is worth using Bolognese rods, of course, if free space in the boat allows.
Feeder
Fishing for bream using feeder gear involves the use of average length rods - 2.1–2.4 m. It is good if the selected products have a small weight (the lightest are picker models). Catching bream with feeder tackle from a boat has several advantages compared to using a standard fly or side rod.
- First of all, the list of advantages includes:
- fast line feed thanks to close casts;
- the possibility of catching more fish when fishing with a feeder (especially with a spring), since more fish initially fall into the bait spot;
- high casting accuracy due to the short fishing distance;
- ease of fishing for prey, which simply has nowhere to hide from the fisherman;
- the ability to use several fishing rods simultaneously, which significantly increases the chances of success.
Entrance
In the classical sense, a leash is a piece of fishing line with a heavy weight tied to it and a long leash with 3-5 hooks on it. In its finished form, such tackle is in many ways reminiscent of a donkey, only its casting is carried out strictly vertically and most often in the current. The optimal thickness of the main fishing line can be 0.3 mm, and a two-meter leash with 4 hooks tied to it can be no more than 0.2 mm.
As bait, it is advisable to attach worms to two hooks, and maggots to another two. The size of the sinker can correspond to the volume of a tablespoon, and the weight is selected in accordance with the strength of the current in the place of fishing: the stronger it is, the heavier the load.
Did you know? According to one of the most common theories, the name of the fish “bream” appeared due to the peculiarities of its behavior during the spawning period. Jumping out of the water, most individuals flop back sideways, creating a noise reminiscent of clanging (in common parlance, “grossing”).
Any fishing rod can be used to place the underpass, but, as follows from the reviews of many experienced fishermen, it is better to choose a long telescopic version, which allows you to “reach” the hidden places of the reservoir. Initially, the approach was developed for catching fish (in particular, bream) in the current, when it rises close to the feeder. In places with standing water, it is much more difficult to cast such equipment correctly, since the “tail” with leads does not stretch in the current and sinks almost under the boat itself (on the stern).
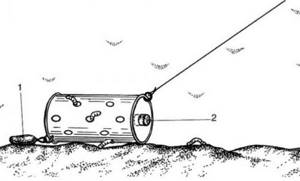
Jar
The jar is deservedly considered a folk tackle with a very simple working device. Its name is explained by its use in creating a tin can as a feeder with holes drilled on the sides. A tube is inserted into the center and a fishing line is passed through, and a heavy lead weight is attached to the side or bottom of the product.
Passing through the jar, a stopper is attached to the fishing line behind the tube (can be presented in the form of a metal ring and a leash with a hook and nozzle). To catch bream, you should use 2-3 hooks attached to one common rod with leashes. A jar with holes is usually filled with porridge (sometimes immediately while fishing) so that when the fishing line is tugged, it is washed out with water and attracts fish.
You might be interested in learning how to deliciously fry bream in a frying pan.
This method of catching bream is in many ways similar to the “ring” method, only in this version, when biting, the feeder is removed from the water along with the fish.
- A significant disadvantage of the can is the high noise level when using it and a considerable load on the rod, however, there are many advantages of the design:
- it is easy to make it yourself;
- for fastening you can use a cheap fishing rod with a reel (sometimes it’s just a strong stick);
- The jar is suitable for use in standing water;
- You can cast the tackle either manually or using a standard fishing rod.
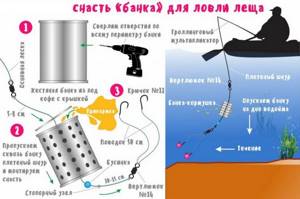
Sometimes a bank is called a type of underpass, but both tackles have many differences, so they cannot be called identical. In any case, when using the device in standing water, you need to lower it into the water very carefully, trying not to create unnecessary pops. Bream is a very cautious fish, so it is easy to scare it away from its feeding area with a pop.
We suggest that you familiarize yourself with information on how to prepare cold smoked bream.
Koltsovka
Typically the ring is used in conjunction with a feeder. On a thick, one-millimeter fishing line or nylon cord, a feeder filled with bait is lowered from the side of the current coming from under the side of the boat. The line of the tackle is inserted into the slot of the ring of the ring sinker (in relation to the onboard tackle, it is considered bottom). Then, from the reel of the fishing rod, through a small hole in the ring, the main line of the ring with the bottom end equipment of a suitable length is passed through it. After this, the ring is lowered onto the neck of the feeder (used for baiting the bream fishing area).

The aroma of the food being washed out will attract schools of bream, causing the fish to rise up. Since the hooks with attachments on the fishing line are constantly in the stream of food washed out of the feeder, the sharp objects at the ends of the leashes end up right in front of the bream’s nose, facilitating the quick capture of fish. As soon as he bites, they hook him. At this moment, the ring jumps off the cord of the feeder and, together with the fish, rises to the top (along the main fishing rod-ring).
Find out also how to deliciously cook bream with potatoes in the oven.
The disadvantage of this design is the large weight of the ring, which creates certain difficulties when fishing the tackle from the bottom, however, in comparison with other types of bottom equipment, it is the ring version that prevents the drift of the baits on the hooks of the ring by the current.
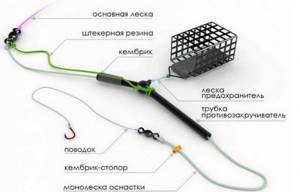
Feeder
A feeder is an essential attribute when catching bream. Despite the fact that an ordinary tin can with holes can serve as it, they usually use a special stationary product equipped with a 0.2 mm fishing line, and leashes with a diameter of 0.16 mm with hooks No. 4–6 mm should reach 80 cm in length. The feeder itself can be either wire or combined (in its manufacture, plastic parts or even weighting lead plates weighing 20–30 g are used together with the wire).
1- lead sinker, 2- cork
The method of filling the feeder with the selected bait also has its own characteristics. You should place bread crumbs (necessarily in large pieces) on the bottom of the mesh and on the sides of the device, and stuff the fragrant bait itself between them. Salapinka, barley or wheat porridge with various additives, is ideal for the role of the central composition.
Important! The basket should not interfere with the free transfer of bites from the hook to the rod tip, so it is worth paying maximum attention to the issue of attaching the feeder and leash.
The filled middle is also covered with breadcrumbs and tightened with wire. Typically, one such filled feeder should be enough for about 4–5 hours of fishing, however, the specific numbers will depend on the speed of the current in the fishing area and the density of filling the feeder.

If possible, the bait mixture can include peas, pearl barley, corn and cake. A good addition would be powdered milk, breadcrumbs, rolled oats and even semolina porridge. Any of the selected mixtures should be viscous enough to stay tightly in the feeder, and to better attract fish, add flavoring substances purchased at the pet store to the prepared “dough.”
Pay attention to the information on how to cook bream in sour cream.
Ring or eggs
There are several types of bream fishing rings, but they can all be combined into 2 main groups: removable and non-removable. In the first case, we are talking about a product with a thickness of 3–5 mm and a diameter of 55–65 mm, with a hole in the middle part of no more than 20 mm (responsible for moving the gear along the cord attached to the feeder).
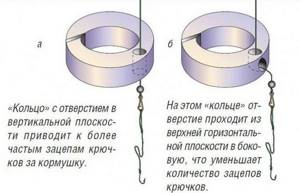
In addition, another hole is drilled at the edge of the ring, this time at an angle of 45 degrees (usually its diameter does not exceed 7 mm, and this is where the fishing line and leash are attached). The removable rings have a small inclined cut on the side opposite to where the fishing line is attached. It allows the parts to fly off the line when the bream is hooked, after which they can be easily returned to their original place.
Forms of side fishing rod sinkers
The most common forms of sinkers for side bottom fishing rods are shown in the photograph. It varies from person to person, but on my fishing trips the shape of the sinker for the bottom tackle is chosen to suit the fishing conditions at a specific place in the reservoir.
Side fishing rods - bottoms with sliding sinkers in the shape of an olive (1) and leashes creeping along the bottom, suggest stationary fishing from a boat. That is, you put, say, a couple of these bottom fishing rods with lines of different lengths on the side of the boat and wait for the fish to deign to pay attention to the hook attachments.
Active fishing is preferable to using an onboard bottom fishing rod with a cone-shaped sinker (2). To do this, the load is rigidly tied to the end of the main line of the tackle.
Conical, round side load
The conical shape of the sinker of the side bottom practically does not allow it to roll across its longitudinal axis during the river flow, due to which there is practically no twisting of the leashes around the main line of the fishing rod. In addition, the position of a sinker of this shape on the bottom will stabilize the force of the current pressure.
I use a small round sinker (3) in the rigs of onboard fishing rods on weak river currents or in shallows, when it is necessary to drive the bait on the hook away from the side of the boat. A large shot rolls well along the hard soils of river bottoms and across the river flow, thanks to which the fish can quickly notice the bait on the hook.
Bait for bream from a boat
Bream loves to eat deliciously, therefore, in order to increase his chances of success, the fisherman should train the fish in advance to take food in a clearly designated place. To do this, several times a week specially prepared bait mixtures based on porridge (usually barley or wheat) are thrown into the water.
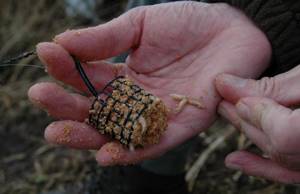
To make the mixture more aromatic and attractive to bream, you can add sunflower cake, chopped worms, anise drops and garlic to the mixture, but always in small quantities. In order to collect as much fish as possible in the most convenient place for the fisherman, it is advisable to form the scattered bait in advance into dense balls, which will dissolve in the water longer.
Important! You can increase the volume of bait and increase its resistance to flow by adding clay or earth to the composition of the preparation in a 1:2 ratio. These components also contribute to the formation of conditions suitable for bream and the uniform distribution of the feed mixture along the bottom of the reservoir.
What to feed (composition of bait)
In some places the bait is called “zakryga”. The easiest option is to fill the string bag with bread. They also put makukha (cake) and crackers there.
For a feeder with a small cell, cook porridge. For bream it is prepared from the following components:
- Millet – 3 packets;
- Salt – 2 tbsp. spoons;
- Sugar – 3 tbsp. spoons;
- Ground makha (cake) – 750 g;
- Barley – 0.5 kg;
- Unrefined sunflower oil (fragrant).
Preparation:
- Pour millet into boiling water and stir gently. Don't go far - you'll have to remove the foam.
- After boiling, add salt and sugar to the porridge. Mix. Bream is a gourmet, so don’t forget to add salt and sweeten it.
- When the cereal becomes soft (the grains will knead when squeezed with your fingers), it’s time to add the ground flour. It is introduced gradually: a couple of handfuls are added, mixed, added again, stirred again.
- Turn off the gas, cover the porridge with a lid, wrap it in a blanket for 3 - 5 hours.
- Steam the pearl barley in a thermos.
- After 3 hours, mix the components.
- At the pond, fill the feeder halfway with porridge.
- Place a piece of cloth and soak it in fragrant oil - the smell will last longer than if added directly to the porridge.
- Fill the feeder to the top. Tie it off.
To prevent the porridge from being washed out too quickly, lay crackers along the inside walls. The aroma of the bait is stunning - the oil and cake do their job.
The best bait for bream is a dung worm, Italian star pasta.
What bait is best to use
Fish bait is the main tool of any fisherman, so choosing the most suitable products should be given special attention. In the case of bream, it is better to try several basic options, ranging from bloodworms, larvae, worms and maggots to peas, pearl barley, corn or grain crops.
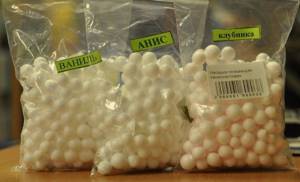
Sometimes fishermen use special scented baits with an artificially created strong odor.
Often capricious bream gets carried away by foam balls or simply dried dough on a string if it is saturated with garlic or some other aroma. Such baits will be appropriate when fishing in places with active currents, which is largely due to their high buoyancy.
Fishing technique and tactics
The specifics of catching bream from a boat largely depend on fishing conditions, including the strength of the current, the season and even the time of day, so before you get ready to go fishing, it’s worth finding out about the specifics of the process in each individual case.
Pay attention to the information on how to cook bream soup.
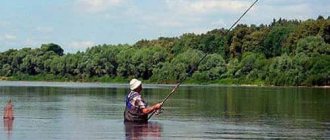
On the current
The first thing you should pay attention to when going to a body of water with a strong current is the choice of suitable fishing gear. If the depth does not exceed 5–6 m, you can use traditional wiring with the classic release of the fishing line from the boat. In this case, suitable tackle is presented in the form of a wire rod, reaching a length of 4–7 m and equipped with guide rings, a reel seat and a reel with a sufficient supply of fishing line.

In situations where the fishing depth does not exceed the length of the rod, equipment with stationary or sliding floats is used. In both options, it is advisable to use elements with one attachment point. The process of fishing on the current (especially important for rivers like the Volga) begins with searching for a “table” or the upper edge of the channel and anchoring the boat.
Important! Productive fishing on the Volga has one trick: as soon as the dams on the reservoirs are opened, a fairly strong underwater stream is formed, into which schools of bream fall to feed. If you manage to pick up a bait that slowly dissolves in the water and correctly set the casting depth of your gear, a good catch is guaranteed.
As soon as the vessel is fixed in one position, bait is lowered into the water (in balls or in a heavy feeder designed for 5–6 kg of wheat or any other porridge). When fishing at great depths with weak currents, a sliding rig will be most effective, while when fishing in strong and uneven currents, side rods are better suited.

In general, for catching bream in the current, lines with a thickness of 0.16–0.2 mm, leashes with a thickness of 0.13 mm, hooks with numbers 8 or 18, flattened and sliding floats with a weight of up to 8 g are suitable. In places with very strong currents Even more durable and heavy elements will do.
On still water
A feature of fishing in still water is the need to use lighter and less noisy gear, which is explained by the increased timidity of bream. They are thrown as carefully as possible so that no unnecessary squelching is created, and the cautious bream does not swim away.
We suggest you familiarize yourself with how to make a balyk from bream.
Casting on lakes and ponds should be done less frequently than in places with strong currents, which is quite logical, especially considering the long stay of the bait in one place (it is not washed away by the current). As for the equipment, in still water the rod leaders used can be thinner than when fishing in the current, and the hooks can be smaller (No. 14–16 are suitable).
When using feeder equipment, the basic set of gear will be the same as in other situations. True, in still water it is best to use the flat fishing method (like carp). Bream readily takes boilies and pellets, especially if the bait is in warm water.
You may be interested in learning about how to catch bream in September on a feeder.
In summer
Summer “hunting” for bream should be carried out taking into account its behavioral characteristics during this period. After spawning, which usually occurs in May–June, schools of fish return to their usual habitats, gradually increasing their feeding activity. For this reason, in late spring, fishermen stick to spring fishing principles (more animal scents and less feed), and then move on to plant foods and sweeter bait scents.
Since in the summer not only bream becomes active, but also smaller fish that actively eat worms and maggots from the hook, it is better to replace them with peas or corn, which bream like no less. Otherwise, the fishing technique is based on the same rules for placing the boat and selecting gear for fishing in the chosen place as in other cases, the main thing is to take into account the strength of the current and weather conditions.
About
Homemade stand for onboard fishing rods
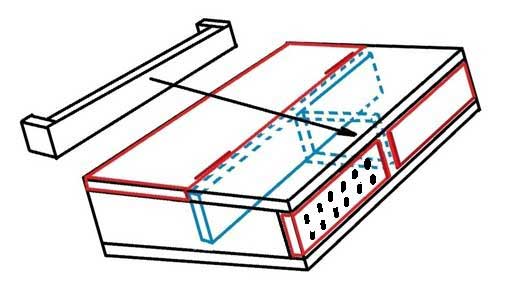
The compartments of a homemade foam plastic stand, made with your own hands for summer fishing with onboard fishing rods from a boat, are shown in the drawing. Decide for yourself the length, width and height of the stand.
You can glue a small foam plastic box of the stand with the required dimensions using the technology discussed in the topic Gluing the pencil case of a winter fishing box. Just in case, on the page I put a drawing of a homemade foam stand suitable for placing onboard fishing rods in a boat.
I have a homemade stand box glued together from 8-10 mm thick hard foam plates in the form of a container with three compartments, the largest of which can accommodate several side fishing rods with the hooks removed.
The lid of the large compartment of the onboard fishing rod stand on two homemade hinges hinges upward from the left side towards the center of the rubber boat.
Compartments of a homemade stand for onboard fishing rods
The covers of two small compartments open in a horizontal plane from the corners of the homemade stand to the starboard side of the boat. Their hinge hinges are glued in the middle of the side edge of the foam stand.
One of the compartments is used to store in the foam cavity of the stand various attributes of homemade onboard bottom fishing rods, which may be needed directly during summer fishing from a rubber boat. For example, homemade nods and bite alarms of different designs and systems.
In the third compartment I store and protect from the scorching rays of the summer sun the baits and attachments necessary for fishing with onboard rods.
If you intend to make the same homemade stand for your onboard fishing rods and will store baits in a container while fishing from a boat, then take care of the ventilation of the compartment. Why at least poke holes in the lid. Make a small compartment for attachments with a hinged lid.
A low side is glued along the arrow above the side compartments, which will prevent side fishing rods with bottom equipment from sliding to the bottom of the boat.
Folding foam strips can be made using the technology described in the topic “Hinge connection of the lid to the butterfly”.
But, of course, a homemade stand for your onboard fishing rods may look a little different depending on the convenience of fishing on your personal stationary or rubber boat. Here I presented only the idea embodied in the drawing of combining a stand with a container for storing and transporting onboard fishing rods to fishing and back.