A self-hooking winter fishing rod is one of the most effective inventions of fishermen, capable of providing not only high bite performance, but also freeing up much-needed additional time while fishing for any other type of activity aimed at finding fish, preparing other equipment and simultaneous fishing with several gears. It just so happens that fishing does not always pamper the angler with a stable bite, especially in winter. You have to conduct an intensive search for fish in fished waters, experiment with baits and different types of bait. As a rule, all these activities require time, and therefore the special attention of the fisherman.
The self-hooking device simplifies the task by not requiring the participation of the fisherman in realizing the resulting bite. A specially designed device will respond to any touch of the trophy to the bait with a high probability of realizing such a chance. Our information article will be presented below to the reader's attention about the nuances of assembling a self-hooking winter fishing rod with your own hands and the principles of its operation.
Advantages and disadvantages of the device
The main advantage of any type of self-cutter design is the automaticity of its operation after cocking the mechanism. The participation of the angler in fishing is limited only by the presence of the device, the selection and attachment of bait to the hook, and the installation of the rod in the working position in a promising fishing spot. After these actions, the fisherman has free time, which he can spend on working with other gear or exploring more suitable places for fishing. Another advantage of the tackle is the fact that after hooking a fish, due to its design features, the trophy will not pull the rod into the hole, but will be held on the hook until it is detected and fished out. Thus, the angler not only realizes the bite, but also saves the caught fish.
The disadvantages include the complexity of the self-cutter design, which requires certain skills and abilities, as well as certain difficulties in setting up and debugging the correct operation of the automated gear. The setting of the operation of the hooking mechanism is done based on the planned size of the catch, which is not always possible to predict, as a result of which you can lose smaller fish from a lip rupture, and when fishing for large ones, you can lose baits as a result of them being eaten by small fish without triggering the mechanism configured for more sensitive touches.
Option 1
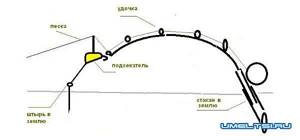
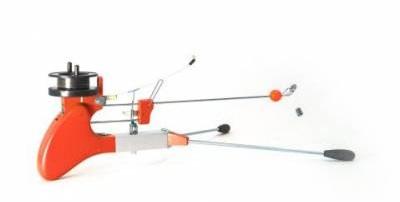
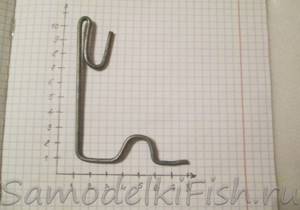
The self-hook is designed for use with a fishing rod or spinning rod and the spring properties of the rod. During a bite, the bent rod is released by the hooking mechanism, as a result, the fish is automatically hooked without any action from the fisherman.
In the image we can see a general diagram of the operating principle of such a system.
To connect the parts of the self-undercutter structure, wire bushings are used, which are soldered, or bolts - you can choose one of these solutions.
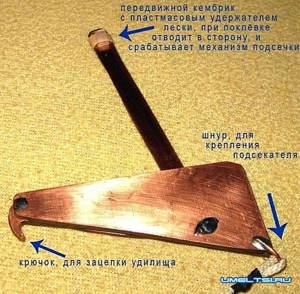
There are different options for the material - steel with or without galvanization, preferably brass. In general, whatever is at hand.
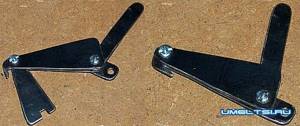
All the elements of the homemade product need to be connected and at the same time ensure that the moving parts should move easily and not get stuck anywhere. You can put a minimum amount of machine oil on them.
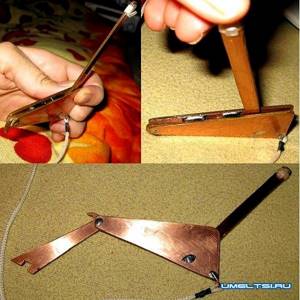
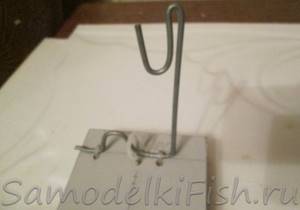
Now we have one part of a homemade auto hook. You can make a holder for installing a fishing rod or spinning rod with your own hands or buy a ready-made glass. Or take some other object of a suitable shape to attach the rod to. For example, you can use the diagram below.
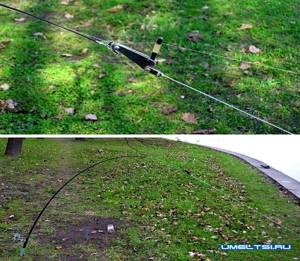
The autocutter is ready. You can put the homemade hooking mechanism in the working position and wait for the fish to be hooked.
Operating principle and design of the self-cutter
The principle of operation of the main mechanism is based on the creation of a fixed force from the tension of a special device, which, when the gouge is triggered, which occurs as a result of excess stress caused by the fish taking the bait, is put into operation and hooks the trophy. Depending on the design of the fishing rod, the tension force arises through excessive stretching of the spring or aviation elastic, commonly called a model.
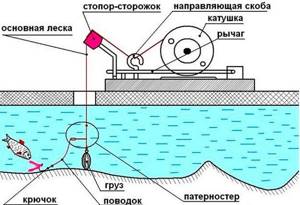
The main equipment elements of a self-hooking winter fishing rod are:
- lever;
- rubber;
- groove for the trigger rod;
- loop for securing nylon thread;
- nylon thread;
- spring, preferably made of rolled steel wire;
- loop for mounting the trigger rod and pulling the monofilament from the spool to the nod;
- fishing rod;
- trigger;
- retractable nod;
- nod base;
- monofilament;
- tripod for fixing the rod in manual mode;
- inertial reel with brake;
- spring groove;
- trigger rod.
For what purposes is it needed?
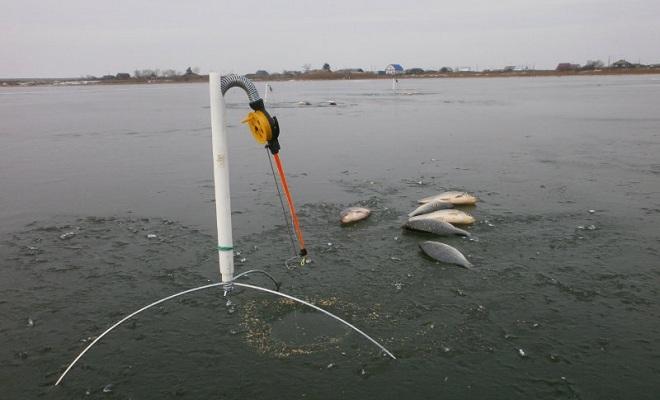
For the most part, the production of hooks is in demand during the deep winter, when times of depressed biting and low fish activity come. Often, for positive results on fishing, a fairly large amount of testing of currently promising baits and searching for fish sites where they exhibit feeding activity are required. Under such fishing conditions, the fisherman leaves devices at selected hunting points with the ability to independently hook fish, calmly carrying out further exploration of the water area.
By analyzing the results of the rods' performance, and the results of the tackle's performance will undoubtedly be there if a fish approaches, one can draw conclusions about the nature of the fish's diet, its type and the type of bait used. Therefore, it is worth purchasing or making a winter fishing rod of this operating principle because of the possibility of comfortable searching for fish without fear of missing out on a trophy that has come to a pre-selected promising place or to a pre-fed point.
Types of self-undercutter
As a result of practical application and improvement of the mechanism, today there are three main types of self-cutters. Based on the principle of these designs, the overwhelming majority of winter fishing rods of the catfish type have been created.
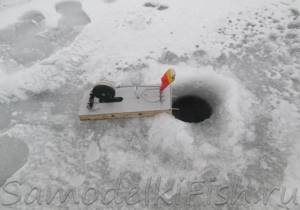
- The simplest drawing of the device is based on the principle of operation of a mousetrap, when a mechanism in the form of a trigger lever is assembled on a wooden plank, and operation occurs due to the operation of a cocked trigger.
- a lever hook, which is based on the operation of a nod under the influence of excessive tension of a steel spring, is a more complex design, but is considered the most delicate and sensitive tool to bites of varying strength.
- a lever-type undercutter using energy from the compression of an elastic band as a trigger mechanism, is simple compared to a spring device and is less expensive to manufacture.
Important! Whatever type of self-cutting mechanism is assembled, its main and final goal is to trigger the nod that pulls the line with the hook to the surface of the reservoir.
It is at the moment of this pull that the fishing line with the hook detects the fish trying the bait and holds it until the fisherman arrives.
Homemade products
Experienced fishermen often make such gear themselves from scrap materials. A do-it-yourself self-cutting fishing rod for winter fishing can be either a complex or a simple design.
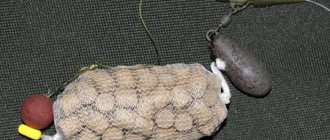
For a basic undercutter you will need a strong paper clip and two rubber bands.
Progress:
- We give the paperclip the appearance of a staple (straighten the inner part).
- We thread the elastic bands through each other (you can use one, then twist them in a figure eight).
- Throw one edge of the elastic over the spool holder.
- We hook the second edge of the elastic to the hook of the staple.
- We stretch the elastic band to the penultimate knee of the fishing rod and hook it with a hook.
- We insert the fishing line into the second hook.
The homemade self-hooking fishing rod is ready. When a bite occurs, the fishing line will stretch, the bracket will fall from the ring, the elastic will take its normal shape, that is, it will tear the fishing line. Here's the hook! The fisherman will only have to get his catch.
For homemade products, more complex mechanisms using springs are also used. The mousetrap principle has also proven itself well. It is popular as an undercutter and the use of a medical tourniquet.
Here, as they say, who can do what! The imagination of craftsmen is limitless. What types of homemade self-hookers you won’t see in winter at the Sazanya Bay fishing base. Many people share their ideas and experiences. They tell beginners what is better and more effective to use in local areas. And which fishing rods brought the biggest trophy.
TAGS:
How to make a self-hooking fishing rod with your own hands
A self-made self-hooking winter fishing rod will undoubtedly become a sought-after aid when searching for fish for every winter angler. In addition, the initially seemingly complex mechanism of operation of the product is quite suitable for production at home and does not require large material costs to complete the complex of work being performed.
Before planning the manufacture of gear, you should stock up on the following list of tools and some materials:
- metal scissors.
- pliers.
- screwdriver
- galvanized sheet metal up to 1.5 mm thick.
- steel elastic wire with a diameter of no more than 0.2 mm.
- steel bar with a diameter of 3 mm.
- eraser, school eraser.
- self-clamping polyethylene clamps.
Manufacturing technology
The base of the product is cut out of a metal sheet using metal scissors. As a rule, a size of 130x80 mm is quite enough for a compact and efficient mechanism. At the rear of the workpiece, approximately 10 mm from its end, we attach brackets cut from galvanized sheet and intended for fastening the main lever. The role of a staple can ideally be played by a piece from a children's metal construction set. We make a spring from thin steel wire by winding it around the future lever.
The short end of the spring will rest on the base, and bend the long end in the form of an arc and fix it on a lever made of a steel rod. In this case, the lever is bent at an angle of 90 degrees and, together with the spring, is inserted into pre-mounted brackets. By moving the lever to the rear position, we fix the spring on it. Pushing the lever forward, we check how strong the kick will be. If the force is insufficient, it is necessary to make the spring stiffer by adding turns. At the front end of the platform we attach a clamp made of a steel rod. For fastening we use plastic clamps threaded into holes drilled in the base. It is important that the end of the lever fits under the lower arc of the latch. Then we attach a rubber eraser to the clamp, piercing a hole in it.
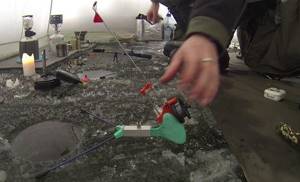
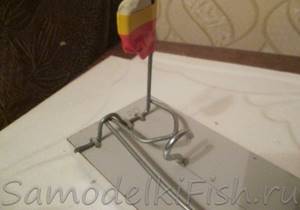
We mount a small reel on the base, as well as a bracket for passing the fishing line. To cock into the working position, the trigger lever is bent to the base and pressed with a latch. The line from the reel is pulled under the bracket and threaded into a small slot on the eraser. The rig with bait is lowered into the hole. When you pull the fishing line, it, being pinched in the eraser of the latch, will pull it behind itself and release the working lever, which, under the action of a spring, will hit the fishing line, automatically performing a hook.
A unique fishing rod with an automatic hook for do-it-yourself winter fishing
Fishing rods with an automatic hooking device are unofficially considered poaching, but in fact this is not true.
Auto hooking is often used in winter fishing by both beginners and experienced anglers. Following the step-by-step instructions, you can make a self-cutting device yourself. Materials and tools for homemade work: • plywood or chipboard; • self-tapping screws; • thin and thick metal wire; • pliers; • drill; • reel with fishing line.
The process of making an auto hooker Having made such a device, the fishing process becomes even more interesting, because practically the fishing rod itself will catch fish.
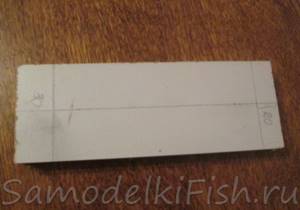
Step 1. Base of the fishing rod
You need to take a piece of plywood or chipboard and cut it to approximately 22x8 cm in size - this is the optimal size. It makes no sense to make the base larger, as it will be cumbersome, and if you make it smaller, all the necessary elements will not fit.
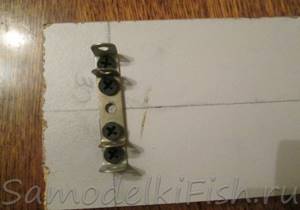
Step 2. Lever bracket
Take the narrow side of the plywood and measure three centimeters, then screw the two undercut arms onto small screws. Levers can be made from old metal construction parts or sheet metal.
Step 3. Spring
To make a spring, you need to acquire two wires, thin and thick. Thin wire can be taken from an old “string” type cornice. Thick wire can be taken from the structure of suspended ceilings.
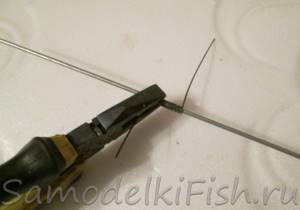
A thin wire is wound onto a thick wire using pliers, making turn after turn. It is necessary to make from 10 to 15 turns (so that the spring fits between the two brackets).
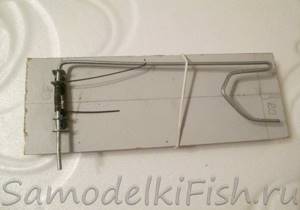
Step 4. Mounting the lever
The future lever must be bent and inserted into the beginning of one of the brackets. Next, a pre-made spring is put on the wire, and the lever is pushed into the second bracket. The spring is located between the brackets. The long end of the spring is bent at the bottom of the lever. It is necessary to make sure that the homemade spring pulls the entire lever.

Step 5. Impact part
The end of a thick wire must be bent at the end of the plywood to form an impact part; all that remains is cut off.
Step 6. Making a clamp
For the clamp, you need to take another thick wire and bend it into a shape similar to a hook.
Step 7. Drilling holes for fastening the clamp
On the other narrow side of the plywood, you need to measure two centimeters from the edge and make six holes. Using plastic ties, a thick wire fastener must be attached to the holes made. Attach a regular rubber band to the end of the fastener for erasing.
Step 8. Finalizing the elastic
To make the elastic hold better, you need to additionally rewind it with electrical tape and cut a small hole so that it can let the fishing line pass through it.
Step 9. Installing the line tensioner
A little lower from the bottom of the bend of the lever, you need to drill a hole for the future line tensioner, it will be a hook on which chandeliers are hung.
Step 10. Attaching the coil
The coil leg must be attached to the base with two self-tapping screws.
The line should pass between the tensioner and the hole in the elastic. Bend the clamp so that the edge of the fishing line goes straight into the hole and does not cling to the wooden base. Conclusion
When the fishing line is in the water and it is pulled, the latch moves forward, while the lever is released and, with the help of a spring, bends the fishing line - a hook occurs. When testing the device in air, everything happens quite quickly, in water everything is much slower. Depending on the number of turns of the spring, the traction force can be changed. Source
Become the author of the site, publish your own articles, descriptions of homemade products and pay for the text. Read more here.