Dried fish
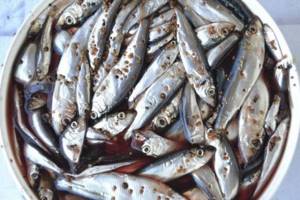
Small fish are usually dried and artificial brine is used for this. Prepare the fish - wash and sort. String small carcasses of 5-10 pieces on a rope and completely lower them into the brine. Soak in brine for 2-3 days, then wash under running water for 30 minutes and hang to dry.
Brine for herring or mackerel is a little softer. In addition to salt, you need to add sugar - 1 tbsp. l. per liter of water, coriander, bay leaf, peppercorns, cloves. Pour the prepared chilled mixture over the fish carcasses and leave for 2 days.
Recipe for brine for red fish and caviar
We prepare brine for red caviar and fish like this. Place a pan of clean water on the fire. Water is taken at the rate of 3 glasses per kilogram of product. When the water in the pan begins to boil, add salt to it. Salt is taken in the proportion: one glass of salt to five glasses of water. But this proportion cannot be called exact, so you definitely need to check the concentration of the solution using the potato method, which I described above. If the potato starts to sink, feel free to add salt!
When you figure out the strength of the solution for salting caviar and fish in brine, you can add other ingredients to the saucepan: sugar (one tablespoon per liter), a little coriander, black and allspice, bay leaf. Boil the brine for a few more minutes and then remove from the heat. Let it cool and pour in our fish or caviar. If the brine has been properly prepared and is strong enough, you can taste the results of salting the very next day.
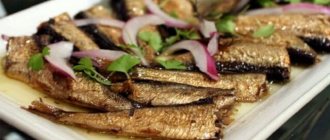
DIY salted sprat
To prepare anchovy and sprat, you need a deep dish with a lid. Place the fish on the bottom of the container and sprinkle generously with salt. Cover and place pressure on top. In a day or two, when the carcasses release juice, check the condition. If the brine is cloudy, it must be drained and salt added again. If desired, you can add sunflower oil. Ready time 3–4 days. Salted fish can be stored for 10–15 days.
You can prepare aromatic salted sprat with your own hands in a few days.
Brine for smoking
IMPORTANT! For hot smoked fish, there are subtleties in preparing the brine.
Pour salt into a large saucepan, first crush it well so that there are no lumps, and fill it with hot water. Add peppercorns, sugar, bay leaf. Mix well and bring to a boil. While it is cooling, it is necessary to prepare the fish product for salting: gut it, remove the heads. Sprinkle each carcass with salt and place in a container. Pour brine, cover and press down with pressure. Salt for 1-3 days. Then wash the salted fish and you can start smoking.
red fish
Quick brine recipes for red fish are popular among housewives. This product takes pride of place and for good reason, because salted trout or pink salmon is very tasty. To make the fish tender, tasty and well salted, you need to remove large bones, fillet and cut the carcass into small pieces. Place fish fillets in a container. Pour 0.5 liters of cold water into a separate bowl, add 100 g of salt and mix well until dissolved.
Pour the brine into the fish, cover and press down. After an hour and a half, drain the marinade and add fresh marinade. Dilute 1 tbsp in a glass. l. vinegar with water, pour it over the fish, after 5 minutes drain the brine. Cut the onion into half rings, add to the fish fillet, and add peppercorns and bay leaves. Drizzle it all with sunflower oil and lemon juice - 1 tbsp. l. Mix. Lightly salted fish is ready.
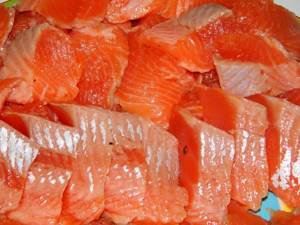
Lightly salted red fish - quick, tasty and healthy.
Quick salting for hot smoking
How to marinate fish for grilling
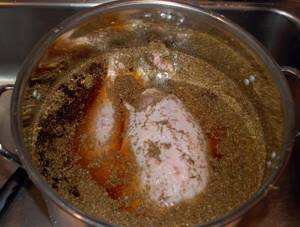
Wash, clean and gut the fish, cut into steaks. Place a saucepan with 1 liter of water on the stove, add 50 g of salt, half a lemon and half an orange, an onion cut into 4 parts, 1 tbsp. l. cinnamon, sugar and pepper mixture, 3 pcs. bay leaf, 1 tsp. a mixture of rosemary, sage and thyme. Cook for 5–10 minutes.
Cool and pour over the fish pieces. Cover and leave for 12 hours. Place the salted carcasses on a paper towel and leave to dry for 2 hours. Then you can smoke it. This fish turns out to be very aromatic, with a slight hint of citrus.
Tuzluk is a savory brine for processing meat, poultry or fish.
What does this unusual mixture mean? Brine is a strong solution of ordinary table salt used for salting various raw materials of animal origin. The most important purpose of the rich, spicy liquid is to marinate freshly caught fish. How is brine used at home? This product is widely used for processing meat and lard, including before smoking. In addition, in the cuisines of some nations, sauces served with meat and fish have the same name. A simple recipe for one of them is given below in this article.
How to prepare brine at home? Recipe for pickling lard
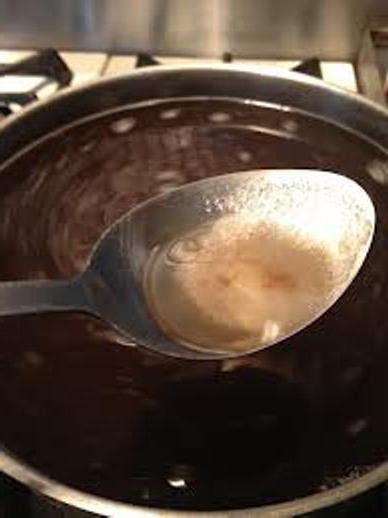
A strong brine solution can be obtained in a rather unusual way. Place a pot of water on the stove, then throw a large potato into the container. After boiling, reduce the heat and start adding salt. When cooking slowly, the potatoes will float about halfway through the liquid. Add salt again and again until our “blank” begins to rise to the surface. As soon as it “jumps out”, throw it away. After this, stop adding table salt to the solution. Boil the brine for a few more minutes, adding various spices at the end of cooking. After complete cooling, you can pour the prepared lard with the aromatic solution. Isn't it an unusual brine? This preparation guarantees a very strong marinade for preserving lard in hot weather, when there is no cool room for storing it. Although you can use it at any other time of the year.
How to cook brine for processing meat before smoking?
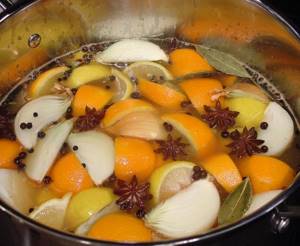
Do you want to get a very original and tasty dish? Then prepare brine in an unusual way, using a variety of aromatic herbs and spices. Add 400 g of coarse table salt to 4 liters of raw water mixed with 2 liters of apple juice. Place the mixture on the fire and start heating. Pour into the almost boiling liquid:
- 6 pcs. large bay leaves and peeled and chopped garlic cloves;
- 4 sprigs each of fresh dry thyme, fragrant rosemary and sage;
- 1 full tbsp. l. allspice mixture of peppers, granulated sugar and cinnamon;
- 2 large lemons, 2 medium oranges and 2 regular onions (all cut into slices with peel).
After boiling, boil the aromatic brine for 5-7 minutes. Depending on the smoking method, products can either be cooked for a short time in a spicy liquid or poured cold into it for marinating.
In some national cuisines, brine is a spicy mixture in the form of sauce. The recipe for one of them
Caucasian brine is prepared with the obligatory use of a large amount of minted garlic and hot spices. Crush it with two full tablespoons of salt, taking about 15-20 cloves (2 cloves). Pour the mixture into 0.5 liters of Adyghe ayran or a mixture of kefir and sour cream, and let it brew in the refrigerator for 1-1.5 hours. Additional seasonings are added as desired, but cayenne and black allspice are mandatory. This sauce goes well with boiled beef and chicken.
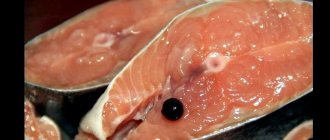
Caviar
Caviar is a product rich in microelements and biologically active substances. As well as a festive table decoration and a very tasty dish. You can prepare caviar at home.
Boil water - 2 liters, add salt - 4 tbsp to the pan. l., wait until it is completely dissolved, remove the water from the heat and cool.
For a brighter taste, you can add 1 tbsp to the brine. l. Sahara. Pour brine over the caviar. Let stand for 30–60 minutes and drain the marinade. Rinse the caviar with running water. Homemade caviar is much tastier, more nutritious and healthier. It does not contain preservatives, dyes or harmful substances. But it is stored much less - only 3-4 days.
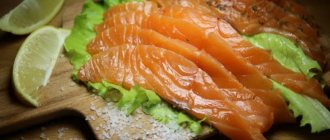
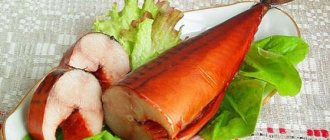
Salting salmon
On the eve of the holidays, every housewife strives to prepare something tasty and special. A table decoration can be, for example, salmon. By salting it at home, you can save a lot. The main thing is to choose the right recipe for preparing red fish.
Ingredients:
- salmon (two kg),
- coarse salt (five tbsp.),
- sugar (two tbsp.).
Remove the skin from frozen fish and then rinse it in running water. Next, cut it into thin pieces. Rub each piece with a pickling mixture consisting of salt and sugar.
Next, place the pieces tightly together in a container. Close the dish and put it in the refrigerator. After eight hours, the fish is ready to eat. By the way, this recipe is most popular among housewives.
Lightly salted herring
Who doesn’t love a tasty, fatty herring with green onions and potatoes? And if the fish is cooked with your own hands, it’s doubly delicious. Let's prepare the brine. Dilute 1 kg of salt in 10 liters of water. If the time for salting is less than 12 hours, then the amount of salt must be increased to 1.5 kg. Place the gutted herring tightly next to each other in a bowl with high edges. Pour in brine. Cover and weigh down. Wash the finished fish.
There is 1 more recipe for spicy quick salting. Prepare the fish, divide into pieces. Prepare brine: 6–7 kg of salt for 2 liters of water. Bring to a boil and pour this brine over the fish. Press down the covered carcasses and put them in a cool, dark place for 1–2 hours. Rinse the finished fish with running water. Add spices and herbs depending on your preferences: coriander, dill, sage, basil, rosemary, etc., sprinkle the fish with lemon juice.
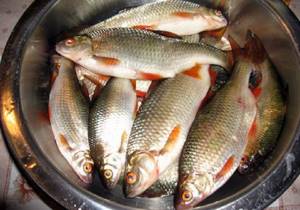
Method of salting in prepared brine
This method has a later origin and is suitable for salting small fish. We remove the entrails from the carcasses and place them in a bowl, belly up. Prepare a saline solution. For this you will need:
- Filtered water - 3 liters.
- Table salt - 1 kg.
- Black pepper - 15 peas.
- Ground bay leaf - 0.5 teaspoon.
- Black currant leaves - 4 pcs.
Boil water and all ingredients and let the brine cool. Pour the marinade over the fish and keep in a cool place. Salting duration is 1-3 days. In this marinade, pickle fish whose weight does not exceed 500 g: roach, gobies, bream, rudd, sabrefish, asp, perch.
Spicy salted smoked fish
The fish turns out aromatic and fragrant. Place a pan of water on the fire, add salt in the ratio of 150 g of salt per 1 liter of water. Boil. Add 1 tbsp. l. Sahara. Remove brine from heat. Pour 50 g of soy sauce and lemon juice into the finished cooled marinade. Add 100 g of dry white wine.
IMPORTANT! Season with pepper, basil, coriander and finely chopped garlic - 2 cloves.
Pour the cleaned, washed and divided fish into pieces with brine and put in a cool place for 12 hours. After draining the marinade, dry the fish for an hour. You can start smoking.
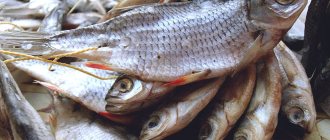
River fish
This fish takes 3 weeks to prepare. Then you can store it only in the refrigerator, without removing it from the brine, and for no more than 10 days. Wash the carcasses, gut them, put them in a container.
Prepare brine from 2 liters of water, 500 g of salt, peppercorns and bay leaf. Boil for 5–10 minutes. Cool and pour over the fish. Be sure to use oppression. After three days, drain the brine and refill with fresh brine.
Salting river fish can take three weeks.
Dry salting of large fish
This method is good for salting fish weighing more than 1 kg . Let's start preparing the product; for this you need to cut the carcasses from the back, remove the insides from them and cut out the gills. It is not necessary to wash the product; you just need to blot the fish with a paper towel. Sprinkle the inside generously with salt and place the product in a wooden box, the bottom of which is strewn with salt. We place each subsequent carcass head to tail of the previous one, sprinkle all layers with salt.
The salting process lasts for 5-7 days. The brine that is released during the salting process will flow out through the cracks in the box. This is the principle of our dry salting recipe; the fish in it is not oversaturated with moisture and is subsequently stored for a long time. Many fishermen use this method to store fish during fishing, but when traveling, they salt it not in a box, but in a mat (burlap). It is suspended over a dug hole, and the brine flows directly into the ground. This is also an ancient, time-tested recipe.
Dry salting of small fish
In this way, you can salt small fish without even removing the giblets from it. Take any clean cloth. Spread it on a wide surface (plywood, table top), place the fish in a head-to-tail position so that the back of the previous one overlaps the belly of the next one . Sprinkle the product generously with salt and cover with a cloth. Place another sheet of plywood on the layer of fish in the fabric and apply pressure. This way the fish fillet will be denser.
After a while, brine will be released from the salted mass, it will pass through the fabric and flow to the ground. In this type of salting, do not use the standard amount of salt (from 120 to 130 g per 1 kg of fish), but increase the concentration to 150-200 g per 1 kg of product. This is due to the fact that in the case of uneviscerated carcasses, the salt is distributed unevenly.
Place the fish in a dark, cool (up to 10˚C) place for 48 hours, then soak in water and dry in fresh air. As a rule, the soaking time depends on the duration of salting; 1 day of salting is equal to 1 hour of soaking, respectively. After soaking, the fish can be sent for storage or drying.
It is important to know
It’s not enough to know cooking recipes; you also need to have secrets, listen to advice, and learn the nuances:
- Water for brine must be filtered and settled.
- Coarse salt is best and in no case iodized.
- If flakes have formed in the cooked brine, it should be strained.
- The brine must be used after it has cooled. In some quick salting recipes, you can pour hot brine over the fish, but not boiling water.
- Use only the following containers: a wooden barrel, enamel dishes without chips, damage or cracks, plastic boxes for food products.
- The fish is only fresh and clean.
- When salting, avoid exposing the fish to pathogenic and disease-causing organisms.
- Do not wrap finished fish in bags, paper, and even more so in newspaper.
- Salt the fish in a cool, dry place.
- Use the fish brine only once.
- Salted fish must be stored in brine at a temperature of no more than 8⁰C.
- Wrap the dried chop in parchment and store in a cool, dry place.
If the rules for salting fish products are not followed, a sticky whitish coating appears on the carcasses, and the brine becomes cloudy and has an unpleasant odor. This fish is not recommended for consumption.
Preparation of semi-finished product klipfisk
Klipfisk should be produced only from live, bloodless and completely fresh fish. Bleeding is necessary, since the whiteness of the meat depends on it - the main requirement for the appearance of the clipfisk. It is performed by cutting the interbranchial space at a distance of 1 cm from the junction of the humerus.
In this case, the cardiac bulb is cut, and bleeding occurs when the heart pulsates. Dormant and lying cod cannot be bled well. In addition, during the process of autolysis, the connection between the septa is weakened and the cod meat is stratified.
During the period of autolysis, gaps filled with muscle juice appear between the cells. At the same time, the tissue becomes more flabby.
Practice has established the following maximum storage periods for fish after bleeding on a trawler, depending on temperature, see Table 2.
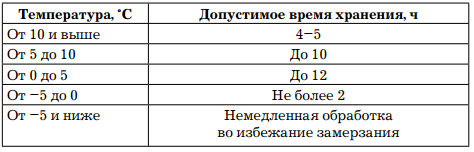
Table 2 - Shelf life of fish
Equally important is careful handling of the fish during processing, as impacts cause bruising, leaving dark spots on the finished product.
When manually cutting fish into klipfisk, a shkerel knife (flounder) is used to bleed and remove the heads, and a klipfisk - cutting knife is used to flatten the fish and separate part of the spine.
To serve fish on the cutting table, a metal rivet hook embedded in a small handle is used. For washing fish, use a trough on a stand, made of boards (2.5 cm thick), measuring 100x125x60 cm, with a side hole for water drainage, closed with a wooden stopper. The sink is equipped with a shield measuring 160x80 cm made of boards 2.5 cm thick. A sink board with an area of 70–75 cm2 is installed in the washing trough obliquely to the wall. The salt is supplied on wooden trays with a capacity of 30–40 kg of salt.
Ripping open the abdomen and separating the head
An incision along the abdomen is made starting below the pelvic fins (1–1.5 cm) and extends to the anus. After this, the esophagus, the muscles connecting the head to the body, and the connections of the atlas with the second vertebra are cut. In order not to damage or expose the humerus and parietal bones from tissue, the knife is inserted under the gill cover and the incision is made to the parietal bones, towards the upper part of the eye. Without bringing the knife to the last, it is turned to the frontal part of the head and the parietal bone and the muscular connections of the humerus with the gill covers are cut.
Such incisions are made on both sides of the body without exposing bones, and the head is separated by simple pressure.
Compared to the usual shkerka, this method of separating the head saves an extra piece of meat during the carcass, equal to 1.5–2% of the total weight of the fish.
The described beheading process is practiced on our trawlers.
Spreading out
The fish is placed on the table with its belly facing the cutter, who continues the previously made cut to remove the entrails, first towards the pelvic fins, and then from the anus to the end of the anal fin, making the cut at the fin itself so that the latter remains on the right side of the fish, when viewed from heads.
After this, the spine (along with the kidneys and swim bladder) is cut out so that as little meat as possible remains. The spine is cut from the front of the fish to the point where the kidneys end, which corresponds to 23–21 mm along the vertebra, with the cut along the spinal column going obliquely through two vertebrae.
Removal of the kidneys is of great importance. They are adjacent to the ridge at the site of the main blood vessels. Obviously, it is for this reason that the removal of the front part of the ridge when cutting into klipfisk came into practice as a guarantee of complete removal of the kidneys and blood vessels, which are the main source of spoilage of the fish.
Clipfisk machine
The clipfisk, or flattening, machine automatically does all the work described above to flatten the cod. The machine cuts through the tail part of the spine, thereby achieving better flattening of the entire fish and eliminating the fleshy fold on the dorsal part of the carcass, which often forms during manual cutting due to an insufficiently deep cut along the spine. The meat in such a fold is surrounded on all sides by skin, which greatly impedes the release of moisture when drying the semi-finished product.
The clipfisk machine is a precise and complex mechanism consisting of about 400 small parts.
All parts in contact with the fish are made of stainless metal. The machine is driven by a 2.7 kW electric motor.
During operation of the machine, its critical parts are constantly washed with a stream of water.
The main parts of the machine are as follows:
- a tray on which fish is placed to be fed into the machine;
- a rotating drum with a device that clamps the fish tail;
- a mechanism that adjusts the machine according to the size of the fish;
- knife head for removing the ridge;
- disc-shaped knife for longitudinal cuts.
Before feeding into the machine, the fish is cut in the same way as for shkerka, only the belly of the fish in the front part is cut to the end.
The prepared fish is placed on the tray with the cut side up, the tail fin is directed manually onto the device that clamps it on the drum, which rotates in a vertical plane.
The captured fish is directed upward and passes under a lever that mechanically adjusts the machine parts according to the size of the fish being cut. The latter passes in the machine past a series of guides and straightening devices; Using a disk-shaped knife, a longitudinal cut is made on the fish, then it is straightened out with special shields and comes under the action of knives located at an angle to each other (with the left knife going behind the right) and mounted on the so-called knife head. These knives separate the spine. The cut carcass falls onto a tray located on the right side of the machine.
The machine works well on completely fresh raw materials that have not lost their elasticity, and worse on aged ones, producing a lot of rejects in the latter case, despite the presence of a special adjustment device in the form of a lever with a movable weight, which regulates the pressure action of the straightening devices and the cutter head.
The machine allows you to adjust the depth of the longitudinal cut using a circular knife as desired. The machine's productivity is about 600 fish per hour.
Washing
During washing, fish carcasses, without damaging the meat, are thoroughly cleaned of blood clots, black film lining the body cavity of the fish, and remnants of kidneys near the humerus bones. Washing is done manually in clean sea water using hair or grass brushes.
Salting of clipfish is carried out in the bins of the hold in a stack 1–1.2 m high. When stacked, each fish is individually straightened by hand. Salt is added in amounts up to 50–60%. Thanks to the large amount of salt, the fish do not come into contact with each other, the brine constantly drains and is partially absorbed by the excess salt. The salt must be clean, free of mineral and organic insoluble residues to contaminate the exposed surfaces of the fish's muscle tissue. A small (2–3%) admixture of calcium salts has a beneficial effect on klipfisk (it becomes whiter). The salting temperature depends on the outside air temperature.
To avoid damaging the tissue structure, freezing of the clipfisk is not allowed.
The dynamics of salting and moisture release at a hold temperature of 11–16°C is expressed by the diagram shown in Figure 7. The salting process is completed within 10–12 days, after which the clipfisk is ready as a semi-finished product for further processing, transportation and storage. If the ambassador has not yet finished, the klipfisk is salted on the shore.
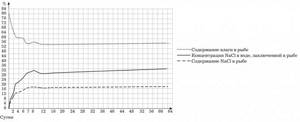
Figure 7 – Klipfisk salting diagram
The lower layers of the stack are salted somewhat faster than the upper ones, and therefore, after 4–5 days from the start of salting, the stack is repositioned. This relaying is also significant because it eliminates the deformation of the product.
Salt consumption, as stated above, for initial salting is 50–60%, during transfer 15–20% and finally upon arrival at the port 3–18%. During the salting process, only 30% of the salt is dissolved.
Average data on waste and losses during processing of semi-finished clipfisk products as a percentage of the total weight are shown in Table 3.
Table 3 – Norms of waste and losses during the production of klipfisk from cod and haddock
Clipfisk storage
Upon arrival at the port, klipfisk (semi-finished product) is folded into stacks 100–120 cm wide and up to 2–3 m high, with gaps between them of 30–40 cm for air circulation between the stacks. One ton of clipfisk occupies 0.9–1 m3.
Signs characterizing the quality of processing
There are three sizes of clipfisk: large - over 52 cm, flat - from 36 to 52 cm, small - up to 36 cm inclusive (from the middle of the humerus to the end of the scaly cover).
When sorting by size and quality, the following defects may be detected:
- exposure of the humerus - from an incorrect cut for bleeding;
- exposure of the humerus bones at the junction with the parietal bones - from improper removal of the heads;
- uneven wings of the clipfisk - from improper ripping of the abdomen;
- rupture of meat near the abdominal cavity - from improper grip of the fish when removing the entrails;
- cutting of the caudal peduncle, incorrect cut in the tail and excessive cutting of meat when separating part of the spinal bone;
- leaving a dark film on the “wings” and damaging the white film (lying under it), leaving behind blood clots and parts of the kidneys, fracture of the tail part of the spine - due to improper washing of the fish;
- darkening (spots from bruises), tissue rupture and exposed bones - from careless handling of the fish;
- delamination along the myosepta - from untimely salting of fish.
In addition to these defects, redness and bacterial yellowing may appear on the fish, which will be discussed below.
Transportation of semi-finished clipfisk products is carried out in boxes or bags.
Klipfisk diseases
Under the influence of microorganisms, both the salted semi-finished product and the dried klipfisk product can be subject to massive spoilage.
Currently, two diseases of clipfisk are known, caused by microorganisms and often affecting large quantities of the product: brown tan and redness. In addition, yellowing of the klipfisk is observed, the origin of which has not yet been established: yellow spots form on the surface of the klipfisk that is not covered with skin, which then penetrate into the thickness of the meat and spread over its entire surface. Yellowing occurs only in summer in warm weather; it disappears in autumn.
Klipfisk sometimes becomes covered with a brown coating due to infection by a fungus. To eliminate this defect, the fish are scattered 1–1.5 m above the floor and fumigated, burning sulfur for 1–1.5 days. 50 g of sulfur is consumed per 1 m3 of room.
After fumigation, the product is shaken and ventilated. This fumigation does not affect the quality or appearance of the fish.
These measures must be taken during the initial period of the appearance of shashel on fish, since in the future the damage caused by it can no longer be corrected.